Preparing for Order Set Creation
Ideally, the work of Order Set creation should be done in one or more focused sessions, with a minimum of interruptions. Therefore, if there are unresolved questions or decisions that need to be made pertaining to your institution’s Order Sets, you should plan to resolve as many of these questions as possible before you begin the work of building Order Sets in the CPOE application. The Order Set planning process varies greatly from one institution to the next, since each institution follows a unique set of rules and protocols. However, completion of the following basic planning stages is considered to be a prerequisite for creation of Order Sets. Before you begin the work of creating Order Sets in the CPOE application, your institution must:- Complete the definition of all of your Order Sets, and ensure that each of these Order Set definitions is up to date.
- Complete all Order Set planning, and make sure that collective agreement has taken place among all stakeholders in your institution to arrive at a consensus on Order Set definition. For example, Order Set definition may require consensus between one or more of an institution’s providers, the nursing unit, and the IT staff.
- Complete a workflow assessment to understand how various types of orders are entered into your institution’s system and how this process translates into Order Set creation electronically.
- Ensure that your workflow assessment addresses any variation that exists between your institution’s facilities and the process that each facility follows.
- Although it is not essential as a prerequisite for building Order Sets, identifying shared Order Set sections at the outset can help to streamline the process of Order Set creation. A shared Order Set section is a section that is common to multiple Order Sets used by your facility. Once your institution completes all of the above prerequisites, you are ready to begin the work of creating Order Sets electronically using the Order Set builder.
Accessing the Order Set Builder
The Order Set builder is available to all level 1 administrators and selected level 2 administrators who have been granted permission to access the CPOE administrative user interface. To access the Order Set Builder:- Click the Admin tab and then the Facility Group or CPOE tab.
In deployments where Facility Groups are not enabled, the Facility Group tab is replaced by the CPOE tab.
- If your institution uses multiple Facility Groups, select the Facility Group you want to configure from the Facility Group drop-down list.
- Click the Order Sets link. The CPOE Order Set Maintenance page displays. From this page, you can create Order Sets, search for and edit existing Order Sets. Information about each of these processes is provided in the sections that follow.
Creating Order Sets
Typically, all Order Sets that you build in the CPOE application should resemble any hard-copy Order Sets that your facility or institution uses. Due to the wide variety in Order Set form design, you can approach this process in a variety of ways. As you become familiar with the process of building Order Sets in the CPOE application, you might decide on a workflow to optimize this process in your institution or facility. However, it is suggested that, until you gain more experience, you approach the overall process by performing the following high-level stages in a linear sequence each time that you create a new Order Set:- Start a new Order Set. For more information, see Starting a New Order Set.
- Using the Order Set Layout builder, structure the Order Set framework by adding rows and columns. For more information, see Creating a Basic Structure Using Order Set Layout.
- Using items from the Toolbox, add content to this framework. For more information, see Adding Items to Your Order Set Structure. Also see Toolbox Items for Structuring Order Set Content.
- Make any adjustments to the Order Set content by setting the properties of the Toolbox items you added. For more information, see Configuring Order Set Content.
- Periodically preview the Order Set as you populate it with content to monitor your progress. For more information, see Previewing Order Sets.
Starting a New Order Set
Before you start adding orders and other elements to define an Order Set, you must open a new Order Set template so that you can create a basic framework and begin structuring the printed output of the Order Set. To create a new Order Set:- Click the Admin tab and then the Facility Group or CPOE tab.
In deployments where Facility Groups are not enabled, the Facility Group tab is replaced by the CPOE tab.
- If your institution uses multiple Facility Groups, select the Facility Group you want to configure from the Facility Group drop-down list.
- Click the Order Sets link. The CPOE Order Set Maintenance page is displayed.
- Click the Add Order Set button. The Edit Order Set window is displayed.
- Click the Content tab. The Order Set Layout displays in the right pane.
Creating Order Sets for Use on Mobile CPOE Devices
Before you begin the work of creating order sets, an essential part of the planning process is to consider how your institution or facility plans to use any order sets that you create. One of the central questions that you must take into consideration is whether your institution has plans to implement Mobile CPOE, either in the short or longer term. This consideration directly affects the approach to take in configuring your order sets, and if there is any uncertainty around your institution’s future plans, it is strongly recommended that you follow a few guidelines to ensure that the order sets that you create are fully supported on Mobile CPOE devices. As you continue with the sections that follow, you should plan to consult these guidelines periodically to ensure compliance with these best practices recommendations. Although these points are re-emphasized in the specific sections that follow, these guidelines serve as a check list that you can use as you build your order sets.Creating a Basic Structure Using Order Set Layout
Before you begin the work of adding content for an Order Set, you must create a basic structure for this Order Set. If you are working from printed Order Sets, you can approach this process by using the printed copies of these sets to approximate how many rows and columns to add to the layout for each Order Set. If your facility does not use printed Order Sets, it is recommended that you sketch out a rough plan (however informal) so that you can create a basic structure at the outset prior to working with Order Sets in the CPOE application. Remember that you can approach this work with some flexibility; if you find yourself needing to add or delete rows and columns after you add content, you can continue to modify your Order Set Layout as needed throughout the process of building your Order Sets. To work of structuring a basic Order Set starts from the Order Set Layout window, which displays on the Content tab in the Order Set builder. For information on accessing this tab, see Starting a New Order Set. To create a basic structure using Order Set Layout:- From the Content tab, position your cursor over any table cell in the default Order Set Layout. A pop-up window displays settings for adding rows and columns to the default Layout.
-
Click one of the following selections from the top (“R”) row to add and delete rows:
- The + symbol positioned at left of row: Adds a new row above the selected row.
- The trash can icon: Deletes the selected row.
- The + symbol positioned in center of row: Adds a new row below the selected row.
-
Click one of the following selections from the bottom (“C”) row to add and delete columns:
- The + symbol positioned at left of row: Adds a new column to the left of the selected column.
- The trash can icon: Deletes the selected column.
- The + symbol positioned in center of row: Adds a new column to the right of the selected column.
- Click any of the arrow icons to merge and un-merge cells.
- When you complete the basic Order Set structure you want, click Save.
Toolbox Items for Structuring Order Set Content
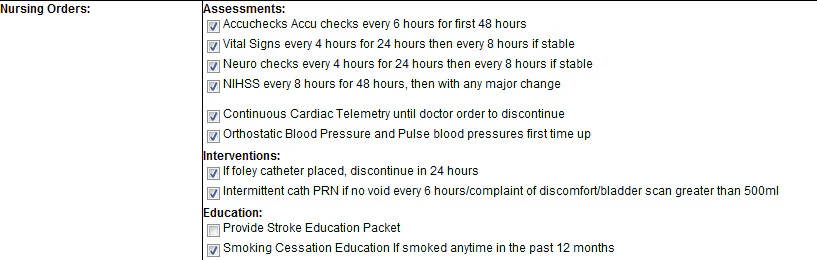
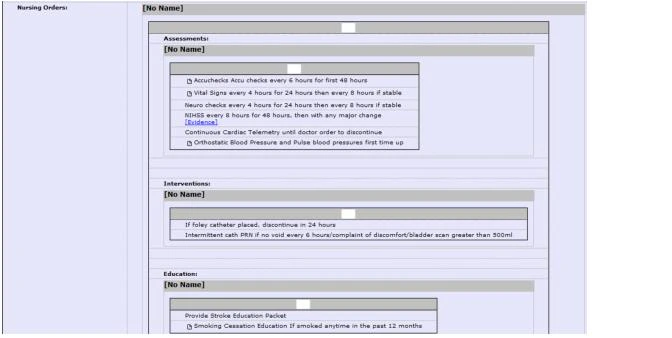
Once you define an Order Set structure (layout) by configuring rows and columns in the Order Set section builder, you must populate these rows and columns using items from the Order Set Toolbox. These items correspond to various Order Set data that is used to display orders in the Order Set print output, as shown belowOverview of the Process for Building Order Set Content
Although there is no specific sequence that you need to necessarily follow when working with Toolbox items, it might be helpful to proceed in a particular order, especially as you familiarize yourself with the process of building Order Sets. If you are entering data from Order Sets that exist in paper form, approach each section of the printed Order Set (often defined with borders) one at a time, starting with the first section.- Add an Order Set section to each row in the Order Set Layout, which represents a specific group of related data in an Order Set. For example, when creating an Order Set involving patient admission, you might create sections in distinct rows to organize the following types of data:
- Patient Status
- Allergies/Adverse Reactions
- Activity
- Diet
- IV Therapy
- Laboratory
- Some groups of related data may be more complex than to be represented by a single Order Set section. In cases where there is a need to further organize data into clusters within an Order Set section, you can create nested sections. To create a nested section, add an Order Set section to the table cell of another section.
- When you add enough Order Set sections to complete a row of the Order Set layout, you can populate the cells by adding the Text, Order, and Order Search items from the Toolbox.
- As you add various items from the Toolbox to your Order Set layout, you can define properties for each of these items. Each item’s properties determine the rules and behavior for the item within the larger Order Set.
- At any time during the building of an Order Set, you can preview how the Order Set will appear in printed form. For more information, see Previewing Order Sets.
Adding Items to Your Order Set Structure
You use items from the Toolbox to create the content that populates the structure defined by the Order Set Layout you create for each of your Order Sets. Typically, you start building the basic structure of your Order Set by adding Order Set sections (including nested sections). Then, when you organize these sections into the basic structure you create with your Layout, you can populate the cells of these sections using Text items, Order items, and Order Search items. To add an item from the toolbox to an Order Set:- Click the Admin tab and then the Facility Group or CPOE tab.
In deployments where Facility Groups are not enabled, the Facility Group tab is replaced by the CPOE tab.
- If your institution uses multiple Facility Groups, select the Facility Group you want to configure from the Facility Group drop-down list.
- Click the Order Sets link. The CPOE Order Set Maintenance page is displayed.
- Enter your search criteria and click the Search button. Use the search filter settings to refine your search criteria so that only the Order Sets you want are returned.
- Select the Order Set from the left pane and click the Edit button that displays in the right-hand portion of the screen.
- From the Edit Order Set window, click the Content tab.
-
Select the item you want from the Toolbox and drag it to the table cell representing the positioning of this item on the Order Set layout. For guidance on how you might take a more systematic approach toward building this content, see Overview of the Process for Building Order Set Content.
You can add any of the following items to your Order Set layout:
- Text—Adding a text item allows you to position descriptive text on any cell belonging to the Order Set layout.
- Order—When you add an order item to an Order Set layout, this item is represented by a checkbox and a label, which identifies the order to providers. By default, the Order Name is used as the label for this Field. However, you can use a custom name by setting a property of the Order item. For more information, see Configuring How Orders Display in an Order Set.
- Order Search—The Order Search item provides a searchable text box that providers can use to locate and enter a specific Order Definition or Order String. By default, the name “Other” is used as the label for this Field. However, you can use a custom name by setting a property of the Order Search item. For more information, see Configuring How Order Searches are Conducted in Order Sets.
- Order Set Section—You can position an empty section within any table cell belonging to the Order Set layout. If you want to nest a smaller section within a larger Order Set section, drag the section item to the table cell representing the positioning of this item within the larger section.
- Shared Order Set Section—Before you can add a shared Order Set section within an Order Set layout, you must create this section. For more information, see Creating Shared Order Set Sections.
- Order Set—You can search for any existing Order Set to add to a larger Order Set. When you drag the Order Set Toolbox item to the Building Area, you can search for Order Sets by Order Set name or by Order Definition. In the latter case, specifying an Order Definition name displays all Order Sets that contain a specified Order Definition. The item is added to the Order Set layout. For more information about these items, see Toolbox Items for Structuring Order Set Content.
Configuring Order Set Content
After you add items to your Order Set Layout from the Toolbox, you can define properties for these items. Each type of item from the Toolbox is configured by a distinct set of properties, which controls how the item behaves within the larger Order Set. To define rules for an item after adding it to the Order Set layout:- Click the Admin tab and then the Facility Group or CPOE tab.
In deployments where Facility Groups are not enabled, the Facility Group tab is replaced by the CPOE tab.
- If your institution uses multiple Facility Groups, select the Facility Group you want to configure from the Facility Group drop-down list.
- Click the Order Sets link. The CPOE Order Set Maintenance page is displayed.
- Enter your search criteria and click the Search button. Use the search filter settings to refine your search criteria so that only the Order Sets you want are returned.
- Select the Order Set from the left pane and click the Edit button that displays in the right-hand portion of the screen.
- From the Edit Order Set window, click the Content tab.
- Locate and double-click the item from the Order Set Layout pane. Depending on the type of item you want to configure, you can launch the window to set properties either by double-clicking the item directly (in the case of Text, Order, or Order Search items) or by double-clicking the section header (in the case of both private and shared Order Set Sections). For more information about these properties and how they are used, see the following sections.
Configuring How Text Displays in an Order Set
The Text item properties are used to configure the formatting and content of text that is included in the Order Sets that providers enter. To configure these properties, navigate to the Content tab of the Order Set Builder and double-click on the Text item that you want to configure. For more information about accessing the Content tab, see Configuring Order Set Content. You can use the Text item properties to configure any of the following:- The content of the message or information to display
- The font size used to display the text
- The font style (bold, italic, underlined) used to format part or all of the text
- Whether to indent the Text item and if so, the amount of indentation to use
- Whether to format the Text item as a header row, which adds background shading to distinguish the item
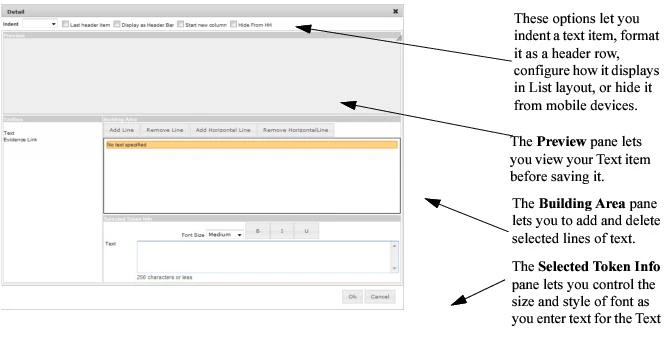
- Whether to show or hide the text item on mobile devices. Some text items may not render properly on mobile device screens due to space limitations, such as labels that display as headers in horizontal columns. Note that the Text item data is included in the data sync, but simply fails to display to the provider using the mobile device. When you double-click a Text item from the Order Set Layout Builder, the following Detail window displays, enabling you to configure these properties
Display of Text item content is limited to the user interface only; this content is not included in the Order Set print output.
Configuring How Orders Display in an Order Set
The Order item properties are used to configure how the orders belonging to an Order Set display to providers. To configure these properties, navigate to the Content tab of the Order Set Builder and double-click on the Order item that you want to configure. For more information about accessing the Content tab, see Configuring Order Set Content. You can use the Order item properties to configure:- The Order Definition or Order String to enter when providers select an order
- Rules to determine whether to launch Order Details automatically when providers select an order
- Rules for configuring how auto-selection occurs among a grouping of orders
- The descriptive text (if any) provided along with the order label in the Order Set display
- Whether to indent the Order item and, if so, the amount of indentation to use
- The formatting of any special instructions that pertain to a particular order
- If the order includes a link to provide evidence data, you can add an Evidence Link item from the Order Behavior Toolbox. Note that when you add one or more evidence links to an Order Set, you must define these items by specifying a URL, label, and Evidence Link Tooltip before you can save the Order Set.
When you add order strings to an Order Set that include site-restricted Fields, these site restrictions are enforced on this order, based on the visit location of the provider working with this Order Set. Any Fields that have been restricted to a location other than the current visit location do not show to the provider when editing this Order Set. For more information, see Restricting Field Sets to One or More Facilities.
Preserving the Formatting of Special Instructions that are Associated with an Order
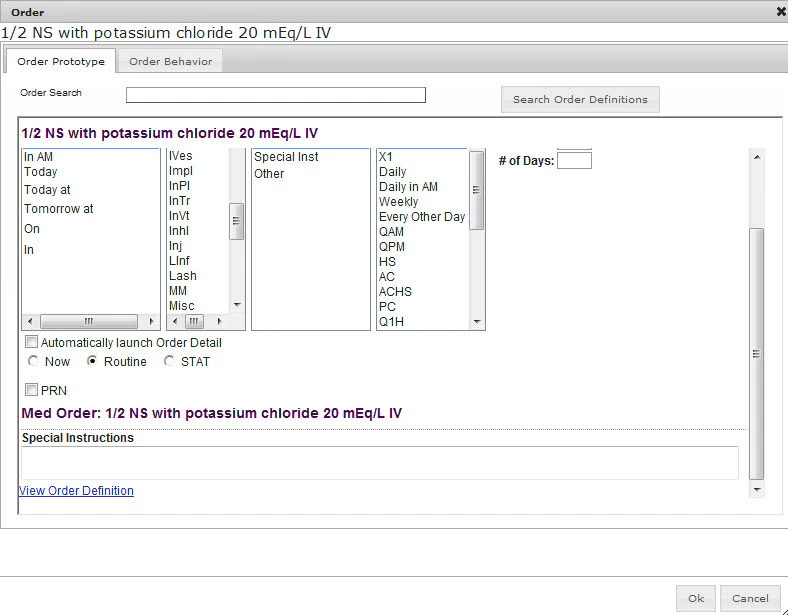
The Toolbox used for formatting the layout of orders includes items to represent any special instructions that are associated with a particular order. These items are provided to preserve the formatting of any special instructions that are associated with either a medication or nursing order. For medication orders, the Toolbox item representing these instructions is named “Special Instructions” (as shown in the following example); for nursing orders, this item is named “Nursing Instructions”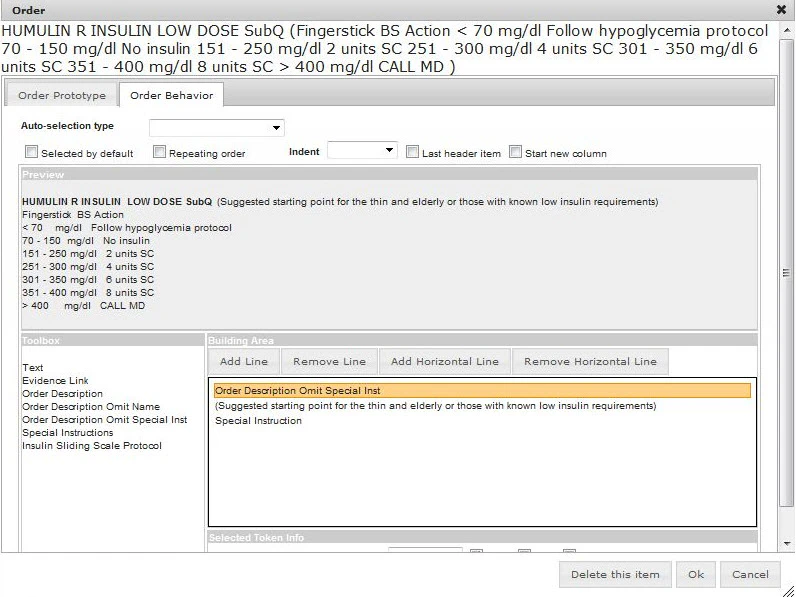
- Click the Admin tab and then the Facility Group or CPOE tab.
In deployments where Facility Groups are not enabled, the Facility Group tab is replaced by the CPOE tab.
- If your institution uses multiple Facility Groups, select the Facility Group you want to configure from the Facility Group drop-down list.
- Click the Order Sets link. The CPOE Order Set Maintenance page is displayed.
- Enter your search criteria and click the Search button. Use the search filter settings to refine your search criteria so that only the Order Sets you want are returned.
- Select the Order Set from the left pane and click the Edit button that displays in the right-hand portion of the screen.
- From the Edit Order Set window, click the Content tab.
- From the Order Set Layout Builder, locate and double-click the order containing the special instructions to be re-formatted.
- From the Order configuration window, click the Order Behavior tab.
- Drag the Order Description Omit Special Inst item from the Toolbox and use this item to remove the special instructions from the Order Description.
- Drag the Special Instructions or Nursing Instructions Toolbox item from the Toolbox and use this item to display the special instructions in the Order Set in such a way that the formatting is preserved.
- Click OK, then Save. The order is updated with re-formatted special instructions.
Configuring Order Layouts
Each time that you add an Order item to the Order Set layout, you can further configure the type of content that is used to define the order. The Order Toolbox lets you to define what items to use for this content, as well as how the display of this content is organized. The Order Toolbox provides the following items, which can be used to structure Order content:- Text: Some orders might require notes, special instructions, or other additional information
- Evidence Link: You can include links with an order to link out to evidence data, an external document, or an external web site.
When you include an Evidence Link item to one or more external documents, you must include these documents on the server where the CPOE application is running.
- Order Description: You can define positioning of the Order Description relative to any other Toolbox items that you define. For example, you might want to position the Order Description under a set of special instructions, or under a link to a web site. In addition to these standard items, the Toolbox can contain other items that are specific to a particular Field. For example, a Free Text item can be used to position a free-text Field relative to an Order Description. For more information, consult your Commure Pro representative.
- From the Order Set Builder (Edit Order Set window), click the Content tab. For information on navigating to the Order Set Builder, see Configuring Order Set Content.
- Locate and double-click the Order item from the Order Set Layout pane. The Order window displays.
- Click the Order Behavior tab.
- Locate the item(s) you want in the Toolbox, and drag these items to the Building Area. The relative positioning of these items in the Order Set is determined by how you position these items in the Building Area.
- (optional) If you want to position an item on a separate line of the Order Set print output, click the Add Line button and drag the item to the new region created under the horizontal line that is added. As you drag Order item content to the Building Area, the Preview pane shows how your Order item content will be organized.
- When you are done configuring the layout, click Ok. Your layout configuration is saved. You can click the Preview tab to see how your Order item content will display in the larger context of the complete Order Set.
Configuring Auto-Selection of Orders
You can configure one or more orders to become automatically selected each time that providers select a particular order belonging to an Order Set. Auto-selection of orders can occur in one of two ways:- All orders belonging to the same Order Set section are auto-selected upon selection of a particular order.
- Only orders belonging to a specified (configurable) list are auto-selected upon selection of a particular order.
Auto-selection configurations are fully supported on Mobile CPOE. When CPOE data is synchronized between the portal and mobile devices, any orders that are continued to be auto-selected will be rendered as selected orders on mobile devices.
- From the Order Set Builder (Edit Order Set window), click the Content tab. For information on navigating to the Order Set Builder, see Configuring Order Set Content.
- Locate and double-click the Order item from the Order Set Layout pane. The Order window displays.
- Click the Order Behavior tab.
-
Locate the setting Auto-selection type and select one of the following options:
- All orders in section: Automatically selects all orders belonging to the selected order’s section whenever providers choose this order from the selected Order Set.
- List of orders: Automatically selects all orders belonging to a custom list whenever providers choose this order from the selected Order Set.
When the Show Link icon option is selected, these orders display with a chain icon, indicating that they are linked.
- None: Disables the auto-selection feature for this order.
- (optional) If you select List of orders for the Auto-selection type, click the Select Orders button and choose the orders that you want to be auto-selected whenever providers choose this order from the selected Order Set, then click Ok to save your list.
- Click Ok to save your configuration changes.
Configuring Orders to be Repeated
You can configure a particular order to be a repeating order. A repeating order is an order that can have more than one instance in an Order Set. A new instance of the order is added below the original order each time that a provider selects the order from the Order Set. For example, you might configure a free text message to be a repeating order, such as a message to the nurse. This functionality enables providers to select multiple instances of a particular order over a period of time. Note that each time a repeating order is selected, the new instance of the order that is added to the Order Set is not selected by default. To configure an order to be a repeating order:- From the Order Set Builder (Edit Order Set window), click the Content tab. For information on navigating to the Order Set Builder, see Configuring Order Set Content.
- Locate and double-click the Order item from the Order Set Layout pane. The Order window displays.
- Click the Order Behavior tab.
- Locate and enable the setting Repeating order.
- Click Ok to save your configuration changes.
Configuring How Order Searches are Conducted in Order Sets
The Order Search item properties are used to configure the rules affecting the order searches that providers conduct from within an Order Set. To configure these properties, navigate to the Content tab of the Order Set Builder and double-click on the Order Search item that you want to configure. For more information about accessing the Content tab, see Configuring Order Set Content. The Order Search item properties determine:- The prompt used to label the Order Search item on the Order Set.
- The Order Type and Order Group within which to conduct the Order Search operation.
- The search text to use as the default text string when conducting the Order Search operation.
- Whether the Order Search window closes automatically or remains open when providers select an order from the list of search results. Note that these order search properties remain fully functional on Mobile CPOE devices. For more information, see the Commure Pro Mobile CPOE on Apple*®*User’s Guide.
Configuring Interfaced Order Sets to be Hidden from Order Search Results
You can configure CPOE so that interfaced Order Sets are not included among search results by default, which can be helpful when administrators need to review and verify this data before making it available to providers. To configure interfaced Order Sets to be hidden from order search results, enable the CPOE preference Hide Interfaced Order Sets (Admin > Facility Group > CPOE Preferences). This setting is enabled by default.Configuring Order Set Sections
The Order Set Section properties configure the look and behavior of Order Set Sections in the Order Sets that providers enter. To configure these properties, navigate to the Content tab of the Order Set Builder and double-click on the header of the Order Set Section you want to configure. For more information about accessing the Content tab, see Configuring Order Set Content. You can use the Order Set Section properties to configure:- The label to use to identify the Order Set section. You can also customize the font size (five relative sizes from smallest to largest) and style (bold, italicized, or underlined).
- The minimum number of orders that providers must enter from a particular section before they can save the Order Set to which the section belongs. (Note that this limitation is imposed on the portal and on mobile devices.)
- The maximum number of orders that providers can enter from a particular section. If they exceed this number of orders, they are prevented from saving the Order Set to which the section belongs. (Note that this limitation is imposed on the portal and on mobile devices.)
- When you specify a value for either of the above two settings, you can customize the error message that displays when providers fail to meet the minimum or exceed the maximum number of orders.
- A rule determining whether an Order Set can be hidden (minimized) when nested within a larger Order Set. For more information, see Excluding Nested Order Set Sections and Including Nested Order Set Sections.
- The layout type that is used to display the Order Set Section. Sections can use either of the following layout types:
- List (default value): Displays orders in a list, which can be aligned either vertically or horizontally. This layout type is needed to support the display of Order Sets on the handheld.
- Grid: Displays orders in a table that you can modify using several configuration settings.
The Grid layout type is not supported on Mobile CPOE devices. It is also important to note that order sets which have been configured to use Grid cannot be modified to use the List layout type; you must re-build these order sets. It is recommended that you do not use the Grid layout type unless you are certain that your facility or institution does not plan to use Mobile CPOE in the future.
- The type of border (if any) used to distinguish the section from other sections in the Order Set. You can choose between the following border types:
- Outer border only: A single, bold line will surround all Order, Text, and Order Search items belonging to this section.
- Inner and outer borders: A bold line surrounds all items belonging to this section, and lines are used to surround the individual items belonging to this section as well (much like table cells).
- No border: No separator lines will be used to surround items belonging to this section.
- The (optional) name of the Order Set Section.
Order Set Section names do not display in the Order Set print output. This data is only provided for the purposes of helping administrators to organize sections on the Order Set layout.
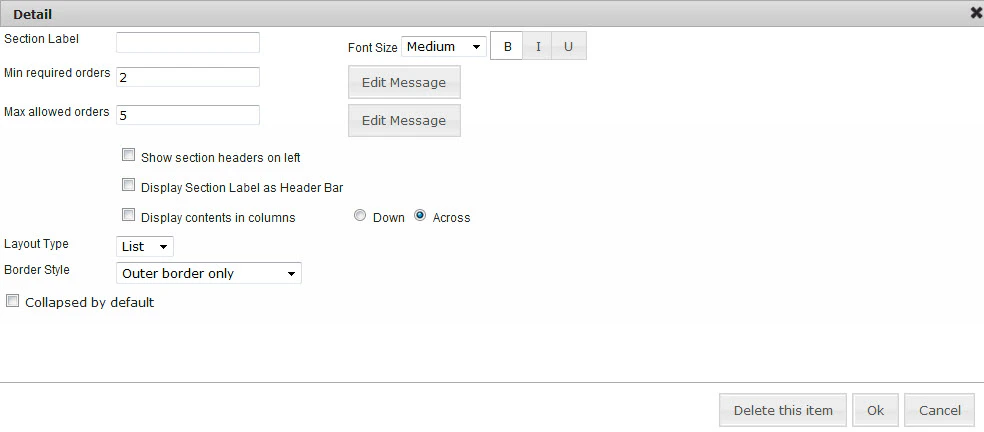
- Show section headers on left: Enable this setting to position the Section Label to the left of the section.
- Display Section Label as Header Bar: Enable this setting to position the Section Label above the section.
- Display contents in columns: Enable this setting to align any content of Order Set sections (orders, text items, or order search boxes) into columns. Numbering of items into columns is done sequentially, either across the specified number of columns (Across) before starting the next row, or in rows (Down), where new columns are created whenever a Text or Order item is encountered that has been flagged with the “Start new column” property. When you want to save all of the Order Set Section property settings, click OK, then Save.
Display of Order Set Columns on Mobile Devices
Rendering of Order Set columns on mobile devices is determined by the Display contents in columns configuration setting.Display of Order Sets that are Configured to be Distributed “Across” Columns
Order Sets that are organized (in the portal) by distributing orders across all columns of a row before starting a new row (both of the Order Set section settings Display contents in columns and Across are enabled) are represented on handheld devices as shown below. Orders configured to display in columns “across” in the portal like this: A1 A2 A3 B1 B2 B3 C1 C2 C3 are rendered in the following sequence on the handheld: A1 A2 A3 B1 B2 B3 …Display of Order Sets that are Configured to be Distributed “Down” Columns
Order Sets that are organized (in the portal) by distributing orders down all rows in a column before starting a new column (both of the Order Set section settings Display contents in columns and Down are enabled) are represented on handheld devices as shown below. Orders configured to display in columns “down” the portal like this: A1 A2 A3 B1 B2 B3 C1 C2 C3 are rendered in the following sequence on the handheld: A1 B1 C1 A2 B2 C2 …Configuring Section Headers to Display on the Printed Order Sheet
The display of Order Set section headers on the printed order sheet is configurable. You can configure this option to include or exclude the display of section headers for any Order Set sections that are configured to use the List layout type. When you enable this option for an Order Set, headers of both the ‘parent’ Order Set section and any sections that are nested within it are affected by the configuration change.Before enabling this setting, check to ensure that you have a recent template that supports this functionality. Enabling this setting with an unsupported template can cause problems in how Order Set data displays on the printed order sheet. For more information, contact your Commure Pro representative.
- First, check to make sure that your site has a recent template that supports the use of this setting before proceeding.
- Click the Admin tab and then the Facility Group or CPOE tab.
In deployments where Facility Groups are not enabled, the Facility Group tab is replaced by the CPOE tab.
- If your institution uses multiple Facility Groups, select the Facility Group you want to configure from the Facility Group drop-down list.
- Click the Order Sets link.
- Enter your search criteria and click the Search button to locate the Order Set that has the section(s) you want to configure. Use the search filter settings to refine your search criteria so that only the Order Set(s) you want are returned.
- Select the Order Set from the search results and click Edit.
- Click the Info tab, locate and enable the Group Orders By Section Headers on Print-Out setting.
- Click Save. The headers of this Order Set section will be included on the printed order sheet, along with any section headers of nested sections.
Some integrations changes (including a template update) are necessary to include section headers from List layout type Order Sets on the printed order sheet. For more information, contact your Commure Pro representative.
Creating Nested Order Sets Within Other Order Sets
You can create Order Sets that include one or more existing Order Sets. This process of “nesting” Order Sets lets you re-use Order Sets when it is convenient to do so, allowing you to leverage existing Order Sets to build more complex Order Sets that contain one or more simpler sets in addition to other Order Set. Support for nesting Order Sets is provided in the Order Set Builder Toolbox, where you can drag, drop, and configure Order Set items just as you configure other Order Set content. When you drop the Order Set item into the Building Area, the Order Set Search window displays so that you can locate and add the Order Set. For more information about using Toolbox items to populate Order Set content, see Adding Items to Your Order Set Structure. After you add one or more nested Order Sets to a larger Order Set, you can configure the default behavior of the nested set(s) by double-clicking the Order Set header from the Order Set Builder and enabling or disabling the Collapsed by default setting. When you enable this setting for a nested Order Set, the Order Set is minimized at the time that an administrator clicks the Done with Order Set button for the larger (parent) Order Set. Though minimized, nested Order Sets continue to be identified as belonging to a larger (parent) Order Set. When you disable this setting, the nested Order Set fully displays all of its orders within the larger Order Set. The Collapsed by default setting works the same way with nested Order Sets as it does with nested Order Set sections. Any orders that are selected by default belonging to nested Order Sets that are collapsed by default are not added to a user’s mobile Order Set submission until the user expands the folder. (Note that on the handheld, these orders are added even when you do not open the folder.) For an example of how this is renders in the user interface, see the section Using Nested Order Set Sections. Note that use of the Collapsed by Default setting is fully supported on Mobile CPOE devices. When Order Set sections are synchronized between the portal and a mobile device, any sections that are configured to be collapsed by default display on the handheld device as a closed folder icon. However, how users interact with this closed folder icon can affect what orders are included in their Order Set submission. Any orders that are selected by default belonging to nested Order Sets that are collapsed by default are not added to a user’s mobile Order Set submission until the user expands the folder. This functionality is designed to prevent users from submitting selected orders that they do not see a minimum of one time. For more information, see the Commure Pro Mobile CPOE on Apple*®*User’s Guide.Searching for and Adding Nested Order Sets
Just as with other toolbox items, you are given some control over how nested Order Sets behave within the context of a larger Order Set. When you drag and drop an Order Set item from the Toolbox onto the Building Area, the Order Set Search dialog box displays, allowing you to search for and configure the nested Order Set. To search for and add a nested Order Set:- From the Order Set Search window, use the Name text box to search for an Order Set by name. Alternatively, you can use the Order Definition lookup button to locate all Order Sets that contain a specific Order Definition.
- Use the Facility drop-down menu to restrict the search scope to include nested Order Sets that are restricted to a particular facility.
- Use the Usage drop-down menu to restrict the search scope to include nested Order Sets that are restricted to a particular visit type.
- You can expand your search criteria by enabling either the Include Inactive or Include Hidden check box settings.
- An additional drop-down setting lets you configure how many search results to return.
- Click the Search button.
- From the search results, select the Order Set that you want to be nested within the selected Order Set. You are returned to the Building Area, where the nested Order Set displays among the other Order Set content.
Previewing Order Sets
As you continue to add and edit content in your Order Set layout, you are likely to want to see how your Order Set will display to your providers. The Preview tab provides an easy way for you to monitor your progress as you make changes, without requiring you to navigate to the Patient List each time that you make changes that you want to verify. Any time that you add, delete, or modify Order Set data, such as rows or columns making up the Order Set layout, items from the Toolbox, or item settings (such as after hiding one or more Order Set sections), you can preview these changes before saving the modified Order Set. To preview an Order Set directly from within the Order Set Builder, click the Preview tab. A message at the top of the Preview screen indicates whether the data shown contains any unsaved changes. A Print button on the Preview tab lets you print a copy of your Order Set.Searching for and Editing Order Sets
You can search for Order Sets directly from the main CPOE Order Set Maintenance screen. When you click the Order Sets link from the list of CPOE configuration options on the left, several filters let you precisely define your Order Set search. If you are conducting a search for Order Sets that have been interfaced from a back-end system, note that any Order Sets currently in the process of being updated in the back-end system are excluded from search results. When you click the Edit button to edit a particular Order Set, the Order Set Builder displays, enabling you to define and configure the Order Set just as you would during Order Set creation. When you click the Delete button, you are prompted with a confirmation dialog box before the selected Order Set is deleted from the list.Searching for All Order Sets Used by a Shared Order Set Section
When administrators search for an Order Set Section that is shared among multiple Order Sets, the search results provide a list of all associated Order Sets that make use of the shared sectionConfiguring Order Sets
After you create the Order Sets that your providers will use to enter orders throughout your institution, several configuration options are provided that let you determine the behavior of these Order Sets as they are used in the CPOE application.Restricting Order Sets to a Facility, Department, or User
Just as with individual orders, you might encounter cases requiring the restriction of certain Order Sets to a single facility, such as when availability or applicability of a particular Order Set is limited. When restricted to a facility, an Order Set is only available to providers who are entering orders withing this facility. In facilities other than the selected (restricted) facility, the Order Set will be excluded from search results. Functionality is also provided for restricting Order Sets to one or more departments, as well as for restricting Order Sets to one or more providers. Access for restricting data in this way is determined by configuration, and is configurable per Facility Group.Before enabling this setting, it is important to note that you cannot make changes to this configuration once facility-specific data has been read from your back-end system or added from the CPOE application.
- Click the Admin tab and then the Facility Group or CPOE tab.
In deployments where Facility Groups are not enabled, the Facility Group tab is replaced by the CPOE tab.
- If your institution uses multiple Facility Groups, select the Facility Group you want to configure from the Facility Group drop-down list.
- Click the Order Sets link.
- Enter your search criteria and click the Search button to locate the Order Set that you want to restrict. Use the search filter settings to refine your search criteria so that only the Order Set(s) you want are returned.
- Select the Order Set from the search results and click Restrict to Facility.
- From the Restrict Order Set to Facility window, select the facility to which you want to restrict the selected Order Set.
- (optional) Click Edit to define any additional restrictions to departments or users.
- Click the Info tab, locate the Restricted to Facility setting, and use the Departments and Users search fields below this setting to search for and select the department(s) and user(s) that you want to allow to access the Order Set.
- Click Save. The selected Order Set will be restricted to the selected facilities, departments, and/or providers.
Restricting Order Set Sections to a Facility
Sections belonging to one or more Order Sets can also be restricted to a single facility. Note that sections cannot be restricted to one or more individual departments or users, however. To restrict an Order Set section to a facility:- Click the Admin tab and then the Facility Group or CPOE tab.
In deployments where Facility Groups are not enabled, the Facility Group tab is replaced by the CPOE tab.
- If your institution uses multiple Facility Groups, select the Facility Group you want to configure from the Facility Group drop-down list.
- Click the Order Set Sections link.
- Enter your search criteria and click the Search button to locate the section that you want to restrict.
- Select the Order Set section from the search results and click Restrict to Facility.
- From the Section Restrict to Facility window, select the facility to which you want to restrict the selected Order Set section.
- Click Save.
- Click Edit and locate the Restricted to Facility setting on the Info tab to verify that your restriction is configured properly.
Restricting Order Sets by Usage Type
During creation or editing of an Order Set (including interfaced Order Sets), you can restrict the Order Set to a single usage type. During order entry, this simplifies the data shown to providers by displaying only the Order Sets that are relevant for the current usage. You can choose to restrict Order Sets to inpatient, outpatient, home, or emergency visit types. The Usage Type assignment is used to determine which Order Sets to display to providers in the following Order Entry windows:| This Window in the User Interface | Displays Order Sets of Usage Type |
|---|---|
| Order Entry window | Inpatient (and those with no usage type specified) |
| Admission Medication Reconciliation | Inpatient (and those with no usage type specified) |
| Discharge Medication Reconciliation | Outpatient (and those with no usage type specified) |
- Click the Admin tab and then the Facility Group or CPOE tab.
In deployments where Facility Groups are not enabled, the Facility Group tab is replaced by the CPOE tab.
- If your institution uses multiple Facility Groups, select the Facility Group you want to configure from the Facility Group drop-down list.
- Click the Order Sets link.
- Enter your search criteria and click the Search button to locate the Order Set that you want to restrict. Use the search filter settings to refine your search criteria so that only the Order Set(s) you want are returned.
- Select the Order Set from the search results and click Edit.
- Click the Info tab and locate the Usage setting.
- Select the visit type for the selected Order Set.
- Click Save. The selected Order Set will be available during the specified visit type only. As noted, in the case of Admission Medication Reconciliation, the visit type is always Inpatient (or unspecified), while during Discharge Medication Reconciliation, the visit type is always Outpatient (or unspecified).
Excluding Order Sets from Search Results
You can configure any of your Order Sets to be excluded from search results when providers conduct searches from the Order Entry screen. Note that, although these Order Sets are hidden from user searches, administrators are given the option to include or exclude these hidden Sets from the results of their searches. To exclude an Order Set from Search Results:- Click the Admin tab and then the Facility Group or CPOE tab.
In deployments where Facility Groups are not enabled, the Facility Group tab is replaced by the CPOE tab.
- If your institution uses multiple Facility Groups, select the Facility Group you want to configure from the Facility Group drop-down list.
- Click the Order Sets link.
- Enter your search criteria and click the Search button to locate the Order Set that you want to restrict. Use the search filter settings to refine your search criteria so that only the Order Set(s) you want are returned.
- Select the Order Set from the search results and click Edit.
- Click the Info tab, locate and enable the Hidden from Search setting.
- Click Save. The selected Order Set will be excluded from all search results during provider order searches. Administrators are given the option to include or exclude hidden Order Sets from their search results.
Excluding Order Sets from Mobile Devices
You can configure any of your Order Sets to be excluded from mobile devices running Mobile CPOE. During data synchronization that occurs between the portal and Mobile CPOE devices, any order sets that have been configured with this setting are excluded from the data synchronization process. Note that this setting is configured to be false by default. Also note that all Order Sets using Grid layout type are not synchronized to mobile devices, as Mobile CPOE does not support the Grid layout. To exclude an Order Set from mobile devices:- Click the Admin tab and then the Facility Group or CPOE tab.
In deployments where Facility Groups are not enabled, the Facility Group tab is replaced by the CPOE tab.
- If your institution uses multiple Facility Groups, select the Facility Group you want to configure from the Facility Group drop-down list.
- Click the Order Sets link.
- Enter your search criteria and click the Search button to locate the Order Set that you want to restrict. Use the search filter settings to refine your search criteria so that only the Order Set(s) you want are returned.
- Select the Order Set from the search results and click Edit.
- Click the Info tab, locate and enable the Exclude from Handheld setting.
- Click Save. The selected Order Set will be excluded from all data synchronization that occurs between the portal and Mobile CPOE devices.
Excluding Order Sets from Migration
You can configure any of your Order Sets to be excluded from the data migration process. For example, you might create several Order Sets on a test system that you do not want to migrate to your facility’s production system. To exclude an Order Set from data migration:- Click the Admin tab and then the Facility Group or CPOE tab.
In deployments where Facility Groups are not enabled, the Facility Group tab is replaced by the CPOE tab.
- If your institution uses multiple Facility Groups, select the Facility Group you want to configure from the Facility Group drop-down list.
- Click the Order Sets link.
- Enter your search criteria and click the Search button to locate the Order Set that you want to restrict. Use the search filter settings to refine your search criteria so that only the Order Set(s) you want are returned.
- Select the Order Set from the search results and click Edit.
- Click the Info tab, locate and enable the Exclude From Migration setting.
- Click Save. The selected Order Set will be excluded whenever your facility or institution migrates Order Set data between two environments.
Configuring Order Set Sections to Display Conditionally
You might encounter scenarios where display of an Order Set section or nested Order Set is contingent upon the fulfillment of one or more specific conditions. The types of conditions around which you can define display rules include the following options:- Patient property (such as age or gender)
- Visit property (such as financial class)
- Selective enforcement of the minimum number of required orders (based on patient or visit property)
- Selective enforcement of the maximum number of required orders (based on patient or visit property) For example, you might configure sections containing only Medicare-specific data so that these sections are hidden for any patients belonging to financial classes other than Medicare. Or you might configure the maximum required orders setting so that the restriction only applies when patients are older than 18 years of age.
Organizing Content for Shared Order Set Sections
Ideally, the work of identifying much of your shared Order Set content will occur as your facility prepares for the creation of Order Sets. However, during creation of Order Sets you might discover additional sections that are common to multiple Order Sets that your facility uses. For instance, your facility might use a single, identical section for entering orders that prescribe a specific patient activity level. Typically, the sections that you add to an Order Set will be specific to that Order Set. However, in cases where you expect a particular section to be used across multiple Order Sets, you can create this section as a shared section. Shared sections are very similar to ordinary Order Set Sections, with a few notable differences:- Shared sections are created in a separate area of the administrative user interface.
- You cannot modify shared sections from within the regular Order Set layout area, because to do so risks changing this content unexpectedly in other Order Sets that share this data.
Creating Shared Order Set Sections
The process for creating shared Order Set sections is very similar to the process for creating Order Sets. Primarily, the only difference in the two approaches is that shared sections are created in a distinct region of the administrative user interface, which you can access by clicking the Order Set Sections link instead of clicking the Order Sets link. Once you create and save a shared Order Set section, you can add this section to any of your Order Sets in the Order Set Layout Builder by dragging a “Section - shared” item from the Toolbox and then searching and adding this section to any table cell in your Order Set layout. To create a shared Order Set section:- Click the Admin tab and then the Facility Group or CPOE tab.
In deployments where Facility Groups are not enabled, the Facility Group tab is replaced by the CPOE tab.
- If your institution uses multiple Facility Groups, select the Facility Group you want to configure from the Facility Group drop-down list.
- Click the Order Set Sections link. The CPOE Order Set Section Maintenance page is displayed.
- Click the Add Section button. The Edit Section window displays.
- Click the Content tab.
- Use the Order Set Layout builder to structure the rows and columns for the shared section. This process is identical to the process used to structure Order Sets. For more information, see Creating a Basic Structure Using Order Set Layout.
- Use the Toolbox items to add content to the cells of the shared section. This process is identical to the process used to populate an Order Set structure with content. For more information, see Adding Items to Your Order Set Structure.
- (optional) At any time, you can click the Preview tab to see how your shared section will display to providers.
- When you are satisfied with the shared section, click Save in the lower-left portion of the screen.
Adding a Shared Section to an Order Set
Once you create and save a shared Order Set section, you can add this section to your Order Set structure using the “Section - shared” item from the Toolbox. For information on adding Toolbox items to an Order Set, see Adding Items to Your Order Set Structure.Using Nested Order Set Sections
The setting Collapsed by default is now added to shared section details (Edit Order Set > Content tab> (double-click header/title of shared section)) so that administrators can configure the behavior of nested Order Set sections as they behave as part of a larger Order Set.
This option is only available to shared sections when you edit these from within the larger Order Set.
When a nested Order Set section is minimized at the time that an administrator clicks the Done with Order Set button for the larger (parent) Order Set, the nested Order Set section is identified as belonging to the larger Order Set, but is minimized. For example, see how the Allergies/Adverse Reactions Order Set is minimized on the larger (parent) Order Set below. Note that when providers enter this larger Order Set, all selected orders belonging to this collapsed section are included in the order submission.


Excluding Nested Order Set Sections
When this setting is enabled for a particular nested Order Set, the nested section is minimized within the larger Order Set. This provides an easier way for administrators to manage nested Order Sets, allowing them to view nested sections “at a glance”, and optionally expand a particular shared section (representing another Order Set) to select one or more orders. Any nested sections that are minimized when an Order Set is completed (when users click the Done with order set button) will be excluded from order entry when providers select this Order Set. This includes any orders that are selected (or configured to be auto-selected) within the nested section. To exclude all orders belonging to a nested Order Set from order entry:- Click the Admin tab and then the Facility Group or CPOE tab.
In deployments where Facility Groups are not enabled, the Facility Group tab is replaced by the CPOE tab.
- If your institution uses multiple Facility Groups, select the Facility Group you want to configure from the Facility Group drop-down list.
- Click the Order Sets link. The CPOE Order Set Maintenance page is displayed.
- Use the search criteria to locate the Order Set you want, and click Edit.
- Click the Content tab.
- Double-click the heading of the nested Order Set (represented by shared Order Set section). The Detail window displays.
- Enable the Hidden Section setting, and click OK.
- Click Save to save the changes to the larger Order Set.
- Click Preview to ensure that the nested section is minimized. When providers enter this Order Set, all orders belonging to this nested Order Set (including selected orders) are excluded from the order entry submission.
Including Nested Order Set Sections
When the Hidden Section setting is disabled, the nested Order Set displays like any other shared section within the larger Order Set. In this case, any orders that are selected when the Order Set is completed will be included in the order entry process when providers select this Order Set. To include all selected orders belonging to a nested Order Set during order entry:- Click the Admin tab and then the Facility Group or CPOE tab.
In deployments where Facility Groups are not enabled, the Facility Group tab is replaced by the CPOE tab.
- If your institution uses multiple Facility Groups, select the Facility Group you want to configure from the Facility Group drop-down list.
- Click the Order Sets link. The CPOE Order Set Maintenance page is displayed.
- Use the search criteria to locate the Order Set you want, and click Edit.
- Click the Content tab.
- Double-click the heading of the nested Order Set (represented by shared Order Set section). The Detail window displays.
- Disable the Hidden Section setting, and click OK.
- Click Save to save the changes to the larger Order Set.
- Click Preview to ensure that the nested section is expanded, and that all of the orders belonging to this set are selected (including any orders configured to be auto‐selected). When providers enter this Order Set, all orders belonging to this nested Order Set (including any selected orders) are excluded from the order entry submission.
Copying Order Sets
Administrators can use an existing Order Set as the basis for creating one or more additional Order Sets. After searching for an selecting an existing Order Set from the CPOE Order Set Maintenance screen, administrators have the option of copying any existing Order Set that displays among a list of search results. To copy an existing Order Set to use as the basis for creating another Order Set:- Click the Admin tab and then the Facility Group or CPOE tab.
In deployments where Facility Groups are not enabled, the Facility Group tab is replaced by the CPOE tab.
- If your institution uses multiple Facility Groups, select the Facility Group you want to configure from the Facility Group drop-down list.
- Click the Order Sets link. The CPOE Order Set Maintenance page displays.
- Use the search criteria to locate the Order Set you want, and click Copy.
- From the Copy Order Set window, modify the Name and Abbreviation of the existing Order Set to re-name it to the new Order Set that you are creating.
- Click Save. The re-named Order Set is created, and uses the original Order Set for its definition.
Copying Order Set Sections
Just as with Order Sets, administrators can leverage existing Order Set sections to create new sections without having to start over from scratch. To copy an existing Order Set section to use as the basis for creating another Order Set section:- Click the Admin tab and then the Facility Group or CPOE tab.
In deployments where Facility Groups are not enabled, the Facility Group tab is replaced by the CPOE tab.
- If your institution uses multiple Facility Groups, select the Facility Group you want to configure from the Facility Group drop-down list.
- Click the Order Set Sections link. The CPOE Order Set Section Maintenance page is displayed.
- Use the search criteria to locate the Order Set section you want, and click Copy.
- From the Copy Section window, modify the name of the existing Order Set Section to name the new Order Set section that you want to create.
- Click Save. The re-named Order Set Section is created, and uses the original Order Set Section for its definition.
Exporting Order Sets
Administrators have the option to export Order Sets to a PDF document directly from the Order Set Maintenance pane. Exporting Order Sets allows customers to easily review one or more Order Sets and is especially convenient when preparing for system downtime. Two buttons are provided on the admin user interface (Admin > Facility Group > Order Sets) that provide options for exporting a single Order Set or a group of Order Sets to PDF using standard browser download capability.When downloading multiple Order Sets, use a supported browser such as Chrome or Edge for best results.
> (BrandingBannerImage, BrandingImage, and BrandingTitle properties)).
Change Tracking of Order Set Data
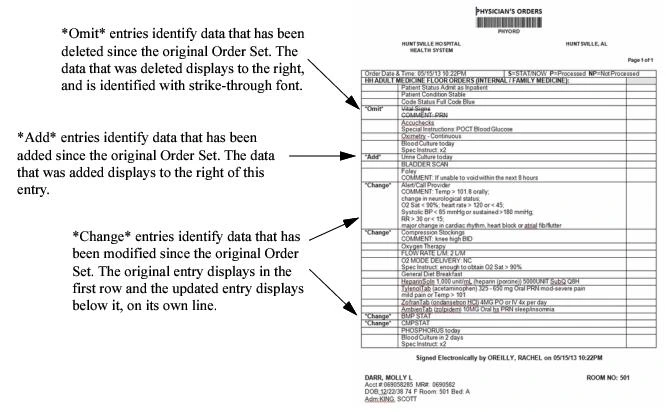
Change tracking is automatically performed on all Order Set data that displays on printed order sheets. Each time that providers add, delete, or make edits to orders belonging to an Order Set, these revisions are represented on the printed order sheet to alert providers to the changes and prevent the occurrence of errors or any other unwanted changes. All revisions that have occurred since the original Order Set was interfaced from the back-end system are identified, to provide a detailed and complete account of all revisions. A new column is added to the left of Order Set data on the printed page, enabling clinicians to account for all changes ‘at a glance’. Each revision is identified using one of the following entries:- Add—Identifies new orders that have been added to the original Order Set.
- Omit—Identifies orders that have been deleted from the original Order Set. The name(s) of the order(s) deleted are retained, but strike-through notation is used to represent the deletion.
- Change—Identifies order data that has been revised since the original Order Set. An example is provided below to demonstrate how change tracking might be used in an actual printed order sheet.
Clearing Order Set Data from Cache Memory
The first time you work with Order Set data in the Order Set Builder, this data is read from the database. In all subsequent edits, this data is read directly from the system cache instead of the database. Authorized administrators can clear this data from the system cache using the Purge Mobilizer Cache button under System Management (Admin > System Management). Note that this button clears all cached data out of Commure Pro Application Server, including provider and diagnosis data from the back-end system. For more information about system features including purging cache data, see the Commure Pro Administration Tools User’s Guide.Clearing the Cache of Data from an Individual Order Set or Section
In some cases, there may be a need to clear the cache of data from a single Order Set or Order Set section. For example, you might choose to clear data from a single Order Set after manually saving edits in Order Set Builder (OSB), or when changes are introduced to an Order Set that is interfaced from a back-end system. To clear the cache of data from an individual Order Set or Order Set section:- Click the Admin tab and then the Facility Group or CPOE tab.
In deployments where Facility Groups are not enabled, the Facility Group tab is replaced by the CPOE tab.
- If your institution uses multiple Facility Groups, select the Facility Group you want to configure from the Facility Group drop-down list.
- Click the Order Sets link or alternatively, the Order Set Sections link. The CPOE Order Set Maintenance pane (or CPOE Order Set Section Maintenance pane) displays.
- Use the search criteria to locate and select the Order Set or section you want, and then click the Clean Cache button.