About Users and Providers
It is important to understand the difference between users and providers. A user is a person who has access to the Commure Pro system, via a handheld device or the web application. They have a Commure Pro user name and password. A provider is a person who provides health care services to a patient. There are many types of providers, such as scheduled, referring, admitting, attending, etc. The Commure Pro system allows for the following combinations of users and providers:- Users of the Commure Pro system, who are not providers. For example, administrators might use the Commure Pro system in order to manage it, but since they do not provide care to patients, they are not providers.
- Providers who are not users of the Commure Pro system. For example, referring providers would not have access to the Commure Pro system, but would need to be listed as providers, for billing or informational purposes.
- Providers who are also users of the Commure Pro system. For example, the providers associated with your organization are considered providers for billing and scheduling purposes, and also use the Commure Pro system to enter charges or review clinical data. The method by which users and providers can be created is highly dependent on your overall system configuration (see Overall System Configuration Options for illustrations of the possible configurations). The table below describes how to manage each type of person, based on your system configuration.
| Configuration | Type of Person | Instructions for Creation |
|---|---|---|
| Direct Integration to MEDITECH® with Downtime Solution | User who is not a provider (e.g., administrator) | Create the user directly in Commure Pro via the Create User option. |
| Direct Integration to MEDITECH® with Downtime Solution | User who is a provider | Enter the provider in the MEDITECH system first (if they do not already exist there). Once done, their provider record is automatically available in Commure Pro. Create a user record for them via the Create User from Provider option. |
| Direct Integration to MEDITECH® with Downtime Solution | Provider who is not a user (e.g., referring provider) | Enter the provider in the MEDITECH system first (if they do not already exist there). Once done, their provider record is automatically available in Commure Pro. No further action is needed. |
| Direct Integration to Cerner™ with Downtime Solution | User who is not a provider (e.g., administrator) | Create the user directly in Commure Pro via the Create User option. |
| Direct Integration to Cerner™ with Downtime Solution | User who is a provider | If an interface for provider data is set up between Commure Pro and your Cerner System, enter the provider in the source system first. Once done, their provider record is automatically available in Commure Pro. Next, create a user record for the provider via the Create User from Provider option. OR, If an interface for provider data is NOT set up between Commure Pro and your Cerner System, create the user via the Create User option. Then designate them as a provider by responding Yes to the Provider question (under User Permissions on the User tab). |
| Direct Integration to Cerner™ with Downtime Solution | Provider who is not a user (e.g., referring provider) | If an interface for provider data is set up between Commure Pro and your Cerner System, enter the provider in the source system first. Once done, their provider record is automatically available in Commure Pro. No further action is needed. OR, If an interface for provider data is NOT set up between Commure Pro and your Cerner System, enter the provider directly in Commure Pro using the Add provider function (under Providers on the System Management tab). |
| Commure Pro with Commure Pro Repository™ | User who is not a provider (e.g., administrator) | Create the user directly in Commure Pro via the Create User option. |
| Commure Pro with Commure Pro Repository™ | User who is a provider | If an interface for provider data is set up between Commure Pro and your source Clinical Information System, enter the provider in the source system first. Once done, their provider record is automatically available in Commure Pro. Next, create a user record for the provider via the Create User from Provider option. OR, If an interface for provider data is NOT set up between Commure Pro and your source Clinical Information System, create the user via the Create User option. Then designate them as a provider by responding Yes to the Provider question (under User Permissions on the User tab). |
| Commure Pro with Commure Pro Repository™ | Provider who is not a user (e.g., referring provider) | If an interface for provider data is set up between Commure Pro and your source Clinical Information System, enter the provider in the source system first. Once done, their provider record is automatically available in Commure Pro. No further action is needed. OR, If an interface for provider data is NOT set up between Commure Pro and your source Clinical Information System, enter the provider directly in Commure Pro using the Add provider function (under Providers on the System Management tab). |
- For more information on the Create User function, see Creating a New User.
- For more information on the Create User from Provider function, see Creating a User from an Existing Provider.
- For more information User Permissions, see User Permissions.
- For more information on the Add provider function, see Adding a New Provider Manually.
- For information about limitations to editing user data, see Rules for Editing Users.
Viewing the User Tab
The User tab consists of a toolbar, a Quick Details area that displays settings for the selected user, a View Users drop-down list that filters the type of users you can display, and a workspace that displays a form based on the particular task you are performing.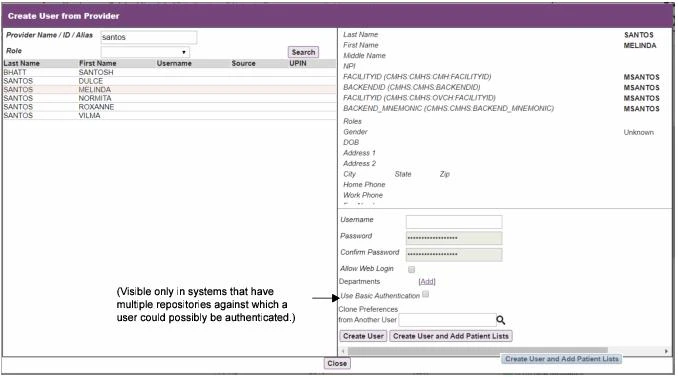
Finding, Creating, and Editing Users
Use the Search button in the Quick Details box to search for a user by name, username, or ID.Filtering Users
You can select categories of users from the View Users drop-down to filter the list. The View Users form refreshes with only users who match the category you selected from the drop-down list, so that you can more easily select the user whose settings you want to modify.Unlocking User Accounts
If a handheld or web user enters an incorrect password more than the designated number of times, the user’s account is locked and they are no longer allowed to log into the system (see Lock User after ‘n’ Login Attempts on Handheld and Disable Access after ‘n’ Login Attempts via the Web). An administrator of Level 0, Level 1, or Level 2 (who has the Level 2: Can Edit Users in Assigned Departments preference set to Yes) must unlock the user’s account before they can gain access. Follow these steps:- On the User tab, select the user whose account is locked. Note that the locked user has a red exclamation mark in the Requires Attention column.
- Click the Unlock User button in the Quick Details box.
Creating a New User
If you intend to grant Commure Pro access to a provider who already exists in your source system, you should use the Create User from Provider option (see Creating a User from an Existing Provider). The Create User function should only be used in cases where the person is not a provider (for example, an administrator), or when an interface for provider data is not set up between Commure Pro and your source system. To create a new user directly in the Commure Pro system:- On the User tab, click Create User. In a Direct Integration to MEDITECH® with Downtime Solution configuration, this button is visible to only Level 0 users who are site administrators. In a Commure Pro with Commure Pro Repository™ or a Direct Integration to Cerner™ with Downtime Solution configuration, this button is visible to only Level 1 users, or Level 2 users for whom the Level 2: Can Add Users to Assigned Departments property is set to Yes (see Level 2 Department Administrator User Permissions).
- In the Create User dialog, type the following:
- First Name: Enter the user’s first name.
- Middle Name: Enter the user’s middle name.
- Last Name: Enter the user’s last name.
- Username: Enter a unique, abbreviated name for the user. This is the name used to login to the system.
- IDX Number, SMS Number, or other number: Provider alias used when IDX, SMS, or some other system is the authority. The provider number fields can be configured based on your organization’s needs.
- UPIN: Unique Physician Identification Number, an alias used to identify providers who treat Medicare patients in the US (see www.upinregistry.com).
- Password, Verify Password, Password Requirements: Enter a password that the user will be required to enter to access the Commure Pro system (in the Password field), and then re-enter it to verify that you have typed it correctly (in the Verify Password field). Use a mix of letters and numbers to make it more secure. Passwords are case-sensitive and cannot be longer than 20 characters. Whether or not the Password and Verify Password fields are visible is based on the access level of the administrator, the overall system configuration, and the type of authentication that is being used by the organization:
- In a Commure Pro with Commure Pro Repository configuration that is using basic authentication:
- The password fields appear for Level 0, 1, and 2 administrators. This Commure Pro password is used to authenticate the user in the Commure Pro Repository.
- In a Direct Integration to MEDITECH with Downtime Solution configuration using multi-authentication (MEDITECH Downtime, LDAP, AD, or other), a Direct Integration to Cerner with Downtime Solution configuration using multi-authentication (Cerner Downtime, LDAP, AD, or other), or in a Commure Pro with Commure Pro Repository configuration using multi-authentication (LDAP, AD, or other):
- When a Level 1 or 2 administrator creates a user, the password fields do not appear. All users created by these administrators are assumed to adhere to the organization’s preference for multi-authentication, and therefore a Commure Pro password is not applicable.
- When a Level 0 user who is a site administrator creates a user, the password fields appear. The administrator is therefore able to enter a Commure Pro password in order to create a local user who authenticates against the Commure Pro Repository (they must also check the next field: Use Basic Authentication).
- Use Basic Authentication: This option appears only on systems that have multiple repositories against which a user could possibly be authenticated, and in which case multi-authentication is enabled in the pkConfiguration file. This would include the following combinations of system configurations and authentication protocols:
- Direct Integration to MEDITECH with Downtime Solution, using multi-authentication (MEDITECH Downtime, LDAP, AD, or other)
- Direct Integration to Cerner with Downtime Solution, using multi-authentication (Cerner Downtime, LDAP, AD, or other)
- Commure Pro with Commure Pro Repository, using multi-authentication (LDAP, AD, or other) This question is visible to Level 0 and Level 1 users only. This setting is used to specify the repository against which the user you are creating should be authenticated. If you leave this box unchecked, the user is authenticated using the multi-authentication protocol of your choice, such as MEDITECH Downtime, LDAP, or AD. If you check this box, the user is placed on a bypass list and is authenticated against the Commure Pro Repository using basic authentication. In this case, Commure Pro recommends that you dump the pkConfiguration.properties file so that the new bypass list is saved. After enabling this setting for a particular user, it is no longer necessary to re-start the mobilizer server before this user can log into the system. Although not visible to Level 1 or 2 administrators, the default Use Basic Authentication setting for all users created by them is unchecked. This ensures that all users created by Level 1 or 2 administrators adhere to the organization’s preference for multi-authentication. Level 1 or 2 administrators can contact their Commure Pro representative if they need assistance modifying this property for a user. See Rules for Editing Users to view a table that illustrates how the user will be authenticated based on your response to this question, your overall system configuration, and the authentication protocol used by your organization.
- Use Basic Authentication: This option appears only on systems that have multiple repositories against which a user could possibly be authenticated, and in which case multi-authentication is enabled in the pkConfiguration file. This would include the following combinations of system configurations and authentication protocols:
- Clone Preferences from Another User: Instead of configuring a new user’s preferences ‘from scratch’, you can search for and select any existing user to serve as a basis for the new user’s configuration settings. When you use this preference to clone an existing user, the new user inherits all default settings from the source user (except the user’s password). Note that when you search for and select from existing users, you are only given access to users that exist at or below your administrative level. During the copy operation, administrators are prompted with the option to include all of the current user’s department associations as part of the copy operation. Selecting Yes to this prompt automatically assigns the new user to all of the same departments as the current user; selecting no creates a user that needs to be manually assigned to one or more departments.
- Click Save to confirm your entries and create the user. If you set the Use Basic Authentication property equal to Yes for the user you created, a warning message appears reminding you that you must restart the Commure Pro Application Server(s) in order for the user to go on the bypass list.
- (Optional) Click Save and Add Patient Lists to create the new user and display a confirmation and the Search for patient list(s) window, where you can search for patient lists to manage for the new user, or click the Create Patient List button to open the Create new patient list window. This function works the same as the Find a Patient List function on the Patient List > Actions menu. Once the user has been created, its status is automatically changed to Complete. This user account is immediately active and is selected by default so that you can immediately begin to make any configuration changes for this user. Note also that this new user can immediately login and begin to use the system.
When you create a User, it is automatically assigned the role USER. See Roles for more information on roles.
Creating a User from an Existing Provider
Some providers exist in the back-end system, for example because they are associated with procedures or charges, but may not exist in Commure Pro. To grant such providers access to Commure Pro, you must make them users of the Commure Pro system. To do this, use the Create User from Provider function on the User tab. To create a Commure Pro user from a provider:- On the User tab, click Create User from Provider. This button is visible only if you are a Level 0 user, a Level 1 user, or a Level 2 user for whom the Level 2: Can Add Users to Assigned Departments property is set to Yes (see Level 2 Department Administrator User Permissions).
- In the Create User from Provider dialog, enter a few characters of the first or last name, ID, or alias of the provider. Use the Role drop-down list to narrow the search. Click the Search button. A list of matching providers is displayed.
- Click on a provider from the list. If you select a provider who is already a user, an error message appears in the right pane prompting you to select a different one.
- When you select a provider who is not yet a user, fields are displayed on the right side of the dialog where you can define the user’s login information for the Commure Pro system. Both level 1 and level 2 administrators can also assign the user to one or more of their departments.
-
Enter the following information:
- Username: Enter a unique, abbreviated name for the user. This is the name used to log in to the system.
- Password, Confirm Password: Enter a password that the user will be required to enter to access the Commure Pro system (in the Password field), and then re-enter it to verify that you have typed it correctly (in the Confirm Password field). Use a mix of letters and numbers to make it more secure. Passwords are case-sensitive and cannot be longer than 20 characters. Whether or not the Password and Confirm Password fields are visible is based on the access level of the administrator, the overall system configuration, and the type of authentication that is being used by the organization:
- In a Commure Pro with Commure Pro Repository configuration, using basic authentication:
- The password fields appear for Level 0, 1, and 2 administrators. This Commure Pro password is used to authenticate the user in the Commure Pro Repository.
- In a Direct Integration to MEDITECH with Downtime Solution, using multi-authentication (MEDITECH Downtime, LDAP, AD, or other) OR,
- In a Direct Integration to Cerner with Downtime Solution, using multi-authentication (Cerner Downtime, LDAP, AD, or other) OR,
- In a Commure Pro with Commure Pro Repository using multi-authentication (LDAP, AD, or other):
- When a Level 1 or 2 administrator creates a user, the password fields do not appear. All users created by these administrators are assumed to adhere to the organization’s preference for multi-authentication, and therefore a Commure Pro password is not applicable.
- When a Level 0 user who is a site administrator creates a user, the password fields appear. The administrator is therefore able to enter a Commure Pro password in order to create a local user who authenticates against the Commure Pro Repository (they must also check the next field: Use Basic Authentication).
- Allow Web Login: Check this box to allow the user to access the Commure Pro application as a web user.
- Departments: You can assign this user to one or more of the departments to which you have access.
- Use Basic Authentication: This question appears only on systems that have multiple repositories against which a user could possibly be authenticated, and in which case multi-authentication is enabled in the pkConfiguration file. This would include the following combinations of system configurations and authentication protocols:
- Direct Integration to MEDITECH with Downtime Solution, using multi-authentication (MEDITECH Downtime, LDAP, AD, or other)
- Direct Integration to Cerner with Downtime Solution, using multi-authentication (Cerner Downtime, LDAP, AD, or other)
- Commure Pro with Commure Pro Repository, using multi-authentication (LDAP, AD, or other) This question is visible to only Level 0 users who are site administrators. This setting is used to specify the repository against which the user you are creating should be authenticated. If you leave this box unchecked, the user is authenticated using the multi-authentication protocol of your choice, such as MEDITECH Downtime, LDAP, or AD. If you check this box, the user is placed on a bypass list and is authenticated against the Commure Pro Repository using basic authentication. In this case, Commure Pro recommends that you dump the pkConfiguration.properties file so that the new bypass list is saved. The system administrator must also restart the Commure Pro Application Server(s) for the bypass to take effect for this user. Although not visible to Level 1 or 2 administrators, the default Use Basic Authentication setting for all users created by them is unchecked. This ensures that all users created by level 1 or 2 administrators adhere to the organization’s preference for multi-authentication. Level 1 or 2 administrators can contact their Commure Pro representative if they need assistance modifying this property for a user. See Rules for Editing Users to view a table that illustrates how the user will be authenticated based on your response to this question, your overall system configuration, and the authentication protocol used by your organization.- f. Clone Preferences from Another User: Instead of configuring a new user’s preferences ‘from scratch’, you can search for and select any existing user to serve as a basis for the new user’s configuration settings. When you use this preference to choose an existing user, the new user inherits all user preferences from the existing user as its default settings (except the user’s password). Note that when you search for and select from existing users, you are only given access to users that exist at or below your administrative level. During the copy operation, administrators are prompted with the option to include all of the current user’s department associations as part of the copy operation. Selecting Yes to this prompt automatically assigns the new user to all of the same departments as the current user; selecting no creates a user that needs to be manually assigned to one or more departments.
- Click the Create User button to create the user on the Commure Pro system. A message box confirms that the new user was created successfully.
- Click OK to dismiss the message box.
- Click the Close button to close the Create User from Provider dialog when you are finished.
When you Create a User from a Provider, it is automatically assigned the role of USER, in addition to any roles that may have already been assigned to that person (such as the role of PROVIDER). Users that are created from providers are also See Roles for more information on roles.
Editing an Existing User
In general, Level 0 and 1 users can edit any user in the institution. Level 2 users whose Level 2: Can Edit Users in Assigned Departments setting is set to Yes can only edit users in departments they belong to. There are some limitations on what data can be edited for particular users, based on how the user was originally created, and where the user record is authenticated. See Rules for Editing Users for more information. To edit an existing user, or configure settings for a new Commure Pro user:- Search for the user by clicking the Search button in the Quick Details area of the User tab.
- In the Search for User dialog box, enter the Username or any portion of the first or last names, and then click Search.
- When the new user is found, click the Edit button in the Quick Details area.
- Configure the settings as described in Reference Guide for User Settings.
Rules for Editing Users
The ability to edit key data for users (name, username, and password), as well as your ability to delete a user record entirely, are dependent on several factors. Your overall system configuration, the method by which the user was created, and your organization’s choice of authentication method, all impact whether or not you can make these changes directly in the Commure Pro system, or whether you must go to some other system to make them. The table that follows outlines the functionality that is available in the Commure Pro system, based on these factors. We do not discuss persons who are not users, such as referring providers, in this section. Direct Integration to MEDITECH® with Downtime Solution:| Authentication Protocol | How Created | Use Basic Authentication? Setting | Where Authenticated | Change Name? | Change User name? | Change Password? | Delete User? |
|---|---|---|---|---|---|---|---|
| Multi-Authentication (MEDITECH Downtime, LDAP, AD, etc.) | Create User from Provider | No | MEDITECH, LDAP, AD, etc. | Yes | Yes | No | Yes |
| Multi-Authentication (MEDITECH Downtime, LDAP, AD, etc.) | Create User from Provider | Yes | Commure Pro Repository | Yes | Yes | Yes | Yes |
| Multi-Authentication (MEDITECH Downtime, LDAP, AD, etc.) | Create User | No | MEDITECH, LDAP, AD, etc. | Yes | Yes | No | Yes |
| Multi-Authentication (MEDITECH Downtime, LDAP, AD, etc.) | Create User | Yes | Commure Pro Repository | Yes | Yes | Yes | Yes |
| Authentication Protocol | How Created | Use Basic Authentication? Setting | Where Authenticated | Change Name? | Change User name? | Change Password? | Delete User? |
|---|---|---|---|---|---|---|---|
| Basic Authentication | Create User from Provider | N/A | Commure Pro Repository | Yes | Yes | Yes | Yes |
| Basic Authentication | Create User | N/A | Commure Pro Repository | Yes | Yes | Yes | Yes |
| Multi-Authentication (LDAP, AD, etc.) | Create User from Provider | No | LDAP, AD, etc. | Yes | Yes | No | Yes |
| Multi-Authentication (LDAP, AD, etc.) | Create User from Provider | Yes | Commure Pro Repository | Yes | Yes | Yes | Yes |
| Multi-Authentication (LDAP, AD, etc.) | Create User | No | LDAP, AD, etc. | Yes | Yes | No | Yes |
| Multi-Authentication (LDAP, AD, etc.) | Create User | Yes | Commure Pro Repository | Yes | Yes | Yes | Yes |
Deactivating Users
There are two ways to deactivate a user in Commure Pro. You can:- delete the user from the system
- set the user’s Web User and Handheld User settings to No
Deleting a User
Depending on how the user’s record was originally created, you may or may not be able to delete them using the Commure Pro system. See Rules for Editing Users for more information. To delete a user from the Commure Pro system:- Locate the user you want to delete by filtering the list and scrolling, or by using Search.
- Click to highlight the user in the View Users area of the tab.
- Click the Delete button. The button is visible only if you are a Level 1 user.
- A message appears warning that deleted users cannot be restored. You care given the option to delete the provider record for this user in addition to deleting the user account. A provider record is the record of the provider in the system. It can come either from the ADT system or from the list of referring providers loaded into Commure Pro from the client site. Referring providers are people that can be chosen as referring providers during charge capture. For example, you could choose a provider who is not a Commure Pro user as a referring provider.
- Choose one of the following options:
- Select the checkbox and click Yes to de-activate the user on the Commure Pro system and to delete the provider record in the back-end system.
- De-select the checkbox and click Yes to de-activate the user on the Commure Pro system, but to preserve the provider record in the back-end system.
- Click No to cancel the delete operation. If you selected Yes, the user is de-activated and will no longer be able to login to the Commure Pro system. You will not be able to locate this user when you perform a search.
If you delete a user who is a member of a provider group, the user will be deleted but the provider will remain a member of the provider group. To remove the user from a provider group, you must edit the provider group.
Restricting a User’s Access to the System
Another way to deactivate a user is to set their Web User and Handheld User settings to No (see also User Permissions). This blocks the user’s ability to access the Commure Pro application via the web or a handheld device, respectively. You could also change their password to a value that the user does not know.Emulating Users
The Emulate button is available on the Quick Details area only for Level 0 and Level 1 administrators who have the Level 0/1/2: Can Emulate User preference set to Yes. This option is used primarily by Commure Pro support staff and system administrators. It allows them to emulate a user in order to test functionality as experienced by that user. When emulating another user, all actions are logged in the audit trail and clearly indicate that the support staff was emulating a different user: “[emulator’s username] as [username].”Some functionality is not available when emulating other users, including Commure Pro Messaging and configuration of ePrescribing users.
- User doing the emulation—User search displays all emulation activity initiated by the user.
- User being emulated—User search displays all emulation activity for a user who was emulated.
- Date / time—Date / time search displays any emulation activity occurring within the specified date range.
- Patients—Patient search displays whenever selected patient(s) were selected during emulation activity. To use this option, follow these steps:
- Select the Admin tab, followed by the User tab.
- Select a user from the list.
- Select the Emulate button in the Quick Details area. You are logged out of the application and returned to the regular Login screen. A separate login session is also started for the emulation, although it may not be the active browser window.
- Check your list of open browser windows to find the Login screen for the emulation session (the title bar of the window says: “App Update - Login”). Select this window to make it active.
-
Enter the following information:
- Username: Your own username; this information is already entered for you.
- Password: Your own password.
- Emulated Username: The username of the person you are emulating; this information is already entered for you.
- Emulated Password: You can leave this field blank, you do not have to know the other person’s password.
- Click the Emulate button. You are now emulating the other user.
- Perform any actions that you want to test as the emulated user.
- Click the Logout option at the top right of the application window when you are done. The emulation session is stopped.
Bulk User Editing
Administrators whose Level 0 / 1 / 2 (w/edit users): Can Use Bulk User Edit setting is set to Yes (see User Permissions) can configure settings for multiple users at one time. All properties configured using this method override the existing user values. These changes cannot be undone, so be sure to always use this feature with extreme care. See Editing User Settings in Bulk for details on how to use this feature.Reference Guide for User Settings
Most of the configuration settings that administrators can set for individual users of the Commure Pro system on the User tab are the same as those that users can set for themselves on the Preferences tab. User settings fall into the following major categories: General, Provider Info, User Permissions, Device, Forms, Patient List, Lab Results, Charge Capture, and Problem List settings. These user settings are all described in the following sections.General Settings
To access the General settings for a user:- From the User tab, select a user by clicking on a name, then click Edit in the Quick Details area of the tab; or,
- From the Preferences tab, select General from the Edit Settings drop-down list. Your ability to edit some of the key data for users found on the General Settings form (name, username, and password), is dependent on several factors. Your overall system configuration, the method by which the user was created, and your organization’s choice of authentication method, all impact whether or not you can make these changes directly in the Commure Pro system, or whether you must go to some other system to make them. Please refer to the section entitled Rules for Editing Users, which contains a table illustrating the scenarios under which a user’s key information is editable in the Commure Pro system.
Username
(Web, Android, Apple) This setting specifies the name by which the user is known to Commure Pro. Once you login to Commure Pro with your username, it is displayed in the title bar of the web application.Domain Name
At sites using multi-domain LDAP to authenticate users during login, you can use this field to specify a child domain for one or more users. This child domain setting is then used to authenticate these users on both the portal and on supported mobile devices.First Name
This setting specifies the user’s given name.Middle Name
This setting specifies the user’s middle name.Last Name
This setting specifies the user’s family name.Commure Pro Mail Notification E-mail Address
If your organization has implemented the Commure Pro Mail module, you can use this setting to designate an external e-mail address for the user, such as a Yahoo® or Microsoft Office® Outlook® address. The user will not receive the full e-mail at this address. Instead, they will receive a notification that they have received a new e-mail in Commure Pro, so that they know to log onto the Commure Pro system to check their Inbox e-mails. In addition to the standard alpha-numeric characters, this field supports the use of all (ascii) characters that might be use to form brackets, which are the following: (, ), [, ],{, }, <, and >.
Title
This setting specifies the user’s professional title.Personnel ID
This field is read-only, and displays the user’s internal Commure Pro identification number (automatically assigned when the user’s record is created).Complete/Incomplete Status
This setting specifies whether or not this user is completely set up in Commure Pro. The status must be complete for the user to be able to login to Commure Pro or initiate a sync.Departments
(Web, Android, Apple) To assign the user to one or more departments, click Edit.- In the Assign Departments form, check the boxes associated with the departments to which you want to assign the selected user. You can assign a user to all available departments by enabling the setting Assign to All Departments. Use the department search field to narrow the list when many departments are configured.
- In the Quick Details area, click Save to save your selections or click Cancel and OK to discard them.
Level 2 users must have the Level 2: Can Add Users to Assigned Departments setting set to Yes in order to add users to their department(s). When set to Yes, they can only add users to, or remove them from departments they belong to. Check boxes for other departments are disabled.
Specialties
(Web, Android, Apple) This setting is used to assign one or more specialties to a particular user. Including specialty information helps to better identify a clinician’s specific area(s) of expertise, such as in the notes that clinicians create and manage in the NoteWriter and Mobile NoteWriter applications, or when communicating with another provider in Commure Pro Messaging. To assign a user to one or more specialties, click Edit and select one or more of the specialties that are listed under the Add Specialty list. You can also select the Default setting that is associated with the clinician’s primary area of specialization. When clinicians first open a note template to document patient progress, this primary specialty will be included with the note unless the clinician makes a change and selects from any other specialty available to them. Note that the options that you can assign from this list are defined using the Specialty reference list. For more information about reference lists, see Managing Reference Lists & System Settings. You can also assign and remove specialty assignments to multiple users at one time using the two Bulk User Edit settings Add Specialty and Remove Specialty.PAT Access Level
(Web) Click the drop-down list and select Level 1, Level 2, or Level 3. For more information on PAT Access Levels, see PAT Access Levels.Use Basic Authentication
(Web) This question appears only on systems that have multiple repositories against which a user could possibly be authenticated, and in which case multi-authentication is enabled in the pkConfiguration file. This would include the following combinations of system configurations and authentication protocols:- Direct Integration to MEDITECH with Downtime Solution, using multi-authentication (MEDITECH Downtime, LDAP, AD, or other)
- Direct Integration to Cerner with Downtime Solution, using multi-authentication (Cerner Downtime, LDAP, AD, or other)
- Commure Pro with Commure Pro Repository, using multi-authentication (LDAP, AD, or other) This question is visible to only Level 0 users who are site administrators. This setting is used to specify the repository against which the user you are editing should be authenticated. If you select No, the user is authenticated using the multi-authentication protocol of your choice, such as MEDITECH Downtime, LDAP, or AD. If you select Yes, the user is placed on a bypass list and is authenticated against the Commure Pro Repository using basic authentication. In this case, Commure Pro recommends that you dump the pkConfiguration.properties file so that the new bypass list is saved. The system administrator must also restart the Commure Pro Application Server(s) for the bypass to take effect for this user.
Disable Basic Auth Account Creation
Administrators can prevent Level 0 and Level 1 users from creating new accounts that use Basic Authentication. When this setting is enabled (via thePKPasswordMgmt configuration property), the option to create Basic Auth accounts is removed from the user creation workflow, ensuring that all new accounts adhere to the organization’s multi-authentication policy (such as LDAP or Active Directory).
This setting is a security control that enforces organization-wide authentication standards. Existing Basic Auth accounts are not affected. Contact your Commure Pro representative to enable this configuration.
Password
(Web, Android, Apple) There are different types of authentication protocols that can be used to secure access to the data in the Commure Pro system. These include basic authentication and multi-authentication (MEDITECH Downtime, Cerner Downtime, LDAP, ActiveDirectory, or other). Passwords for users of all platforms are stored in only one location: the server. The user or an administrator may be able to change the server password here in this option (see the NOTE below).Whether or not a user’s password can be changed in this option depends on the authentication protocol that your organization has implemented. Please refer to the section entitled Rules for Editing Users to view a table that illustrates when a user’s password is, or is not, editable in Commure Pro. If the password is not editable in Commure Pro, you must instead change the password directly in your backend system, or by using your multi-authentication service (MEDITECH Downtime, Cerner Downtime, LDAP, AD or other).
- Enter your current password: type your current password on the first line.
-
Enter new password for
<LAST NAME>,<FIRST NAME>(<username>): enter the user’s new password on the second line. -
Confirm new password for
<LAST NAME>,<FIRST NAME>(<username>): re-enter the user’s new password on the third line.If you are changing your own password, the form does not spell out your last name, first name and username. - Click Save to save the new password.
Log Request Response
(Web) This field is visible to only Level 0 users (both site administrators and non-site administrators). When set to Yes for a user, it creates a log file that records all traffic for that user (requests and responses) between the server and the backend system. Commure Pro support services use this option for trouble-shooting purposes.Wallet Entries
(Web) If your organization has implemented one or more links to external systems, such as an Internet reference tool or a picture archiving and communication system (PACS), you may need to use the Commure Pro Wallet to store the individual’s username and password for the external system(s). Whether or not a wallet entry is required depends on how access to the external system has been defined (external systems are defined on the System Management tab, via the External Systems option). Furthermore, in some cases, the wallet entry can be automatically created by the Commure Pro system, thereby eliminating the necessity to manually enter it here. Please refer to Links from Commure Pro to External Systems for more information. To create an entry in a user’s wallet, use the following procedure. Note that while users of all levels (level 0 - level 3) can edit their own wallet entries, creating and deleting entries is restricted to administrators with level 0 or level 1 access only.- Click the Edit link next to Wallet Entries. The Wallet Entry Administrator dialog box opens.
- Click the Add Wallet Entry button. The Add Wallet Entry dialog box appears.
-
Select an external system from the External Systems drop-down list.
the external system must first be defined in the External Systems option on the System Management tab, or it will not appear as an option in the drop-down list. However, please note that links to external systems with a shared username/password are not listed here, since they do not require individual wallet entries. Also, once you create a wallet entry for an external system, it does not re-appear in the drop-down list when creating subsequent wallet entries (since a wallet entry has already been defined for it).
-
Prompts appear for one or both of the following fields, depending on how the external system has been defined:
- Target Username: enter this user’s username in the selected external system.
- Target Password: enter this user’s password in the selected external system.
- Click Save. The entry is now added to the user’s wallet of user names and passwords, and is visible on the Wallet Entry Administrator screen. Users of all levels can edit wallet entries by selecting them and clicking the Edit button on the right side of the screen.
Override System Portal Time-Out Setting
(Web) This User-level setting allows administrators to assign a portal timeout value to a user that is different from the Institution-level Portal Timeout value, which applies to all users by default. This setting is blank by default. When an acceptable value is set here (1-720 minutes), the Institution-level Portal Timeout value is ignored and inactivity timeout occurs based on this value. This is also available as a Bulk User Edit setting. See Site Administration Settings for information on the Institution-level portal timeout setting.Changes to this setting take effect the next time users login.
Created Date/Time
(Web) Identifies the date and time that the selected user was originally created.Created By
(Web) Identifies the user who was responsible for creation of the selected user.Display Preference Tab
(Web) Determines whether users are able to access the Preferences tab to make edits to some of their own preferences. Administrators (level 0 and 1) can use this preference to configure this behavior for individual users, or instead use the corresponding Bulk User Edit setting to display or hide the Preferences tab for all users.Show Portal Alerts
(Web) Determines whether to display the unfinished item(s) indicator at the top of the screen, which provides a running total of the unfinished items for CPOE, NoteWriter, Home Meds, and Co-Signature. Unfinished items include items such as unreconciled home medications (for Admission Medication Reconciliation), unfinished orders (resulting from orders saved as draft in CPOE or draft Hospital, Transfer, or Discharge Orders in Home Meds), orders requiring co-signature, or draft notes. When set to Yes, the number of unfinished items is displayed in the indicator banner for each of these applications; when set to No, the indicator banner is not displayed regardless of the number of unfinished items.Last Web Login and Last Mobile Login
(Web) The Last Web Login and Last Mobile Login display the last login date and time for the selected user. The login times are hidden by default. Click the Show link next to the corresponding login type you want to see. The data is displayed in MM/DD/YY HH:MM format. If the user has never logged in to a location, N/A is displayed.Display Mode
(Web) Controls if the Patient List displays in Light mode or Dark mode.- Light (the default)- The Patient List displays with dark text on a light background.
- Dark- The Patient List displays with light text on a dark background.
Clear user web settings
(Web) Click this link to clear all user web sticky settings and return to the defaults. This will clear the user’s current settings, such as:- the default tab that is selected when they log in
- the criteria settings on the Patient Search tab and the default sort order of the results
- whether or not the patient list is minimized on the Patient List tab
- various view settings on the Patient List tab
- any configurations that this user has made to pin Charge Capture picker groups to remain open by default
Any favorites that this user has defined still remain open, as these groups are configured to always be opened by default.
Show Tooltips Above Cursor
(Web) Mark this check box to have long tooltips appear above the cursor, such as those for detailed diagnosis, charge code, or provider names that are seen when posting a charge. Having tooltips appear above the cursor is especially helpful when using a tablet, because the user’s hand and stylus can obstruct their view of a long tooltip when it appears below the cursor. This preference is device specific, so a desktop computer and a tablet can have different settings. This preference does not affect the tooltip when the cursor hovers over small items like a button, icon, or tab. In these cases, the tips still appear under the cursor.Reset Preferences
(Web) Use this setting to replace the selected user’s configuration preferences with another user’s preferences. Clicking this link yields the Reset Preferences to Another User window, where you can search for and select any user at or below your administrative level.Copy Preferences to Another User
(Web) Use this setting to replace another user’s configuration preferences with the selected user’s preferences. Clicking this link yields the Copy Preferences to Another User window, where you can choose between copying these preferences to a brand new user, or to an existing user at or below your administrative level. During the copy operation, administrators are prompted with the option to include all of the current user’s department associations as part of the copy operation. Selecting Yes to this prompt automatically assigns the new user to all of the same departments as the current user; selecting no creates a user that needs to be manually assigned to one or more departments.Provider Info
The Provider Info form shows demographic information for a healthcare provider, such as last and first names, role(s) assigned to them in the Commure Pro system, gender, date of birth, address, phone, and fax numbers. Some if this information may not be editable, depending on your system configuration (see Rules for Editing Users). Level 3 users are not allowed to edit their own provider information. To edit a provider’s information:- Click the Edit Provider Info button. The Edit Provider dialog opens.
- In the Edit Provider dialog, enter the following information:
Provider ID NumbersThe number and type of provider ID number fields can be customized to meet your organization’s needs. Please contact your Commure Pro representative for more information. Some examples of provider ID fields include: - o IDX Number (HH:IDXNUM)
- UPIN (HCFA:UPIN)
- SMS Number (HH:SMSNUM) RolesSelect one or more from among the available roles. The roles that appear vary by institution and are defined on the Admin tab under Reference Lists, Roles. See Adding Entries to a Reference List for more information. Some examples of roles are: - o User
- Provider
- Administrator
- Billing Provider
- Referring Provider
- Hospitalist If you check the role PROVIDER, this determines the Provider Yes/No setting on the User Permissions screen, which in some instances, can also be edited from that screen (see User Permissions).
If you change the status of the PROVIDER role here on the Edit Provider Info screen, to ensure that your change is saved you should click the Return to Choose Users link prior to performing any other edits on this user record. If you select User Permissions from the Edit Settings menu without first clicking Return to Choose Users, you will note that the status of the PROVIDER role remains unchanged on that screen. If you then click Save from the User Permissions option, you can inadvertently reset the role it to its previous value.
When you Create a User, it is automatically assigned the role USER. See Finding, Creating, and Editing Users for more information on creating users.
- Male
- Unknown DOB Click the popup calendar and select the user’s date of birth, or enter it in the format MM/DD/YYYY.Address 1, Address 2, City, State, ZipEnter an address for the user.Home PhoneEnter a home phone number for the user.Work PhoneEnter a work phone for this user. When this user sends Commure Pro Mail to other Apple users, their Work Phone number is included in the e-mail. If the recipient’s device is a smartphone, they can then select the number to call back this user.Fax NumberEnter a Fax Number for the user. Other PhoneEnter another phone number for the user.Messaging Phone(Android, Apple) If your organization has enabled Commure Pro Messaging, you can enter a callback telephone number for this user here. The callback feature is available when Commure Pro Messaging is used on an Apple® iPhone® or Android device. When this user and another person are using Commure Pro Messaging to converse via text messages, the other person can use the call back feature in Commure Pro Messaging to place a phone call to this user, at this number. This field accepts only numbers, you cannot enter any parentheses or dashes. The user is also able to enter or change their callback number on their mobile device, as well as in the Commure Pro Messaging window on the web application. See also Enable Commure Pro Messaging.Provider GroupsThis read-only field displays a list of the provider groups to which the selected user belongs..
- Click one of the following:
- Click Save to save your edits and close the Edit Provider dialog.
- Click Cancel to close the dialog without saving.
User Permissions
To access the User Permissions form for a user, starting on the Personal Preferences screen on the User tab, select User Permissions from the Edit Settings drop-down list. The User Permissions form lets you specify how users can access the system and what actions they can perform for selected areas. The available properties depend on the user’s Access Level.Level 0 and 1 System Administrator User Permissions
The User Permissions screen for Level 0 and 1 users has several properties that let you specify detailed permissions for this user.Provider
(Web, Android, Apple) This setting determines whether the user is a provider in the Commure Pro system. This setting is related to the Roles setting on the Provider Info screen. When you set it to Yes here, the role of PROVIDER is assigned to the user on the Provider Info screen. Likewise, checking or unchecking the PROVIDER role on the Provider Info screen adjusts this setting to Yes or No, respectively. Once this field has been set to Yes and saved, it cannot be reset to No via this option. You must instead make the change via the Provider Info screen, by unchecking the PROVIDER role in that option. See Provider Info for more information.Web User
(Web) This setting determines whether the user can access the system using the standard web application on a desktop or laptop computer. Choose Yes to allow access, or No to prevent access.Handheld User
(Android, Apple) This setting determines whether the user can access the system using an Android or Apple device. Choose Yes to allow access, or No to prevent access.Medical Records User
(Web, Apple) If your organization has implemented Commure Pro eSignature™, you can designate certain users as medical records personnel by setting this field to Yes. When sending Commure Pro Mail from the web platform, if the user selects the Medical Records Department as the recipient of the e-mail, all users who have this field set to Yes will receive the e-mail (on the web and handheld platforms).Restricted Local User
(Web) When this setting is enabled in the pkConfiguration file, it is visible to all administrators, but is editable by only Level 0 administrators. The Restricted Local User feature is often implemented when organizations wish to give administrative users access to the Commure Pro web application for management purposes, but not allow them to see patients’ clinical data. The default response to this setting is No, allowing the local user access to all of the functions normally associated with the Commure Pro application (within the parameters established in their user profile). Choose Yes to limit a local user’s access to the system, giving that user access to only a certain set of tabs, as defined in the pkConfiguration file. Speak to your Commure Pro representative if you need help setting this attribute for a user, as well as to define the tabs that should or should not be seen when a user is restricted. See also the section entitled Rules for Editing Users, for a definition of local user.Level 0: Site Admin
(Web) If set to Yes for the Level 0 user, the user is considered to be a site administrator, and has the ability to edit any preference setting in the entire Commure Pro system. Only a site administrator can enable this function for a Level 0 user who is not currently a site administrator.Level 0/1/2: Can Emulate User
(Web, Apple) This setting determines whether a user can log in as a different user, in order to emulate their actions and test functionality as experienced by that user. The emulation function does not require the administrator to know or change the password of the person they are emulating. This function is used primarily by Commure Pro support staff and system administrators, and only a Level 0 site administrator can enable this function for them self, or for a Level 0 or Level 1 administrator, or for a Level 2 User. See Emulating Users (on the web). See Logging In Using Emulation Mode (for Troubleshooting) in the Apple help.Commure Pro Messaging is not available when emulating another Commure Pro user.
Clinical Emergency Access
(Web) If set to Yes for the Level 0 or Level 1 user, the user is allowed to access all patient clinical sections but cannot access any administrative functions. Only a site administrator can enable this function for a Level 0 user.Admin Emergency Access
(Web) If set to Yes for the Level 0 or Level 1 user, the user is given access to only the administrative sections and has the ability to edit any preference setting in the entire Commure Pro system, but cannot access the patient data. Only a site administrator can enable this function for a Level 0 user.Level 0/1: Can Edit Code Sets (Reference Lists)
(Web) This setting determines the level to which the user can edit entries in code sets, also known as Reference Lists, on the System Management tab (under the Admin tab). You may select from the following options:- No: User is not able to view or edit Reference Lists.
- Add/Edit: User is able to add new entries and edit existing entries, but not able to delete entries.
- Add/Edit/Delete: User has full edit capabilities, including adding new entries, editing existing entries, and deleting entries. Only a Level 0 site administrator can enable this function for a Level 0 user who is not a site administrator, or for a Level 1 user. See Reference Lists.
Level 0/1: Can Import Provider Directory
(Web) This setting determines whether the user can import providers from a CSV file to be used for the Provider Directory (similar to a telephone book containing provider information). This directory has no relation to the providers that are users of your system, or to the providers that might be associated with charge or visit data (such as billing, referring, or admitting providers). Only a Level 0 site administrator can enable this function for a Level 0 user who is not a site administrator, or for a Level 1 user.Level 0/1: Can Access Vitals Edit Tool
(Web) This setting determines whether the user has access to the Vitals Edit option (under Admin > System Management). The Vitals Edit option is used to rename, determine the sort order, or map the vital sign information that displays for each patient. Please note that the Vitals Edit option is reserved for Commure Pro support staff, and only a Level 0 site administrator can enable this function for them self, or for a Level 1 administrator. See Vitals Edit.Level 0/1: Can Use Bulk User Edit
(Web) This setting determines whether the user can edit user settings in bulk, via the Bulk User Edit tab (under the Admin tab). Only a Level 0 site administrator can enable this function for a Level 0 user who is not a site administrator, or for a Level 1 or 2 user.Level 0/1/2: Can Edit Interfaced Providers
(Web) This setting determines whether the user can edit providers who are loaded or created using the HL7 interface for providers, as opposed to providers who are created directly using the Commure Pro interface.Level 0/1/2: Can Add/Edit Commure Pro Providers
(Web) This setting determines whether the user can add or edit providers who are created using the Commure Pro interface.Level 1: Can View XML Customization Link
(Web) This setting determines whether to expose the XML Customizations link to level 1 administrators. When this setting is enabled for a particular Level 1 user, the user can view, add, edit and delete XML customizations. Only a Level 0 user (does not have to be a site administrator) can enable this function for one or more Level 1 administrators. This setting is also configurable as a Bulk User Edit setting, for a group of users.Level 0/1/2: Can Edit Provider Info in Provider Directory
(Web) This setting determines whether the user can make edits to provider data directly from within the Provider Directory. When this setting is enabled, an Edit button displays at the bottom of the Provider Directory screen. Clicking this button opens the Edit Provider window, which displays all data for the selected provider in fields that the administrator can modify.Level 0/1/2: Can Access Return to Holding Bin
(Web) This setting determines whether Level 0, 1, or 2 users can access the Return Charges to Holding Bin button in the Charges > Search option. This feature allows administrators to return charge transactions with an Outbox or Sent to Billing status back to the Holding Bin, so that any necessary corrections can be made.Can Send Commure Pro Mail To
(Web) If your organization has implemented the Commure Pro Mail module, use this field to designate to whom this user can send e-mails. E-mails can be sent/received on the web and handheld platforms only. You may select from the following choices:- No Users: The user cannot send e-mails to anyone. When this option is selected for a user, the Send Commure Pro Mail button no longer displays in the upper-right portion of the user’s screen.
- Medical Records Only: The user can send e-mails to only those users who have the Medical Records User preference set to Yes in their user profiles. This option is applicable only if Commure Pro eSignature™ has been implemented by your organization.
- Within the User’s Department: The user can send e-mails to medical records users (if eSignature is implemented), as well as to any users that are members of the same departments as the user.
- Within the User’s Facilities: The user can send e-mails to medical records users (if eSignature is implemented), as well as to any users that work within the same facilities as the user.
- All Users: The user can send e-mails to any user.
Clinical Rounding Report View Access
(Web) This setting determines whether the user can view the Clinical Rounding Report on the web. This report contains a short summary of recent clinical data for the patients on the user’s patient list. Possible values for this setting are:- None: The user does not have access to the Clinical Rounding Report.
- No Other Users: The user can view/print the Clinical Rounding Report for only their own patient lists.
- Within the User’s Departments: The user can view/print the Clinical Rounding Report for all users who belong to the same departments as they do.
- Within the User’s Facilities: The user can view/print the Clinical Rounding Report for all users who belong to the same facilities as they do.
- All Users: The user can view/print the Clinical Rounding Report for all users. For more information, see Printing a Clinical Rounding Report.
Tracking/Reporting View Access
(Web) This setting provides the user with access to the Tracking/Reporting tab (under the Admin tab). On this tab users can view information about data transmissions between handheld devices and the Commure Pro Application Server for the Mobile Clinical Results, Mobile Charge Capture, and Vitals Capture applications. In addition, for Vitals Capture and NoteWriter, they can also monitor transmissions between the Commure Pro Application Server and your organization’s HIM system. The options for access behave as described below. These options regulate the scope of an individual user’s access to view data on the Tracking/Reporting tab. These settings are applied consistently to all users, regardless of access level.- None (the default): The user does not have access to the tracking and reporting functions.
If you select None, the Submission Record Management setting is disabled.
- Within the User’s Departments: The user can view data submissions and device sessions for any department to which they belong.
- Within the User’s Facilities: The user can view data submissions and device sessions for any facilities associated with the departments to which they belong. Note that these are the facilities defined on the department’s General Settings, not those listed on the department’s Vitals Capture settings.
- All: The user can view all data submissions and device sessions.
Submission Record Management
(Web) This setting is not available if the user’s Tracking/Reporting View Access is set to None. It controls a user’s access to additional functions on the Tracking/Reporting tab, related to the management of submission records. The functions available depend on the user’s access level. Select Yes to enable the submission record management controls, or select No to disable them. When set to Yes, this setting enables:- Level 2 and 3 users to restart the HL7 interface, reprocess submissions with errors, or mark submissions with the status of “Backend Processing Failure” as “ignored” on the Tracking/Reporting tab; and
- Level 0 and 1 users to perform all of the above user functions. In addition, Level 0/1 users can exclude submission records from being purged automatically from the system. For more information, see Purge Criteria and Exclude from Purge Checkbox description on page 661.
Allow Copy Pickers from Departments
(Web) This setting determines whether the user can copy department pickers.- None: The user does not have access to copy pickers. (This is the default setting.)
- All of the User’s Departments: The user can copy pickers from all of the departments that he is assigned to.
- Departments within the User’s Facilities: The user can copy pickers only from the departments that belong to the same facilities as he does.
- All Departments: The user can copy pickers from all departments.
Standard, Sealed, or Other Permissions
One or more fields related to confidential patient data may be listed here. These fields identify any special permissions that the user has been granted for viewing these types of data. In addition to the permissions defined for a particular user, this data includes the facility or domain associated with each specific permission (for example, CBA:FLH:OCOMS for facility-level permission, or CBA:FLH for domain-level permission.) These permissions are defined in the source ADT/Registration system. They are displayed here for informational purposes only, and cannot be edited. For more information on how Commure Pro handles confidential patient data, please refer to Additional Security for Confidential Patients and Data.LIS access group
LIS access groups are used to organize users based on their permissions to view confidential data. As with the standard and sealed permissions, these groups are defined in the source ADT/Registration system.Level 0/1 Allow Temporary Disabling System Access
(Web) Lets authorized administrators disable Commure Pro applications to prevent users from accessing these applications during maintenance window periods, such as during upgrades or validation testing. When this setting is enabled for one or more level 1 administrator(s), they can access several settings for disabling system access under Site Administration settings (Admin > Institution > Site Administration). Settings are provided for disabling all Commure Pro applications, but also for disabling the CPOE or Medication Reconciliation applications individually. For more information on disabling all Commure Pro applications, see the sections Restricting Access to the System During Maintenance and Site Administration Settings. For more information on disabling the CPOE and/or Medication Reconciliation applications individually, see Settings for Disabling System Access.Level 2 Department Administrator User Permissions
The list of User Permissions includes some user preferences that are specific to Level 2 administrators. Each of these preferences is labeled with the “Level 2” prefix in the administrative user interface so that administrators can easily identify the scope of each preference directly from the admin screen. This section discusses only those settings that are unique to level 2 administrators. For user preferences common to all administrative levels, see Level 0 and 1 System Administrator User Permissions). Level 2 (w/edit users): Can Use Bulk User Edit (Web) This setting provides the following options to level 2 users:- None—The level 2 administrator is not granted access to the Bulk User Edit tab.
- Within the User’s Departments—The level 2 administrator is granted access to the Bulk User Edit tab. All active departments that the user belongs to are available as values in the Department field in the User Search pane of BUE. In this pane, the level 2 administrator is able to search for any user that is in the same department, provided the setting Exclude from department checks when sharing data between users has not been set to the value No.
- Within the User’s Facilities—The level 2 administrator is granted access to the Bulk User Edit tab. All active departments sharing the same facility with the user’s department are available as values in the Department field in the User Search pane of BUE. In this pane, the level 2 administrator is able to search for any user belonging to any departments sharing this common facility, provided the setting Exclude from department checks when sharing data between users has not been set to the value No.
- All—The level 2 administrator is granted access to the Bulk User Edit tab. All active departments are available as values in the Department field in the User Search pane of BUE. In this pane, the level 2 administrator is able to search for any user belonging to any of the institution’s facilities.
Level 2: Can Edit Assigned Departments
(Web) This setting determines whether a Level 2 user has access to the Department tab and can edit settings for departments to which he is assigned. Choose Yes to enable this capability, or No to hide the Department tab and disallow editing of department settings.Level 2: Can Edit Users in Assigned Departments
(Web) This setting determines whether a Level 2 user has access to the User tab and can edit users in departments to which he is assigned. Choose Yes to enable this capability, or No to hide the User tab and disallow editing of user settings. Level 2: Can Add Users to Assigned Departments (must have edit departments or edit userspermission) (Web) This setting determines whether a Level 2 user can create users, or add users to departments to which he is assigned. This setting has dependencies with other settings:
- In order for this user to be able to add users to their departments (via the Department tab), this user’s Level 2: Can Edit Assigned Departments must also be set to Yes.
- In order for this user to be able to create users, this user’s Level 2: Can Edit Users in Assigned Departments property must also be set to Yes.
Level 2: Can Access System Reports for Users in Assigned Departments
(Web) Use this setting to selectively grant permission to individual level 2 users to view system reports. When this setting is enabled for a specific user, the user can view an additional (System Reports) tab under the Admin tab. This tab very closely resembles the screen that level 0 and 1 administrators see when they click the View Reports button from the Institution Settings screen. The primary difference is that level 2 administrators are restricted to obtaining usage information about users that belong to their assigned departments only.Level 2 / 3: Can Edit Other Users’ Charges
(Web, Android, Apple) This setting determines whether a Level 2 or 3 user can edit charges that were entered by other users. It affects the user’s ability to edit both draft and completed charges and has dependencies with other settings.Level 0 and Level 1 users can always edit other users’ charges.
- In the Desktop Charge Capture application (included editing charges in the Schedule tab), it functions as follows:
- When Level 2 / 3: Can Edit Other Users’ Charges is set to No, the user can only edit those charges they have entered themselves, or those charges for which they are the billing provider.
- When Level 2 / 3: Can Edit Other Users’ Charges is set to Yes, the user can edit any charge that they can view, based on the settings below:
- In the Mobile Charge Capture application, it functions as follows:
- When Level 2 / 3: Can Edit Other Users’ Charges is set to No, the user can only edit those charges they have entered themselves, or those charges for which they are the billing provider.
- When Level 2 / 3: Can Edit Other Users’ Charges is set to Yes, the can edit any charge that they can view on their handheld device, based on the settings below:
- Show Charge Transactions within the Last “n” Days on Handheld (1 - 365)
- Max # Charge Transactions Allowed on Handheld
- Show Charge Transactions Within User’s Department on Handheld Please note that there are additional restrictions in place that determine whether a charge transaction can be edited (based on visit date and charge status). See Restrictions to Editing Charge Data for more information.
Level 2: Can Send Charges to Outbox
(Web) This setting determines whether a Level 2 user is able to send charges to the Outbox directly from the Charge Transaction screen, or from the Charges > Holding Bin and Charges > Search tabs. Administrators send charge transactions to the Outbox so that they can then be batched for final billing.Level 0 and 1 users always have the ability to send charges to the Outbox from these options.
Level 3 User Permissions
The User Permissions screen for Level 3 users contains a subset of the fields described above for Level 0, 1, and 2 users. The following settings can be defined for each Level 3 user. Each of these settings is described in Level 0 and 1 System Administrator User Permissions or Level 2 Department Administrator User Permissions:- Provider
- Web User
- Handheld User
- Medical Records User
- Restricted Local User
- Level 2 / 3: Can Edit Other Users’ Charges
- Can Send Commure Pro Mail To
- Clinical Rounding Report View Access
- Submission Record Management
- Allow Copy Pickers From Departments
- Standard, Sealed, or Other Permissions
Device Settings
Use the Device Settings option to establish settings for the selected user on the various Commure Pro subplatforms (Web, Android, and Apple). This option is available to Level 1 administrators for all users. Level 2 administrators can access this setting for users belonging to their departments only. To access the Device Settings form for a user, from the Personal Preferences screen on the User tab, click the Edit Settings drop-down list and then select Device.The following properties are displayed:Created Date of User’s Account
(Web, Android, Apple) This setting displays the date and time stamp to indicate when the selected user’s account was created in the Commure Pro system.Active Handheld Modules
(Android, Apple) This setting displays the list of modules available to the user on their handheld device. Click Edit and mark the checkbox for each module to which the user should have access.In environments using multiple mobilizers, changes to this setting do not take effect until you clear the caches on each of the mobilizer servers (Admin > System Management > Misc > Web System Control screen). This includes the web and session caches in addition to the mobilizer cache.
| Module Name | Applicable to Android | Applicable to Apple |
|---|---|---|
| Allergies | Yes | Yes |
| Charge Capture | Yes | Yes |
| Clinical Notes | Yes | Yes |
| CPOE (to enable the CPOE Orders module, both this option and the Orders module must be selected) | Yes | Yes |
| Forms | No | No |
| Inbox | No | Yes |
| Lab Results | Yes | Yes |
| Medications | Yes | Yes |
| Orders (standard Order Status module) | Yes | Yes |
| Patient Info | Yes | Yes |
| Patient Photos | Yes | Yes |
| Patient Summary | No | No |
| Problem List | Yes | Yes |
| Provider Directory | Yes | Yes |
| Sign-Out | No | Yes |
| Test Results | Yes | Yes |
| Vitals and I/Os | Yes | Yes |
Sync Interval
(Android, Apple) Enter the number of minutes (between 5 and 400) in this field to indicate how frequently data should automatically sync from the server to this user’s handheld device. The default is 30 minutes. See also the Enable Sync Exclusion Period? and Only Sync when Application is in Foreground settings, which can also affect when the device syncs.Max # of Submissions in Payload
(Apple) This setting determines the number of submissions that are included in the payload when the user’s handheld device submits new items to the server. A value of 0 (the default) means that all pending submissions are included in the payload, and in most cases, this is the appropriate setting. Any number other than 0 indicates the specific number of submissions that will be included the payload. A number other than 0 should only be specified in rare cases where your organization’s server takes more time than normal to process a submission payload, which could occasionally result in a submission getting stuck because the server is slow to create a lock in the database. In this scenario, it would be advantageous to limit the number of submissions sent in a single payload, as the device would break the submissions into several small payloads, and wait for the each payload to be processed before sending the next one. It does not mean that the submissions will be processed more quickly, but rather it reduces the chances of a submission becoming stuck.Mobile Device Authentication Type
(Android, Apple) This setting determines the type of authentication that is available to the user when they log into the Commure Pro handheld application. Based on this setting, the user is allowed to enter the following on the Login screen: only a Password, or either a Password or a numeric PIN (Personal Identification Number). If the user’s password is a complex one that contains a combination of alpha, numeric, or special characters, they might find it easier to use a numeric-only PIN. This setting is available only when the corresponding institution-level Handheld Authentication Type preference is set to Use Commure Pro Managed PIN. In addition, please note that this setting is not available and is set to Password Only behind the scenes if the user-level Shared Device User preference is set to Yes for this user. The choices for this setting are:- Password Only: The user may enter only a Password to log into the Commure Pro application.
- Password or PIN (the default): The user may enter either a Password or a PIN to log into the Commure Pro application. When enabled, the provider is automatically prompted to establish their PIN when they install the Commure Pro application and log in for the first time. Or, they can wait and establish their PIN at a later time. Once the PIN is established, they can then use either their PIN or their password to log into the Commure Pro application (and easily switch between the two).
On Apple devices, the Password or PIN option is not supported in the Commure Pro version 9 or later application. When set to Password or PIN, the application behaves the same as if it were set to Password Only.
Enable Sync Exclusion Period?
(Android, Apple) This setting determines whether automatic syncing is discontinued on the user’s handheld device for a specific period of time during each day. Setting sync exclusion periods reduces unnecessary database activity on the server. For example, if the provider always works during the day, you might set an exclusion period for the late evening hours, during which time scheduled syncing is discontinued. If the user needs updated patient data during the exclusion period, they may still manually sync the device. Once a manual sync is initiated, the device reverts to automatic syncing based on the Sync Interval, and does not stop until the next exclusion period.- Yes: Enables a sync exclusion period for this user; enter the starting and ending times of the exclusion period in the next two fields.
- No: Enables automatic syncing to run continuously, based on the Sync Interval. See also the Only Sync when Application is in Foreground setting, which can also affect when the device syncs.
Sync Exclusion Period Start
(Android, Apple) If you set the Enable Sync Exclusion Period field to Yes, enter the starting hour (based on a 24 hour clock) of the exclusion period in this field. The device will stop syncing on this hour and will not resume until the hour you specify in the next field.Sync Exclusion Period End
(Android, Apple) Enter the ending hour (based on a 24 hour clock) of the exclusion period. The device will resume syncing at this hour.Only Sync when Application is in Foreground
(Android) This setting determines when automatic syncing occurs on the user’s device.- Yes: Automatic syncing occurs (according to the defined Sync Interval) only when the Commure Pro application is running in the foreground on the device. This can help preserve battery power on the device.
- No: Automatic syncing occurs (according to the defined Sync Interval) whenever the Commure Pro application is running on the device, regardless of whether or not it is in the foreground. See also the Enable Sync Exclusion Period? setting, which can also affect when the device syncs.
Lock User to Device
(Android, Apple) This setting prevents the user from using more than one handheld device for the Commure Pro application. Select Yes or No:- Yes: The user can have only one device provisioned to their username. If the user attempts to provision a second device, they will receive an error message indicating that they already have a device provisioned to their username. If the user needs to switch devices, the administrator must first delete the old device from the system via the Handheld Devices option (see Deleting a Device).
- No: The user can have more than one device provisioned to their username.
Shared Device User
(Apple) This setting determines whether the user will be automatically logged out of the Commure Pro application when they connect their device to a power source, such as a charging or docking station. It should only be set to Yes for persons who use a shared device to access Commure Pro. This ensures that when the user returns the shared device to the docking station, they are automatically logged out of Commure Pro, before the next person picks up the device to use it.- Yes: When the user connects their device to a power source, they are automatically logged out of the Commure Pro application. In addition:
- When this preference is set to Yes, the Mobile Device Authentication Type preference is hidden, and set to Password Only behind the scenes.
- When this preference is set to Yes, the ability to log into the Commure Pro application via Apple’s Touch ID® or Face ID® feature is disabled for the user (see Allow HH users to login using Biometrics).
- No: When the user connects their device to a power source, they are not automatically logged out of the Commure Pro application.
Assign Modules
This setting lets users define a default configuration that determines which handheld modules to activate by default during creation of new users. Note that this preference is available from the System Administration Tool screen (Admin > User > System Defaults button) rather than from the Device Settings screen. Also note that this setting is reset during each installation or upgrade and as a result, all of the handheld modules are de-selected.Administrators can continue to configure the list of active modules for individuals on a per-user basis, if a particular user’s list diverges from the default configuration. For more information, see Active Handheld Modules.
Charge Capture Settings
If Charge Capture is enabled for your facility, you can access the Charge Capture Settings form on the User tab by selecting Charge Capture from the Edit Settings drop-down list. On the Charge Capture Settings form, you can set the properties below for users who you have permission to edit.Administration
Allow User to Add/Edit Charges on the Web
(Web) This setting determines whether the user is able to add or edit charges in the web application. If this setting is set to Yes and the Charge Desktop View Access setting is set to Within the User’s Department or All Charges, a My Charges Only checkbox will appear in the Holding Bin, Worklist, and Search tabs on the Charges tab allowing him to restrict the display to only his charges.Add/Edit Charge Pickers
(Web, Android, Apple) Charge Pickers organize charge codes into categories. Organizing codes into categories makes it easier for users to find and enter charges. Administrators typically define charge Pickers at the department level, via the setting below. All department-level Pickers are automatically visible to all users assigned to that department. Instructions for defining Pickers at the department level are described in Configuring Charge or Diagnosis Pickers. Admin - Department - Charge Capture - Add/Edit Charge Pickers Certain modifications can be made to a user’s charge Picker list at the user level, in order to personalize it for that user. For example, if specific charge codes, charge macros, or entire categories from the department-level Pickers are not helpful for a particular provider, they can be hidden for that user. In addition, new items can be added to the charge Picker for a user. There are two methods available for making changes to charge Pickers at the user level, described below. Please note that there is a slight terminology difference between the two options, but both options do in fact make changes to the charge Pickers.- The first method is here via this Add/Edit Charge Pickers setting, which is accessed via the Admin > User option. This option is typically used by administrators, when modifying charge Pickers for a specific user in order to tailor it to that provider’s needs. See Configuring Charge or Diagnosis Pickers for instructions on using this option. (In this option, we use the terminology “user-level” subcategories/items and “department-level” subcategories/items.) A provider can also use this same Add/Edit Charge Pickers setting via the Personal Preferences option to modify their charge Picker list, but we recommend that they instead use the option described in the next bullet.
- The second method is directly on the Charge Transaction screen, via the Settings button . This is the preferred method for providers. It allows them to make changes to their charge Picker list while they are in the process of entering a charge, as this is the most likely time that they would realize that a change is needed. (In this option the user-level items/subcategories are listed under the Favorites category, while department-level items/subcategories are listed under the Department category.) See Managing Charge Favorites and Department Categories for instructions.
Can Create/Edit User-Level Charge Macros
(Web, Apple) This setting determines whether the user is able to create their own charge macros containing multiple charges, modifiers, and/or diagnoses.- Yes: The user can create personal charge macros on the fly during charge entry in the Desktop Charge Capture application (see Creating a New Charge Macro for the Charge Favorites Category) or the Mobile Charge Capture application on Apple devices (see the Commure Pro on Apple Help. Or, they can do so on the Preferences tab of the Desktop Charge Capture application (see Configuring Charge Macros for instructions).
Although the ability to create a personal macro on the fly is not supported on Android devices, once a personal macro has been created on the web or Apple platform, it can be viewed and used on all platforms, including Android.
- No: The user is not able to create their own charge macros, and can only use department-level charge macros, or personal charge macros that their administrator has created for them.
Add/Edit User Macros
(Web, Android, Apple) This setting displays a list of charge macros that are available when the user is posting charges for a patient. A charge macro is a set of charges, modifiers, and diagnosis codes that are grouped together to make it possible to add the entire set to a charge transaction with a single tap or mouse click. Charge macros are typically defined by administrators at the department level via the setting below: Admin - Department - Charge Capture - Add/Edit Department Macros These charge macros are available to all members of the department. If a particular charge macro is not useful for an individual user, it can be hidden via this user-level setting so that it does not appear during charge entry for that user (note that department-level charge macros can only be hidden at the user level; they cannot be modified or deleted). See Hiding or Unhiding a Departmental Charge Macro for instructions. Custom charge macros can also be defined for individual users. These personal charge macros can only be seen or used by that one user. There are two ways to do this:- The first method is here via this Add/Edit User Macros setting, which is accessed via the Admin > User option. This option is typically used by administrators, when creating personal macros on behalf of a specific user. See Adding a New Charge Macro for instructions on using this option. In this option, personal charge macros are easily identifiable by the underscores ‘_’ that precede their names. A provider can also use this same Add/Edit User Macros setting via the Preferences tab to create personal macros (if their Can Create/Edit User-Level Charge Macros setting is configured to Yes), but we recommend that they instead use the option described in the next bullet.
- The second method is directly on the Charge Transaction screen on the web or Apple platforms. This feature allows the provider to create a new macro while they are in the process of entering a charge, as this is the most likely time that they would realize that one is needed. This is the preferred method for providers, but it is available only if their Can Create/Edit User-Level Charge Macros setting is configured to Yes. For instructions, see Creating a New Charge Macro for the Charge Favorites Category for the web application, or the Commure Pro on Apple Help for the Apple application.
Although the ability to create a personal macro on the Charge Transaction screen is not supported on Android devices, once a personal macro has been created on the web or Apple platform, it can be viewed and used on all platforms, including Android.
Enable Commit Option in Outbox (L 0-2 Users)
(Web) Determines whether to display a Commit button on the Charges > Outbox tab enabling users to manually commit charges in batches. Institutions that do automated batching of charges can hide this button since there is no need to commit their charges manually. Even when this preference is set to No, Level 0-2 users can still access the Outbox tab to view, preview, or print batch reports. This setting is accessible to Level 0 and Level 1 administrators, who can configure it for users with Level 0, 1, or 2 access.Commure Pro-Cerner Integration: Log DEBUG Messages
(Web) This setting is used when troubleshooting an issue with the Commure Pro-Cerner integration.- Yes: The logging level for the user is changed from the standard INFO/ERROR to a more verbose DEBUG level. This setting should only be set to Yes when the user or Commure Pro staff is attempting to reproduce an issue with the integration. Once the issue has been resolved, the setting should be set back to No.
- No: The logging level for the user is set to the standard INFO/ERROR level.
Billing Configuration
Exclude Cancelled Visits from Charge Screens
(Web) Determines whether to display data from cancelled visits or charges on the Patient List, Schedule, Patient Charge Status, and Worklist screens. When this preference is set to Yes, cancelled visits and charges are not displayed on both the Patient List, Schedule, Patient Charge Status, and Worklist screens. A No setting enables the display of both cancelled visits and charges on the Patient List, Schedule, Patient Charge Status, and Worklist screens.Cancelled Visits Are Billable
(Web, Android, Apple) This setting determines whether the selected user is granted permission to enter charges for patient visits that have been cancelled. The default value for this setting is No.This setting is only available to configure individual users when the corresponding setting is enabled at the institution level via the following setting:
Charge Entry Display Options
Show Diagnoses at Top of Charge Screen
(Web) This setting allows you to define the initial orientation of the Diagnoses section relative to the Charges section, located within the center area of the Charge Transaction screen, for this user. When set to Yes (the default), the Diagnoses section is oriented above the Charges section. When set to No, the Diagnoses section is oriented below the Charges section. Please note that the user may change the orientation of the section themselves, using the Menu > Screen Settings option, directly on the Charge Transaction screen. Changes made by the user in this manner override this setting.Show Biller Comments (Web only)
(Web) Determines whether to show or hide the Biller Comments field on the Charge Transaction screen from this user. This setting is available only to Level 0-2 users. Set this field to No for a user when you do not want biller comments to display on the user’s Charge Transaction screen.When the related Institution-level setting below is set to No, this User setting is automatically set to No and cannot be edited. When display of biller comments is disabled for an institution, display of this field cannot be enabled on a per-user basis.
Limit problems sent to Handheld based on date last used/date last billed
(Apple) Select Yes or No to indicate whether you want the number of problems (diagnoses) that are available on the Existing list on mobile devices, for each patient, to be limited to a specific number. When set to Yes, no more than the specified number of problems are available on the Existing list (used when entering charges, orders, or notes). When determining which to make available, only the most recent problems are sent, based on the date that the problem was last used on a charge transaction, order, or note. This setting does not affect the patient’s overall Problem List, which always shows all problems.Most Recent Problems
(Apple) If you set the previous preference to Yes, specify the maximum number of most recent problems (between 1 and 999) that should be available on the Existing list on mobile devices for each patient. Commure Pro recommends setting this to 30-50 problems. If the previous setting is set to No, this setting is ignored.Limit problems displayed on Web charge edit/add screen based on date last used/date last billed
(Web) Select Yes or No to indicate whether you want the number of problems (diagnoses) that are available on the Existing list, for each patient, to be limited to a specific number. When set to Yes, only the specified number of problems are available on the Existing list (used when entering charges, orders, or notes). When determining which to display, only the most recent problems are made available, based on the date that the problem was last used on a charge transaction, order, or note. This setting does not affect the Problem List module, which always shows all problems.Most Recent Problems
(Web) If you set the previous preference to Yes, specify the maximum number of most recent problems (between 1 and 999) that should be made available on the Existing list for each patient. Commure Pro recommends setting this to 30-50 problems. If the previous setting is set to No, this setting is ignored.Charge Entry Controls
Add/Edit Charge Headers
(Web, Android, Apple) Charge headers are one of the essential elements in creating a charge. A charge header is a data field that is associated with a charge transaction (in addition to the obvious fields for charge code and diagnosis). Typically, a header is associated with the entire charge transaction as a whole. However, a header can also be associated with the individual charge codes on the transaction. There is a predefined set of *standard *charge headers that are associated with every charge transaction. You cannot delete standard charge headers, but some attributes of standard headers can be modified. In addition to the standard charge headers, you can also create your own *custom *headers (new headers can only be created at the institution level). Similar to the standard headers, you can determine exactly how the custom headers should function when a user enters a new charge transaction. Typically, the default settings for Charge Headers are set at the institution level, and are explained in detail in the section entitled Add/Edit Charge Headers. When you modify a header at the institution level, those changes are effective for all users. However, you can also modify headers here at the user level in order to customize them for a specific user. Once you modify a header at the user level and save your changes, the header no longer receives any modifications that are made at the institution level. To reset a specific header for a user back to the institutional default settings, click the Reset Header button (or click the Reset All Headers button to reset all of the user’s headers). Once a header is reset, it once again starts receiving any modifications that are made at the institution level.Allow User to Add Charges for Future Dates (Web Only)
(Web) In certain cases, organizations prefer to enter charges in advance of the actual visit, to facilitate the charge entry process. For example, a billing administrator might pre-enter the charges for a surgery that is scheduled for the next day, and then hold those charges for review. Once the surgery has taken place, the provider then need only review the charges entered by the administrator, and make any necessary changes or additions. Select Yes to allow this user to enter charges for future visits in the Desktop Charge Capture application. If set to No, no charge can be entered with either a future visit (inpatient or outpatient) or future date on an open visit. A code edit will fire and display the message “The service date you have selected is not billable, please select a valid service date.”Allow Editing a Charge “n” Days after Visit End
(Web, Android, Apple) This setting determines how many days after a visit’s end date that a user can enter or edit charges for that patient visit.Allow Setting Service Date “n” Days before Today
(Web, Android, Apple) This setting determines how many days before today a Level 3 user can specify a service date for a patient. The service date appears as the Date field when viewing the details of a transaction. Level 1 and 2 users receive a warning message when they back-date a charge farther back than this setting indicates, but they are still allowed to save the charge or send it to the Outbox.Default to Today for Service Date (Inpatient Only)
(Web, Apple) Determines whether to populate the Service Date field when creating or copying charge transactions for an inpatient visit. When creating a new charge, this setting is applied only if the user clicks a general Add Charge button/option that does not concretely identify a specific visit date. When this preference is set to:- Yes: When creating or copying a charge transaction for an inpatient visit, the Service Date field uses the default value defined for the inpatient visit type, based on the following Commure Pro Visit Type setting: Charge Capture: Date of Service Default. The possible values are Today, Start Date, or None (the default).
- No: The Service Date field is blank by default and users must provide a date for each newly created or copied charge transaction entered against an inpatient visit.
On Apple devices, only the No option is respected. When set to Yes, Apple devices use different logic for defaulting a service date.
Enable Multi-Day Charge Entry
(Web, Apple) This setting determines whether the user is able to apply the charges they are entering on the Charge Transaction screen to multiple service dates. When set to Yes, the user is able to enter multiple dates or date ranges for the charge transaction. The service dates can be consecutive, or not, as appropriate for the charges they are entering. The user cannot select a date or date range that falls outside of the billable window for the visit. When set to No, the user is able to enter only a single service date for the charge transaction.Users are allowed to enter multi-day charges only on Commure Pro Visit Types that are configured to allow it. See Commure Pro Visit Types for more information.
Only Show Errors in Multi-Day Confirmation Screen (Web Only)
(Web) This setting is available only if Enable Multi-Day Charge Entry is set to Yes. When a user enters charges for multiple days, this setting determines the circumstances under which the Multi-Day Confirmation Screen is shown. When set to Yes, the Multi-Day Confirmation Screen is displayed only if there are errors in one or more of the submitted charge transactions. When set to No, the Multi-Day Confirmation Screen is always shown to the user.Although multi-day charges can be entered on both the web and handheld platforms, this setting for the confirmation screen applies only to the web application. On handheld devices, the confirmation screen is always displayed.
Placement of Custom Workflows Option on Charge Transaction Screen
(Web) This setting determines where and how the Custom Workflows option is displayed on the Charge Transaction screen for this user.- As a Folder Under Charges Section: The Custom Workflows option shows as the first folder in the center CHARGES section on the Charge Transaction screen. The user also has access to the Favorites and Department folders in this section.
- As a Replacement for Charges Section: The Custom Workflows option entirely replaces the CHARGES section in the center of the Charge Transaction screen. The user does not have access to the Favorites and Department folders and can only enter charges via a Custom Workflows screen. Please note that if you select this option, it means that the user will not be able to enter charges via the Batch Charge Entry option, as Custom Workflows are not supported there.
Prompt to Edit Transaction if Visit/Date is Coded
(Web) This setting determines whether the user will see a warning message when they attempt to create a new charge transaction for a visit date that already has one or more existing charge transactions.-
If set to Yes, prompt to create new or edit, and the current user has the appropriate permissions to edit any of the existing transactions, then the user is warned that other transactions for this date already exist and is offered choices to either edit the existing transactions or create a new one
When confirming whether any of the existing transactions may be edited by the current user, all of the standard editing rules are applied, briefly summarized here:
- The user must be able to view the existing transaction, based on their Set Patient List Charge View Access or Set Charge Desktop View Access settings.
- If the existing transaction was created by a different user, this user’s Level 2 / 3: Can Edit Other Users’ Charges setting must be set to Yes.
- If the existing transaction is in the Outbox, the user’s Allow User to Edit Charges in Outbox setting must be set to Yes.
- Today’s date cannot exceed the Allow Editing a Charge “n” Days after Visit End setting in the user’s profile.
- If set to No, create new, or if the current user does not have the appropriate permissions to edit any of the existing transactions, the user is not warned of the other existing transactions and always creates a new one. You can determine the types of visits for which the user will see the above prompt, using the following Commure Pro Visit Type setting:Charge Capture: Notify on Add Charge if Existing Transaction for Visit Date. The notification only appears for the particular visit types that you configure. See Commure Pro Visit Types for more information.
Allow User to Edit Charges in Outbox
(Web, Android, Apple) This setting determines whether the user can edit charges that are in the Outbox. Set to Yes to enable the user to edit charges that have an Outbox status. When set to Yes for a provider, the provider is able to make corrections or additions to charges without any intervention from billing administrators. Note that if the user makes a change that causes the charge to no longer be error-free, the transaction is sent back to the Holding Bin for administrator review. Set to No to disable this feature. This means that in order to edit a transaction that is in the Outbox, the user must request that an administrator first send the transaction back to the Holding Bin.Allow User to Save Transactions as Drafts
(Web, Android, Apple) Determines whether this user has permission to save charges as drafts when adding, copying, or editing charge transactions. When this preference is set to:- Yes: The option to save a charge as a draft is enabled on the Charge Transaction screen.
- No: The option to save a charge as a draft is visible but is disabled. If charges submitted by this user are sent to the Outbox with code edits, an error message informs the user of the code edits, and enables the user to cancel the submission or continue editing the charge.
Allow User to Save Transactions with Forced Code Edits as Draft
(Web, Android, Apple) This setting determines whether the user can save a charge transaction as a draft, if the transaction has a forced code edit and the user has not corrected the issue that caused the code edit to fire. Please note that the Allow User to Save Transactions as Drafts setting, must be also set to Yes.- Yes: The user is able to save the transaction as a draft, even if they have not resolved the issue. In this case, the user is presented with options to either correct the errors (and then submit again) or save the transaction as a draft.
- No: The user cannot save the transaction at all, unless they correct the issue. In this case, the user is presented with options either correct the errors (and then submit again), or discard the transaction.
On handheld devices, this setting works as described above as long as the device has an active connection to the server. When disconnected, code edits do not fire. In a disconnected state, the user’s ability to save as draft or as completed depends on the following setting: Allow Handheld User to Save when Disconnected.
Extension Period before Draft Expires
(Web, Android, Apple) This setting specifies the number of days after which draft charge transactions, that were created by this user, should expire. The default value is 2 (days). Please note that there is a corresponding Institution level setting for the extension period: Admin - Institution - Charge Capture - Extension Period before Draft Expires If the Institution and User settings have different values, this User setting overrides the Institution setting. The extension period is defined relative to the service date of the charge, not the creation date of the charge. Once a draft expires, its charge status automatically changes to Holding Bin (if created on the Desktop Charge Capture application) or Holding Bin (HH) (if created on a handheld device), and it is then treated as any other charge in the Holding Bin. In the Holding Bin, the transaction is flagged with an error type of Expired Draft.Set Min # CPTs per Transaction
(Web, Android, Apple) This setting determines the minimum number of charges, between 1 and 15, that are required for each transaction. A transaction that doesn’t have the minimum required charges can only be saved as a Draft.Set Max # CPTs per Transaction or Charge Macro
(Web, Android, Apple) This setting determines the maximum the number of charges that this user can add to a Charge Macro, when defining the macro. It also determines the maximum number of charges, between 1 and 99, that this user can enter on a charge transaction. During charge entry, if the number of charges in the charge transaction exceeds this number, the transaction can only be saved as a Draft. The default setting is 10 charges per transaction or Charge Macro.Set Max # Modifiers per CPT
(Web, Android, Apple) This setting determines the maximum number of modifiers, between 1 and 15, that can be assigned to a charge.Configure GC Modifier
(Web, Android, Apple) This setting determines whether a GC modifier (for resident/teaching physician service) is automatically added each time that this user adds a charge, or whether you want to prompt the user to select GC modifiers as needed. Note that the user can always manually add or remove GC modifiers, regardless of how this setting is configured. Admin - Institution - Charge Capture - CPTs Exempt from GC Modifier The Configure GC Modifier setting has the following options:- Yes: On both the handheld and web platforms, a GC modifier is automatically added each time that this provider adds a new charge or copies a charge. For example, if the provider always assumes the teaching physician role, you might select this option so that the GC modifier is always added automatically to every charge for the provider.
- No (the default value): On both the handheld and web platforms, GC modifiers are not automatically added when this provider adds or copies charges. Select this option if the provider does not serve in the capacity of teaching physician or if you want the provider to select the GC modifiers manually as needed.
- Prompt-Always: On both handheld and web platforms, a dialog box displays so that the provider can respond Yes or No to enter a GC modifier, for every charge on every transaction. Select this option if the provider assumes the teaching physician role in some scenarios, but not on a consistent basis, and you wish them to specifically designate whether the GC modifier is appropriate for each and every charge code.
- Prompt-with Options (Web only): Select this option if this provider assumes the teaching physician role in some scenarios, but not on a consistent basis, and you wish the provider to have the control to turn the prompt on or off from the add/edit charge screen. This option functions differently on the handheld and web platforms.
- On handheld devices, this acts the same as if set to Prompt-Always.
- On the web, an option is added to the Menu > Screen Settings option on the Charge Transaction screen, called GC Modifiers. The user can use this option to determine how GC modifiers behave. They have three choices (the default setting is Prompt):
- None: A GC modifier is not automatically added to any charges that the user enters.
- Auto-Add: A GC modifier is automatically added to every charge that the user enters.
- Prompt: A dialog box displays so that the user can respond Yes or No to enter a GC modifier, for every charge that they enter. That same dialog box also has a Remember my selection and do not prompt me again checkbox. If the user realizes that several of their upcoming charges will all require the same answer (either Yes or No), they can check the “remember my selection” box. Their Yes or No response is then retained on all charges entered from that point forward, for the current and all subsequent transactions, and the GC modifier is either entered automatically or not, based on that response. It also sets the Menu > Screen Settings > GC Modifier option to None (if they answered No and “remember my selection”) or to Auto-Add (if they answered Yes and “remember my selection”). If the user wants to start being prompted again at a later time, they can reset the Menu > Screen Settings > GC Modifier option to Prompt.
Select Financial Class
(Web, Android, Apple) This setting is enabled only when Configure GC Modifier is set to either Yes, Prompt-Always, or Prompt-with Options. When one or more financial classes are selected via this setting, the Configure GC Modifier setting is applied only when the patient’s visit has that financial class associated with it. For example, if Configure GC Modifier is set to Yes, and Medicare and Medicaid are selected as the Financial Classes, then a GC modifier is added automatically only when the patient visit has either Medicare or Medicaid on it. If you do not select any financial classes via this setting, then the Configure GC Modifier setting is applied to all charges entered by the user, regardless of the financial class listed on the patient’s visit.Allow Free Text Charges
(Web, Android, Apple) This setting determines whether the user can enter a charge using free text. Choose Yes to give the user this capability; choose No and force the user to select a charge from a predefined list of charges.Allow Free Text Diagnoses
(Web, Android, Apple) This setting determines whether the user can enter diagnoses using free text on charge transaction. Choose Yes to give the user this capability; choose No and force the user to select diagnoses from a predefined list of diagnoses. If you choose Yes, the user must enter some text in the diagnosis; he will not be able to save a diagnosis with the description left blank.Prompt User to Add All Existing Diagnoses
(Web) This setting determines whether users are given the option to add all existing diagnoses to a charge on the Charge Transaction screen. When this preference is enabled for a user, an Add all link is present in the Existing (Diagnoses) heading, located in the center area of the screen.Commure Pro-Cerner Integration: Default Ranked Diagnoses to Multi-Day Visits
(Web) If your organization has implemented the Commure Pro-Cerner Charge Capture app, then your users can click a link in the Cerner® application to access the Commure Pro Charge Transaction screen in order to create or edit a charge. When this user is creating a new charge for a multi-day visit, this setting determines whether diagnoses are retrieved from Cerner and automatically added to the Selected Codes section on the Charge Transaction screen.- Yes (the default): Diagnoses are retrieved from Cerner and automatically added to the Selected Codes section, when creating a new charge transaction for a multi-day visit. There is specific logic for which diagnoses are retrieved, see How Diagnosis Information Flows Between Commure Pro and Cerner for more information.
- No: Diagnoses are not retrieved from Cerner when creating a new charge transaction for a multi-day visit. Instead, the settings below determine whether diagnoses are copied from elsewhere: Admin - User - Charge Capture - Copy Diagnoses on New Transactions
Commure Pro-Cerner Integration: Default All Diagnoses to Single-Day Visits
(Web) If your organization has implemented the Commure Pro-Cerner Charge Capture app, then your users can click a link in the Cerner® application to access the Commure Pro Charge Transaction screen in order to create or edit a charge. When this user is creating a new charge for a single-day visit, this setting determines whether diagnoses are retrieved from Cerner and automatically added to the Selected Codes section on the Charge Transaction screen.- Yes (the default): Diagnoses are retrieved from Cerner and automatically added to the Selected Codes section, when creating a new charge transaction for a single-day visit. All diagnoses associated with the visit are retrieved. (See How Diagnosis Information Flows Between Commure Pro and Cerner for more information.)
- No: Diagnoses are not retrieved from Cerner when creating a new charge transaction for a single-day visit. Instead, the settings below determine whether diagnoses are copied from elsewhere: Admin - User - Charge Capture - Copy Diagnoses on New Transactions
Display Error Message for Missing NDC Code or Quantity
(Web) This setting determines whether this user sees an error message if they do not complete both the NDC and Qty (quantity) fields for a charge code that is mapped to one or more NDC codes. For example, you might want the error message to appear for administrators and nurses, but not for physicians. See Configuring User Settings for NDC Collection in the chapter entitled Configuring the Selection of NDC Codes During Charge Capture for more information.Charge Transaction Copy Options
Copy Diagnoses on New Transactions
(Web, Android, Apple) This setting determines whether the diagnoses from a previous transaction for a given patient are automatically copied forward into the user’s next transaction for the same patient. This includes any diagnoses that were auto-added to previous transactions via the Automated Code Entry feature (see Configuring User Settings for Automated Code Entry). Your options are:- Yes: The diagnoses from a previous charge transaction for the selected patient are always copied when creating a new charge transaction for the same patient.
- No (the default): The diagnoses from previous charge transactions are never copied when creating new charge transactions.
- Prompt User: A prompt is displayed to the user, asking if they want to copy the diagnoses from a previous charge transaction for the selected patient to the new charge transaction for the same patient.
If the NoteWriter application is implemented, the choices for the Copy Diagnoses on New Transactions setting differ from those listed above. Please see *Configuring Charge Capture Settings for a User *for more information.
P opulate Diagnoses From
(Web, Android, Apple) Use this setting to specify from which transaction the diagnoses should be copied:- User’s Charges Only (the default): Copies the diagnoses from the charge transaction with the most recent service date, that was entered by this user, for the current patient. On the web, this would always be the most recent charge transaction entered by the user. On the handheld, this would be the most recent charge transaction entered by the user, if it is available on their handheld. See the following settings for more information about the charge transactions that are available on a handheld device:
- Last Available Charge: Copies the diagnoses from the charge transaction with the most recent service date, that was entered by this user or another, for the current patient. On the web, this would be the most recent charge transaction that the user has permission view (see Set Patient List Charge View Access) and could include charge transactions outside of the user’s department. On the handheld, this would be the most recent charge transaction that is available on the user’s handheld.
- Department’s Charges Only: Copies the diagnoses from the charge transaction with the most recent service date, that was entered by any user from within the current user’s department, for the current patient. This would always be the most recent charge transaction from within the user’s department. On the handheld, this would be the most recent charge transaction within the user’s department that is available on the user’s handheld.
Copy Diagnoses on Copied Transactions
(Web, Apple) When a user copies an existing charge transaction in order to create a new charge transaction with similar charges (for a different service date), this setting determines whether the diagnoses from the source transaction are copied as well (including any diagnoses that were auto-added to the source transaction via the Automated Code Entry feature; see Configuring User Settings for Automated Code Entry). Your options are:- Choose Yes to always copy the source transaction’s diagnoses to the new charge transaction.
- Choose No to never copy the source transaction’s diagnoses to the new charge transaction.
- Choose Prompt User to display a prompt asking the user if they want to copy the source transaction’s diagnoses to the new charge transaction.
Copy Modifiers on Copied Transactions
(Web, Android, Apple) When a user copies an existing charge transaction in order to create a new charge transaction with similar charges (for a different service date), this setting determines whether the modifiers from the source transaction are copied as well (including any modifiers that were auto-added to the source transaction via the Automated Code Entry feature; see Configuring User Settings for Automated Code Entry). Choose Yes to include the modifiers; choose No to copy only the charges.Copy Comments and Biller Comments on Copied Transactions
(Web, Android, Apple) This setting determines whether the comments associated with a charge transaction are copied forward when this user copies a charge transaction as the basis for a new transaction. This setting affects the web and handheld platforms differently.- Yes:
- When copying a charge transaction on the web platform, both provider and biller comments are copied forward to the new transaction.
- When copying a charge transaction on the handheld platforms, only provider comments are copied forward to the new transaction.
- No:
- When copying a charge transaction on the web or handheld platforms, no comments are copied forward to the new transaction.
Exclude Free Text on Copied Transactions
(Web, Android, Apple) When you enable this setting, any free text diagnoses or charges that providers create on a charge transaction are excluded when this user copies a charge transaction as the basis for a new transaction. This flexibility allows you the option of limiting free text entries to a particular transaction so that they are not used repeatedly, causing billers to have to reconcile them on multiple transactions. The default is Yes.Exclude Flagged Diagnoses/Charges on Copied Transactions
(Web, Android, Apple) This setting, when used in conjunction with charge or diagnosis code definitions, enables institution-level administrators to define a subset of diagnosis or charge codes to be exempt from being copied forward when this user copies a charge transaction as the basis for a new transaction. See the Exclude Flag setting for charge codes in Update Charges/Modifiers, and for diagnosis codes in Nomenclature Vocabularies.Code Exclusions
Exclude Free Text on Existing List
(Web, Android, Apple) This setting determines whether to include free text diagnoses on the patient’s Existing list when entering a diagnosis on the Charge Transaction screen, or on the A/P tab in NoteWriter. (This setting does not affect the Existing list when entering orders.)- Yes (the default): The Existing option on the Charge Transaction screen or on the A/P tab in NoteWriter, which pulls diagnoses from the patient’s Problem List, does not include any free text diagnoses from that list. An additional effect is that once this setting is set to Yes, when this user enters a free text diagnosis on a charge transaction, it is saved on the charge transaction, but it is not saved to the patient’s Problem List. However, please note that any free text entries that had been previously added to the patient’s Problem List are not removed.
- No: The Existing option includes free text diagnoses from the patient’s Problem List.
Exclude Flagged Diagnoses on Existing List
(Web, Android, Apple) This setting, when used in conjunction with diagnosis code definitions, enables institution-level administrators to define a subset of diagnosis codes that are excluded from the list of codes displayed on a patient’s Existing list. See the Exclude Flag setting for diagnosis codes in Nomenclature Vocabularies.Hide Excluded Diagnoses/Charges from Search Results
(Web, Android, Apple) This setting allows administrators to hide specific charge and diagnosis codes from a user when searching for those codes during charge entry or when adding a problem to a patient. The default is Yes. For example, administrators might create “dummy” codes that should only be used under special circumstances (such as for technical billing), and only by certain users. Administrators can enable the Exclude Flag on these codes in the charge or diagnosis code definitions (for charges see Update Charges/Modifiers and for diagnoses see Nomenclature Vocabularies). Then, when this user preference is set to Yes, the “dummy” codes are hidden from the user’s search results.Held for Review Options
Reviewing User
(Web) This setting determines whether the user is authorized to mark charge transactions as reviewed. If set to Yes, the user can resolve a transaction that is held for review, as long as they also have one or more of the Roles that are designated as the Resolve Role for the reason that the transaction was held for review. Please note that this setting is only one of several necessary to configure the Hold for Review workflow; see Configuring the Hold for Review Workflow for complete configuration instructions.State of Hold for Review Checkbox
(Web, Android, Apple) When this user enters or edits a charge transaction, this setting determines whether the user can hold it for review using the Review Requested reason, as well as the initial state of that reason (checked or unchecked) in the Hold for Review drop-down list on the Charge Transaction screen. This setting is only one of several necessary to configure the Hold for Review workflow; see Configuring the Hold for Review Workflow for complete configuration instructions.- Show Checked: The user can hold a charge transaction for review using the Review Requested reason, and it is initially checked by default in the Hold for Review drop-down list. However, the user can uncheck the reason prior to submitting a charge transaction if they feel the transaction does not need to be reviewed after all.
- Show Unchecked: The user can hold a charge transaction for review using the Review Requested reason, and it is initially unchecked by default in the Hold for Review drop-down list. If the user thinks a charge transaction should be held for review, they can select this reason.
- Hide, Checked: The Review Requested reason is not visible to the user in the Hold for Review drop-down list, but it is checked behind the scenes and the user is not able to uncheck it. As a result, all charges entered by this user are held using the Review Requested reason.
- Hide, Unchecked: The user cannot hold a charge transaction for review using the Review Requested reason (the reason is not available under the Hold for Review drop-down list). If you want to disable the Review Requested reason system-wide, then all users should be set to Hide Unchecked. If multiple users are involved in the creation/editing of a transaction, and they have differing values for this setting, the rules below are applied. These rules are in place to accommodate scenarios where multiple users (such as nurses or residents) are contributing charges to a transaction, and some of the charges need to be reviewed by an attending physician. For example, if a transaction includes any charge by a resident, it should always be reviewed by the resident’s preceptor.
- When a user opens the transaction for editing, if the Review Requested reason in the Hold for Review drop-down list was left unchecked by the previous user, the application checks the Review Requested reason if the editing user is set to “Show Checked” (or it is checked behind the scenes if the editing user is set to “Hide Checked”).
- When a user opens the transaction for editing, if the Review Requested reason in the Hold for Review drop-down list was checked by the previous user, the reason remains checked, even if the editing user is set to “Show Unchecked” or “Hide, Unchecked.”
Hold Charge for Review when Comment Entered
(Web, Android, Apple) When this user enters a comment on a charge transaction while entering or editing it, this setting determines whether the charge is held for review using the Comment Review reason. Please note that this setting is only one of several necessary to configure the Hold for Review workflow; see Configuring the Hold for Review Workflow for complete configuration instructions.- Yes: When the user enters a comment on a charge transaction, the transaction is automatically held for review using the Comment Review reason (the reason is checked behind the scenes).
- Prompt: When the user enters a comment on a charge transaction, a prompt is displayed asking the user if they want to hold the transaction for review. If they respond Yes, it is held for review using the Comment Review reason (the reason is checked behind the scenes). If they respond No, it is not held for review (the Comment Review reason remains unchecked).
- No: When the user enters a comment, the transaction is never held for review using the Comment Review reason. If you want to disable the Comment Review reason system-wide, then all users should be set to No. Please note that the Comment Review reason is not listed in the Hold for Review drop-down on the Charge Transaction screen when initially creating charge—it is assigned behind the scenes and is only displayed in the drop-down when later editing or reviewing the charge transaction. Furthermore, if the Comment Review reason is the only Hold Reason that is available to the user, then the Hold for Review drop-down is not displayed on the Charge Transaction screen at all.
Hold Autonomously Coded Charge for Review
(Web) When Autonomous Coding is enabled for this user, this setting determines whether autonomously coded charge transactions are automatically held for review before being submitted to the Outbox.- Yes: Autonomously coded charges are placed in the Holding Bin for the provider to review before submission. This allows providers to verify AI-generated charge codes before they are billed.
- No: Autonomously coded charges are submitted directly without being held for review.
- Prompt User: The user is prompted each time an autonomously coded charge is generated and can choose whether to hold it for review.
Charge Transaction Routing
The following settings determine what types of charges are kept in the Holding Bin for review, instead of being automatically submitted to the Outbox for batch billing:- Send All Transactions to Holding Bin
- Send Transactions with Validity Errors or Non-Forced Code Edits to Holding Bin
- Send Transactions with Free Text to Holding Bin
- Send Transactions with Comments to Holding Bin
- Send Imported Transactions to Holding Bin There is a corresponding series of these settings at the department level that determines which charges are sent to the Holding Bin for each department (see Charge Entry Controls). Here at the user level, you can override the department settings for a particular user so that more charges are sent to the Holding Bin for that user. For example, if the department is configured to Send Transactions with Validity Errors or Non-Forced Code Edits to Holding Bin, and the user is configured to Send All Transactions to Holding Bin, then all charges for that user are sent to the Holding Bin. In contrast, a particular user cannot send less charges than defined at the department level. For example, if the department is set to Send All Transactions to Holding Bin, all charges are sent to the Holding Bin for all users in that department, even though a particular user may have only Send Transactions with Validity Errors or Non-Forced Code Edits to Holding Bin set to Yes.
If your organization has implemented Automated Code Entry, all charge transactions that have auto-added codes are always sent to the Holding Bin, regardless of these settings. See Auto-Added Code Entry.
Send All Transactions to Holding Bin
(Web, Android, Apple) When set to Yes, all charge transactions are sent to the Holding Bin, including those with no errors. If this option is set to Yes, the follow settings are also automatically set to Yes and cannot be changed to No (unless this setting is changed to No):- Send Transactions with Validity Errors or Non-Forced Code Edits to Holding Bin
- Send Transactions with Free Text to Holding Bin
- Send Transactions with Comments to Holding Bin
- Send Imported Transactions to Holding Bin
Send Transactions with Validity Errors or Non-Forced Code Edits to Holding Bin
(Note: All L 0-2 users can override Non-Forced Code Edits and send them to the outbox.) (Web, Android, Apple) When set to Yes, any charges containing Validity Errors or Non-Forced Code Edits are sent to the Holding Bin.Send Transactions with Free Text to Holding Bin
(Web, Android, Apple) When set to Yes, any charges with certain fields that are created with free text (not selected from a predefined list), such as provider headers, diagnoses, and charges are sent to the Holding Bin. This option does not apply to headers that are free-text by design.Send Transactions with Comments to Holding Bin
(Note: All L 0-2 users can override transactions with comments and send them to the Outbox.) (Web, Android, Apple) When set to Yes, all charges with comments are sent to the Holding Bin for administrative review. Disable this setting to have all charges with comments sent directly to the Outbox.Send Imported Transactions to Holding Bin
(Web) When set to Yes, charges that are imported via an inbound charge interface or a CSV file are sent to the Holding Bin for administrative review. These charges are assigned an error status of Imported Charge. This error status is purely informational and does not prevent an administrator from sending the charge to the Outbox after they have reviewed it. Disable this setting to have imported charges sent directly to the Outbox (also with an Imported Charge error status). Please note that if the Send Transactions with Validity Errors or Non-Forced Code Edits to Holding Bin setting above is enabled, then imported charges with errors will go to the Holding Bin, even if this setting (Send Imported Transactions to Holding Bin) is disabled. For more information about importing charges, see Importing Charges from Third Party Systems.Allow User to Override DOS Validity Errors and Send to Outbox (L 0-2)
(Web) Determines whether a Level 0/1/2 user is granted permission to override validity errors when they attempt to either submit or send to the Outbox a charge transaction that has and invalid Date of Service (DOS). Administrators (Level 0 and 1 only) can selectively grant this permission to other Level 0/1/2 administrators. When the selected user enters or edits a charge transaction that triggers a DOS validity error and this preference is set to:- Yes (the default): A message displays indicating that the charge transaction has an error. The user may either cancel, or proceed with submitting the charge or sending it to the Outbox.
- No: A message displays indicating that the charge transaction has an error, and the user is prevented from submitting the transaction or sending it to the Outbox. Instead, the charge is discarded (in the case of new charges) or remains saved as it was before (in the case of edited charges), until the user addresses the critical error(s).
Allow User to Override Free Text Errors and Send to Outbox (L 0-2)
(Web) This setting is visible only for Level 0/1/2 users. It determines whether this user can send charge transactions with free text errors (such as free text provider names, free text charges, free text diagnoses, or free text NDC codes) from the Holding Bin to the Outbox, without first resolving the free text error (i.e., without replacing the free text entry with a valid entry from a reference list or the master lists of charge or diagnosis codes). Please note that there is a corresponding Institution level setting for this permission: Admin - Institution - Charge Capture - Allow Users to Send Free Text Errors to Outbox (L 0-2) If the Institution and User settings have different values, this User setting overrides the Institution setting.Allow User to Override Missing CDM Errors and Send to Outbox (L 0-2)
(Web) Determines whether a Level 0/1/2 user is granted permission to override a Missing Technical CDM or Missing Professional CDM error when they attempt to send a charge transaction that has one of these errors to the Outbox. Administrators (Level 0 and 1 only) can selectively grant this permission to other Level 0/1/2 administrators. When the selected user edits a charge transaction that triggers this error and this preference is set to:- Yes (the default): A message displays indicating that the charge transaction has an error. The user may either cancel or proceed with sending it to the Outbox.
- No: A message displays indicating that the charge transaction has an error, and the user is prevented from sending it to the Outbox. Instead, the charge remains saved as it was before, until the error is resolved (by an administrator adding the appropriate CPT-to-CDM mapping). For more information, see Configuring User Settings for a CDM.
Show Missing CDM Errors
(Web) Determines whether the user is able to see Missing Professional CDM and Missing Technical CDM errors on the Charge Transaction screen or any charge report. Typically you would show the errors to Level 0/1/2 users, who need to address and resolve them, but hide the errors from Level 3 providers, since these users cannot resolve them in any way. See Implementing a Charge Data Master (CDM) for more information.- Yes (the default): If a transaction has a missing CDM error associated with it, the user will see it when editing a charge transaction or when viewing the charge transaction on any charge report.
- No: If a transaction has a missing CDM error associated with it, the user will not see it when editing a charge transaction or when viewing the charge transaction on any charge report. When using the Error Type filter on a report, if the user selects the “Missing Professional CDM” or “Missing Technical CDM” options, the report will find the transaction, but the error will be listed as None. If a charge transaction has other errors in addition to the missing CDM errors, only those additional errors are visible.
Handheld
Show Charge Transactions within the Last “n” Days on Handheld (1 - 365)
(Android, Apple) This number specifies the number of days’ worth of charge data the user may view on their handheld device. Commure Pro recommends 30 days or less for optimal handheld performance (the default is 5).Max # Charge Transactions Allowed on Handheld
(Android, Apple) This setting limits the number of transactions that can be downloaded per patient to the handheld device. Select a value from 5 to 30 from the drop-down list (the default is 10).Show Charge Transactions Within User’s Department on Handheld
(Android, Apple) Set this to No to allow the user to view only charges that he himself has entered. Set it to Yes (the default) to allow the user to view all charges entered for billing areas associated with the department(s) to which he belongs.Max # Days for Charge Status Icons on Handheld
(Android, Apple) This setting specifies the number days of charge status icons to display on the Patient List on handheld devices.Allow Handheld User to Save when Disconnected
(Android, Apple) This setting determines how the user is allowed save charge transactions on their handheld device when it is not connected to the server. If set to Yes, the user is allowed to save charge transactions as either completed or draft. If set to No, the user can save transactions only as drafts. Once the device reconnects to the server, any accumulated transactions are submitted at that time.Code edits are applied and reflected in the Holding Bin for all charges that are saved in the disconnected mode and later submitted.
This setting has no function.
Charge Reporting Options
Set Patient List Charge View Access
(Web) This setting determines whether the user can view charges entered by other providers on the Patient List, Patient Search, and Patient Charge Status tabs of the web application, and if so, which charges they can view in those options. This setting also determines which not coded visits the user can view.-
None: the user does not have access to the following displays containing charge data and not coded visit information:
- The Charges display item on the Patient List tab
-
The Charges display item found on the standard Patient Data Display (the Patient Data Display can be accessed by clicking the Details button in a variety of options)
- The Patient Charge Status tab (a sub-tab under the Charges tab)
- No Other Charges: The user can view only charges that he himself has entered, or on which he is listed as the billing provider.
- Within the User’s Department: The user can view charges that have billing areas within his assigned departments (and the Exclude from User/Department Security Checks setting for that department is false).
- All Charges: The user can view all charges in all departments. This includes charges in departments where the user is not a member. The only exception is departments with a protected status: the user cannot see charges in departments with a protected status unless they are in fact a member of the protected department. See Protected Status Department for more information. This setting also indirectly affects which charges the user can edit (see Set Charge Desktop View Access for more information).
Set Charge Desktop View Access
(Web) This setting determines what charges a user can view in the Schedule tab and whether the user has access to the Charges tab, and if so, which charges they can view on it. For the Charges tab, if any value other than None is set, this setting provides users of all levels with access to the Worklist and Search sub-tabs. It also provides Level 1 and Level 2 users with access to the Charge Summary, Holding Bin, and Outbox sub-tabs. And finally, it may also provide access to these additional sub-tabs:- To the Batch Charge Entry sub-tab if their Enable Batch Entry preference is set to allow it.
- To the Patient Charge Status sub-tab, if their Set Patient List Charge View Access is set to allow it.
- To the PQRS Reporting sub-tab, if access has been granted via an XML customization.
- To the Missing Charges sub-tab, although this report can be hidden via an XML customization, if necessary.
- To the Charge-Note Reconciliation sub-tab, if their Enable Charge-Note Reconciliation preference is set to allow it.
- To the RVU sub-tab if their Set RVU Report Access is set to allow it.
- To the Charge Reconciliation sub-tab, if access has been granted via an XML customization. The available options for this setting are:
- None: The user does not have access to the Charges tab, and no charges are visible for any visit in the Schedule tab
- No Other Charges: For the Charges tab, the user has access to his own charges, to Not Coded visits for which he is the scheduled provider, and to appointments scheduled for services that are associated with the departments to which the user has access. For the Schedule tab, the user has access to all charges where the user is the billing provider (for charges that the user has created, or charges that another user has created where they are the billing provider), and all charges created by the user where the user is not the billing provider for the visits displayed on the schedule.
- Within the User’s Department: The user has access to charges that have billing areas within his assigned departments, to Not Coded visits for which he is the scheduled provider, and any visits for which the scheduled provider has access to departments in common with him (and for which the Exclude from User/Department Security Checks setting is false). Users are not required to be a provider to see all charges within their department(s). Users can see all charges for which they are the billing provider, as well as charges from all billing providers that have been deleted.
- All Charges: The user has access to all charges in all departments. This includes charges in departments where the user is not a member. The only exception is departments with a protected status: the user cannot see charges in departments with a protected status unless they are in fact a member of the protected department. See Protected Status Department for more information. In addition, when entering charges on the Charge Transaction screen, on the web platform only, the user can select any billing area (except those billing areas in a department with a protected status to which the user does not belong, or those for which the Exclude from User/Department Security Checks setting is true).
| Items Shown in Charge Desktop | Charge Desktop View Access => No Other Charges | Charge Desktop View Access => Within the User’s Department | Charge Desktop View Access => All Charges |
|---|---|---|---|
| Providers drop-down lists | The Providers drop-down list is hidden | Providers who share a department in common with the user (and the Exclude from User/Department Security Checks setting for the department is false) | All providers |
| Services drop-down lists | Services that are associated with the Departments to which the user has access | Services that are associated with the Departments to which the user has access | All services |
| Departments drop-down lists | Departments to which the user has access | Departments to which the user has access | All departments |
| Facility or Location drop-down lists | Facilities/Locations that are associated with the Departments to which the user has access | Facilities/Locations that are associated with the Departments to which the user has access | All Facilities/Locations |
| Not Coded Visits | Not Coded visits for which the user is the scheduled provider. Any visits scheduled for Services that are associated with the Departments to which the user has access | Not Coded visits for which the user is the scheduled provider. Any visits scheduled for Services that are associated with the Departments to which the user has access. Any visits for which the scheduled provider has access to a department in common with the user (and the Exclude from User/Department Security Checks setting for the department is false) | All Not Coded visits |
| My Charges Only checkbox displayed in Holding Bin, Worklist, and Search tabs? | No | Yes (if the Can add charges on the web setting is also set to Yes) | Yes (if the Can add charges on the web setting is also set to Yes) |
- Level 1 administrators can edit any charge in the system.
- Level 2 or 3 users who also have the user-level parameter Level 2 / 3: Can Edit Other Users’ Charges set to Yes, can edit those charges that they can view (based on their Patient List Charge View Access and Charge Desktop View Access).
- Level 2 or 3 users who have the user-level parameter Level 2 / 3: Can Edit Other Users’ Charges set to No, can only edit those charges they have posted themselves, or those charges for which they are the billing provider.
Set RVU Report Access
(Web) This setting determines whether a user can access the RVU sub-tab (under the Charges tab), and if so, the amount of information that they can see on it. The RVU tab displays summarized RVU (Relative Value Unit) information in both table and graph formats. When this preference is set to:- None (the default): The user does not have access to the RVU tab.
- User and Dept Average: The user has access to the RVU tab and can view RVU information for themselves and the department(s) to which they belong.
- User, Providers in Dept, and Dept Average: The user has access to the RVU tab and can view RVU information for themselves, the department(s) to which they belong, and the providers who belong to those same department(s).
The user must also have access to the Charges tab in general, which is granted via the Set Charge Desktop View Access setting.
Enable Charge-Note Reconciliation
(Web) This setting determines whether a user can access the Charge-Note Reconciliation sub-tab (under the Charges tab). The Charge-Note Reconciliation is used to identify service dates, based on a user-defined set of criteria, for which charges and/or clinical notes have not yet been entered, and then allows users to enter charges and notes in cases where they are missing. When set to Yes, the user can access the tab. When set to No, the user cannot. Please note the following additional requirements for this option:- The user’s Can View Clinical Results (Web Only) setting must also be enabled in order to use the Charge-Note Reconciliation.
- The user’s Set Charge Desktop View Access setting determines the amount of information that the user can see on the Charge-Note Reconciliation, once it is enabled via this setting. See also Limit Charge-Note Reconciliation to User’s Departments, which can override the Set Charge Desktop View Access setting in certain situations.
- The types of clinical notes that can be viewed on the Charge-Note Reconciliation must be configured via the Define Note Types for Charge-Note Reconciliation institution setting.
Limit Charge-Note Reconciliation to User’s Departments
(Web) The amount of charge information that a user can view on the Charge-Note Reconciliation report is based on their Set Charge Desktop View Access setting. However, in organizations with a large amount of data, the performance of the report might be adversely affected for a given user if their Set Charge Desktop View Access setting is configured to “All Charges.” For these users, you can improve the performance of this report by configuring this setting to Yes, which effectively reduces the amount of data retrieved by this report to just those departments to which the user belongs.(Note that this setting can only be configured when the user’s Set Charge Desktop View Access preference is set to “All Charges.”)- Yes: The user can view data on the Charge-Note Reconciliation report for only those departments to which the user belongs.
- No (the default): The user can view data for all departments on the Charge-Note Reconciliation report, including data in departments where they are not a member. The only exception is departments with a protected status: the user cannot see data in departments with a protected status unless they are in fact a member of the protected department. See Protected Status Department for more information.
AC Schedule Start Date
(Web) When Autonomous Coding is enabled, this date field specifies when the user’s autonomous coding schedule begins. Charges created on or after this date are eligible for autonomous coding. Use the date picker to set the start date inmm/dd/yyyy format.
AC Schedule End Date
(Web) When Autonomous Coding is enabled, this date field specifies when the user’s autonomous coding schedule ends. Charges created after this date are no longer processed by autonomous coding. Use the date picker to set the end date inmm/dd/yyyy format. Together with the start date, these fields define the active window during which autonomous coding applies to this user’s charge transactions.
PQRS Registry Participant
(Web, Android, Apple) For those organizations that have implemented PQRS reporting and are participating in the PQRS Registry, this setting determines whether this user is a participant in the registry. See Configuring PQRS/MIPS for more information.- Yes: The user is a participant in the PQRS Registry. Each time they complete a PQRS Clinical Metrics form, their responses to the questions for each measure are recorded by the system. At the end of the PQRS reporting period, Commure Pro sends the provider’s PQRS information to the CMS.
- No (the default): This user is not a participant in the PQRS Registry. If your organization is using the Claims Billing method for PQRS reporting, select No for all of your users. When the provider completes a PQRS Clinical Metrics form, their responses are translated to CPT II codes which are added to the charge transaction.
of Days to Display for Patient Charge Status (Web)
(Web) This setting controls the number of days of charge status data that will be shown, left to right, for patients on the user’s patient list on the Patient Charge Status tab of the web application.Charge Report Display Options
Show Auto-Added Charges to User
(Web, Android, Apple) The Automated Code Entry feature can be configured to automatically add additional charge, modifier, and diagnosis codes to the charge transactions that users enter on a daily basis, based on client-defined criteria. The auto-added charge codes are appended with an “(A)” to indicate that they are A uto-added. This setting determines whether the user can view the charge codes that were automatically added as part of the Automated Code Entry feature. See Configuring Automated Code Entry for more information.This setting does not affect the user’s ability to see auto-added diagnoses or modifiers. Auto-added diagnoses become part of the patient’s Existing List and are always visible to all users who have access to patient clinical information. Auto-added modifiers are also always visible to all users.
- Yes (the default): This user can see the charges that were entered manually, as well as any auto-added charges (for example, the auto-added charges for technical components). Auto-added charges can be viewed in all of the regular charge displays. The user can also utilize the Technical Mismatch filter and the Auto-Added Charges/Diagnoses Only checkbox in the Holding Bin, Worklist, and Search options (if they have access to those options). For Level 0/1/2 users, this preference is always set to Yes and cannot be changed to No.
- No: This user can view only the charges that were entered manually.
Show RVU Values to User
(Web) This setting determines whether this user can view the RVU value for specific charge codes directly on the Charge Transaction screen, and also in the Charges > Holding Bin option, listed to the right of each charge code. When set to:- Yes: The user can view RVU values on the Charge Transaction screen and in the Holding Bin option.
- No (the default): The user cannot view RVU values in these options. For more information, see Configuring RVU Management.
Show PQRS Charges to User
(Web, Android, Apple) For those organizations that have implemented PQRS reporting and are using the Claims Billing method, this setting determines whether the user can view the charges (CPT II codes) that are automatically added when a provider answers the questions on a PQRS Clinical Metrics form. These additional codes are appended with a “(P)” to indicate that they were automatically added as part of the PQRS feature. See Configuring PQRS/MIPS for more information.- Yes (the default): This user can see the charges that were entered manually, as well as any CPT II codes that were automatically added as the result of a provider answering PQRS Clinical Metrics questions. The CPT II codes can be viewed in all of the regular charge displays. For Level 0 users, this preference is always set to Yes and cannot be changed to No.
- No: This user can view only the charges that were entered manually.
Custom Workflows
Enable Batch Entry
(Web) This setting allows individual users to quickly add the same diagnosis and charges to multiple patients at once via the Batch Charge Entry tab. The default setting is No. Click Yes to display the Batch Charge Entry tab for the individual user. Please refer to Configuring Batch Charge Entry for more information about this particular setting, as well as an overview of the Batch Charge Entry feature and complete instructions for configuring this feature for use.This user setting is available only when both the institution level and department level Enable Batch Charge Entry settings are set to Yes. Please also note that when configuring Batch Charge Entry settings, the user-level settings can override department-level settings.
Setting Provider Header Fields for Users Who are Not Providers
This section provides guidelines for setting up the Provider Header Fields setting for special situations.Billing Prov/Subsequent Default Overrides Provider Setting
A security issue exists in that the Subsequent Default setting for billing providers overrides the Provider setting (under User Permissions). If the Provider setting is set to No, the user should not be able to charge for services, because they should not be listed as a provider. However, the following scenario allows a user who was once but is no longer a billing provider to charge for services:- Set the user’s Provider setting (under User Permissions) to Yes.
- Sync with that user on the handheld device.
- Add a charge.
- Click on the charge and go to Details to ensure that the Billing Prov field displays the expected name (as specified by the Subsequent Default value for Billing Prov (under the Provider Header Fields setting).
- Sync again.
- Change the Provider setting (under User Permissions) to No and save.
- Sync again.
- Add a new charge to the same user.
- View the details of the new charge. Expected result: The Billing Provider field in the charge should be empty regardless of the Billing Prov/Subsequent Default value because the Provider setting for this user is set to No.
Charge Provider Header is Autopopulated with Submitter’s Name
If a handheld user is not set up as a Provider (under User Permissions), the default for Billing Provider in the transaction should be blank (in other words, the Initial Default attribute of the Charge Header Fields/Billing Prov setting attribute should be set to None). This will force an administrator who has permission to edit charges to choose a Billing Provider for the charge. The user will not be able to choose a Billing Provider unless they have permission to edit charges for other users, as the user who entered the charge will not be associated with it. If the Billing Prov/Initial Default attribute is not set to None and a handheld user who is not set up as a Provider enters a charge and submits it, on the handheld the Billing Provider field in the charge details will appear blank. On the web, the charge will appear in the Holding Bin, but the Billing Provider field will be populated with the name of the syncing user, who is not a Provider and whose name should, therefore, not appear in the Billing Provider field. Further, if the user clicks on the Edit link to change the Billing Provider field to another user who is a provider, an error may occur if the user does not have permission to edit charges. If a user who enters charge is not a Provider and Billing Prov/Initial Default is set to None, the charge will not appear on the user’s handheld after a sync, as the user who entered the charge cannot be associated with the charge. The charge will instead go into the Holding Bin, where an administrator with permission to edit charges will need to enter a billing provider, as the standard configuration does not allow a handheld user to set the Billing Provider field on their handheld. The user who entered the charge will see it on the web only if they have permission to view all charges. If all users are set up to see only department charges and a charge is entered with the Billing Provider set to None, no one will be able see this charge in the Holding Bin. Even if a user can view all charges, if they enter a charge with the Billing Provider field blank, the charge will appear in the web interface but not on the handheld, where all such charges will simply disappear.HIE Settings
If the Health Information Exchange (HIE) option is enabled for your organization, then the Detail screens of most of the clinical modules show the source (hospital or practice) from which the patient’s clinical data was derived. The HIE Settings screen lets you determine whether the user can also see a column for Source on the Summary screens, as well as filter those screens by source. See also Source Reference List. When the Health Information Exchange (HIE) option is enabled for your organization, these HIE settings are enabled by default (set to Yes).Filter on Source (Web)
(Web) This setting determines whether a Source filter appears on the Patient Summary tab and also on the Summary panes of most of the clinical display options (New Results, Overview, Allergies, Clinical Notes, Medications, Lab Results, Order Status, CPOE Orders, Problems, and Test Results). If you choose Yes, the Source filter is present, and the user can filter the screen to view just those clinical items that were derived from a particular hospital or practice.Display Source in Clinical Summary (Web)
(Web) This setting determines whether a column for Source is added to the Patient Summary tab and to the Summary panes of most of the clinical display options (New Results, Overview, Allergies, Clinical Notes, Medications, Lab Results, Order Status, CPOE Orders, Problems, and Test Results). If you choose Yes, the Source column is present so that the user can quickly see the hospital or practice from which the clinical data was derived.Filter on Source (Handheld)
(Apple) This setting determines whether a Source filter is available in most of the clinical modules. When enabled, the user can filter the Summary screen by Source, to show just those clinical items that were derived from a particular hospital or practice. The availability of this feature varies by application version:- On Apple devices, filtering by Source is available in these modules: Allergies, Clinical Notes, Medications, Lab Results, Order Status, and Test Results.
On Android devices, filtering by Source is not available in any module.
Display Source in Clinical Summary (Handheld)
(Android, Apple) This setting determines whether Source is displayed on the Summary screens of most of the clinical modules. If you choose Yes, the Source column is present so that the user can quickly see the hospital or practice from which the clinical data was derived. Keep in mind that there is limited space for an additional column on handheld devices; you may want to set this to No. The availability of this feature varies by device type and application version:- On Apple devices, Source is available on the Summary screens of these modules: Allergies, Clinical Notes, Lab Results, Orders, Problem List, and Test Results.
- On Android devices, Source is available on the Summary screens of these modules: Allergies, Clinical Notes, Medications, Lab Results, Order Status, and Test Results.
Lab Results Settings
If the Lab Results module is enabled for your organization, the Lab Results Settings screen lets you create stock snapshots and phrases that will be automatically available to the selected user. The user can choose to hide the snapshots and phrases that were defined at the department level by using the Lab Results Settings on the Preferences tab. The Lab Results settings are only available at the user level if Lab Results has been selected as an Active Handheld Module under the user’s Device Settings (see Active Handheld Modules). When you select Lab Results from the Edit Settings menu, the Lab Results Settings form appears. The Lab Results Settings form lets you configure the following settings.Snapshots
(Web, Apple) Snapshots are customized groupings of lab components that are viewed on the web and handheld platforms. To define snapshots for the selected user:- Click Edit .
- Click New Snapshot.
- Enter a Snapshot Title in the Quick Details box.
- Select the tests that you want to include in the snapshot from the list in the Create Snapshot form. To locate tests, click the Search button in the Quick Details box and enter search text, or click the Mnemonic or Test Name headings at the top of the form to sort the list of tests by either of those criteria. Once you have selected all of the tests you want to include, click the Save button in the Quick Details box to create the snapshot.
- To edit an existing snapshot, select the snapshot in the View Snapshots form, and then click the Edit button in the Quick Details box. Edit the snapshot title or tests that you want to include, or both, and then click the Save button in the Quick Details box.
- To delete an existing snapshot, select the desired snapshot in the View Snapshots form, click the Delete button in the Quick Details box, and then click OK.
Default # of days lab data to download
(Android, Apple) This setting specifies the default number of days of lab data that are downloaded to a user’s handheld device when they sync or refresh their device. You can change this value to any number between 1 and the number defined on the Max Amount of Patient Lab Data Stored on Handheld Institution setting.Messaging Settings
If Commure Pro Messaging is enabled for your organization, the Messaging Settings screen lets you controls its behavior for users. You can enable and disable Commure Pro Messaging as needed, and control whether it automatically starts upon login when it’s enabled. If Federated Messaging is enabled for your site, you can specify Commure Pro Messaging as the default messaging client.Show Notifications and Increment Unread Message Count
This feature is for a future release and should be set to No.Enable Commure Pro Messaging
(Web, Android, Apple) Determines whether this user is allowed to send text messages via the Commure Pro Messaging module.- Yes: The user is allowed to send text messages to other providers in your organization, for whom Commure Pro Messaging is also enabled. While conversing with other providers via Commure Pro Messaging, the user can send and receive links to patients, send and receive images, and can also send and receive telephone calls (if they are using Commure Pro Messaging on an Apple® iPhone® or Android phone). To receive a call back from another person with whom they are conversing via Commure Pro Messaging, this user’s Messaging Phone number must be configured.
When Commure Pro Messaging is enabled, users should receive a push notification on their mobile device(s) each time they receive a new message in Commure Pro Messaging. This includes all mobile phones and tablets that a user has provisioned at that time. The only time a user should not receive a push notification on a device is when they are actively participating in the conversation where a new message is received (this means that the device is unlocked, the Commure Pro app is in the foreground, and the conversation with the new message is currently open; if all three of these conditions are met, then a push notification is not displayed on that device).
Automatically Turn on Commure Pro Messaging when Logging In
(Web) Determines whether Commure Pro Messaging is automatically turned on each time this user logs into the Physician Portal.- Yes: Each time this user logs into the Physician Portal, Commure Pro Messaging is automatically turned on and the user’s name shows as available for messaging to other providers in your organization, for whom Commure Pro Messaging is also enabled.
- No: Each time this user logs into the Physician Portal, Commure Pro Messaging remains turned off and the user’s name shows as offline for messaging. The user can manually turn on Commure Pro Messaging at any time by clicking the Turn On Messaging button in the Commure Pro Messaging window.
On Apple and Android devices, Commure Pro Messaging is always automatically turned on each time the user logs into the Commure Pro application, and the user’s name shows as available for messaging to other providers in your organization, for whom Commure Pro Messaging is also enabled.
Use Commure Pro as default Federated Messaging client
(Web, Android, Apple) This setting controls if Commure Pro Messaging is the user’s default messaging client. This setting is only available when the following institution-level settings are enabled: Enable Commure Pro Messaging and Enable Federated Messaging.This functionality requires that Commure Pro Messaging users be in a Department that is in a Facility that is registered in Directory Services.
- Yes: (the default) Commure Pro Messaging is the preferred messaging client in directory services when Federated Messaging is enabled. Messages are routed to this messaging client.
- No: user will not receive messages through the Commure Pro Messaging client when Federated Messaging is enabled. Set this to No when a different message client in another system will be used as the preferred message client. If this messaging client preference is set to Yes in another messaging client system, this Commure Pro setting will be set to No by default.
Enable Patient-Based Messaging View
(Android, Apple) When Commure Pro Messaging is enabled for a user, this setting controls whether the user is able to narrow the scope of their Commure Pro Messaging history to view only those conversations that contain messages about a specific patient.- Yes: The user is able to view only those conversations that contain messages about a specific patient, via the patient-centric Communication module or the Filter button in the general Messages option.
- No: (the default) The user is not able to view only those conversations that contain messages about a specific patient. The patient-centric Communication module and the Filter button in the general Messages option are not enabled.
This setting can also be configured for multiple users at a time via Bulk User Edit.
Enable MHB Care Team Integration
(Web, Android, Apple) This setting is only available if Enable Commure Pro Messaging is set to Yes for a user, and when the setting Enable Care Team Integration is enabled for a site. This Enable MHB Care Team Integration setting controls if care team data is available to a user. This setting can be configured for individual users, for multiple users at once using Bulk User Edit, or for all subsequent new users in System Defaults (Admin > User > System Defaults > General).- When set to Yes, the Dynamic Care Team button is available for the user on the web portal and handheld devices.
- On the web portal, care team data can be accessed in Commure Pro Messaging when patient context is active in a conversation.
- On handheld devices, care team data can be accessed in the following ways:
- Patient Details module
- Communication module
- Commure Pro Messaging when patient context is active in a conversation
The Dynamic Care Team is only available for patients whose current visit is an InFacility visit, and if the care team data exists in the external system.
- When set to No (the default), the Dynamic Care Team button is not available for the user.
Patient List Settings
To access the Patient List Settings form for a user, from the Personal Preferences screen on the User tab, click the Edit Settings drop-down list and select Patient List. At the top of the Patient List Settings tab are two clickable links:View Patient List
This link is available only if the user who you are editing has been assigned the role of Provider in their User Permissions. Click the link to view the patient list for that user. With the list of patients displayed, you can choose from two drop-down lists that let you filter the list by Profile or by View Filter. You can also print the currently displayed patient list by clicking the Print button.When accessed from this link, the criteria used to display the patient list on the screen differs from the criteria used to print this same patient list. When displayed on the screen, this patient list is filtered based on visits that are associated with the current account. When printed, the (same) patient list is filtered based on visits with which the current user has a relationship. Though the source list is the same, the end results can vary based on the method used to view the patient list.
View Schedule
This link is available only if the user who you are editing has been assigned the role of Provider in their User Permissions. Click the link to view the schedule for that user. You can also print the currently displayed schedule by clicking the Print button.Patient and Data Access
Restrict Patient Access to Facilities for User’s Departments
(Web, Android, Apple) If this preference is set to Yes, only visits that are in facilities associated with the user’s departments (where Exclude from department checks when sharing data between users = No) will be shown. If the preference is set to No, all visits will be shown (that match any search/filter criteria, if applicable).Restrict Patient Lookup to
(Web, Android, Apple) This setting controls the user’s access to patients on the web and all handheld platforms. It affects the patient visits that are returned to the user when searching for a patient to add to their patient list from the census list, or when using the web Patient Search tab. For organizations comprising multiple facilities, you can use this setting to limit a user’s access to patients based on facility. To do this, you should associate specific facilities to each department via the Admin > Department > General > Facilities setting, and then choose the Patients in Facilities Associated with User’s Departments option below. Please note that if you do not explicitly associate any facilities with a department, then the system acts as if all facilities are associated with that department (unless the department has Exclude from department checks when sharing data between users set to Yes). See also Facilities for more information. You can set the Restrict Patient Lookup To setting as follows:- Patients with Relationships to User: The user can view only patients with whom they have a system relationship.
- Patients with System Relationships to Providers in User’s Departments: The user can view patients who have a system relationship to a provider who belongs to the same department(s) as them or who have a system relationship to the user. (Please note that if the other provider also works in a department to which this user does not belong, this user can still view the provider’s patients from the outside department.)
- Patients in Facilities Associated with User’s Departments: The user can view patients who have a visit in a facility that is associated with their department(s) or who have a system relationship to the user. If the user’s department is not associated with any facilities, then the user has access to all patients in all facilities.
- No Restriction: The user can view all patients (default). In the case of the first three bullets above, the Facility drop-down on the Patient Search tab/screen limits the user’s ability to search for patients, by allowing them to select only those facilities that are associated with the departments to which they belong. However, if the user’s department is not associated with any facilities, then the Facility drop-down shows all facilities.
Departments that have Exclude from Department Checks When Sharing Data between Users set to Yes are not used when determining the facilities to which the user has access. In addition, multiple users in such a department are not considered to be in the same department.
Can View Clinical Results (Web Only)
(Web) This setting determines whether or not users can view clinical information for patients on the web. If you select No, all of the clinical display options in the center column of the Patient List tab are turned off for the user (such as Lab Results, Test Results, Medications, Order Status, etc.). The user also cannot view a patient’s reason for visit from any display option or report. You can set this preference as follows:- No: The user cannot view clinical data for any patients.
- Yes: The user can view clinical data for all patients (the default).
Departments that have Exclude from department checks when sharing data between users set to Yes are not used when determining the facilities to which the user has access. In addition, multiple users in such a department are not considered to be in the same department.
Patient List is Accessible on Web
(Web) This setting determines whether the user has access to functions that relate to the management of a personal patient list on the web application (via the Patient List and Patient Charge Status tabs). The default for administrators (with Access Level 1 or 2) is No; for physicians (with Access Level 3) it is Yes. Select Yes to allow the user to access the Patient List tab and the Patient Charge Status tab, or No to disallow it.In order to view the Patient Charge Status tab, the user must also have the following two permissions set to a value greater than None:
- Since the Patient Charge Status tab is located under the Charges tab, the user must have permission to view the Charges tab. The Set Charge Desktop View Access setting controls a user’s access to the Charges tab, and must be set to a value greater than None.
- The Set Patient List Charge View Access setting gives the user specific access to the Patient List Charge Status tab and must be set to a value greater than None.
Patient Summary is Accessible on Web
(Web) This setting determines whether the user has access to the Patient Summary tab and the New Results option (under the Patient List tab) on the web application.Scheduling Access
(Web) This setting determines the user’s access to visits displayed on the Schedule tab of the web application. The Schedule tab allows users to view schedules for those providers whose information the user has permission to access. In addition, the Schedule tab may contain functions that allow the user to add, cancel, or reassign visits, if the respective privileges for those functions have also been granted (see Can Add/Edit Commure Pro Visits, Can Cancel Appointments, and Allow Patient Assignment). The available options for the Scheduling Access setting are None, User, Department, and All. If set to None, the user does not have access to the Schedule tab at all. If set to User, Department, or All, the user has access to the Schedule tab, but the providers/services whose schedules the user can view, as well as the providers/services to which the user can reassign visits, vary based on the setting.The Schedule tab can also show the charge information associated with a visit. Whether or not a user can view the charge information is based on their Set Charge Desktop View Access setting. The Scheduling Access setting should be configured to match the Set Charge Desktop View Access setting to ensure that the user can see a charge associated with a visit. For example, if the Set Charge Desktop View Access setting is set to Within the User’s Department then the Scheduling Access setting should be Department.
| Scheduling Access | Access to Schedule Tab? | Available Providers on Schedule Tab | Available Medical Services on Schedule Tab |
|---|---|---|---|
| None | No | n/a | n/a |
| User | Yes | User can see only their own schedule (this includes visits for which the user is the scheduled provider and visits containing charges for which the user is the billing provider). User can reassign visits to only themselves. | User can see schedules for, and reassign visits to, services that are associated with the departments to which the user has access. |
| Department | Yes | User can see schedules for, and reassign visits to, providers of a visit who share a department in common with them (and the Exclude from User/Department Security Checks setting for the department is false), Schedules for another provider includes visits for which that provider is the scheduled provider. | User can see schedules for, and reassign visits to, services that are associated with the departments to which the user has access. |
| All | Yes | User can see schedules for, and reassign visits to, all scheduled providers of a visit. Schedules for another provider includes visits for which that provider is the scheduled provider. | User can see schedules for, and reassign visits to, all services. |
The Scheduling Access setting does not affect which providers and medical services are available to the user when reassigning visits on the Patient Search or Sign-Out Summary tabs. The user has access to all providers and medical services in those options. However, the Charge Desktop View Access setting for a user will determine which charges are displayed for the available visits.
Patient and Visit Management
Combine Visits with Same Account Number
(Web, Android, Apple) When this setting is enabled and multiple visits share a single account number, the visit with the most recent date and time is the visit that displays in the Select Note Template drop-down list that displays when clinicians add a new template. When this setting is disabled (the default), all qualifying visits display in the Select Note Template list, including multiple visits that share a single account number. (Web) This setting also affects the Charge-Note Reconciliation report when there are overlapping visits for the same visit day that share the same account number. It shows the visit day only once on the report if this setting is enabled, or multiple times (once for each visit) if this setting is disabled.Allow Patient Assignment
(Web) This setting determines whether the user can reassign patients to other providers on the Patient Search, Schedule, or Sign-Out Summary tabs of the web application. If set to Yes, the user can reassign one or more patients and does not have to have a relationship to the patient in order to reassign them. This is particularly useful when managing health care providers across shift changes.- To use the reassign function on the Schedule tab, the user must also have a Scheduling Access of User, Department, or All. The user may reassign visits to only the providers and services defined by that setting. See Scheduling Access for more information.
- On the Patient Search and Sign-Out Summary tabs, the user may reassign visits to any provider or medical service.
Can Cancel Appointments
(Web) This setting determines whether the user can cancel appointments on the Patient Search or Schedule tabs of the web application. To use the cancel function on the Schedule tab, the user must also have a Scheduling Access of User, Department, or All.Allow Patient/Visit Search
(Web) This setting determines whether the Patient Search tab on the web application is enabled. The default is No. Set this to Yes to allow the user to search for patients, visits, or both on the Patient Search tab. Note that even when set to No, the user may still be able to search for patients when adding a patient to their patient list via the Patient List tab, using the Add Patient(s) option on the Actions drop-down list.Allow Patient Merge
(Web) Determines if user can do a patient merge on the Patient Search tab. If set to Yes, the Merge function is available below the list of search results on the Patient Search tab. If set to No, the Merge function is not available on the Patient Search tab.Data Entry
Auto-select visit during “Add” Activities
(Web) This setting determines whether the system automatically selects a visit, when this user adds a new charge transaction in the Desktop Charge Capture application, or a new note in the NoteWriter application. Auto-selection only occurs for certain visit types, as defined in the Commure Pro Visit Types option (see Commure Pro Visit Types).Manual Patient Registration
Can Edit Interfaced Patients
(Web, Android, Apple) This setting determines whether the user can edit patients whose data has been interfaced from a source system (patients not created in the Commure Pro system). Edits made in the Commure Pro system affect only the data in the Commure Pro system. Those changes are not reflected in your source system. In fact, the next time information for the same patient is interfaced to the Commure Pro system, the data from the source system will overwrite the data that was edited in the Commure Pro system. As a result, users should correct the information in the source system as well.- Choose Yes to allow the user edit interfaced patients on the web platform. To allow the user to perform this same action on their handheld device, you must enable both this setting and the Can Create Patients on Handheld setting.
- Choose No to prevent editing on all platforms.
This preference appears only if your site administrator has set the Patient Registration preference to Enabled (on the Institution, Site Administration settings).
Can Edit Interfaced Visits
(Web, Android, Apple) This setting determines whether the user can edit visits that have been interfaced from a source system (visits not created in the Commure Pro system). Edits made in the Commure Pro system affect only the data in the Commure Pro system. Those changes are not reflected in your source system. In fact, the next time information for the same visit is interfaced to the Commure Pro system, the data from the source system will overwrite the data that was edited in the Commure Pro system. As a result, users should correct the information in the source system as well.- Choose Yes to allow the user edit interfaced visits on the web platform. To allow the user to perform this same action on their handheld device, you must enable both this setting and the Can Create Patients on Handheld setting.
- Choose No to prevent editing on all platforms.
This preference appears only if your site administrator has set the Patient Registration preference to Enabled (on the Institution tab, Site Administration settings).
Can Add/Edit Commure Pro Patients
(Web, Android, Apple) This setting determines whether the user can manually create (register) patients in the Commure Pro system, or edit patients who were manually created. The options are as follows:- Can edit patients, created patients are verified:
- On the web platform, the user can edit patients that were manually created. The user can also manually create patients, and those patients are automatically verified (their name has an asterisk at the end, as in DARR, MOLLY*). Note that selecting this option can result in extraneous patient data, so the default configuration for this setting (described below) is recommended at sites where patient accounts are often manually created. In addition, if your organization has implemented Photo Registration on mobile devices, this setting is disregarded for all manually registered patients created via the Photo Reg option. Instead, these patients are always created as non-verified patients. See Allow Creating New Patient from Photo (Photo Reg) for more information. To also allow the user to manually create a patient/visit combination that is verified, you must enable this setting, as well as the Can Add/Edit Commure Pro Visits setting.
- On handheld devices, the user can manually create a patient/visit combination that is verified. However, in order to do so you must enable this setting, as well as the Can Add/Edit Commure Pro Visits and Can Create Patients on Handheld settings.
- Can edit patients, created patients are non-verified (the default setting):
- On the web platform, the user can edit patients that were manually created. The user can also manually create patients, and those patients are non-verified (their name is enclosed in quotation marks, as in “DARR, MOLLY”). To also allow the user to manually create a patient/visit combination that is non-verified, you must enable this setting, as well as the Can Add/Edit Commure Pro Visits setting.
- On handheld devices, the user can manually create a patient/visit combination that is non-verified. However, in order to do so you must enable this setting, as well as the Can Add/Edit Commure Pro Visits and Can Create Patients on Handheld settings.
- Non-verified patients created by this user can be hidden from other users, if necessary. See Non-Verified Patient Visibility.
- No, cannot edit or add Commure Pro patients: The user cannot manually create patients, or manually create patient/visit combinations, or edit patients that were manually created, on any platform.
This preference appears only if your site administrator has set the Patient Registration preference to Enabled (on the Institution tab, Site Administration settings).
Can Add/Edit Commure Pro Visits
(Web, Android, Apple) This setting determines whether the user can manually create visits in the Commure Pro system, or edit visits that have been manually created.- Choose Yes to allow the user manually create visits, as well as edit visits that were manually created. To allow the user to perform these same actions on their handheld device, you must enable both this setting and the Can Create Patients on Handheld setting.
- Choose No to prevent these actions on all platforms.
This preference appears only if your site administrator has set the Patient Registration preference to Enabled (on the Institution tab, Site Administration settings).
Available Visit Types for Manual Registration
(Web, Apple)* *This selection field determines what visit types are available to the user when manually registering a patient. The selections are all existing values in the Admin > System Management > ADT Visit Types option where Source = MANUALREG, listed in alphabetical order by Name. The default is All.This preference appears only if the user also has either Can Add/Edit Commure Pro Patients or Can Edit Interfaced Visits to Yes.
This setting is not supported on Android devices. Android users can manually register patients using all visit types that have a Source = MANUALREG.
Can Verify Patients
(Web) This setting determines whether the user is allowed to verify manually created patients using Verify option on the Patient Search tab. Verification means that the patient record contains the required information to be considered a full patient who is eligible for all workflows, such as submitting charges to the Outbox. Choose Yes to allow a user to verify manually created patients. Choose No if the user is not allowed to verify manually created patients.Can Create Patients on Handheld
(Android, Apple) This setting determines whether the user can perform a variety of actions related to adding or editing patient or visit data on a handheld device. To perform any of these actions, you must enable this setting, as well as one or more corresponding settings, as described in the table below.- Choose Yes to allow this user to perform one or more of the actions in the table below (be sure to also enable the corresponding setting).
- Choose No to prevent this user from performing all of the actions in the table below.
| To Allow this Action on the Handheld: | Enable These User Settings |
|---|---|
| Manually create a patient and visit combination (all in one step) | Can Create Patients on Handheld Can Add/Edit Commure Pro Patients Can Add/Edit Commure Pro Visits |
| Manually create a visit for an existing patient | Can Create Patients on Handheld Can Add/Edit Commure Pro Visits |
| Edit patient data for an interfaced patient | Can Create Patients on Handheld Can Edit Interfaced Patient |
| Edit patient data for a patient that was manually created directly in the Commure Pro system | Can Create Patients on Handheld Can Add/Edit Commure Pro Patients |
| Edit visit data for an interfaced visit | Can Create Patients on Handheld Can Edit Interfaced Visits |
| Edit visit data for a visit that was manually created directly in the Commure Pro system | Can Create Patients on Handheld Can Add/Edit Commure Pro Visits |
Default Values for Manual Registration
(Android, Apple) Use this setting to configure default values for this user, for the basic fields that are always required during manual registration on handheld devices (First Name, Last Name, ADT Visit Type, Appt/Admit Date with Time, and Location (Facility and Unit)). Typically, the default values for manual registration are set at the institution level via the setting below. See the documentation for that setting for a detailed description of each of the default value fields. Admin - Institution - Patient List - Patient Registration Fields - Set Defaults button When you modify the default values at the institution level, those changes are effective for all users. However, you can also modify the default values here at the user level in order to customize them for a specific user. Once you modify a single default value here at the user level and click the Save Defaults button, all of default value fields for this user no longer receive any modifications that are made at the institution level. To clear all default values for this user (so that no values are defaulted during manual registration), click the Cancel button and then the Save Defaults button.Problem List Settings
The Problem List Settings screen lets you configure a user’s Diagnosis Picker, and also determine whether the user can enter free text problems, can delete problems, or see a Favorites tab/option. To access the Problem List Settings, select Problem List from the Edit Settings drop-down list on the User tab.Diagnosis Pickers
(Web, Android, Apple) Diagnosis Pickers organize diagnosis codes, search terms, and diagnosis macro groups into categories. Organizing these items into categories makes it easier for users to find and enter diagnoses. Administrators typically define diagnosis Pickers at the department level, via the setting below. All department-level Pickers are automatically visible to all users assigned to that department. Instructions for defining Pickers at the department level are described in Configuring Charge or Diagnosis Pickers. Admin - Department - Problem List - Diagnosis Pickers Certain modifications can be made to a user’s diagnosis Picker list at the user level, in order to personalize it for that user. For example, if specific diagnosis codes, search terms, diagnosis macro groups, or entire categories from the department-level Pickers are not helpful for a particular provider, they can be hidden for that user. In addition, new items can be added to the diagnosis Picker for a user. There are two methods available for making changes to diagnosis Pickers at the user level, described below. Please note that there is a slight terminology difference between the two options, but both options do in fact make changes to the diagnosis Pickers.- The first method is here via this Diagnosis Pickers setting, which is accessed via the Admin > User option. This option is typically used by administrators, when modifying diagnosis Pickers for a specific user in order to tailor it to that provider’s needs. See Configuring Charge or Diagnosis Pickers for instructions on using this option. (In this option, we use the terminology “user-level” subcategories/items and “department-level” subcategories/items.) A provider can also use this same Diagnosis Pickers setting via the Admin > Preferences option to modify their diagnosis Picker list, but we recommend that they instead use the option described in the next bullet.
- The second method is directly on the diagnosis selection screen that is seen when entering a charge/problem/note, via the Settings button or More button. This is the preferred method for providers. It allows them to make changes to their diagnosis Picker list while they are in the process of selecting a diagnosis, as this is the most likely time that they would realize that a change is needed. (In this option the user-level items/subcategories are listed under the Favorites category, while department-level items/subcategories are listed under the Department category.) See Managing Diagnosis Favorites and Department Categories.
Allow Free Text Diagnoses
(Web, Android, Apple) This setting determines whether the user can enter problems using free text in the Problem List module. Choose Yes to give the user this capability (the default setting); choose No to force them to select problems from a predefined list. Note that in addition to configuring a user’s permissions from within the Problem List module, this setting also determines whether a CPOE user can add a free text problem to an order in the CPOE and Mobile CPOE applications. Note that free-text diagnoses are not available to orders entered in the ePrescribing application, however. (To enforce this restriction, the Add as Free Text option is not available in the Select Problem window for ePrescribing orders.) If you choose Yes, the user must enter some text for the problem description; they cannot save a diagnosis with a blank description. See also Allow Free Text Diagnoses under Charge Capture settings.Can Delete Problems
(Web, Apple) This setting determines whether the user is able to delete a problem from a patient’s problem list in the Problem List module. This setting does not affect the user’s ability to remove a diagnosis from an individual charge or charge transaction.Show Diagnosis Favorites Tab
(Web, Android, Apple) This setting determines whether to display a diagnosis Favorites option for the current user when entering charges in the Charges module or when entering new problems in the Problem List module.- Yes: The user can maintain a list of favorite diagnosis codes that is independent from their diagnosis Picker list. The Favorites list is configured by the user in the either the web or mobile application during the process of adding new charges or problems for a patient.
In addition, the user can maintain and use the Favorites list when entering orders in the CPOE Orders module on Apple devices. This is not available on the web or Android applications.
- No: The user cannot maintain a list of favorite diagnosis codes.
Select Secondary Diagnoses
(Web, Android, Apple) When a user selects a primary diagnosis on the Charge Transaction screen, the application automatically alerts them if one or more secondary diagnoses may be applicable. This setting determines whether the user is warned that a secondary diagnosis is appropriate, whether they are prompted to select a secondary diagnosis, or whether the secondary diagnosis is* automatically added* to the transaction. Note that the user can always manually add or remove secondary diagnoses, regardless of how this setting is configured. The options for this setting are:- User Selects: No automatic action is taken, other than displaying a Secondary icon (in Desktop Charge Capture) or a warning message (in Mobile Charge Capture) next to the primary diagnosis. If the user wants to add a secondary diagnosis, they must manually open the dialog that shows all of the secondary diagnoses, and then select one or more of them.
- Prompt User: A dialog listing all of the secondary diagnoses is displayed automatically. The user can then select one or more of them, or they can close it without selecting any.
- Automatically Include: The secondary diagnosis codes are automatically added to the charge transaction without any user intervention. This is the recommended setting for all users as it ensures that all appropriate codes are selected. The user may still manually delete any that do not apply to the patient. Please note that only the “preferred” secondary diagnosis codes are added (those listed above the “Additional Options” section of the dialog box).
This setting does not affect charges that are imported from an external system; secondary diagnosis codes are never automatically added to imported charge transactions.
Allow non-specific diagnoses
(Web, Android, Apple) This setting determines whether the user is able to select a diagnosis that is not specific, when adding a diagnosis to the patient’s problem list, a charge transaction, or a note.- Yes: The user is able to select a non-specific diagnosis when adding a diagnosis to the patient’s problem list, a charge transaction, or a note.
- No: If the user selects a non-specific diagnosis when adding a diagnosis to the patient’s problem list, a charge transaction, or a note, they are automatically prompted (and required) to select one or more diagnosis attributes in order to make the diagnosis as specific as possible. For example, they might be prompted to select a type, a complication, or a severity.
In addition, in the CPOE Orders module on Apple devices only, a Refine button is always displayed next to any non-specific diagnoses. The user can tap it to make the diagnosis more specific, but using the button is optional.
Screens Settings
The following settings are available to configure the screens for your individual users.Data View Type
(Web) Determines which version of the user interface the user sees upon logging in to the system.- Classic: The view of users logging in will be familiar to any users who have used previous versions of Commure Pro software, with the patient list displaying on the left and with tabs laid out horizontally at the top of the screen for viewing any other functionality that the user has permission to access.
- Revenue Reports: The view of users logging in will be a new layout that is defined by Dashboards and Reports that customers can configure and customize in a variety of ways. Note that this view is currently supported only for use by Charge Capture customers and customers using ePrescribing (restricted to EPCS administrators only).
Can Create/Copy New Screens
(Web) This setting determines whether a Revenue Reports user can create a new screen (a dashboard or report) on the Dashboard Management tab, or copy an existing screen to create a new one (via the Dashboard Management tab or while viewing the screen). Please note that the ability to edit a screen is determined by the access permissions in the screen’s definition.- Yes, can share with other users: The user can create or copy screens. If the user wishes to allow other users to view and/or edit the new screen, they can set the access permissions in the screen’s definition to allow it.
- Yes, cannot share with any other user: The user can create or copy screens. Other users will not be able to view or edit those screens (except for Level 0 and 1 users, who can view and edit all screens).
- No: The user cannot create or copy screens.
Enable Caching for Patient and Patient List Dashboards
(Web) This setting is available when the setting Enable Patient View is enabled for a site; which enables a sub-set of patient data to be stored in cache so it can be loaded quickly within dashboards (in Revenue Reports mode). This setting controls if Patient View cache is used to fetch patient, visit, and clinical data from cache for this user.- When set to Yes, data is fetched from Patient View cache first when loading data in dashboards, and then from the database (if it is not available in cache).
- When set to No, data is always fetched from the database, and data is not stored in cache for the user.