Overview of the Commure Pro Platform™
The Commure Pro Platform™ is comprised of software frameworks for Smartphone, PDA, tablet, laptop, or desktop devices and a middleware server technology known as the Commure Pro Application Server™ and Commure Pro Integration Server™. The middleware technology supports a web service bus and adapters for integration with any back-end system in the health care enterprise. There are several possible configurations for retrieving data from back-end systems (for further information, see Overall System Configuration Options):- Direct Integration to MEDITECH® with Downtime Solution
- Direct Integration to Cerner™ with Downtime Solution
- Commure Pro with Commure Pro Repository™ The Commure Pro Platform can be installed at end-user sites or run in ASP mode.
Overall System Configuration Options
The following sections describe how your source information systems are configured to exchange data with the Commure Pro system.Direct integration to MEDITECH® with Downtime Solution
In this configuration, Commure Pro integrates directly with the MEDITECH system. The direct integration technology maintains a copy of all the clinical data in MEDITECH. If necessary, this configuration can retrieve data from multiple MEDITECH systems. A configuration that retrieves data from a single system is generally referred to as a single-domain environment, while one that retrieves data from more than one system is referred to as a multi-domain environment. If the MEDITECH system(s) are down, Commure Pro can still provide full access to all patient information current as of the time the MEDITECH system(s) went down. This means that users can still access the Commure Pro Physician Portal and Desktop Charge Capture applications, or use their handheld devices to view or enter patient data. This solution requires that customers deploy a dedicated database server to host the replicated data.
Direct integration to Cerner™ with Downtime Solution
In this configuration, Commure Pro integrates directly with the Cerner system. The direct integration technology maintains a copy of all the clinical data in Cerner while receiving patient/visit data from an HL7 ADT feed. If necessary, this configuration can retrieve data from multiple Cerner systems. A configuration that retrieves data from a single system is generally referred to as a single-domain environment, while one that retrieves data from more than one system is referred to as a multi-domain environment. If the Cerner system(s) are down, Commure Pro can still provide full access to all patient information current as of the time the Cerner system(s) went down. This means that users can still access the Commure Pro Physician Portal and Desktop Charge Capture applications, or use their handheld devices to view or enter patient data. This solution requires that customers deploy a dedicated database server to host the replicated data.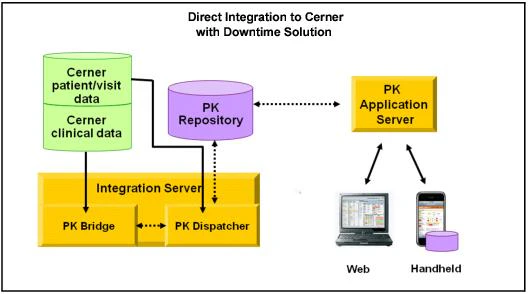
Commure Pro with Commure Pro Repository™
Commure Pro can be deployed with the Commure Pro Repository, which acts as a clinical data repository and maintains a complete, longitudinal medical record for your patients. Typically the Commure Pro Repository is populated using industry-standard HL-7 interfaces from your clinical information system. Since the Commure Pro repository is logically and physically separate from your primary systems, it also has the advantage of offering you a complete downtime solution. When the source clinical information system(s) are down, users can still access the Commure Pro Physician Portal and Desktop Charge Capture applications, or use their handheld devices to view or enter patient data, which is current up until the time that the clinical information system went down.
The Commure Pro Sub-Platforms
The Commure Pro Platform™ includes several sub-platforms. All of them access the Commure Pro Application Server™, which retrieves patient data from the Commure Pro Repository™.- Web Platform: In this model, the user launches the Internet browser on their desktop or laptop computer and then logs into the Commure Pro web application. The user views and edits patient data that is stored on the Commure Pro server. To use the Commure Pro application, the computer must have an active connection to your organization’s information system network. The connection can be wired, wireless, or remote via VPN. For a list of supported browsers, please see the Commure Pro Technical Brief on Commure Pro Supported Browsers, available from your Commure Pro representative.
- Android and Apple Platforms: In this model, a software application is installed on an Android™ or Apple® handheld device.
- Android: This is our platform for Android devices. The following applications are currently supported: Mobile Charge Capture, Mobile Clinical Results, and Mobile CPOE.
- Apple: This is our platform for Apple devices. The following applications are currently supported: Mobile Charge Capture, Mobile Clinical Results, Mobile CPOE, Mobile Sign-Out, Mobile NoteWriter, and Mobile eSignature.

Restricting Mobilizer Access by Administrative Level
Customers can define a mobilizer access policy so that administrators specifically delegated with admin mobilizer access are restricted from accessing all other mobilizers. Authorized administrators can define mobilizer access rules by setting the option WebRestrictPATAccessOnSpecificMobilizers in the Configuration Editor (Admin > System Management > Configuration Editor). To configure access restrictions, specify the access levels that you want to block from mobilizer access in a comma-separated list. For example, set this property as follows to prevent level 1 and 2 administrators from accessing the mobilizer:Backing Up Commure Pro Servers
The information in this section is for hospital IS staff who are responsible for backing up the servers on which the Commure Pro system is running. Every Commure Pro system has a database server and an application server. The database server contains most of the sensitive and frequently updated data. The application server contains static binaries and log files, and possibly interface messages and billing files, all of which change less frequently. There are two steps to backing up a Commure Pro system:- Backing up the database
- Backing up the application
Database Server
The database server contains operating system files, Oracle binaries and data files, and SQL Server binaries and data files. Data on the database server should be backed up at appropriate intervals for each type of data.Oracle Database Servers
Since the database server’s operating system and Oracle binaries rarely change, these should be backed up on a low priority, low frequency basis. Commure Pro recommends backing up these components every time you would normally take a full backup of a server system, or once a month, whichever is more frequent. Oracle datafiles contain the repository of Commure Pro system information, and should be backed up on a daily basis. Oracle provides several potential strategies for backing up an Oracle database; Commure Pro recommends using a third-party database backup agent in conjunction with Oracle’s RMAN to provide database backups. A partial list of available agents is located from the Oracle RMAN wiki, located at http://www.orafaq.com/wiki/Oracle_database_Backup_and_Recovery_FAQ#RMAN_backup_and_recovery. Check the availability of Oracle agents within your existing backup system. These agents greatly simplify the process of backing up Oracle, including the datafile management, scheduling, incremental backups, and processes to detect any additional datafiles to be backed up. In addition, the agents will provide simplified recovery processes. If an Oracle agent is not an option, you have two other, less optimal, options for backup. Keep in mind that neither of these methods provides for incremental backups, and restoring the database from these backups will take longer than the Oracle agents, and may still result in the loss of database transactions that occurred after the backup was taken. If you choose one of these options, be sure to contact Commure Pro for a review of the technical considerations.- Option 1: Use the Oracle export utility to export the entire database to a specified file. This file can be placed in a location that is backed up as part of a normal filesystem backup.
- Option 2: You can shut down Oracle at the beginning of the backup, use a regular filesystem backup on the Oracle datafiles, and then start Oracle again. Do not back up the raw Oracle datafiles using a simple filesystem backup process while the Oracle server is running. This will crash the Oracle server, with potential data loss.
SQL Server Database Servers
Since the database server’s operating system and SQL Server binaries rarely change, these should be backed up on a low priority, low frequency basis. Commure Pro recommends backups of these components every time you would normally take a full backup of a server system, or once a month, whichever is more frequent. SQL Server databases contain the repository of Commure Pro system information, and should be backed up daily. Contact your current backup software provider for an SQL Server agent for your system, as this is the best way to back up a SQL Server database.Reducing Oracle I/O by Filtering Dispatcher Messages
You can configure the dispatcher to exclude messages (by type) that are written to the database, reducing the Oracle I/O by writing only those message types that are necessary. For more information, contact your Commure Pro representative.Application Server
The Commure Pro Application Server stores little data of intrinsic value on its systems; most valuable data is stored in the database. Thus, for the application server, a general backup routine is advisable. Data from this server that is likely to change on a daily basis includes log files, interface messages, and billing files.Log Files
The Commure Pro Application Server creates log files of each user session, to be used for debugging and problem solving. These files are of little intrinsic value, and could reasonably be excluded from the regular system backup altogether. Further, these log files will grow in number and size over time, so excluding them could save media costs, though it is not required.Interface Messages
The Commure Pro Application Server can be installed and configured to process HL7 or other types of interface messages from your hospital information system. When this is the case, these messages are spooled to disk and will increase the size of a backup significantly. Thus, the message files can also be excluded from a regular backup regimen, though this is not required.Billing Files
The Commure Pro Application Server for the Commure Pro Charge Capture Suite™ generates output billing files to be handed off to billing vendors. These files are generated daily, and should be backed up daily.Patient Information
The Commure Pro Application Server stores patient information in several places. If a separate backup mechanism is required by the policies of your site, place these artifacts into a site-specific information backup area: Database backups, Commure Pro Application Server Log files, Billing files, or Interface messages.Restarting the Commure Pro Application Server
If you need to restart the Commure Pro Application Server, follow the steps in this section. You must have appropriate security (username and password) to access both the Oracle® database server and the Commure Pro Application Server. It also assumes that you either have access to the physical computers, or if they are located off-site, that you are familiar with using Remote Desktop Connection (©2006 Microsoft Corporation) to access them. Restarting the Commure Pro Application Server is a three-step process:- Step 1: Verify that the Oracle Database Services are Running
- Step 2: Verify that No Users Are Currently Logged In
- Step 3: Restart the Commure Pro Application Server
Step 1: Verify that the Oracle Database Services are Running
It is very important that you ensure that the Oracle® database services are running before starting or restarting the Commure Pro Application Server. If the Oracle database services are not available, the application server will fail when you attempt to restart it.-
Log on to the Oracle database server as usual. For example, if you have access to the physical computer, simply log on. Or, if the server is located remotely, use a tool such as Remote Desktop Connection.
If you are using Remote Desktop Connection and you do not know the host name of the Oracle database server, follow these steps to find it:
-
Log onto the Commure Pro Application Server (directly or via Remote Desktop Connection) and navigate to the following directory:
C:\Commure Pro\ENVIRONMENT\Mobilizer\WEB-INF\pkConfigOr, in the case of some older installations:C:\Program Files\Commure Pro\ENVIRONMENT\Mobilizer\WEB-INF\pkConfigYour assigned drive (C:) may differ from the above examples, depending on your specific configuration. Also, note that ENVIRONMENT represents the system environment, such as Production, Test, or Training. - Right-click on the pkBootstrap.properties file, select Open With, and then choose WordPad.
-
Search for the property called Database.DataSource. This property lists the host name of the Oracle server, and uses this format:
Database.DataSource=jdbc:oracle:thin:@DBSERVERHOSTNAME:1521:SIDIn this example, DBSERVERHOSTNAME is the host name for the Oracle database server. This is the server to which you should connect to verify that the Oracle services are running. Make a note of the DBSERVERHOSTNAME for future reference. SID is the Oracle System Identifier and it refers to the instance of the Oracle database that is running on the server. This is usually an acronym or abbreviation for the name of the client hospital. Make a note of the SID, as it should match the SID in Step 3 below. - Select File and then Exit from the WordPad menu to close the pkBootstrap.properties file. Be careful not to make (or save) any changes to this file.
-
Log onto the Commure Pro Application Server (directly or via Remote Desktop Connection) and navigate to the following directory:
- Once you have logged onto the Oracle database server, access the Services option. There are two ways you can do this:
- Open the Control Panel, then Administrative Tools, and then Services.
- Right-click on the My Computer icon and select Manage. In the Computer Management window, double-click Services and Applications, and then Services.
-
In the Services window, locate the following two services:
- OracleServicePKSID, where SID is the Oracle System Identifier (this is usually an acronym or abbreviation for the name of the client hospital). This should match the SID you obtained from the pkBootstrap.properties file in Step 1c above.
- OracleOraDB10g_home1TNSListener. The number 10 may be different number, such as 9 or 8.
-
Verify that both of these services have a status of “Started.” If they do, you can skip to Step 2 (see Step 2: Verify that No Users Are Currently Logged In). If they do not, you must restart them by following the steps below, in the order listed here:
- Click on the OracleServicePKSID service, and then select Start from the Action menu. Wait a few moments until you have verified that it has started.
- Click on the OracleOraDB10g_home1TNSListener service, and then select Start from the Action menu.
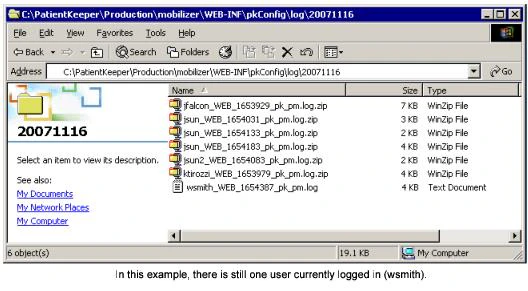
Step 2: Verify that No Users Are Currently Logged In
It is important that you verify that there are no users currently logged into the Commure Pro system before you restart the Commure Pro Application Server.- Log on to the Commure Pro Application Server (directly or via Remote Desktop Connection).
- Navigate to the following directory:
pkConfig\log\YYYYMMDD Or, in the case of some older installations: C:\Program Files\Commure Pro\ENVIRONMENT\Mobilizer\
WEB-INF\pkConfig\log\YYYYMMDD In the examples above, the drive letter (C:) may be different, depending on your specific configuration, and ENVIRONMENT represents the system environment, such as Production, Test, or Training. You will see many subdirectories with names in the format of YYYYMMDD; navigate to the one with today’s date.
- Verify that all user sessions listed in this directory end in a .zip extension. Any session that ends in .log indicates that the user is still logged into the Commure Pro system.
Step 3: Restart the Commure Pro Application Server
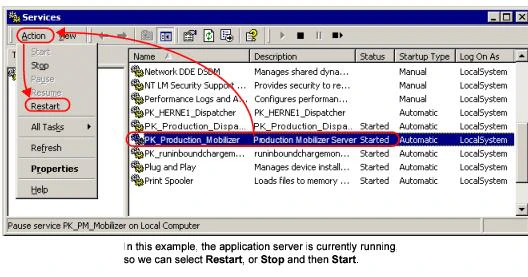
Once you have verified that the Oracle database services are running, and that no one is logged into the Commure Pro system, you can restart the Commure Pro Application Server.- While still logged onto the Commure Pro Application Server, access the Services option. There are two ways you can do this:
- Open the Control Panel, then Administrative Tools, and then Services.
- Right-click on the My Computer icon and select Manage. In the Computer Management window, double-click Services and Applications, and then Services.
- In the Services window, locate the Commure Pro Application Server service and click on it to select it. The name of the service uses one of these formats:
- PK_ENVIRONMENT_AS
- PK_ENVIRONMENT_Mobilizer
- From the Action menu of the Services window, select one of the following:
- Start, if Mobilizer is not currently running.
- Restart, if Mobilizer is currently running (or you can also do this in two steps: Stop and then Start).
Broadcasting Messages to Users
Level 0 and Level 1 users can broadcast messages to all web, Android, and Apple users of the Commure Pro system. Broadcast messages are displayed to users at the following times:- On the web: When the user logs into the Commure Pro application.
The message is also displayed to users when they access the Commure Pro application via a link from third party application. This includes links to the application as a whole, as well as links to single pages, such as the Charge Transaction screen.
- On Android and Apple devices: When the user logs into the Commure Pro application, or if they are already logged in, when their device syncs. Two types of messages can be sent:
- Basic Messages: Use this type of message for general notifications, such as when you need to notify users about scheduled system downtimes. The user reads the message, clicks OK to acknowledge it, and is then logged into the system.
- Messages Requiring Agreement: Use this type of message when you want the reader to formally agree to the terms of your message, such as rules regarding patient confidentiality or the terms of use for your organization’s information system. The user reads the message and then must click a button indicating acceptance or non-acceptance of the terms described in the message. Users must accept the message to continue logging in to the system.
- Select Admin > System Management > Broadcast Message.
- Click the Edit Message button to broadcast a new message, or to change a previous message.
- Define the parameters of the message:
- Message Status: Determines whether the message should be enabled (broadcast) immediately after saving it.
- On: Select On to start broadcasting the message immediately after saving. Once you save the message parameters, the message starts broadcasting.
- Off: Select Off if you do not want to broadcast the message immediately after saving. You can define the terms of the message now, and then at a later time, set the Message Status to On to start broadcasting it.
- Display Message: Determines how frequently the message should be displayed.
- At Every Login:
- Message Status: Determines whether the message should be enabled (broadcast) immediately after saving it.
- On the web: The message appears every time a user logs in.
- On the handheld: If the user is already logged in, the message appears at the next sync (once). The message also appears every time a user logs in.
- Only Once Per User:
- On the web: The message appears the next time the user logs in (once).
- On the handheld: If the user is already logged in, the message appears at the next sync (once). Or if the user is not logged in, the message appears the next time they log in (once).
If a handheld user views a broadcast message, and then clears data and syncs, the same broadcast message is displayed again.
- User/Message Interaction: Determines the level of interaction required by the user.
- Required for Login: The user must click an I Agree button, indicating that they agree to the terms described in the message, in order to log into the system. Or, for a handheld user that is already logged in, if the message appears after a sync, the user must click I Agree in order to remain logged in. If they instead click Cancel, they are immediately exited from the system. The next and all subsequent times that the user attempts to log in, they are presented with the same message; they are not allowed to proceed until they click the I Agree button.
- Simple Acknowledgement: The user clicks OK to acknowledge that they have read the message and are then logged into the system. Or, for a handheld user that is already logged in, if the message appears after a sync, they remain logged in.
- Enter the text of the message in the large text box. Keep in mind that the message window has a maximum height of 600 pixels. You can include HTML markup to format how these messages display both on the web and on supported handheld devices.
- (Optional) Click the Preview button to verify the content and formatting of your message. Preview mode renders any HTML markup into its intended formatting style so that you can verify how your message will display to both web and handheld users.
- Click Save to save the message parameters and immediately start broadcasting the message (if you set the Message Status to On). Or, click Cancel to exit without saving your changes.
Each time you click the Save button, the message parameters are reset, and the message is considered a new message. If the Message Status is set to On when you click Save, the message is re-broadcast to all users, even if you did not make any changes to the message text.
| HTML Code | Description | HTML Code | Description | |
|---|---|---|---|---|
<a> | link to a web address | <li> | list item within a list | |
<b> | bold text | <nobr> | no line breaks | |
<big> | large font | <ol> | ordered list | |
<br> | line break | <p> | defines a paragraph | |
<caption> | table caption | <plaintext> | as-is text | |
<center> | center horizontally | <pre> | pre-formatted text (that retains the spaces, lines, and tabs of your source document) | |
<cite> | identifies a citation | <q> | quotation | |
<code> | identifies a fragment of computer code | <samp> | sample output from a computer | |
<dd> | definition description used in a <dl> | <small> | small font | |
<dfn> | defining instance of an enclosed term | <span> | user-defined inline structure | |
<div> | user-defined block-level structure | <strong> | strong emphasis (bold) | |
<dl> | definition list | <sub> | subscript text | |
<dt> | definition term used in a <dl> | <sup> | superscript text | |
<em> | emphasis (italic) | <strike> | strike through text | |
<font> | specify a different font or color | <tt> | teletype text | |
<h1> through <h6> | Headers 1 through 6, with Header 1 being the largest font | “ | underlined text | |
<hr> | horizontal rule | <ul> | unordered (unnumbered) list | |
<i> | italic text | <var> | identifies a variable or program argument | |
<img> | include an image |