- ADT Visit Types: Indicate the various types of visits that can be created manually, as well as those that are interfaced from your source system, map those interfaced visit types to Commure Pro visit types, and possibly establish a default service site for each (see ADT Visit Types)
- Date Range Filters: Configure the various options that are available in the time-based filters list that let users choose the amount of patient data to display in the Patient Data Display area (see Date Range Filters).
- Export/Import of System Settings: For test environments only, import or export settings from the Institution, Department, or User tabs (see Export and Import of System Settings).
- Handheld Devices: View and edit details about provisioned handheld devices (see Handheld Devices).
- Mobile InterApp: Configure the parameters necessary to allow interapp communication between the Commure Pro Apple application, and other Apple applications (see Configuring InterApp Communication for Apple Devices).
- Reference Lists: Maintain lists of values, or code sets, that are used to keep track of various types of information (see Reference Lists)
Reference lists and code sets are the same thing in Commure Pro and we use the terms interchangeably.
- Relationships: Specify how users’ patient lists are populated based on provider-patient relationships (see Relationships)
- Commure Pro Visit Types: Set the parameters to use for each type of visit in the Commure Pro system. For example, determine which visit types should be included in the schedule; whether a visit type should appear in various reports of missing charges; and which visit type should appear as the “current” visit on providers’ patient lists (see Commure Pro Visit Types).
- PQRS Measures: Manage the PQRS measures for your organization, by editing the descriptions, questions, or answers for each measure. (see PQRS Measures).
- Purge Criteria: Define when various submissions and session logs are purged from the Commure Pro Application Server (see Purge Criteria).
- Vitals Edit: Rename, determine the sort order, or map vitals information that displays for each patient (see Vitals Edit).
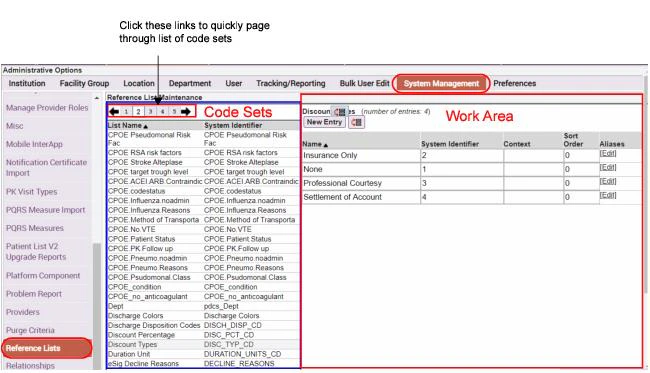
Reference Lists
Reference lists are lists of values, or code sets, that help you keep track of various types of information. In order to use the Reference Lists option, the setting below must be enabled for the administrator. Only your Commure Pro representative can turn this feature on for a user. Admin - User - User Permissions - Level 0/1: Can Edit Code Sets (Reference Lists) To access the Reference Lists option:- Click the Admin tab, followed by the System Management tab.
- Click the Reference Lists option.
The ability to edit reference lists is supported on both MEDITECH® and HL7-based systems.
- Values for custom code set transaction headers, such as Injury Type, to be used in Charge Capture.
- Insurance data coming across the ADT feed, and the alias used to link it to code edits in the Charge Capture application.
- Sets of patient demographic information, such as medical services, coming across the ADT feed that should be tracked. Whether making additions or edits to reference lists, it is recommended that you purge your caches (including session and mobilizer cache) whenever you make any reference list changes. No server re-start is necessary when making modifications to reference list definitions. For more information, see Clear Web & Session Caches and Purge Mobilizer Cache.
Editing reference list values can cause issues with the Commure Pro software. Each type of code set has its own particular rules. Make sure that you are aware of the proper formatting and entry rules for a list before adding or editing any entries. Aside from those reference lists that you might create yourself for custom charge headers, generally the only other reference lists that are edited include the following: Service Site Types, Visit Types, and Completed Status.
Adding Entries to a Reference List
To add a new entry to a reference list:- On the Reference Lists screen, select the code set that you want to update. Its row, including the list name and System Identifier that the Commure Pro system uses for it, becomes highlighted.
- Click the New Entry button. A new row is added to the bottom of the list of values.
- Enter the following information for the new list item:
- Name
- System Identifier
- Context
- Click Save.
Editing Entries in a Reference List
To edit an existing code set:- On the Reference Lists screen, select the code set that you want to update. Its row, including the list name and the abbreviation that the Commure Pro system recognizes for it, becomes highlighted.
- In the work area on the right side of the Reference Lists screen, edit the name, abbreviation, or context of the desired entry, observing the existing formatting and rules for that entry.
- If you want to add an alias for the entry, click Edit in the Aliases column for that entry.
- In the
Edit Aliases for <entry>dialog, click the Add Alias button. - Enter an Alias and an Authority for the entry. Note that the aliases on this list are sorted alphabetically by default. Authority specifies the sending system (in other words, the source of the data). There can be several inbound interfaces coming from multiple sources.
- To delete an alias, click the X symbol to the right of it.
- Click OK to confirm your changes and dismiss the Edit Aliases dialog.
- In the
- If you want to change the sort order of the list entries, click the Reorder icon
 that displays to the right of the New Entry button. The Reorder window displays the list as it is currently organized. Select an entry from the list and use the UP and DOWN buttons to change this entry’s positioning relative to the other list entries. Alternatively, you can use to TOP and BOTTOM buttons to move any list entry to the start or end of the list.
- In the Reference Lists screen, click Save to save your edits. Or click Cancel Changes to revert your changes, then Yes to confirm that you want to cancel your edits and revert all changes.
Observe the formatting and entry rules that apply to the code set when editing an existing entry. Failure to do so may cause problems with the Commure Pro software.
Creating a Reference List
You can create a reference list (code set) which you can then access as a picklist when creating charge headers (see Add/Edit Charge Headers). To create a reference list:- Click the Add Reference List button. A dialog opens prompting you to name the reference list.
- Type a name for your list, then click OK. The new name is added to the existing collection of reference lists.
- Now you can treat it just like one of the existing reference lists. Follow the instructions for Adding Entries to a Reference List or Editing Entries in a Reference List
Deleting a Reference List
To delete a user-created reference list:- Click to highlight the list.
- Click Delete Reference List.
You can delete only user-created reference lists. You may not be able to delete reference lists created by your backend system. Check with your Commure Pro consultant before deleting a reference list, as the system may not function properly if you incorrectly delete a reference list.
Completed Status Reference List
The Completed Status reference list should be used in cases where the backend Laboratory Results system uses more than four statuses to indicate whether the processing of the laboratory result is finished. If your system uses four or less statuses, you can choose to instead map panel completion status using the Map Panel Completed Status option, found on the Institution tab, under Lab Results Settings (see Mapping Completion Status). However, if there is any possibility of the number of statuses increasing, it may be wise to use this option, as it allows for growth. Do not map completion statuses in both options; map them in either the Map Panel Completed Status option or in this Completed Status reference list. Some common examples of lab completion statuses are Pending, Preliminary, Unknown, and Final. These examples are listed in order from the least complete to the most complete status. In the Commure Pro system, a given panel can have one or more components, and each component within a panel has its own completion status associated with it. Many of the lab results displays on both the Physician Portal and on handheld devices show summarized information for the panel as a whole. In these cases, the system must determine the overall completion status for the panel. To do so, the system reviews each of the individual component statuses in the panel, and selects the “least complete” status as the panel’s overall completion status. In this option, you must prioritize the completion statuses from your backend Lab Results system, so that the overall completion status for a panel can be determined. Generally, the entries for Completed Status are automatically created when the interface to your backend Lab Results system is implemented. All you need do is edit the entry for each backend status, and modify the Name and numeric Sort Order (priority). For example, if your backend system uses five statuses, assign each status a sort order of 1 to 5, with 1 being used for the least complete status, and 5 being used for the most complete status. The fields for each status should be completed as follows: Name Enter the label you wish to be displayed to users in the various Commure Pro lab results display options. System Identifier This is the identifier for the status from your backend system; you should not make any changes to this field unless you have reason to believe it is incorrect. Sort Order: Enter the priority of the status, as described above. If you do not assign a Sort Order to a status, it is automatically assigned one of 0 (zero), which would be considered the “least complete” status. This might happen, for example, if a new status were implemented in your backend system, and you did not use this option to prioritize itService Site Types Reference List
The Service Site Types reference list comprises a list of all the types of sites where services can be provided to patients (service sites are also known as places of service). Keep in mind, these are general categories of service sites, not actual physical locations. There are four default service site types:Other, Inpatient, Outpatient, and Office. You can add more service site types if your organizations needs them. Using the Service Sites property on the Institution tab (under Charge Capture settings), you can then list the charge service sites from which you want users to select when entering charges. Each charge service site maps to a service site type from this reference list. You can keep a simple one-to-one relationship between charge service sites and service site types, or you can map several charge service sites to a single service site type. For example, North Inpatient and South Inpatient may be two different charge service sites, and therefore may be available as two separate choices when entering a charge, but you can map both of them to the single service site type Inpatient. Please refer to Configure Service Sites for more information. The Commure Pro system is pre-configured with several default service site types in the Service Site Types reference list, each of which has a numeric system identifier. For the default service site types of Other, Inpatient, Outpatient, Office, and Observation, the numeric identifiers are 0, 1, 2, 3, or 4, respectively. (These are the values that are typically sent over the interface). If your organization has enabled the standard Visit - Place of Service code edits, those code edits correspond to these numeric system identifiers. When a user enters a charge, they select a charge service site. The charge service site is mapped to a service site type as describe above. The Visit - Place of Service code edit then fires based on the numeric system identifier for the service site type associated with the charge transaction. However, if desired or necessary for the interface to your billing system, you can change the system identifiers for the default service sites to alpha values (such as IP for Inpatient). If you do so, be sure to deactivate the associated standard code edit (which uses the numeric identifier) and create a new custom code edit so that the new alpha identifier is associated with it. You can also add new service sites with either numeric or alpha values, and create custom code edits for them.Source Reference List
If your organization plans to implement the Health Information Exchange (HIE) option so that users can view the sources from which clinical data are derived, you will need to configure the Source reference list. This reference list contains all sources from which data is derived, including system sources for dictionaries (such as drug databases) as well as sources of patient clinical data (such as outside hospitals). There two settings below allow users to filter clinical data by the source (hospital) from which it was derived: Admin - User - HIE - Filter on Source (Web) Admin - User - HIE - Filter on Source (Handheld) You can use the Context field to designate which sources from this reference list should appear in the users’ Source filter list. To include a source in the filter list, enter “HIE” or “hie” in the Context field. Typically, you would set the Context to “HIE” for all hospitals/organizations from which you derive patient clinical data, and also for the “MANUALLYADDED” entry, since this is the source that is used for problems (diagnoses) that are entered directly in the Commure Pro system. You should leave the Context field blank for system sources such as drug databases. To add “HIE” or “hie” as the context for a source:- Select Admin > System Management > Reference Lists.
- Select the Source reference list. A list of sources appears on the right pane.
- Enter “HIE” or “hie” in the Context field for all sources that you want to appear in the Source filter list.
- Select Save to save your changes.
If a new source appears on any clinical results in your system, but has not yet been added to the Source reference list, the new source will automatically appear in the Source filter list. This ensures that providers can select from all designated HIE sources, as well as any new sources, even if your administrator is not aware of the new sources.
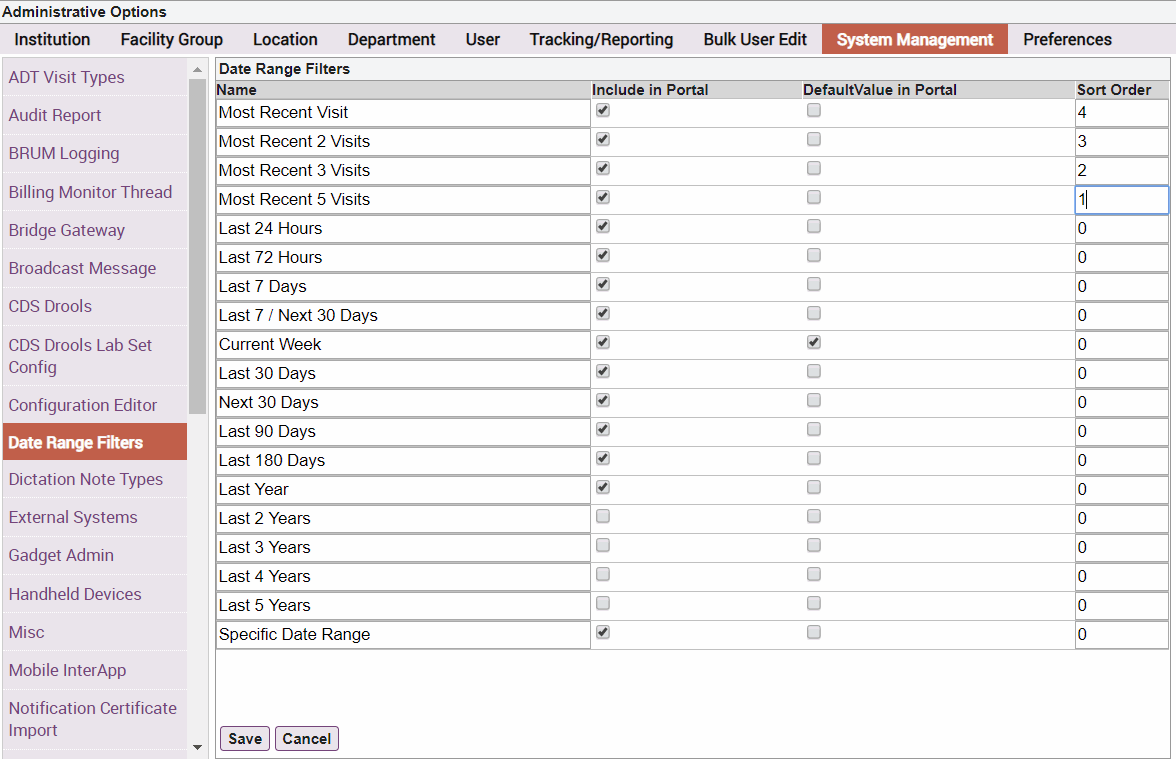
Date Range Filters
You can use the Date Range Filters option to configure the various choices that are included in the Timeframe drop-down list that lets users select the amount of patient data to display in the Patient Data Display area, as shown below. You can also configure a default value for the Timeframe.
- Select Admin > System Management > Date Range Filters.
- Configure the following options for each timeframe filter:
- Include in Portal—Determines whether to include or exclude each option from the time-based filter list.
- Default Value in Portal—Determines which option to display to users in the drop-down list by default. (You should select only a single option from this list.)
- Sort Order—You can create a custom sort order by specifying sort order precedence in a numeric sequence, starting by entering the value 0 next to the option to display first in the list, 1 next to the option to display next, 2 for the 3rd item to display, and so on, until you specify a custom sort order for all options that have been configured to be included in the time-based filters list. Note that all list entries set to the value 0 retain their order as shown on the Date Range Filters pane, and display of these items takes precedence over the items configured with the numeric sequence 1, 2, 3, etc. For example, you might configure the system to display all the time-based filters except those that are older than one year in the past, with a default value of “Last 30 Days.” A site might choose to configure their system in this way if they perform a purge of all data that exceeds one year in the past. Here, users will see the selection “Last 30 Days” in the drop-down menu when they first visit the portal. You could then configure the sort order of items on the list to start with the option “Last 24 Hours”, followed by “Last 72 Hours”, and so on through the list items that specify 0 as the sort order. The top four entries in the list shown below will display at the end of the list, starting with “Most Recent 5 Visits” and ending with “Most Recent Visit.”
Relationships
In the Commure Pro system, a provider must have a relationship with a patient visit in order for that patient to appear on the provider’s patient list. For example, a provider might have a consulting relationship, or he might be the admitting, attending, or scheduled provider for the visit. The Relationships option allows administrators to specify how users’ patient lists should be populated based on those relationships, as well as whether or not users can manually remove visits with specific relationships. For an in-depth discussion of how the Relationships option can be used to do control these actions, please refer to Relationships Management. This section of the user documentation simply discusses the mechanics of the Relationships option itself. To access the Relationships option:- Click the Admin tab, followed by the System Management tab.
- Click the Relationships option.
- A list of all relationships appears on the right side of the screen.
- Make your changes:
- To set or unset any of the three flags for a relationship (ADT Autopopulate, Declarable, Removable), simply click the checkbox(es) that you want to change.
- To change the sort order for one or more relationships, edit the number in the Sort Order column. The sort order affects the order in which the given relationship appears in the Relationship drop-down list when a user manually adds, sends, or gets a patient. A value of 0 means that it appears at the top of the drop-down list, a value of 1 appears in the second position, and so on. If there are several relationship types with the same sort order number assigned, they appear in random order at that position (e.g., several relationships with a sort order of 1 will all appear in random order after the relationship that was assigned a sort order of 0).
- When you are done making your changes, click the Save button to save them. Or click the Cancel button to exit this option without saving your changes.
Commure Pro Visit Types
You can use the Commure Pro Visit Types option to set the parameters to use for each type of visit in the Commure Pro system. For example, you can determine which visit types should be included on the Schedule tab; whether a visit type should appear in various reports of missing charges; and which visit type should appear as the “current” visit on providers’ patient lists. There are two sets of default Commure Pro Visit Types that can be pre-loaded into the system as a starting point. You may modify these to suit your needs, or create additional visit types. The default visit types are:| Standard (loaded on all systems) | Additional (loaded by client request) |
|---|---|
| Inpatient | Observation |
| Outpatient | Pre-Registration/Pre-Admit |
| Emergency Room | Recurring Outpatient |
| Inpatient Appointment |
- On the standard Patient Data Display, in the Visit summary list, in the Type column (the Patient Data Display is visible on the Patient List tab, or after clicking the Details button
- On the Patient Search tab, in the criteria section, as the Visit Type drop-down list (enabling you to search for visits of a specific type)
- On the Patient Search tab, in the results section, as the Type column (enabling you to view the visit type for each visit listed in the search results)
- On the Patient Search tab, after searching for a patient or visit and possibly selecting one, when clicking on the Add Visit button (enabling you to select the type of visit that you want to manually add)
- On the Patient Search tab, after searching for a patient or visit and finding no matches, the system displays a list of visit types (enabling you to manually register a patient and add a visit for them all in one step) Please note that the ADT visit types and Commure Pro visit types are interrelated. Each ADT visit type must be mapped to one Commure Pro visit type. Several ADT visit types can be mapped to the same Commure Pro visit type. If you want users to be able to manually register patients using a particular Commure Pro Visit Type, an ADT Visit type that has MANUALREG as a source must be mapped to that Commure Pro Visit type. Please refer to ADT Visit Types for more information on mapping visit types.
Adding or Editing Commure Pro Visit Types
As a general rule, it is recommended that you purge your caches whenever you make any changes to Commure Pro visit types. When editing existing visit types, you should purge both session cache and mobilizer cache. When adding new visit types, you only need to purge session cache, as purge of mobilizer cache occurs automatically when you add new Commure Pro visit type. For more information, see Clear Web & Session Caches and Purge Mobilizer Cache. In both cases, you should re-start the dispatcher after completing the process of adding or editing Commure Pro visit types. For more information, consult your Commure Pro representative. To enter a new Commure Pro visit type, follow these steps:- Click the Admin tab, followed by the System Management tab.
- Click the Commure Pro Visit Types option.
- Click the Add Commure Pro Visit Type button.
- Enter the appropriate information for the new visit type in each of the attribute fields. Each field is described in the section entitled Defining the Attributes of Commure Pro Visit Types.
- Click the Save button. Please be aware that the save process can take a few minutes, because the mobilizer cache is cleared behind the scenes as the new Commure Pro Visit Type is added.
- After adding a new Commure Pro visit type, you must run Recalculate InFacility and restart the dispatcher (see Run InFacility Calculation). To edit an existing Commure Pro visit type, follow these steps:
- Select Commure Pro Visit Types on the System Management tab.
- Click on the Commure Pro visit type that you want to edit from the list in the left pane. The attributes of the selected Commure Pro visit type are displayed in the right pane.
- Click the Edit button, located at the bottom of the right pane.
- Enter or modify any attribute (except System Identifier) for the selected Commure Pro visit type. Each field is described in the section entitled Defining the Attributes of Commure Pro Visit Types.
- Click the Save button to save your changes, or click the Cancel button to exit without saving.
- After editing a Commure Pro visit type, you must run Recalculate InFacility and restart the dispatcher (see Run InFacility Calculation).
Deactivating or Reactivating Commure Pro Visit Types
You can deactivate a Commure Pro visit type if you no longer want it to be used. When you do so, any existing patient visits of that type must be transferred to a different Commure Pro visit type.You cannot deactivate the default Commure Pro visit type. If you no longer want to use that visit type, before deactivating it you must assign a different visit type to be the default. See Setting a Default Commure Pro Visit Type.
- Select Commure Pro Visit Types on the System Management tab.
- Click on the Commure Pro visit type that you want to deactivate from the list in the left pane. The attributes of the selected Commure Pro visit type are displayed in the right pane.
- Click the Deactivate button, located at the bottom of the right pane. The following message appears: “Are you sure you want to deactivate the selected Commure Pro Visit Type?”
- Click Yes to continue, or click No to exit without deactivating. The Move Visits and Map ADT Visit Types dialog appears.
- All existing patient visits of this type must be transferred to a different Commure Pro visit type. In the Select Default Target field, select the new Commure Pro visit type to which you want to transfer the existing visits.
- If any ADT visit types are mapped to this Commure Pro visit type, you must now select a different Commure Pro visit type to which they will be mapped. For each ADT visit type listed, select a visit type in the New Commure Pro Visit Type column. (See ADT Visit Types for more information on mapping.)
- Click the Move button to deactivate the visit type and move its associated visits, or click the Cancel button to exit without making any changes. If you deactivate a Commure Pro visit type in error, you can reactivate it. However, this does not restore the visits that had been transferred to a new visit type when you deactivated the visit type. Those visits remain set as the new visit type. Activating a deactivated visit type simply enables it for use with new visits.
- Select Commure Pro Visit Types on the System Management tab.
- Click on the deactivated Commure Pro visit type that you want to reactivate. The attributes of the selected Commure Pro visit type are displayed in the right pane.
- Click the Activate button, located at the bottom of the right pane. The following message appears: “Are you sure you want to activate the selected Commure Pro Visit Type? Note, this will not restore old visit types to existing visits.”
- Click Yes to continue, or click No to exit without reactivating.
Setting a Default Commure Pro Visit Type
In the Commure Pro Visit Types option, you can specify one visit type as the default Commure Pro visit type. The values of the parameters on the default Commure Pro visit type are then used as the default values, or starting values, each time you create a new Commure Pro visit type. This feature allows you to quickly create several Commure Pro visit types with similar attributes (although you can still change the value of any parameter as needed for a specific visit type). Another reason for setting a default Commure Pro visit type relates to the mapping of ADT visit types to Commure Pro visit types. In a Commure Pro with Commure Pro Repository™ configuration, if the system receives an interface message for a visit type that is not listed in the ADT Visit Types option, it creates an ADT visit type automatically. Since every ADT visit type must be mapped to a Commure Pro visit type, you should set a default Commure Pro visit type to use in this event. Any auto-created ADT visit types are then automatically mapped to the default Commure Pro visit type. To set a default Commure Pro visit type, click the Flag icon next to the visit type that you want to set as the default. When prompted with the message “Are you sure you want to change the default visit type to [Commure Pro visit type system identifier],” click the Yes button. You will note that the flag changes from gray to red, indicating that it is now the default Commure Pro visit type.Defining the Attributes of Commure Pro Visit Types
Each Commure Pro Visit Type can have the attributes listed below assigned to it. All attributes that contain “Charge Capture” in their label are applicable to only the Desktop Charge Capture and Mobile Charge Capture applications. The section entitled Sample Commure Pro Visit Types contains examples of some commonly used visit types and how the attributes might be set. Name Enter a descriptive name for this Commure Pro visit type, such as Inpatient Visit or Outpatient Appointment. This is a required field. System Identifier Enter an internal system identifier for this visit type. It is not visible to users anywhere except in this option. The system identifier must be unique (cannot be used for more than one Commure Pro visit type), and Commure Pro recommends that you limit it to one word (can be the same word as the Name). This is a required field. Use the following four fields to define a time frame for acceptable dates of service for the visit type, based on the start and/or end date of the visit. These settings affect the Charge Capture and NoteWriter processes on the web and Apple platforms. (Charge Capture, NoteWriter): Activate Date (Web, Android, Apple) To set a starting point for a date of service when entering charges or creating a note for this visit type, select the type of date on which the starting point should be based. You can base it on an admission date or a scheduled date. If there should be no limitations, leave this field blank. For example, for an inpatient visit, you would most likely set this field to Admit. (Charge Capture, NoteWriter): Activate Days (Web, Android, Apple) If you selected either Admit or Scheduled in the Charge Capture: Activate Date field, enter the number of days before the selected date, that should be considered as the earliest acceptable date of service for this visit type. Continuing the inpatient visit example above, you might set the activate days to 0, indicating that the earliest acceptable date of service is the admit date. If you set it to -1, then the earliest acceptable date of service would be the day before admission. The value must be between -30 and 0. (Charge Capture, NoteWriter): Deactivate Date (Web, Android, Apple) To set an end point for a date of service when entering charges or creating a note for this visit type, select the type of date on which the end point should be based. You can base it on a discharge date or a scheduled date. If there should be no limitations, leave this field blank. For example, for an inpatient visit, you would most likely set this field to Discharge. (Charge Capture, NoteWriter): Deactivate Days (Web, Android, Apple) If you selected either Discharge or Scheduled in the Charge Capture, NoteWriter: Deactivate Date field, enter the number of days after the Deactivate Date, that should be considered as the latest acceptable date of service for this visit type. Using an inpatient visit as an example, you might set Deactivate Days to 0, indicating that the latest acceptable date of service is the day of discharge (specifically, until 23:59 on the discharge day). If you set it to 1, the latest acceptable date of service would be the day after discharge. The value must be between -30 and 5000. In the case of NoteWriter, Deactivate Days may be used in conjunction with the following user preference: Admin - User - NoteWriter - # of Days Beyond Visit End to Allow Add/Edit Note This user-level preference defines the number of days after a visit is deactivated that a provider can create or edit a note. This is useful in cases where a provider needs to write a note or edit a draft note, but the patient has been discharged and now the visit is unavailable. In this scenario, the provider’s timeframe for writing or editing a note for that visit can be extended using this user preference. Let’s look at an example where we are writing a note for a patient who was discharged on January 28. If the Deactivate Days setting is 2 (meaning the visit is available for notes 2 days after the visit is deactivated), then a provider could create a note for the visit until January 30. However, if the Deactivate Days setting is 0, then the visit will be unavailable for notes after January 28 (the discharge date). In this example, an Administrator could extend the timeframe for that provider using this user preference.Since the Deactivate Days setting can vary for each visit type, the value used for this user preference may vary as it is relative to when a visit type is deactivated. Calculate the # of Days Beyond… preference based on the Deactivate Days setting (Deactivate Days + # Days Beyond… = Date until which provider can enter or edit a note for the visit type).
Administrators with Level 1 or 2 access are not restricted by the Allow Setting Service Date “n” Days Before Today setting, although a warning message alerts them when they back-date a charge farther back than their preference setting indicates.
- When this setting is checked, the user is able to enter multiple dates or date ranges on charge transactions entered against visits of this type. The service dates can be consecutive, or not, as appropriate for the charges they are entering. Upon saving, the application checks to ensure that the selected dates or date ranges fall within billable window that is configured for the visit. Please note that the user must also have the following setting in their user profile set to Yes:
- When this setting is not checked, the user is able to enter only a single service date on charge transactions entered against visits of this type.
- In Desktop Charge Capture, on the Patient Charge Status sub-tab (located under the Charges tab), it shows charge status for visits in the context of the user’s patient list. When the Charge Capture: Check Per Day field is left unchecked, the visit is represented as a single button. When the field is checked, the visit is represented by multiple buttons (one for each day of the visit), from the visit start date to the visit end date. If there is no end date associated with the visit (no discharge date), the buttons or icons continue through today’s date. Users can see the charge status for each day of the visit, and if charges have not been entered for a particular visit day, they can click on the button to enter them.
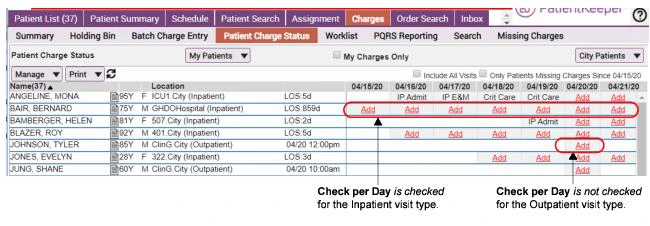
- In Desktop Charge Capture, when Show Visits is checked in the Charges display option; it shows the charge status for visits, in the context of a single patient’s list of visits. When the Charge Capture: Check Per Day field is left unchecked, the visit is represented by a single row. When the field is checked, the visit is represented by multiple rows (one for each day of the visit), from the visit start date to the visit end date. If there is no end date associated with the visit (no discharge date), the rows continue through today’s date. If no charges have yet been entered for a particular day, users can click an Add link to enter them.

- If your organization has implemented the Commure Pro-Cerner Charge Capture app, then your users can click a link in the Cerner® application to access the Commure Pro Charge Transaction screen in order to create or edit a charge. When using this feature, diagnoses from the Cerner visit can be automatically defaulted into the Selected Codes section of the Charge Transaction screen.
- When the Charge Capture: Check Per Day property is checked, the visit is considered a “multi-day” visit. If defaulting is enable for the user for multi-day visits, then there is specific logic that determines which diagnoses from the Cerner visit should be automatically defaulted into the Selected Codes section.
- When the Charge Capture: Check Per Day property is left unchecked, the visit is considered a “single-day” visit. If defaulting is enable for the user for single-day visits, then the app simply defaults all diagnoses from the Cerner visit into the Selected Codes section. Please note that this is only one of several settings necessary to configure the Commure Pro-Cerner Charge Capture app. See Configuring the Commure Pro-Cerner Charge Capture App for complete instructions and for more information on the diagnosis defaulting logic.
- None: nothing should default in the Date of Service field. (This is the default setting.)
- Today: today’s date should default in the Date of Service field.
- Visit Start: the start date for the visit should default in the Date of Service field. For visit types that have an admit date (such as inpatient visits), the admit date is defaulted. For visit types that have only a scheduled date (such as outpatient appointments), the scheduled date is defaulted.
For the inpatient visit type only, nothing will default into the Date of Service field if the setting below in the user’s profile is set to No.
- All: (the default) Show a warning for all diagnoses that have a flag indicating that they are not recommended to be in the primary position. Diagnoses flagged in the IMO database as not recommended in the primary position for inpatient visits, outpatient visits, or all visits, will display a warning message to the user. This is the default setting, so that if you have not yet configured this option, a warning message will be shown to users for all diagnoses that have a non-primary flag.
- Inpatient: Treat this visit type as an Inpatient type of visit with respect to diagnoses not recommended to be primary. Diagnoses flagged in the IMO database as not recommended in the primary position for inpatient visits or all visits, will display a warning message to the user.
- Outpatient: Treat this visit type as an Outpatient type of visit with respect to diagnoses not recommended to be primary. Diagnoses flagged in the IMO database as not recommended in the primary position for outpatient visits or all visits, will display a warning message to the user.
- None: Treat this visit type as neither inpatient nor outpatient. Only those diagnoses flagged in the IMO database as not recommended in the primary position for all visits, will display a warning message to the user. You might select this option for a visit type that is neither inpatient nor outpatient, such as “Pre-Registration.” When a user selects a non-primary diagnosis as the primary diagnosis for a charge transaction, and the visit type is configured to display a warning (based on the settings above), a Red Exclamation icon
 is displayed next to the diagnosis. The user may hover their cursor over the exclamation mark to see the following message: “Please ensure that your primary diagnosis reflects the reason for your encounter. If no other diagnosis exists, continue with this selection.”
- In Desktop Charge Capture:
- The Patient Charge Status sub-tab (located under the Charges tab).
- The Charges display option, when Show Visits is checked.
- In Mobile Charge Capture:
- In the Patient List module, when Charge Capture Status is displayed in the right-hand column.
- In the Charge Capture module main view. Check this box if you want visits if this type to be included in the above displays, so that users can see the charge status for the visit, and potentially enter charges. This setting works in conjunction with the Charge Capture: Check Per Day setting.
-
When this setting is checked, and a transaction already exists for the visit date (for visits of this type), the application then checks the setting below in the user’s profile:
Admin - User - Charge Capture - Prompt to Edit Transaction if Visit/Date is Coded
- If set to Yes, prompt to create new or edit, and the current user has the appropriate permissions to edit the existing transaction, then the user is warned that another transaction for this date already exists and is offered choices to either edit the existing transaction or create a new one. When confirming whether the existing transaction may be edited by the current user, all of the standard editing rules are applied, briefly summarized here:
- The user must be able to view the existing transaction, based on the settings below: Admin - User - Charge Capture - Set Patient List Charge View Access
- If the existing transaction was created by a different user, the setting below must be set to Yes: Admin - User - User Permissions - Level 2 / 3: Can Edit Other Users’ Charges
- If the existing transaction is in the Outbox, the setting below must be set to Yes: Admin - User - Charge Capture - Allow User to Edit Charges in Outbox
- Today’s date cannot exceed the number of day specified in the setting below: Admin - User - Charge Capture - Allow Editing a Charge “n” Days after Visit End
- If set to No, create new, or if the current user does not have the appropriate permissions to edit the existing transaction, the user is not warned of the existing transaction and always creates a new one.
- If set to Yes, prompt to create new or edit, and the current user has the appropriate permissions to edit the existing transaction, then the user is warned that another transaction for this date already exists and is offered choices to either edit the existing transaction or create a new one. When confirming whether the existing transaction may be edited by the current user, all of the standard editing rules are applied, briefly summarized here:
- When this setting is not checked, and a transaction already exists for the visit date (for visits of this type), the user is never warned that a transaction exists, and always creates a new one (regardless of how their user profile is configured).
- If this setting is checked: Initially, visits of this type will appear with an Add Charge link on the above tabs for all providers who have a relationship to the visit. When any provider enters a charge transaction for the visit (with their name as the billing provider), the visit no longer appears with an Add Charge link on these tabs for all providers who have a relationship to the visit. Instead, it appears as a coded visit (with a link to the entered charges).
- If this setting is not checked: Initially, visits of this type will appear with an Add Charge link on the above tabs for all providers who have a relationship to the visit. The visit remains with an Add Charge link on the above tabs until each provider enters a charge transaction for that visit (with their name as the billing provider). If any provider enters a charge with their name as the billing provider, the Add Charge link continues to display for the other provider(s) who have a relationship to the visit, in addition to a link for the entered charge (for the first provider). An example of when you might configure the parameter in this manner is when you have co-surgeries with multiple scheduled providers. By leaving this option unchecked, each surgeon will be able to easily enter his or her own charge(s).
- If this setting is checked: Initially, visits of this type will appear with a Not Coded link on the Schedule of providers who are the scheduled provider for the visit. When any provider enters a charge transaction for the visit (with a billing provider who either is or is not the scheduled provider), the visit no longer appears with a Not Coded link on the Schedule of the provider who is listed as the scheduled provider for the visit. Instead, it appears as a coded visit (with a link to the entered charges).
- If this setting is not checked: Initially, visits of this type will appear with a Not Coded link on the Schedule of providers who are the scheduled provider for the visit. The visit remains with a Not Coded link until that provider enters a charge transaction for that visit (with their name as the billing provider). If a different provider enters a charge with their name as the billing provider, the Not Coded link continues to display for the scheduled provider, in addition to a link for the entered charge (for the other provider).
If the Commure Pro Visit Type setting is not checked and a charge is entered for a not coded visit directly from the Schedule tab, the user must refresh the screen after the charge is entered in order to see the Not Coded link in addition to the edit link for the coded charge. This only happens if the provider selected as filter criteria was the scheduled provider for visit, and the charge entered had a different provider as the billing provider.
- Yes: When editing an existing charge, the diagnosis codes currently associated with the visit in Cerner completely replace the set of diagnoses that were previously entered in the Selected Codes section on the charge transaction.
This setting takes effect only if diagnosis defaulting is enabled for the user via the Commure Pro-Cerner Integration: Default All Diagnoses to Single-Day Visits or Commure Pro-Cerner Integration: Default Ranked Diagnoses to Multi-Day Visits setting. For example, if this Commure Pro Visit Type is classified as a single-day visit via the Charge Capture: Check Per Day attribute, then the Commure Pro-Cerner Integration: Default All Diagnoses to Single-Day Visits user setting must be set to Yes, in order for this setting (Charge Capture: Update Charge Diagnoses When Editing Charge in Cerner App) to take effect.
- No: When editing an existing charge, the diagnoses that were previously entered in the Selected Codes section on the Charge transaction remain unchanged. Please note that this is only one of several settings necessary to configure the Commure Pro-Cerner Charge Capture app, see Configuring the Commure Pro-Cerner Charge Capture App for complete instructions.
- Always: Select this option if you want all visits of this type to be considered for auto-selection.
- Only With Relationship: Select this option if visits of this type should be auto-selected only in cases where the user who is entering the charge or note has a relationship to the visit.
- Never: Select this option if you never want visits of this type to be auto-selected.
This setting applies only to the Desktop Charge Capture and NoteWriter web applications. Visit are never auto-selected on handheld devices.
- the visit type allows it (determined via this option) and
- if the setting below is set to Yes for the user who is entering the charge or note: Admin - User - Patient List - Auto-select visit during “Add” Activities How does the auto-select feature work? When a patient has more than one visit, the system must first determine which visits are “eligible for selection” by the user who is attempting to enter the charge. Whether or not a visit eligible is based on the following two settings in the user’s profile. Admin - User - Charge Capture - Allow Editing a Charge “n” Days after Visit End This setting determines how many days past the visit’s end date (typically, the discharge date or scheduled date), that a Level 3 user may enter or edit charges. Let’s look at an example where this field is set to 5. For visits that have admit and discharge dates, only visits that are currently still admitted, or that have been discharged within the last 5 days, would be considered eligible. Or for visits with a scheduled date, only those visits with a scheduled date within the last 5 days would be eligible.
Administrators with Level 1 or 2 access are not restricted by this setting. For administrators, older visits are still eligible for selection, even though they are outside of what is normally considered to be the “billable window.” This allows them to make corrections when necessary, or to bill for missed charges.
- If there is only one eligible visit, it is selected.
- If there is more than one eligible visit, the system next determines which visit types in the list can be auto-selected.
- Visit types that have Always are considered for auto-selection.
- Visit types that have Only With Relationship are considered for auto-selection if the user has a relationship to the visit. If the user does not have a relationship, it is not selected.
- Visit types that have Never are never considered for auto-selection.
- From the remaining visits that are potential candidates for auto-selection, the system now selects the visit that it considers to be the “current visit.” See How does the current visit calculation work?.
Typically only Outpatient visits are included in the Schedule tab. To display Inpatient or ER visits in the Schedule tab, see your Commure Pro Representative as additional settings and XML customizations are needed.
- A value of -1: This results in removal at the moment of discharge.
- A value of 0: This results in removal at the end of the day, on the day of discharge.
- A value of 1: This results in removal at the end of the day, 1 day after discharge.
- A value of 5: This results in removal at the end of the day, 5 days after discharge.
- Inpatient: This display is based on the assumption that an admit date, and eventually a discharge date, are associated with the visit type.
- The summary portion of the Visits display option shows the admit date/time and discharge date/time in the Arrival and Discharge columns, respectively. The Provider column displays the attending provider.
- The detail portion of the Visits display shows the Arrival Date, Discharge Date, Admitting Diagnosis, Length of Stay, Discharge Diagnosis, and Discharge Disposition.
- The manual registration screen contains fields for Admit Date/Time, Discharge Date/Time, Admitting Diagnosis, Discharge Diagnosis, Discharge Disposition, Admitting MD, and Attending MD (as well as several other provider fields).
- Pre-Reg: This display type is based on the assumption that an admit date, and possibly a discharge date, are associated with the visit type.
- The summary portion of the Visits display option shows the admit date and discharge date (if available) in the Arrival and Discharge columns, respectively. The Provider column displays the attending provider.
- The detail portion of the Visits display shows the Arrival Date, Discharge Date (if available), and the Admitting Diagnosis.
- The manual registration screen contains fields for Admit Date/Time, Discharge Date/Time, Admitting Diagnosis, Admitting MD, and Attending MD (as well as several other provider fields).
- Outpatient: This display type is based on the assumption that the visit lasts only one day, and has only a scheduled date.
- The summary portion of the Visits display option shows the scheduled date/time in the Arrival column and nothing in the Discharge column. The Provider column displays the scheduled provider (if available, otherwise the attending provider is displayed instead).
- The detail portion of the Visits display shows the Appointment Date/Time and the Reason for Visit.
- The manual registration screen contains fields for Appointment Date/Time, Reason for Visit, and Scheduled MD (as well as several other provider fields).
- Recurring: This display type is based on the assumption that the visit has a start date, but possibly no end date, and although the visit can occur on multiple days, those specific dates are unknown.
- The summary portion of the Visits display option shows the start date and end date (if available) in the Arrival and Discharge columns, respectively. The Provider column displays the scheduled provider (if available, otherwise the attending provider is displayed instead).
- The detail portion of the Visits display shows the Start Date, End Date (if available), and Reason for Visit
- The manual registration screen contains fields for Start Date/Time, End Date/Time, Reason for Visit, and Scheduled MD (as well as several other provider fields). Several of the following settings are visible in only a Direct Integration to MEDITECH® with Downtime Solution configuration. These settings all contain the word “Bridge” in their label, and they affect how far into the past and future that information should be retrieved from the MEDITECH system, for each visit type. Information is retrieved from the MEDITECH system via the Commure Pro-MEDITECH Bridge™, which is an interface of data from MEDITECH to the Commure Pro Repository™.
Sample Commure Pro Visit Types
The table below illustrates the default settings that are associated with each visit type when they are initially installed at a client site. Please note that these are only default settings, and if necessary, you can change the attributes based on your own organization’s needs and requirements. You can also create additional visit types, if needed.| Commure Pro Visit Type Attribute | Emergency Room | Inpatient (regular) | Outpatient (regular) | Pre-Reg | Recurring Outpatient | Observa-tion | Inpatient Appt |
|---|---|---|---|---|---|---|---|
| Name | ER | Inpatient | Outpatient | Pre- Registration | Recurring | Observation | IP Appt |
| System Identifier | E | I | O | PI | R | OBS | IPAPPT |
| PLv1 Short List: Add Date & PLv2: Add to Cache | Admit | Admit | Scheduled | Admit | Scheduled | Admit | Scheduled |
| PLv1 Short List: Add Days & PLv2: Add to Cache | 0 | 0 | -5 | -5 | -5 | 0 | -5 |
| PLv1 Short List: Remove Date & PLv2: Remove from Cache | Discharge | Discharge | Scheduled | Admit | Scheduled | Discharge | Scheduled |
| PLv1 Short List: Remove Date & PLv2: Remove from Cache | 5 | 5 | 5 | 5 | 120 | 5 | 5 |
| RESULTS of the four settings above: | Added on admit date, removed 5 days after discharge. | Added on admit date, removed 5 days after discharge. | Added 5 days before scheduled date, removed 5 day after scheduled date. | Added 5 days before admit date, removed 5 days after admit date (in the event that a discharge date is never entered). | Added 5 days before scheduled date, removed 120 days after scheduled date. | Added on admit date, removed 5 days after discharge. | Added 5 days before scheduled date, removed 5 days after scheduled date. |
| Include in Schedule | No | No | Yes | No | No | No | Yes |
| Visit Detail Display Type | Inpatient | Inpatient | Outpatient | Pre-Reg | Recurring | Inpatient | Outpatient |
| Charge Capture: Date of Service Default | Visit Start | Today | Visit Start | None (the default setting) | Today | Today | Visit Start |
| RESULTS of the setting above: | Date of service defaults to admit date. | Date of service defaults to today. | Date of service defaults to scheduled date. | No default date of service. | Date of service defaults to today. | Date of service defaults to today. | Date of service defaults to scheduled date. |
| Charge Capture: Include in Patient Charge Status | Yes | Yes | Yes | No | No | Yes | Yes |
| Charge Capture: Check Per Day | No | Yes | No | n/a | n/a | Yes | No |
| RESULTS of the two settings above: | Appears in displays of charge status as one visit day (admit date). | Appears in displays of charge status as multiple visit days (admis-sion through today or discharge date). | Appears in displays of charge status as one visit day (sched-uled date). | Does not appear in displays of charge status. | Does not appear in displays of charge status. | Appears in displays of charge status as multiple visit days (admis-sion through today or discharge date). | Appears in displays of charge status as one visit day (sched-uled date). |
| Charge Capture: Activate Date | Admit | Admit | Scheduled | Admit | Scheduled | Admit | Scheduled |
| Charge Capture: Activate Days | 0 | 0 | 0 | 0 | 0 | 0 | 0 |
| Charge Capture: Deactivate Date | Discharge | Discharge | Scheduled | Discharge | Scheduled | Discharge | Scheduled |
| Charge Capture: Deactivate Days | 0 | 0 | 0 | 0 | 120 | 0 | 0 |
| RESULTS of the four settings above: | Date of service must be between admit and discharge dates. | Date of service must be between admit and discharge dates. | Date of service must be equal to scheduled date. | Date of service must be between admit and discharge dates. | Date of service can be on scheduled date, and up to 120 days past scheduled date. | Date of service must be between admit and discharge dates. | Date of service must be equal to scheduled date. |
| Charge Capture: Include Not Coded in Worklist and Search | Yes | No | Yes | No | No | Yes | Yes |
| Charge Capture: Name for Not Coded Filter on Worklist and Search | ER | n/a | Outpatient | n/a | n/a | Observation | IP Appt |
| Charge Capture: Include Appointment in Missing Charge Filter (handheld only) | No | No | Yes | No | No | No | No |
| Charge Capture: Remove Visit from Worklist/Schedule With a Single Charge | No | No | No | No | No | No | No |
| Charge Capture: Notify on Add Charge if Existing Transaction for Visit/Date | No | No | No | No | No | No | No |
| Charge Capture: Allow Multi-Day Copy and Add | No | No | No | No | No | No | No |
| Current Visit: Start Date | Admit | Admit | Scheduled | Admit | Scheduled | Admit | Scheduled |
| Current Visit: End Date | Admit | Discharge | Scheduled | Discharge | Scheduled | Discharge | Scheduled |
| Current Visit: Relative Ranking | 3 | 1 | 4 | 7 | 6 | 2 | 5 |
| Current Visit: Exclude if no relationship | No | No | Yes | Yes | Yes | No | Yes |
| RESULTS of the four settings above: | Current visit calculation is based solely on the admit date (most organiza-tions do not have a discharge date associated with ER visits), ranked 3rd against other visit types. | Current visit calculation is based on admit and discharge dates, ranked 1st against other visit types. | Current visit calculation is based on admit and discharge dates, ranked 4th against other visit types, but excluded if user does not have a relation-ship. | Current visit calculation is based on admit and discharge dates, ranked last against other visit types, and excluded if user does not have a relation-ship. | Current visit calculation is based on admit and discharge dates, ranked 6th against other visit types, but excluded if user does not have a relation-ship. | Current visit calculation is based on admit and discharge dates, ranked 2nd against other visit types. | Current visit calculation is based on scheduled date, ranked 5th against other visit types, but excluded if user does not have a relation-ship. |
| Current Visit: Auto-select visit (Add Charge, Add Note) | Allow | Allow | Allow with Relationship | Never | Allow with Relationship | Allow | Allow with Relationship |
| Bridge: Poll Ahead Days | 3 | 3 | 3 | 3 | 3 | 3 | 3 |
| Bridge: Poll Back Days | 3 | 3 | 3 | 3 | 3 | 3 | 3 |
| Bridge: Visit Start Date | Admit | Admit | Scheduled | Admit | Scheduled | Admit | Scheduled |
| Bridge: Visit End Date | Admit | Discharge | Scheduled | Discharge | Scheduled | Discharge | Scheduled |
| RESULTS of the four settings above: | Bridge looks ahead 3 days for visits, and backward 30 days (the first time it is run). Uses Admit date to determine visit start and end. | Bridge looks ahead 3 days for visits, and backward 30 days (the first time it is run). Uses Admit and Discharge dates to determine visit start and end. | Bridge looks ahead 3 days for visits, and backward 30 days (the first time it is run). Uses Scheduled date to determine visit start and end. | Bridge looks ahead 3 days for visits, and backward 30 days (the first time it is run). Uses Admit and Discharge dates to determine visit start and end. | Bridge looks ahead 3 days for visits, and backward 30 days (the first time it is run). Uses Scheduled date to determine visit start and end. | Bridge looks ahead 3 days for visits, and backward 30 days (the first time it is run). Uses Admit and Discharge dates to determine visit start and end. | Bridge looks ahead 3 days for visits, and backward 30 days (the first time it is run). Uses Scheduled date to determine visit start and end. |
| Override Default Location Display | No | No | No | Yes: Pre-Reg | Yes: Recurring | No | No |
| Display Discharged in Location | Yes | Yes | No | Yes | No | Yes | No |
| Handheld Label | ER | IP | OP | P-R | RECUR | OBS | IP APPT |
| Include all visit dates in PLv2 Time-Based Criteria | No | No | No | No | No | No | No |
ADT Visit Types
The ADT Visit Types option lets you define the various visit types that are interfaced from your source system or that can be manually registered directly in the Commure Pro system, and map each one to a visit type from the Commure Pro Visit Type list. Before attempting to add or edit entries in this option, you should first create all the standard visit types that might occur at your organization in the Commure Pro Visit Types option (see Commure Pro Visit Types). You can then use the ADT Visit Types option to indicate the following:- The visit types that are interfaced from your source system
- The visit types that you want to allow users to manually register directly in the Commure Pro system If the Commure Pro system receives an interface message for a visit type that is not listed in the ADT Visit Types option, it creates a new ADT visit type automatically. The mapping of the new ADT visit type to a Commure Pro visit type is handled as follows:
- In a Direct Integration to MEDITECH® with Downtime Solution configuration, the new ADT visit type is mapped automatically, based on the type of visit that it receives from MEDITECH.
| MEDITECH Visit Type | Mapped to Commure Pro Visit Type |
|---|---|
| Inpatient visit types | Inpatient (“I”) |
| Emergency room visit types | Emergency Room (“E” or “ER”) |
| Pre-registration visit types | Pre-Registration or Pre-Admit (“PI”) |
| All other visit types | Outpatient (“O”) |
- In a Commure Pro with Commure Pro Repository™ configuration, you should set a default Commure Pro visit type to use in this event. All new ADT visit types are them automatically mapped to the default Commure Pro visit type. Please refer to Setting a Default Commure Pro Visit Type for instructions. This option also allows you to select default charge service sites in order to indicate where each type of visit is most likely to occur. Please refer to Configure Service Sites for more information on setting service site defaults for charge entry.
Filtering ADT Visit Types by Source
The ADT Visit Type Maintenance screen includes a source-based filter dropdown at the top of the list. By default, the filter is set to All, which displays all ADT visit types regardless of source. You can select a specific source from the dropdown and click Apply to show only those visit types originating from that source. This is useful for managing large lists of visit types across multiple source systems. The table below illustrates some common ADT visit types that you might create:| ADT Visit Type Name | Abbreviated Name | Mapped to Commure Pro Visit Type | Default Service Site | Source |
|---|---|---|---|---|
| Emergency Room | ER | ER | Emergency Room | MANUALREG |
| Emergency Room | ER | ER | Emergency Room | HOSPITALSYSTEM |
| Walk-in Outpatient | WalkOP | Outpatient | Walk-in Clinic | MANUALREG |
| Outpatient | OP | Outpatient | Outpatient Clinic | HOSPITALSYSTEM |
| Inpatient | IP | Inpatient | Inpatient | HOSPITALSYSTEM |
| ADT Visit Type Name | Abbreviated Name | Mapped to Commure Pro Visit Type | Default Service Site | Source |
|---|---|---|---|---|
| Walk-In Outpatient | WI OP | Outpatient | Outpatient Clinic | MANUALREG |
| Outpatient Rehab Clinic | OP RH | Outpatient | Rehab Clinic | MANUALREG |
| Outpatient | OP | Outpatient | Outpatient Clinic | HOSPITALSYSTEM |
- On the standard Patient Data Display, when using the Visits display option, in the Visit Detail area for a particular visit (the Patient Data Display is visible on the Patient List tab or after clicking the Details button )
- On manual registration screens, when editing or manually adding a visit, the ADT visit type field may be available (registration screens are customized by organization, so the field may not be visible at all sites) To enter a new ADT visit type, follow these steps:
- Click the Admin tab, followed by the System Management tab.
- Click the ADT Visit Types option.
- Click the Add ADT Visit Type button.
- Enter the following information:
- Name: Enter a descriptive name for this ADT visit type, such as Walk-in Outpatient, or Emergency Room. This is a required field.
- Abbreviated Name: Enter a short name for this ADT visit type. This abbreviation is used when displaying the ADT visit type in various options throughout the application (see an itemization of displays at the end of this section). This is a required field.
- Map to Commure Pro Visit Type: Map this ADT visit type to an entry from the Commure Pro Visit Type list by selecting a Commure Pro visit type from the drop-down list. We might map the Walk-in Outpatient ADT visit type to the Outpatient Commure Pro visit type. This is a required field.
- Default Service Site: If desired, select a charge service site where this ADT visit type is most likely to take place. The Service Site charge header can be configured to automatically select your choice here as the service site whenever a user enters a charge for this ADT visit type. For example we might select the charge service site of Walk-in Clinic as the default service site for the Walk-in Outpatient ADT visit type. This field is not required. Please refer to Configure Service Sites for more information.
- Source: Select the source system in which this ADT visit type is created. Your options are SYSTEMNAME (where SYSTEMNAME refers to the source information system from which visits of this type are interfaced) or MANUALREG (to be able to manually register visits of this type). This is a required field.
the MANUALREG choice appears only if your site administrator has enabled the manual registration feature.
- Click the Save button.
Managing Provider Roles
The option for managing provider roles has been designed to standardize the nomenclature involving references to the role of provider.Handheld Devices
The Handheld Devices option allows you to view details about, edit, delete, retrieve logs remotely, and clear data remotely on provisioned Apple devices.Viewing Details about a Device
To review the details of a provisioned handheld device, follow these steps:- Select the Admin > System Management > Handheld Devices.
- Search for a user that has an associated handheld device by entering any portion of their first name, last name, or username in the Search field at the top of the screen, and then pressing Enter on your keyboard or clicking Refresh. A list of users with associated handheld devices is displayed, with columns for Device Name and User Name.
- Click on any row in the results list to display the information below for that device. Only a few fields can be edited (as noted below).
- Device ID: Indicates the unique internal ID for this device.
- Device Type: Indicates operating system of the device (iOS™ or Android™).
- Application: Indicates the application (Mobile Clinical Results) that has been selected for the device.
- Name (editable field): Identifies the unique device name that is assigned when a device is provisioned. This consists of the user’s username plus a unique number. See Renaming a Device for more information.
- Department: This field is deprecated and never shows a value.
- User: Indicates the username of the user.
- Horizontal Resolution: Indicates the width in pixels of the device screen.
- Vertical Resolution: Indicates the height in pixels of the device screen.
- Has Cell: Indicates that the device has cellular phone service. Not currently implemented.
- Has Keyboard: Indicates that the device has a keyboard.
- Has Touchscreen: Indicates that the device has a touchscreen.
- Has Virtual Keyboard: Indicates that the virtual keyboard preference is enabled.
- Has Wifi: Indicates that the device has WiFi access.
- Last Sync: Indicates the date and time of the last sync from the server to the device.
- Last Submission: Indicates the date and time of the last data submission from the device to the server.
- The following four fields are editable and are used to retrieve the logs from an Apple user’s device if they are experiencing issues. See Retrieving Logs Remotely from a Device for more information and instructions.
- Collect Logs
- Logs Start Date
- Logs End Date
- Notify User Email
Renaming a Device
Each device has both an internal ID (Device ID) and an external name (Name). The Device ID never changes, and is used to identify the device during syncing. The Name is used in reporting functions, such as Device Sessions Reports and Submission Status Reports help you identify each device. You might change a device’s Name, if for example, the name assigned during provisioning was not specific enough. To change a device’s name:- Select the Admin > System Management > Handheld Devices.
- Search for the user whose device you want to rename by entering any portion of their first name, last name, or username in the Search field at the top of the screen, and then pressing Enter on your keyboard or clicking Refresh. A list of users with associated handheld devices is displayed, with columns for Device Name and User Name.
- Find the device you want to rename, and click on the row for that device.
- Click the Edit button. The Edit Device screen appears.
- Enter a new name in the Name field.
- Click Save to save your change, or click Cancel to exit without saving.
Deleting a Device
Deleting a device in the Handheld Devices option prevents it from continuing to sync. Why would you want to do this?- If you have locked a user to a single device (based on the setting below) and the user has acquired a different device that they would like to use instead, you must delete the old device in this option before you can provision the new device for that user. Admin - User - Device - Lock User to Device
- If a device has been lost, you might delete it to ensure that it does not continue to sync. However, a better safeguard would be to clear the data from the device in order to protect patient confidentiality. See Clearing Data Remotely from a Device.
If a device is deleted, and then found at a later date, an administrator must clear the data from the device (if it has not already been cleared) and then reprovision it before it can be synced again. For instructions on provisioning a device, see Commure Pro on Apple help or the Commure Pro on Android help.
- Select the Admin > System Management > Handheld Devices.
- Search for the user whose device you want to delete by entering any portion of their first name, last name, or username in the Search field at the top of the screen, and then pressing Enter on your keyboard or clicking Refresh. A list of users with associated handheld devices is displayed, with columns for Device Name and User Name.
- Find the device that you want to delete and click on the row for that device.
- Click the Delete button. The following message appears: “Are you sure you want to delete the selected device?”
- Click Yes to delete the device, or click No to cancel the deletion.
Retrieving Logs Remotely from a Device
If a user is experiencing issues with the Commure Pro application on their handheld device, Commure Pro support staff might ask you to submit the device’s logs. Both Android and Apple users can submit the logs themselves using an option in Settings within the Commure Pro mobile application (see the Commure Pro on Apple help or the Commure Pro on Android help). Or, for Apple devices only, or an administrator can retrieve the logs remotely using a function in the Handheld Devices option.Logs can be retrieved remotely only on Apple devices running the Commure Pro version 9.0 or greater.
- Select the Admin > System Management > Handheld Devices.
- Search for the user whose device logs you want to retrieve by entering any portion of their first name, last name, or username in the Search field at the top of the screen, and then pressing Enter on your keyboard or clicking Refresh. A list of users with associated handheld devices is displayed, with columns for Device Name and User Name.
- Find the device for which you want to retrieve logs and click on the row for that device.
- Click the Edit button. The Edit Device screen is displayed.
- Complete the following fields:
- Collect Logs: Set this to Yes to retrieve the logs from the device. The next time the device syncs, the logs are submitted to the server and then this field is automatically reset to No (and the three fields below are also cleared).
- Logs Start Date: (Optional) If you leave the Logs Start Date blank, then logs are submitted from the first date/time that they are available on the device. Or, if you enter a date and time, only those logs with a date/time on or after the entered value are submitted. When you select a start date, the time defaults to 00:00, which is the beginning of the day for that date.
- Logs End Date: (Optional) If you leave the Logs End Date blank, then logs are submitted up through the last date/time that they are available on the device. Or, if you enter a date and time, only those logs with a date/time on or before the entered value are submitted. When you select an end date, the time defaults to 23:59, which is the end of the day for that date.
- Notify User Email: (Optional) If you enter a valid email address, then once the logs are submitted, an e-mail notification is sent to that address. The e-mail lists the device ID, the selected date range for the logs, and the submission ID that can be used to locate the logs on the Admin > Tracking/Reporting > Submission Status tab. For example: “The requested logs for Device Name: Commure Pro QA iPhone 6S for the currently logged in User: JONES, ALAN from 2018-10-08 12:00:00.0 through 2018-10-10 11:59:00.0 are now available and can be found in the Submission Status tab under Tracking/Reporting in Commure Pro admin tools. The Submission ID for the requested logs is 83429.”
- Click Save to submit your request. The next time the device syncs, the logs are submitted to the server and an e-mail notification is sent to the requester (if an email address was entered).
- To view the logs, go to Admin > Tracking/Reporting > Submission Status and enter the Submission ID listed in the e-mail message into the Submission ID criteria field. See Filtering Submission Records for more information.
Clearing Data Remotely from a Device
Clearing data from a device removes all user and patient data from the device, with the exception of the Commure Pro application itself. Why would you want to clear data from the device?- If you want to assign the device to a new user, you must clear the data from the device first, and then provision it for the new user.
- If you have the device in hand, you can clear the data using the Clear Data button on the device itself, and then immediately provision it for the new user. For instructions, see Commure Pro on Apple help or the Commure Pro on Android help.
- If you do not have the device in hand, you can clear the data remotely using the Handheld Devices option (available for Apple devices only). The new user or department manager can then log in and provision the device on their own.
- If the device has been lost or stolen, you should clear the data so that patient confidentiality is not compromised. If an unauthorized person finds the device after it has been cleared, they would have to know the user’s password in order to log in, re-provision the device, and view patient data (unlikely).
- Since you would not have the device in hand, you can clear the data remotely using the Handheld Devices option (available for Apple devices only).
- Please note that if an employee who owns their own device is terminated, the best procedure is to delete their LDAP or Commure Pro user account, which also has the effect of clearing data the next time that user attempts to log into the Commure Pro application. If you just clear data instead of deleting their account, they could simply log in and reprovision the device again, thereby regaining access to patient data. To clear data remotely from a device:
- Select the Admin > System Management > Handheld Devices.
- Search for the user for which you want to clear device data by entering any portion of their first name, last name, or username in the Search field at the top of the screen, and then pressing Enter on your keyboard or clicking Refresh. A list of users with associated handheld devices is displayed, with columns for Device Name and User Name.
- Find the device for which you want to clear data and click on the row for that device.
- Click the Clear Device button. The following message appears: “Are you sure you want to clear data for Device [device name]? Clearing data will require re-configuring the device for the new user.”
- Click Yes to clear the device, or click No to cancel. If you select Yes, the message “Device Deactivated: Pending Sync” appears in the device details on the right side if the screen.
Configuring InterApp Communication for Apple Devices
Your organization can use inter-app communication to create a direct link from the Commure Pro Apple® application to a third party Apple application, or vice versa, so that providers or nurses can easily navigate between the two. These integrations can be configured in a variety of manners depending on their context and usage. For example, when moving from the Commure Pro application to another application, the integration might use a new left-swipe or menu option from the Patient List module, or a new menu item under the Notifications button. Or when moving in the other direction, the integration might consist of a “Commure Pro” button in the other application. When a user selects the integration option, the target application is a launched and the user is automatically logged into that application so that they do not have to enter their username and password. In addition, the patient they were accessing in the starting application can be passed to the target application, so that when it opens, that patient is already selected for them. In order for this type of integration to work, an entry must be configured in the Mobile InterApp option, which includes defining a shared secret (the instructions for this are listed below). In addition, there may be other settings that require configuration on the Institution, Department, or User level. Please note that additional work is also required by the Commure Pro development team, in conjunction with cooperation from the other application vendor, in order fully implement this type of integration. See Configuring Apple Users to Launch Other Applications from the Commure Pro Application, or Vice Versa for more information about setting up specific integrations. To configure an entry in the Mobile Interapp option, follow these steps:- Select Admin > System Management > Mobile Interapp.
- Click the Create New button.
- Complete the following fields:
- App Bundle ID (required): Enter the application bundle ID for the other application; the vendor should be able to provide you with this information.
- Shared Secret (required): Enter a shared secret token so that data such as username or patient MRN can be passed securely from the other application to the Commure Pro application. This token must be agreed upon between Commure Pro and the other vendor.
- Description: Enter a description for the other mobile application, such as “Application ABC.”
- Click Save.
Purge Criteria
The Purge Criteria option allows you to define when device session logs and submission records for the Mobile Clinical Results, Mobile Charge Capture, and NoteWriter applications are purged from the Commure Pro Application Server. The Device Session and Submission Record Purge Criteria screen displays a list of all device session logs and submission record types. The Name column lists the internal name for the item, while the Description column lists a more descriptive name. The Description is also the same name that is used in the Tracking/Reporting option. See Device Session Types for an explanation of the different device session types, and Submission Record Types for a explanation of the different submission record types. The purge criteria date range is between 1 and 365 days. For device session logs, you can define the number of days to keep both successful and failed logs before they are purged. For submission records, you can define the number of days to keep a record (whether failed or successful) before it is purged. Any given Application Update or Submission device session log can contain one or more submission records. As a result, these types of device session logs are not purged until the purge criteria has been met for every one of the submission records contained within them. For example, if the purge settings were defined as:| Purge Setting | Purge Setting Value |
|---|---|
| Successful Submission device session logs | 60 |
| Failed Submission device session logs | 90 |
| Vital submission records | 80 |
| IO submission records | 30 |
| Audit submission records | 30 |
| Device Session Log | Submission Records contained within the Device Session Log | Status | Purge Setting | When Purged |
|---|---|---|---|---|
| Submission device session log | — | Successful | 60 | 81 days (the Alteration submission record has the longest purge criteria) |
| — | Alteration submission record | Successful | 80 | — |
| — | Audit submission record | Successful | 30 | — |
| Submission device session log | — | Successful | 60 | 61 days (the Submission device session log has the longest purge criteria) |
| — | Audit submission record | Successful | 30 | — |
| — | Message submission record | Successful | 30 | — |
| Submission device session log | — | Failed (due to the failed Message submission) | 90 | 91 days (the Message submission record causes the entire device session to fail. Failed Submission device session logs have a purge criteria of 90 days) |
| — | Audit submission record | Successful | 30 | — |
| — | Message submission record | Failed | 30 | — |
You can manually exclude a specific instance of a device session log or submission record from being purged by checking the Exclude from Purge checkbox on the Device Session Details screen, or the Submission Record Details screen, respectively. See Filtering Device Session Results and Filtering Submission Records.
- Select the Admin tab followed by the System Management tab.
- Select the Purge Criteria option.
- Select a submission record or session log from the list. The current purge criteria are displayed on the right side of the screen.
- Click the Edit button to change the purge criteria for the currently selected item. The Edit Purge Type window opens and displays the purge criteria fields. Device session logs have two fields:
- Number of days to keep successful session logs of this type (default of 60 days)
- Number of days to keep failed session logs of this type (default of 90 days) Submission records have only one field:
- Number of days to keep submissions of this type (default of 60 days)
- In the purge criteria fields, enter the number of days (between 1 and 365) to keep the session log or submission record.
- Click Save to save your changes, or Cancel to close the window without saving your changes.
Vitals Edit
The Vitals Edit option allows you to rename, change the sort order, and map together vital signs components that are displayed for each patient for the Physician Portal and Mobile Clinical Results applications. To make changes to the list of available vital signs components, follow these steps:- Select the Admin tab, followed by the System Management tab.
- Select the Vitals Edit option. The Vitals Administration screen appears.
- Pulse Rate (HR): The rate at which the patient’s heart is beating, usually in beats per minute.
- Respiratory Rate (RR): The rate at which the patient is breathing, usually in breaths per minute.
- Blood Pressure (SBP and DBP): The pressure(s) at which blood flows through the peripheral vascular system. Systolic and diastolic pressures may be reported separately or as a composite measurement (for example, 120/80), usually in mmHg.
- Temperature (Temp): The patient’s temperature as obtained from a given anatomical location (such as, oral, axillary, ear, or rectal), reported in Fahrenheit or Celsius.
- Weight: The weight of a patient measured, usually in kilograms.
- O2 Sat by Pulse: The oxygen saturation (SaO2) level of the patient’s blood as determined by a pulse oximeter, usually reported in percent (%).
- Finger Stick Blood Glucose (FSBG): The glucose level of a patient’s blood determined by a finger stick test.
Mapping Systolic and Diastolic Blood Pressure as a Composite
To map together the systolic and diastolic blood pressures as a composite measurement, so that they display together as a single measurement in the Vitals display option (for example, 120/80), follow these steps:- Go to Admin > System Management > Vitals Edit.
- Click and hold the DBP component row and then drag it on top of the SBP component row so it highlights.
- Release the DBP component row. The DBP and SBP component rows are combined and are displayed as a single composite row, followed by two child rows for SDB and DBP. Each row has its own Sort Order.
- Set the Sort Order value for the composite row equal to its location in the overall list of vital signs. For example, if you want SBP/DBP to appear sixth in the vitals list, set the Sort Order for the composite row to “6.”
- Set the Sort Order value for the child SBP component to “1” and the child DBP component to “2.” This ensures that the SBP value appears before the DBP value in the composite measurement.
- Click the Resort/Rename button.
- Click the Refresh button to display the changes to the Vitals display of the patients.
Mapping Vital Signs to CDS Categories
In the CPOE application, certain Clinical Decision Support (CDS) rules are based on the value of a given vital sign. For example, when ordering a cardiac medication, a CDS alert might be triggered if the patient’s blood pressure is within a certain range. In order for this type of alert to function, vital signs must be mapped to categories, so that the CDS engine can find the correct vital sign to check when executing the alert. The vital sign categories themselves are stored in the Vitals Category reference list. At initial implementation, the Vitals Category reference list is pre-loaded with a standard list of categories as a starting point. Clients should not make changes to this list; Commure Pro staff will make any necessary adjustments. To map vital signs to vital sign categories:- Go to Admin > System Management > Vitals Edit.
- For the vital sign that you want to map, click in the Vital Category column.
- Select a category from the drop-down list. For vital signs that have been mapped together as a composite (such as might be the case for systolic and diastolic blood pressure), select one category for the entire composite. If you are unsure which category to use for a particular vital sign, contact your Commure Pro representative for assistance.
- Repeat the Step 2 through Step 3 for each vital sign.
- Click the Resort/Rename button to save your changes.
- Click the Refresh button to display your changes.
Renaming a Vital Sign for the Vitals Display
To rename a vital sign component for the Vitals display option, follow these steps:- Go to Admin > System Management > Vitals Edit.
- Click in the Vital Name box or Abbreviation box that you want to change.
- Change the appropriate name or abbreviation.
- Click the Resort/Rename button.
- Click the Refresh button to display the changes to the Vitals display of the patients.
Changing the Order of Vitals Signs for the Vitals Display
To change the order of the vital signs components in the Vitals display option, follow these steps:- Go to Admin > System Management > Vitals Edit.
- Click in the Sort Order box and change to desired order of each component.
- Click the Resort/Rename button.
- Click the Refresh button to display the changes to the Vitals display of the patients.
PQRS Measures
The PQRS Measures option allows you to manage PQRS measures for your organization. Your Commure Pro representative uses this tool to activate and deactivate measures as determined by your organization. Level 1 administrators use the PQRS Measures tool to edit descriptions for any active measures, as well as each measure’s associated questions and answers. For more detailed information on how to customize these descriptions, see Customizing Quality Measures.PQRS Measures Import
The PQRS Measures Import option is used to import PQRS measures to your Commure Pro system. Once implemented, your Commure Pro representative will upload annually when CMS makes available the newly published PQRS measures list. For more detailed information, see Importing Quality Measures.Export and Import of System Settings
Two settings are provided on the Institution tab for export and import of system data. This functionality provides an easy way to perform a direct comparison between the preference settings of two sites, such as between a test environment and a live production environment. This functionality is provided for test environments only, and can also be used during upgrade to keep track of all system data. Do not perform export and import of system settings in a production environment, or without the assistance of your Commure Pro representative.
- Institution settings
- Department settings
- User settings
- Code Edit settings (These are the settings that enable or disable each type of code edit, which are configured via Admin > Institution > Charge Capture > Code Edits.)
Import of system settings is intended to be used in test environments only. Do not transfer system settings between environments without the assistance of your Commure Pro representative.
- Charge Header reports (for institutions and users)
- Sign-Out task definitions and macros (for institutions)
- System Management Reports, including data about relationships and visit types (both Commure Pro and ADT) For more information about export of system data, contact your Commure Pro representative.