Workflows for Entering Charges
The Commure Pro application can support several different workflows surrounding the entry of charges. In some organizations only physicians enter charges, while in others multiple users, such as physicians, nurses, or billing administrators, all enter charges. Some organizations use Desktop Charge Capture to enter only the professional charges provided by physicians, while others also use it to enter technical charges provided by the facility’s staff. The various workflows supported by Desktop Charge Capture are outlined below.| Workflow | Description | Reference to Detailed Description |
|---|---|---|
| Standard Charge Entry | Physicians enter charges for professional services, one patient at a time. | Standard Charge Entry Workflow |
| Custom Charge Capture | Physicians and non-physicians enter charges for their respective professional and technical services on the same transaction, one patient at a time. Custom screens assist non-physicians, and sometimes physicians, with selecting correct charge codes. | Custom Charge Capture Workflows |
| Automated Code Entry | Physicians enter charges for professional services, one patient at a time. Charges for technical services are automatically added after the physician submits the transaction. | Automated Code Entry Workflow |
| Batch Charge Entry | Physicians enter charges for professional services in a batch for multiple patients at once. | Batch Charge Entry Workflow |
| PQRS/MIPS | This workflow can be added to Standard Charge Entry, Custom Charge Capture, or Automated Code Entry. After charges are submitted, the transaction is evaluated against Merit-based Incentive Payment System criteria. If applicable, the user is prompted to answer quality measure questions. | PQRS/MIPS Workflow |
| Custom Forms | This workflow can be added to Standard Charge Entry, Custom Charge Capture, or Automated Code Entry. After submission, the transaction is evaluated for code edits with associated custom forms. If criteria are met, the form is displayed for completion and can be routed for printing or faxing. | Custom Forms Workflow |
Standard Charge Entry Workflow
The standard charge entry workflow consists of a physician entering charges for professional services, one patient at a time. It might also consist of an administrator entering charges on behalf of a physician. The user can initiate the charge entry process from a variety of options, all of which lead to the standard Charge Transaction screen, which is where the user actually enters the charges for a given patient (see Basic Steps for Entering a New Charge Transaction). Billing administrators may also be involved in reviewing or editing the charge transactions after they are submitted by the physician, to ensure proper coding.Custom Charge Capture Workflows
In this workflow, both physicians and non-physicians enter charges for their services on the same charge transaction, for one patient at a time. There are several different scenarios where this can be useful, some examples are listed below:- If a physician organization is leasing space at your facility, a physician may be entering charges for professional services, while a nurse may be entering the facility’s technical charges for services such as room preparation/clean-up, the nurse’s assistance to the physician, or the nurse’s administration of medications. In this example, the nurse might create the transaction to enter the facility’s charges, and the physician might later edit the transaction to enter his professional charges. Or, the sequence might be reversed, with the physician entering charges first, and the nurse entering second.
- One or more nurses may be entering charges for the chemotherapy infusion services that are provided to a patient during an infusion session. One nurse might create the charge transaction to record the first drug/service that was administered, and then another nurse might edit the transaction to record other drugs/services as they are administered during the session.
- One or more physicians may be entering charges for the time that they spent with a patient during a critical care incident. The first provider who saw the patient might create the charge transaction to record the time that they spent, and then subsequent providers might edit the transaction to record their own time.
Batch Charge Entry Workflow
Batch Charge Entry provides an easy, simplified workflow in which providers can quickly and accurately enter the same diagnosis and charge codes for multiple patients on their patient list. Often, providers see multiple patients who require the same diagnoses, treatments, and care. One typical scenario is where a provider in a dialysis unit sees up to fifty patients during a 4-hour shift. In most cases, the charge information remains the same for all patients. The only piece of information that changes is the patient name. Another scenario is where a PCP evaluates his/her patients during a routine evaluation. For the most part, these are E&M encounters that share the same diagnosis and CPT codes; the only charge information that changes is the patient name. When it comes time for a provider to enter charges, they must enter the same diagnoses, CPT codes, and charge headers again and again for each patient. The Batch Charge Entry feature can be used to streamline this process. Batch Charge Entry is accessed via it’s own option, and uses its own Batch Charge Entry screen, which is different from the standard Charge Transaction screen. This screen enables providers to create or edit one charge and then apply it to multiple patients on their patient list. Once they submit the charges, they are saved as individual charge transactions, and are no different than any other charge transaction. After charges have been submitted using the Batch Charge Entry option, billing administrators can view or edit any individual transaction to make corrections, if necessary. Corrections are done on an individual charge transaction basis (i.e., a user cannot edit a “batch” as a whole). Please note that physicians who have been configured to use the Batch Charge Entry option, may also be allowed to enter charges using the standard charge entry workflow (see Standard Charge Entry Workflow). To configure your system for this workflow, administrators should refer to Configuring Batch Charge Entry. For more detailed information about using Batch Charge Entry once it has been configured, see Entering Charges for Multiple Patients via Batch Charge Entry.PQRS/MIPS Workflow
Physicians can report quality measure data as part of the Merit-based Incentive Payment System (MIPS) sponsored by the Centers for Medicare and Medicaid Services (CMS). To facilitate this, the Commure Pro Physician Quality Reporting System (PQRS) workflow can be added to the end of the end of the Standard Charge Entry workflow, Custom Charge Capture Workflows, or the Automated Code Entry workflow. When it is implemented at your organization, each time a user enters a charge transaction, it is evaluated to determine if it fits the quality reporting criteria. Patient information such as age and gender, and the charges and the diagnoses that were entered, are all taken into account. The reporting frequency for the each measure determines how often the user is prompted to answer the Clinical Metrics form (each time a provider uses a particular charge code, once per visit, once per calendar month, once per reporting period, and so on). When appropriate, the user is prompted to answer a series of clear and concise quality measure questions. The answers to the quality measure questions are then conveyed to CMS using either of the methods below:- Registry method: After a provider answers the quality measure questions, the answers are recorded by the Commure Pro application. Administrators and providers are able to monitor their performance throughout the year using the Charges > PQRS Report option. At the end of the reporting period, Commure Pro reports the information to the CMS.
- Claims Billing method: After a provider answers the quality measure questions, those answers are translated into one or more CPT II codes and modifiers which are automatically added to the charge transaction. The codes are then submitted along with the original charges to your billing system, and are then reported to the CMS when the claim is submitted for payment.
Custom Forms Workflow
Some organizations might wish to collect performance or quality data, or they might wish to send information to outside parties, such as primary care physicians. To facilitate this, the Commure Pro Custom Forms workflow can be added to the end of the end of the Standard Charge Entry workflow, Custom Charge Capture Workflows, or the Automated Code Entry workflow. When it is implemented at your organization, each time a user enters a charge transaction, it is evaluated to determine if it meets the criteria for one or more specific code edits that have Custom Forms associated with them. If it does, the Custom Form is displayed to the provider, who can then complete the fields on the form and save the form. The form can then be routed to a fax or printer for distribution or analysis.NOTE**:** Routing to a printer or fax requires integrations work by Commure Pro services. In addition, code edits that launch Custom Forms fire only on the Desktop Charge Capture application. They do not fire when a qualifying charge transaction is entered on a handheld device.
Basic Steps for Entering a New Charge Transaction
Your administrator determines whether you can enter charges in the Desktop Charge Capture application, based on a setting in your user profile. If you are allowed to enter charges, there are many different workflows surrounding charge entry, and many different options from which a user may initiate the charge entry process (see Workflows for Entering Charges). Regardless of the user’s starting point, all of the options (with the exception of Batch Charge Entry) lead to the same standard Charge Transaction screen, which is where the user actually enters the charges for a given patient. This section reviews the basic steps for filling out the Charge Transaction screen in order to enter a charge transaction for a patient. A charge transaction contains charge transaction header information that applies to the entire transaction, charges and associated modifiers and headers, and diagnoses. A completed charge transaction contains one or more charges, and zero, one, or more diagnoses that apply to some or all of those charges. A transaction can also contain physician’s and biller’s comments. The basic steps for completing the Charge Transaction screen are as follows:- Initiate the charge entry process. If you attempt to create a new charge transaction for a visit date that already has an existing charge transaction, you may see this warning message: “One or more charge transactions was already entered for [patient name] on [date]. Select the service date in the list below to edit the existing transaction, otherwise, click “Add Charge” to create a new charge transaction.” Click the visit date link to edit the existing transaction, or click the Add Charge button to create a new transaction.
- (Optional) Change the visit associated with the charge transaction.
- (Optional) View the patient’s clinical notes, to assist you in billing for the correct diagnoses and services. Or, view the patient’s photos and possibly link one to the charge transaction as additional documentation for the services provided.
- Enter charge transaction header information for the entire transaction.
- Enter diagnosis codes, charge codes, charge modifiers, charge header information, and possibly NDC codes.
- (Optional) Enter comments for the charge transaction.
- (Optional) Check your work for errors.
- Determine the best method for saving your work.
Methods for Creating a New Charge Transaction
There several ways to create a new charge transaction:| Tab or Option | Quick Steps | Where Documented |
|---|---|---|
| Patient List tab | Select a patient list, and then a patient. Then use any of these methods: • Click on the Charges display item (make sure Show Visits is checked), then click the Add link for a visit date. • Click on the Actions button located in the top right corner of the Patient Data Display area, and then choose Add Charge from the menu. • Click Add, located to the right of the Charges display option. | Creating a New Charge from Patient List Tab |
| Patient Search tab | On the Patient Search tab, search for a patient. In the search results, click on the patient to select them. Click the Actions button located in the top right corner of the results section, and then choose Add Charge. | Creating a New Charge from Patient Search Tab |
| Patient List or Patient Search tab | You can also copy a patient’s existing charge transaction to create a new one. Select a patient on the Patient List tab, or select a patient on the Patient Search tab and then click on the Details icon to open the Patient Data Display. Click on the Charges display option, click on the charge that you want to copy, and then click the Copy button in the Charge Details pane. | Copying a Charge Transaction from the Patient List or Patient Search Tab |
| Charges tab | Under the Charges tab, there are a series of sub-tabs for Classic Charge Reports and Revenue Reports. Many of these report-based options can be used to enter charges. If a patient visit appears on the report, based on the report’s selection criteria, there is usually a link you can click to enter a charge. The link might look like any of these: Add, Add Charge, Add Charge, Not Coded, or a date link (such as 01/15/2022). Some reports may also allow you to copy a previous charge that is listed on the report. | Creating a New Charge Transaction from a Report Descriptions of Standard Charge Reports |
| Schedule tab | This tab shows a provider’s schedule. If a patient visit appears on the schedule, based on the report’s selection criteria, you can select a link (such as Not Coded Outpatient) to enter a charge. | Entering or Editing Charges from the Schedule Display |
| External application (Cerner®) | Some organizations provide direct access to the Charge Transaction screen from Cerner®, via the Commure Pro-Cerner Charge Capture app. In Cerner: select a patient and visit, launch the Commure Pro-Cerner Charge Capture app, and then click on an Add Charge link or Add button. The Commure Pro Charge Transaction screen opens with the same patient and visit automatically selected. Additionally, the ICD-10 diagnosis codes (and/or the Intelligent Medical Objects® terms) from the Cerner application are automatically added to the charge. | Using the Commure Pro-Cerner Charge Capture App Entering a New Charge Using the Commure Pro-Cerner Charge Capture App Copying a Charge Using the Commure Pro-Cerner Charge Capture App |
| External application (other) | Some organizations provide direct access to the Charge Transaction screen from other external applications. The access is typically configured as follows: the user selects a patient (and possibly a visit) in the external application and then clicks a link which opens the Commure Pro Charge Transaction screen with the same patient (and visit) automatically selected. In some cases, additional information can be passed from the external application to the Commure Pro Charge Transaction screen, such as ICD-10 diagnosis codes (and/or the Intelligent Medical Objects® term), providers, or charge header values. | This optional feature requires configuration by Commure Pro services, and may function differently at each site, depending on the organization’s requirements. |
Creating a New Charge from Patient List Tab
To enter a charge for a patient on the Patient List tab, follow these steps:- Click on the Patient List tab and select a patient by clicking on the row containing their name.
-
Add a charge to a visit using method A, B, or C below:
- Click the Visits display item to see a summarized list of the patient’s visits. In the Visits summary, click a visit to select it. From the Visit Details window, click the Add Charge to this Visit button.
- Click on the Charges display item. By default, the Show Visits box (located in the title bar of the Charges summary) is checked, so that each date that the patient was present at your facility is listed, along with information about whether or not a charge was posted on that date. Visit days with an Add link are visit days for which charges have not yet been posted. Click the Add link for the correct service date.
- Click on the Actions button located in the top right corner of the Patient Data Display area, and then choose Add Charge from the drop-down menu. Or, click Add , located to the right of the Charges display option.
- Depending on how your administrator has configured your user profile, the patient visit that you selected in Step 1 may now be automatically selected and the Charge Transaction screen automatically opened with an appropriate date of service defaulted for you.
- Or, if the patient has more then one billable InFacility visit, the Visit selection screen is shown instead, so that you can review all of the patient’s visits and choose the specific visit with which to associate the charges yourself.
- The Charge Transaction screen opens. Start entering the charge transaction, as outlined in Basic Steps for Entering a New Charge Transaction.
Creating a New Charge from Patient Search Tab
To enter a charge for a patient on the Patient Search tab, follow these steps:- Click on the Patient Search tab.
-
Locate the visit or patient by entering search criteria and then clicking the Run Patient List Search, Search for Visits, or Search for Patients button (see Searching for Patients or Visits for information on using the search criteria fields).
- If you use the Run Patient List Search, the results show all the visits that match the criteria of the patient list that you selected.
- If you use the Search for Visits button, the results show all the visits for the patients that match the patient and/or visit criteria that you entered. Click the patient visit for which you wish to enter charges.
- If you use the Search for Patients button, the results show one record for each patient that matches the patient criteria that you entered. Click the patient for whom you wish to enter charges.
-
Click on the Actions button located in the top right corner of the results section, and then choose Add Charge.
- If you selected a visit after using the Run Patient List Search or Search for Visits button, you have already identified the visit for which you wish to bill, and the Charge Transaction screen is displayed.
- If you selected a patient after using the Search for Patients button:
- Depending on how your administrator has configured your user profile, a visit for the patient may now be automatically selected and the Charge Transaction screen automatically opened with an appropriate date of service defaulted for you.
- Or, if the patient has more then one billable InFacility visit, the Visit selection screen is shown instead, so that you can review all of the patient’s visits and choose the specific visit with which to associate the charges yourself.
- The Charge Transaction window opens. Start entering charge data, as outlined in Basic Steps for Entering a New Charge Transaction.
Copying a Charge Transaction from the Patient List or Patient Search Tab
Some patients have the same services or procedures performed from one visit to the next. If you see a previously posted procedure that you would like to post again, with a new service date, use the Copy function:- Select a patient on the Patient List tab, or select a patient on the Patient Search tab and click on the Details icon .
- Click on the Charges display item. The Charges summary list is displayed.
- Locate the charge that you would like to copy, and click on it. The Charge Detail screen is displayed below the summary list, with buttons to View, Edit, Copy, or Delete the transaction.
- Click the Copy button.
-
Select the correct visit for the new charges you want to post:
- If your user profile is configured to automatically select visits, the system selects a visit for you and displays the Charge Transaction window. You can change the visit that was automatically selected by clicking on the Visit drop-down list.
- If your user profile is not configured to automatically select visits, the system displays the Visit drop-down list from which you can select the visit to which you wish to post the new charges.
-
Depending on how your user profile is configured, Copy may now do the following:
- It may automatically copy the comments and biller comments from the previous transaction.
- It may automatically copy the modifiers from the previous transaction.
- It may automatically copy the diagnosis codes from the previous transaction, or it may display those diagnosis codes and allow you to select the ones you want to copy (if any).
The Charge Transaction window is now displayed. All of the charge codes (and possibly the comments, modifiers, and diagnosis codes) from the earlier transaction are entered for you. You should review the copied information and make any necessary modifications for this transaction. For complete instructions on how to properly fill out the Charge Transaction screen, please refer to Basic Steps for Entering a New Charge Transaction.It will not copy any photos that were associated with the previous transaction to the new transaction. - Click the Submit button to save your changes and return to the Patient List or Patient Search screen.
Changing the Visit Associated with the Charge Transaction
The visit that is initially selected for billing affects much of the functionality found on the Charge Transaction screen. For example, selecting an outpatient visit might automatically select a Service Site of “outpatient” or “office” with a defaulted Service Date equal to the appointment date. Additionally, in the center CHARGES section, the Favorites and Department categories for charge codes might be configured contain only those charges that are appropriate for an outpatient visit. And finally, the facility associated with the visit determines which custom screens are available in the Custom Workflows category. At any time during the charge entry process, you can change the visit that is associated with the charge transaction. Just click on the Visit drop-down at the top right of the Charge Transaction screen and select a different visit from the list. When you do so, any charge detail, charge, or diagnosis information that you have entered so far is retained. However, you should review it for accuracy, as some of the data may no longer be correct (especially the fields in the CHARGE DETAILS section, such as the Service Date, Service Site, and Billing Area). If the user does not choose a billable visit before initiating the charge entry process, the Charge Transaction screen either displays a list of visits to choose from, or automatically selects the most appropriate visit. Once the visits that are eligible for selection by the user have been determined, the following occurs:- If there is only one visit in the list, it is selected automatically.
- If there is more than one visit in the list, then depending on your system’s configuration, a list of the eligible visits may displayed so that the user can select the one they want, or a visit may be automatically selected for the user. However, keep in mind that the user can always override the auto-selection, and select a different visit from the list. How does the system determine which visit to auto-select? Your organization determines which visit types are allowed to be auto-selected, as well as the method by which the visit types should be prioritized for auto-selection. The settings used to determine auto-selection are detailed in Commure Pro Visit Types.
Viewing Clinical Notes while Entering the Charge Transaction
View a How-To Video on an Overview of the Charge Transaction screen (including a brief section on viewing clinical notes) When entering a charge transaction for a patient, you may find it helpful to review the patient’s clinical notes, since they might contain useful information about the patient’s diagnoses or the services that were provided. You can view your own draft or completed notes, as well as other providers’ completed notes, as long as you have permission to view clinical data, based on a setting in your user profile.- On the Charge Transaction screen, click Notes in the upper right corner. The Notes display opens in the center area of the screen and shows a Summary list of the patient’s clinical notes. By default, a Category of “All” note types and a Date of “Selected Visit” are chosen (see Step 3 below for more information on these filters).
-
(Optional) Move or resize the Notes display:
- To move the Notes display to a more convenient location, grab the title bar, drag the box to a new spot, and drop it.
- To change the size or shape of the Notes display, click on any of the edges of the box and drag them to the left or right, or up or down.
You can move or resize it again at any time, and then save the new shape/location by clicking the Save Layout button again. To go back to the original shape and location, click the Default Layout button. -
Use the filters to select which notes are displayed in the Summary list:
- My Notes Only: Check this box to see only those notes where the Author of the note is the same as the Billing Provider on the charge transaction.
- Category: Use this drop-down to select only those note types that you want to view. Use the individual checkboxes, or the Check All or Uncheck All options.
- Date: Use this drop-down to see a list of time frames, such as Selected Visit, Notes for Service Date, Most Recent Visit, Last n Hours, Last n Days, Last n Years, Current Week, and so on. Only notes that fall within the selected time frame are shown. Of note, the Selected Visit time frame shows all notes that fall within the date range of the visit that you chose for the charge transaction (via the Visit drop-down at the top of the Charge Transaction screen). If there is more than one visit with the same account number as the selected visit, the application uses the earliest start date and the most recent end date out of all of the visits with that account number.
Each time you use the Notes display, the application remembers the last selections you made for the My Notes Only, Category, and Date filters, and uses them again. These “sticky” settings do not affect the Clinical Notes display on the Patient List tab, and vice versa. -
To view the content of a clinical note, click on any note in the Summary list.
The details of that note are displayed.
While viewing the note’s content, you can take any of the following actions:
- Continue to enter data on the Charge Transaction screen (that screen is still active).
- Scroll up or down to view the content of the note.
- Type a word or phrase in the text box at the top right of the Notes display to highlight that word or phrase anywhere that it appears in the note.
- Click the Print button to print the note content.
- Click the Back to List button to close the note details and go back to the Summary list of notes.
- To close the Notes display, click the X icon in the upper right corner of the Notes display. Or, the display closes automatically when you exit the Charge Transaction screen.
Entering Detail Information for the Entire Charge Transaction
View a How-To Video on Entering Charge Details. The CHARGE DETAILS area, located in the left-most column of the Charge Transaction screen, includes a series of fields, commonly referred to as charge header fields, that are associated with the entire charge transaction as a whole. The specific fields that are displayed in this section are based on your system’s configuration.Each individual charge code on the transaction can also have header fields associated with it. See Entering Details for a Specific Charge Code.
| Field Format | Example Fields that Use this Format | Possible Options for Completing the Field (depending on the field’s configuration) |
|---|---|---|
| Picklist Fields Provider Fields | Picklist Fields: Billing Area Billing Location Injury Type Discount Percentage Provider Fields: Billing Provider Secondary Provider Referring Provider Resident Provider | These fields can be defined to have any or all of the options for completion below: • Search for a specific value or provider name. For Provider fields, start typing the provider’s last or first name in the blank field. Or for Picklist fields, start typing the name of the value you want. As you type, potential matches are displayed; just click on the value/provider you want. • Select from the full list of available values or provider names. Click Search to view a full list of available values/provider names and select the value/provider from that list. Depending on how your administrator has configured the field, when you click Search you may see a list of all values/providers, or a shorter fixed list of commonly used values/providers. • Select from a shorter list of recently or commonly used values or provider names. Click the Drop-Down Arrow to view a shorter list of either the values/providers that you have used recently, or a fixed list of commonly used values/providers (as defined by your administrator). • Enter a free text value or provider name. Typically, you should always search for a value/provider before entering it as free text. Type the value/provider name, and if no matches are found, none are displayed. Proceed to the next field by either pressing the Tab key on the keyboard or using your mouse to click into the next field. If free text entries are allowed in the field, the value that you typed is saved in the field, preceded by a Yellow Exclamation icon to highlight that it is free text. If free text entries are not allowed in the field, the field is automatically cleared and left blank. • Delete the value in the field. To clear a defaulted value/provider, or to delete a value/provider you entered in error, hover over the field to expose the X to the right of the value/provider name, and then click it. |
| Date, Time, or Date/Time Fields | Service Date Injury Date/Time Anesthesia Start Time | When you first click into a Date, Time, or Date/Time field, you can either manually type the date and/or time in the required format (mm/dd/yyyy, dd/mm/yyyy, hh:mmAM or hh:mmPM), or you can use the pop-up controls below: • Date fields display a pop-up calendar from which you can select a date. For the Service Date field in particular, the billable dates for the visit are underlined and highlighted in pink on the calendar (see the Service Date field in the list below this table for an explanation of the billable date range). • Time fields display sliders for hours and minutes, as well as a Now button, which you can use to select the current time. • Date/Time fields display a pop-up calendar (with the billable dates underlined and highlighted in pink), sliders for hours and minutes, and a Now button. |
| Numeric Fields | Minutes Spent with Patient | Enter the required information as a number. |
| Checkbox fields | ABX Given | Check the box to indicate Yes or Done, or leave it unchecked to indicate No or Not Done. |
| Yes/No fields | PCP Notified? | Select the Yes or No radio button, or select neither to leave the field unanswered. |
| Text Fields | Prior Authorization Number | Enter the required information as text. |
- Service Date: Enter the date when the service took place. There are several settings that determine the billable date range for the visit (i.e., whether you can enter a service date that is before or after the admission and discharge dates, or before or after the appointment date), whether a date of service is defaulted for you, and how far in the past you can backdate the charge. When a charge is associated with an AI-generated scribe note, the system can automatically extract the date of service from the note body using LLM-based date extraction. If a service date is identified in the clinical note content, it is used to pre-populate the Service Date field on the charge transaction. This reduces manual entry and improves accuracy for charges linked to ambient scribe encounters. Even if a date of service is defaulted for you, you can change the defaulted date, as long as you stay within the parameters defined by your administrator. Please note that in most cases, you will enter charges for a single day at a time, with a single Service Date. However, you may also enter charges for multiple days at once, if this feature has been enabled for you. See Entering Charges for Multiple Service Dates (on a Single Patient).
- Other Date and/or Time Fields: Your system administrator may define various other date and/or time fields, such as Injury Date, Posting Date, Time of Injury, etc. Depending on your system’s configuration, a default date may be populated in these fields, although you can typically change the default date if necessary.
- Billing Provider: This field may be configured to default any of the following into the field: a) your own name, b) a provider name from information on the visit, or c) nothing (as may be the case for billing administrators entering charges on behalf of providers). The value that is entered here impacts the Billing Area field below.
- Secondary Provider, Referring Provider, Resident Provider, or other provider. Your system administrator may configure the system to automatically default the appropriate provider names into these fields for you.
- Billing Area: Select a billing area to specify the area to which the charge should be credited. Billing areas are typically subcategories of departments. For example, the Cardiology department might have several billing areas such as Cardio, Cardio-Pulmonary, Cardiac Surgery, etc. You must enter a value in the Billing Provider field before you can enter a value in the Billing Area field, as the list of billing areas that are available in the drop-down list, as well as the default values, are based on the billing provider’s user settings, rather than the current user’s settings. For example, only those billing areas that are associated with the departments to which the billing provider belongs are available in the drop-down list. And in some cases, administrators may configure this field to further restrict the available billing areas, based on the patient’s location or visit type. If there is only one billing area available to the billing provider, or if an administrator has configured a default billing area value for the billing provider, that value is defaulted into the Billing Area field. However, you can change the defaulted value if necessary. Note that if you change the value in the Billing Provider field, it may result in changing or clearing of the Billing Area field, if the new billing provider has a different default value defined for the Billing Area field, or if they do not have access to the value that was previously entered in the Billing Area field. Since the values shown in the drop-down list are based on the billing provider (rather than the current user), this ensures that when a billing administrator is entering charges on behalf of a provider, the drop-down list displays only the billing areas that are appropriate for the provider whose charges they are entering. If the correct billing area is not available for any reason, then an Additional Billing Areas option is shown at the bottom of the drop-down list. The administrator can click it to view all billing areas to which they themselves have access (based on their Set Charge Desktop View Access), which is most likely a broader list that will include the billing area that they need for the charge. If the billing provider is not a user of the Commure Pro system, then all billing areas available to the current user are displayed in the Billing Area drop-down list.
- Service Site: Select a service site to indicate where the procedure took place (for example, your choices here might be inpatient, outpatient, or doctor’s office).
- Billing Hospital: Select a billing hospital to indicate the specific hospital where the service took place.
- Billing Location: Select a billing location to further categorize the type of location where the service took place. For example, if you chose outpatient as your Service Site above, you might choose from day hospital, sleep lab, or dialysis treatment facility to further specify the type of outpatient location.
- Billing Office: Select a billing office to indicate the specific office responsible for billing this service.
- Discount Type: Select a discount type if a discount is to be applied to this service. Examples of common choices might be professional courtesy or insurance only.
- Discount Percentage: Select a discount percentage to specify the amount of the discount (if one is to be applied).
- Injury Type: Select an injury type if this service is a result of an injury. Examples include items such as motor vehicle accident or worker’s compensation.
Entering Charge Codes on a Charge Transaction
View a How-To Video on Selecting Charge Codes. The CHARGES section in the middle area of the charge transaction screen is where you select charge codes (CPT codes). There are several functions you can use to quickly select the appropriate charge codes for the current charge transaction. These include:| Option Name | Location on the Screen | Where Documented |
|---|---|---|
| Search | A search field located in the CHARGES section heading | Selecting Charges Using the Search Option |
| Custom Workflows | The first category in the CHARGES section (only present if enabled) | Selecting Charges from the Custom Workflows Category |
| Favorites | The next category in the CHARGES section | Selecting Charges from the Favorites or Department Categories |
| Department | The last category in the CHARGES section | Selecting Charges from the Favorites or Department Categories |
| Free Text | After performing a search at the top of the CHARGES section, an Add as Free Text button may be present just above the search results, but only if enabled in your user profile | Entering Charges as Free Text |
- For charges, the guidelines for proper usage are displayed.
- For charge macros, a list of the individual charges, modifiers, and diagnoses contained within the charge macro is displayed.
Selecting Charges from the Favorites or Department Categories
View a How-To Video on Selecting Charge Codes (including selecting from Favorites and Department categories). In the CHARGES section, there are two categories called Favorites and Department.- The Favorites category contains those charges that you have personally marked as favorites. This category may contain a simple list of codes, or you may have organized them into subcategories.
- The Department category contains the charges that your administrator has deemed useful to all members of your department and these are typically organized into subcategories. For example, charge categories might include items such as Inpatient, Observation, or Office Visits.
-
Charge Macros: These are preceded by a gears icon so that you can distinguish them from regular charge codes:

- Start the process for entering a charge transaction.
- In the CHARGES section, click on the Favorites or Department category to expand it (if it is not already expanded). The category expands to show you the contents. This may be a list of subcategories, or a list of actual charge codes or charge macros.
- Continue to drill down through the subcategories until you see the code or macro that you want.
-
When you see the specific item you want, click on it.
- If you select an individual charge code, it is immediately added to the Selected Codes area on the right side of the screen.
- If you select a charge macro, all of the individual items within the macro are immediately added to the Selected Codes section.
- Since charge codes are updated each year, a code that was included on your Favorites list in the past, may be inactive today. Inactive codes cannot be used on new charge transactions. To distinguish them from active codes, they are shown on the Favorites list with a Search icon, the code struck through, and the text in light gray:

- (Optional) Repeat this process until you have selected all of the charge codes that are necessary for the charge transaction.
Using a Charge Macro to Enter Charges
If you or your administrator have created Charge Macros, you can use them to more efficiently enter charges. A charge macro is a group of related charges, modifiers, and diagnoses that are linked together and that can be entered with a single mouse click. Just select the charge macro, and all of the codes are automatically added to the Selected Codes section. Charge macros are found in the center CHARGES section of the screen, in the Favorites and Department categories. See Selecting Charges from the Favorites or Department Categories for instructions on selecting a charge macro for the current charge transaction.Selecting Charges Using the Search Option
View a How-To Video on Selecting Charge Codes (including using the Search option). Use the Search field in the CHARGES section heading to search for a charge code or charge macro. When searching for a charge, you can enter any of the following into the Search field:- A partial or complete charge description
- A partial or complete charge code
- A partial or complete charge macro description
- The search will return all charges that contain your search phrase in either the charge code, charge description, or the charge’s associated keywords, from the master list of charge codes.
- The search will also return any charge codes or macros that contain your search phrase in the Favorites or Department category’s description of the code or macro. (When adding items to the Favorites or Department category, you or your administrator can change the description of a given charge code or macro, so you might see a code listed more than once, each time with a different description.)
-
In the CHARGES section, click into the charge Search field and type a partial or complete charge code or a description.
As you are typing, any charge codes or macros that match what you type are displayed. The number of characters that you must enter to trigger these matching search results is configurable (the default is two characters, contact your Commure Pro representative to modify this).
- If you enter a complete charge code that is an exact match for a CPT code, the charge is automatically selected for you and added to the Selected Codes section on the right side of the screen, using the description from the master list of charge codes.
- If you enter a search phrase (such as a partial code or a few words), then the search will return all charges that contain that phrase. If more than one match is found, then the code will be listed more than once in the results, each time with a different description. Items from the Favorites or Department categories are shown at the top of results list and charge macros are shown with a gears icon to distinguish them from charge codes:
-
(Optional) If the list of potential matches is long, you can you can change the way it is sorted, to help you find the code you want more easily.
- Just below the Search field, select one of the Sort By options:
- Code: Sorts numerically by code, in ascending order.
- Description: Sorts alphabetically by description, in alphabetic order.
- To reverse the sort order, either click the Sort icon or click on the same sort option a second time (for example, click Description a second time to sort in reverse alphabetic order). You might do this if you knew the item you were looking for was near the end of the alphabet.
- Select the charge code or macro that you want from the search results, Or, if you cannot find the charge you want in the search results, see Entering Charges as Free Text. The charge code is added to the Selected Codes section on the right side of the screen. If you selected a macro, all of the charge codes within the macro (as well as any associated charge modifiers or diagnosis codes) are added to the Selected Codes section.
-
(Optional) Perform searches for additional charges as necessary:
- Click X in the Search field to clear the prior search phrase.
- Repeat Step 1 through Step 3.
Entering Charges as Free Text
If you cannot find the charge that you want by looking in the Favorites or Department categories, or by performing a Search for it, you may be able to enter it as free text. Your ability to enter a free text charge on a charge transaction is controlled by a setting in your user profile. Use free text charges sparingly, as all free text items must be reconciled by administrative staff before final billing.- In the CHARGES section, click into the Search field and type a description of the charge. A list of potential matches is displayed.
- Review the search results to confirm that the item you are looking for does not already exist as a legitimate charge code.
- If you cannot find the item you want in the results, click the Add as Free Text button, located at the top right of the search results list. The free text charge is added to the Selected Codes area, followed by the Yellow Exclamation icon
Selecting Charges from the Custom Workflows Category
If your organization has implemented the Custom Charge Capture Workflows feature, you may see either of the items below:- A Custom Workflows category, located within the CHARGES center section, with one or more custom screen names listed in it. This category is pinned open by default so that you can see the available custom screens. See Pinning a Charge Category or Subcategory Open if you want to pin it closed.
- A Custom Workflows section (instead of a CHARGES section), located in the center area of the screen, with one or more custom screen names listed in it.
- Evaluation & Management (E & M): These screens help to you identify the correct level of E & M charge code for outpatient technical charges.
- List: These screens help you to identify any additional services or procedures that were performed.
- Critical Care: These screens help you to record the amount of time spent with a patient during a critical care incident.
- Infusion: These screens help you to record the infusion services that you provided so that the correct charge codes can be calculated.
- In the center of the screen, in the Custom Workflows category or section, click on a screen name to display the custom screen. The screens are designed and named by your administrator, so their names are unique to your organization. For example, you might see screen names such as “Critical Care,” “E&M Technical,” or “Infusion.” The custom screen that you selected is displayed. The type of screen (E & M, List, Critical Care, or Infusion) is listed at the top left of the screen, and the name of the screen is listed on the tab. In addition, there are tabs for all of the other customs screens, so that you can easily navigate from one to another if necessary.
-
Review the questions on the screen and answer all that apply. Click the Information icon for help about any screen.
- On List and E &M screens, the questions are designed by your administrator and can use a variety of formats:
- Checkbox: Check the box to indicate that a particular service was provided.
- Numeric quantity (on List screens only): Check the box to indicate the service was performed, and then enter a number to indicate the number of times the service was provided.
- Increase/decrease quantity: Check the box to indicate the service was performed, and then click the + or - signs to increase or decrease the quantity for the service.
- Age range: Check the box to indicate that the service was performed. The system automatically calculates the patient’s age on the date of service, and selects the correct age range for you (although you can click the + or - signs to change it, if necessary).
- On Critical Care screens, the same two questions for Time Spent with Patient and Complexity are always present. Please note that this screen is a cumulative record of the time that all providers spent with the patient. As a result, if you are editing a transaction, there may already be prior entries on this screen when it opens. Each row represents a segment of time that you or another provider spent with the patient (the name of the provider who entered each row is displayed for reference purposes). If so, do not change those entries. Instead, click the Add icon to add a new row and enter your own time. Even if you made a prior entry yourself, you should not edit it unless it was a mistake. Always add a new row for a new segment of time (or click the Delete icon to remove a row that was entered in error).
- Time Spent with Patient: Record the number of minutes that you spent with the critical care patient during this segment.
- Complexity (optional): Select the complexity of the time that you spent with the patient from the drop-down list. If the total time spent by all providers is less than 30 minutes, this field may be used to calculate an E & M code.
- On Infusion screens, the same set of questions is always present. These questions are used to record all of the services provided during an infusion session. The questions at the top of the screen are asked once per infusion session, and include the following:
- Infusion Type: The infusion type (Single, Sequential, or Concurrent) is an important factor that is taken into consideration when the system generates the charge codes for the services that were provided to the patient. If you know the correct infusion type, you can select it yourself. Or, if you are not sure, you can keep the default selection of System Generated. The system then evaluates the start and stop times of services you enter, and calculates the appropriate infusion type for you.
- Access Type: Indicate whether the drugs/services are given via a Single Site or Multiple Sites.
- Separate Hydration Order on File: Check this box if there is a separate hydration order on file.
- Drug/Service: Enter a drug or service name. As you are typing, any generic or trade names that match what you typed are displayed. If the optional SOLR search feature has been enabled for your system, you can enter a generic or trade name and also a drug class (such as “chemo” or “hydration”), separated by a space. For example, if you type “chemo abs” or “abs chemo” the system finds any items with a drug class of “chemo” that have “abs” in the generic or trade name. If you type just a drug class, such as “hydration,” all items in that class are shown. If the phrase that you type is an exact match for a drug or service, it is automatically selected for you.
- Delivery Method: Choose the method that was used to deliver the drug or service (for example, Infusion, Push, etc.)
- Site: Choose the site used to deliver the drug or service. This is not the actual location on the body, but represents a unique vascular access site through which drugs have been delivered for this infusion session. For example, if all drugs/service were administered via the same vascular access site, you would choose “1st” for all of them. If the drugs/services were administered via two different vascular access sites, you would choose “1st” for the drugs/service that were administered via the first site, and “2nd” for the drugs/services that were administered via the second site. A value of “1st” is selected by default since in most cases only one vascular access site is used, but you should change it if appropriate.
- Start Date and Stop Date: The service date on the charge transaction is defaulted as the start and stop dates. In most cases you do not need to change this, but if you do, click the field to display a pop-up calendar, and then select a date from it. Typically, the start and stop dates are the same date, unless the drug/service was administered at night and into the next day.
- Start Time and Stop Time: Enter the start or stop times in military time (for example, enter 14:00 for 2:00 PM).
- (Optional) Click on a different tab to answer another set of questions.
-
When done, click the Ok button at the bottom of any tab to close all of the custom screens.
If any of the information that you entered on a custom screen has errors (these are typically due to incomplete information), that custom screen’s tab is shown with a red exclamation mark, as in this example:

Editing or Deleting Information on or from Custom Screens
When you answer one or more questions on the custom screens, charge codes are added to the Charge Transaction screen. What happens if you now delete the generated charge codes on the Charge Transaction screen, or if you re-open the custom screens and make changes there? Or, what happens if a different user edits the transaction and makes changes at a later date? Some basic rules are listed below.-
Critical Care and Infusion Screens: When a user enters a time segment or a list of services on a Critical Care or Infusion custom screen, one or more critical care or infusion charge codes are generated and added to the Charge Transaction screen.
- After charges are generated by a Critical Care or Infusion screen, a Level 3 user (typically this is a physician, nurse, or medical assistant) cannot delete the generated charge codes on the main Charge Transaction screen (only Level 0, 1, or 2 users may do this), as indicated by the Yellow Exclamation icon next to the charge in the Selected Codes section. The only way a Level 3 user can change or remove the generated codes is by re-opening the custom screen and selecting/deselecting different items or services. When the user closes the screen, the selected items or services are re-evaluated, possibly resulting in a changing or removing the charge codes that were originally generated.
- Critical Care and Infusion screens contain charges for services that are the result of multiple persons (physicians, nurses, medical assistants, etc.) sharing responsibility for the patient. Therefore, these custom screens “remember” the items or services that were selected across all user sessions. So for example, the items that the original provider selected are remembered (and shown as selected) to that same provider if he re-opens the Critical Care or Infusion screen. They are also remembered (and shown as selected) to the next user who edits the transaction. If the second user makes changes, those changes are remembered (and shown as selected) to the next user, and so on.
The only exception to this rule is the Infusion Type field on Infusion screens. If a user initially selects an Infusion Type other than System Generated (such as Single), the Infusion Type selected by the user is used to calculate the correct charge codes. However, if the same or another user later re-opens the Infusion screen after the transaction was initially saved, the Infusion Type is reset back to the default of System Generated, since the user might be adding or removing services, which would make their original selection (Single, in our example) invalid. The user may keep the default of System Generated, or choose a different infusion type.- If a Level 0, 1, or 2 user removes a generated charge code on the main Charge Transaction screen, and then re-opens the custom Critical Care or Infusion screen, the previously selected items or services will still be listed, as described above. If they leave the items as selected and close the custom screen, the same charge codes will be generated and re-added to the charge transaction screen again.
-
Evaluation & Management Screens: When a user answers one or more questions on an E & M custom screen, a single E & M charge code is generated and added to the Charge Transaction screen (or in some cases, an E & M screen may have preselected answers, resulting in an E & M charge code being generated as soon as the Charge Transaction screen is accessed by a user).
- After a charge is generated by an E & M screen, any user may delete the generated charge code on the main Charge Transaction screen. If a user deletes the generated charge code on the Charge Transaction screen and then submits the transaction immediately (does not go back to the custom screen), the transaction is saved without the E & M code. For example, a provider might complete the E & M screen (generating a technical E & M code), and then realize that the visit should have been coded as a preventive visit. The provider could delete the generated E & M code on the Charge Transaction screen, enter a preventive visit code instead, and then submit the transaction.
- E & M screens contain charges for services that are the result of multiple persons (physicians, nurses, medical assistants, etc.) sharing responsibility for the patient. Therefore, these custom screens “remember” the items or services that were selected across all user sessions. So for example, the items that the original provider selected are remembered (and shown as selected) to that same provider if he re-opens the E & M screen. They are also remembered (and shown as selected) to the next user who edits the transaction. If the second user makes changes, those changes are remembered (and shown as selected) to the next user, and so on.
If a user removes a generated charge code on the main Charge Transaction screen, and then re-opens the custom E & M screen, the previously selected items or services will still be listed, as described above. If they leave the items as selected and close the custom screen, the same E & M charge code will be generated and re-added to the charge transaction screen again. -
List Screens: When a user answers one or more questions on a List custom screen, charge codes are generated and added to the Charge Transaction screen. The rules for List screens are as follows:
- After a charge is generated by a List screen, any user may delete the generated charge code on the main Charge Transaction screen. If a user deletes one or more of the generated charge codes on the Charge Transaction screen and then submits the transaction immediately (does not go back to the custom screens), the transaction is saved with only the remaining codes.
- List screens typically contain charges for services that are provided by individual persons. Therefore, the List screen “remembers” the items that were selected during the current user session only. So for example, the items that the original provider selected are remembered (and shown as selected) to that same provider if he re-opens the List screen during the same user session. However in the next user session (for example, if the original or a different user edits the transaction at a later time), the user starts with a “fresh slate.” The charge codes generated during the previous user session are listed on the Charge Transaction screen, but when the user opens a List screen in the new session, nothing is displayed as selected. If the user selects any response now, new/additional charge codes are generated by those responses and are added to the Charge Transaction screen. In some cases, this may be a second instance of a charge that was generated in a previous session.
Adding a Modifier to a Specific Charge Code
View a How-To Video on Modifying the Selected Charge Codes (including adding modifiers). Each charge code on the charge transaction can have one or more modifiers associated with it. The total number of modifiers that you may add to a single charge code is controlled by a setting in your user profile. There are several ways to add modifiers to a charge code:| Action | Where Documented |
|---|---|
| The GC modifier (resident/teaching physician services) can be configured to be added automatically to your charges, or not. | Adding GC Modifiers for Resident/Teaching Services (Automatically or Manually) |
| You can select modifiers from the complete list of modifiers, from the Modifier Selection window. | Selecting Modifiers from the Modifiers Selection Window |
| You can select modifiers from your personal modifier Favorites list. | Selecting Modifiers from Your Modifier Favorites List |
| See also the instructions on how to add modifiers to your Favorites list. | Managing Your Modifier Favorites List |
Adding GC Modifiers for Resident/Teaching Services (Automatically or Manually)
The GC modifier for resident/teaching physician services can be configured to behave in a variety of manners, based on a setting in your user profile. For example:- If you never teach, the application can be configured to never add GC modifiers to your charges.
- If you act as a teaching physician all of the time, your administrator can configure the application to add GC modifiers to all of your charges automatically.
- If you teach only occasionally, a dialog box can be configured to pop-up with every charge that you enter, asking if you want to enter a GC modifier to it.
- And finally, your administrator may even give you the option to decide for yourself whether or not GC modifiers are added to your charges.
- None: A GC modifier is not automatically added to any charges that you enter.
- Auto-Add: A GC modifier is automatically added to every charge that you enter.
- Prompt: A dialog box displays so that you can respond Yes or No to enter a GC modifier, for every charge that you enter. That same dialog box also has a Remember my selection and do not prompt me again checkbox. If you realize that several of your upcoming charges will all require the same answer (either Yes or No), you can check the “remember my selection” box. Your Yes or No response is then retained on all charges entered from that point forward, for the current and all subsequent transactions, and the GC modifier is either entered automatically or not, based on that response. It also sets the Screen Settings > GC Modifiers option to None (if you answered No and “remember my selection”) or to Auto-Add (if you answered Yes and “remember my selection”). If you want to start being prompted again at a later time, you can select the Screen Settings > GC Modifiers option again and re-select the Prompt option.
Selecting Modifiers from the Modifiers Selection Window
View a How-To Video on Modifying the Selected Charge Codes (including adding modifiers). You can enter any type of modifier (including the GC modifier) to any charge on the transaction from the Modifiers Selection window.- Select one or more charge codes for the transaction, using any selection method.
- From the list of CHARGES in the Selected Codes section on the right side of the screen, identify the charge to which you want to add a modifier.
-
Click Add Modifier: +M , located to the right of the charge code. Example:

-
Locate the modifier you want using any of these methods:
- Scroll up or down until you find the modifier that you want.
- Enter text or a number in the Search field to search for modifiers containing that text or number.
- Click the Mod (Modifier) or Description column heading to sort the list of modifiers by that item.
- Click on one or more modifier codes in the Mod (Modifier) or Description column to select them. When you click on a modifier, a green checkmark is displayed in the Sel (Selected) column, to indicate that it is selected.
-
Click the X button in the upper right corner of the Modifier Selection window to close it.
On the Charge Transaction screen, the modifier code(s) are displayed on the row containing the charge, in the same order that you selected them, as in this example:

- (Optional) You can change the order of the modifiers by dragging and dropping them into new positions.
-
(Optional) You can delete any modifier that was added in error: hover your mouse cursor over the modifier to expose the X next to it, exxample:

Selecting Modifiers from Your Modifier Favorites List
View a How-To video on Modifying the Selected Charge Codes (including adding modifiers). You can select frequently used modifiers quickly from your modifier Favorites list.- Select one or more charge codes for the transaction, using any selection method.
- From the list of CHARGES in the Selected Codes section on the right side of the screen, identify the charge to which you want to add a favorite modifier.
-
Hover your mouse cursor over the Add Modifier button +M , located to the right of the charge code, to display the Favorites pop-up list, as in this example:

- Select a modifier from the pop-up. On the Charge Transaction screen, the modifier code(s) are then added to the row containing the charge, in the same order that you select them.
- (Optional) You can change the order of the modifiers by dragging and dropping them into new positions.
-
(Optional) You can delete any modifier that was added in error: hover your mouse cursor over the modifier to expose the X next to it. Example:
Entering Details for a Specific Charge Code
Your administrator may have created special detail fields (called charge header fields) to capture additional information about the individual charge codes on the transaction. For example, you might see a header field to capture information about immunizations. Or, if your organization bills for both professional and technical services on the same charge transaction, you might see the fields below.- Rendering Provider: This header is used to indicate the specific person who provided each service, such as the name of the attending physician, resident, nurse, or medical assistant.
- Supervising MD Present: Select Yes or No to indicate whether a supervising MD was present when the service was provided.
- Click Expand Down to expand the area downward and show the charge headers and diagnosis codes.
- Click Collapse Up to collapse the area upward and hide the charge headers and diagnosis codes.
Entering NDC Codes for a Specific Charge Code
When billing for the administration of drugs such as vaccinations or other injections (such as steroids), Medicare and other insurance providers require organizations to submit the National Drug Codes (commonly referred to as NDC codes) that are associated with those drugs. If your organization provides these types of services, they may have implemented the NDC Selection feature. When implemented, two additional fields are listed underneath the charge code for the drug administration: NDC and Qty (quantity). These fields are only present when you enter a charge code for the administration of a drug. The NDC and Qty fields have the following traits, based on a variety of configuration settings:- The NDC field allows you to search for a drug and its associated NDC code, but your choices are limited to only those drugs that are appropriate for the charge code, and possibly also for the visit location (only drugs dispensed at that location), and possibly also for the patient’s financial class (only those that are allowed by the financial class).
- The NDC field might allow you to enter a free text NDC code, and might also add leading zeros if you enter a free text code that does not contain the expected number of digits.
- Both the NDC and Qty fields may be required.
- You might see an error message if you do not complete the NDC and Qty fields.
- Enter a charge code for a drug administration. The charge code is added to the Selected Codes section on the right side of the screen. If an NDC value is mapped the charge code, an additional NDC field is displayed below the charge code to capture the NDC code and quantity.
-
Use the NDC field, located underneath the charge code in the Selected Codes section, to enter or search for the NDC code. You can use any of these methods:
- Click into the NDC field and start typing any of the following: a partial or full trade name, generic name, or NDC code. For example, if you type “flu,” the system finds any drugs that are appropriate for the charge code that you selected, that have “flu” in the generic or trade name. Similarly, if you enter a “842”, the system finds any drugs that are appropriate for the charge code that you selected, that have those characters in the NDC code. If the list of matches in the pop-up window is too long (only the first 50 are shown), you can continue typing more characters to narrow the list. When you see the drug and code you want, click on it to select it.
- Click Search to the right of the NDC field to pop up a window that displays all the drugs and associated NDC codes that are appropriate for the charge code that you selected. You can scroll through this list to find the drug and associated NDC code that you want. Or, if the list is too long, you can type a full or partial name in the Drug Name field, or a full or partial NDC code in the Code field (these fields are at the top of the pop-up window). When you see the drug and code you want, click on it to select it.

- Enter the amount administered in the Qty field, based on the strength and delivery options for that particular drug (oral, injection, etc.).
- Complete the remaining information for the charge transaction and then click Submit. If you did not complete the NDC or Qty field, and your administrator has configured your user profile to show an error message when those fields are incomplete, a “_Missing/invalid NDC code or quantity”_error message is displayed. You should fill in the fields if at all possible. In addition, if you do not complete the fields, you might be able to save the transaction as complete, or you may only be able to save it as a draft, depending on your system’s configuration. In all cases (whether the error message is displayed or not, and whether saved as a completed transaction or as a draft), if you do not complete the NDC and Qty fields, the transaction is assigned a NDC Errors error status.
Entering Diagnosis Codes on a Charge Transaction
View a How-To Video on Selecting Diagnosis Codes. The middle area of the charge transaction screen is where you select diagnosis codes. There are a few features available to facilitate the quick entry of diagnosis codes:- Depending on a setting in your user profile, when you enter a new charge transaction, the diagnoses used on the patient’s previous transaction may be copied automatically to the new transaction, or those diagnoses may be displayed so that you can select the ones you want to copy to the new transaction (if any).
- If you accessed the Charge Transaction screen via a link from an external application, that link may be designed to automatically add the patient’s diagnoses from the external application to the Charge Transaction screen.
| Option Name | Location on the Screen | Where Documented |
|---|---|---|
| Search | A search field located in the DIAGNOSES section heading | Selecting Diagnoses Using the Search Option |
| Existing | The first category the DIAGNOSES section. | Selecting Diagnoses from the Patient’s List of Existing Diagnoses |
| Favorites | The next category the DIAGNOSES section. | Selecting Diagnoses From the Favorites or Department Categories |
| Department | The last category in the DIAGNOSES section. | Selecting Diagnoses From the Favorites or Department Categories |
| Free Text | After performing a search at the top the DIAGNOSES section, an Add as Free Text button may be present just above the search results, but only if enabled in your user profile. | Entering Diagnoses as Free Text |
| See also: Secondary icon | Selected Codes area. | Selecting Secondary Diagnosis Codes |
- Each diagnosis code is listed, in the order in which you selected it. The first diagnosis is considered the primary diagnosis for the transaction and it is displayed in bold text.
- Some diagnosis codes may not be appropriate for use as a primary diagnosis. A Red Exclamation icon is displayed next to the diagnosis if it falls into this category (hover your cursor over the exclamation mark to see a message explaining the problem). You may want to enter a new primary diagnosis and/or move the non-primary one out of the first position by simply dragging and dropping it into a new position on the list (see Changing the Order of Diagnosis Codes).
- When the charge transaction is saved, any new diagnosis codes are automatically added to the patient’s problem list and are assigned a Type of “Acute” and a Status of “Active.” In addition, the current date is used for the Last Used date and the Onset date.
Associating a Photo with a Charge Transaction
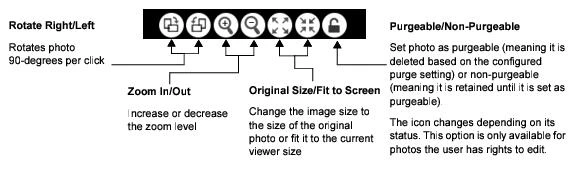
Associating a Photo with a Charge Transaction View a How-To Video on an Overview of the Charge Transaction screen (including a brief section on linking a photo) You can attach one or more photos to a charge transaction in cases where this additional documentation is necessary or helpful to your workflow. For example, you might attach a photo of a wound, a rash, or a fracture as a means of communicating with other providers for purposes of monitoring or assessment. Or you might attach a photo as a means of communicating with billers to validate the coding of the charge transaction. In order to attach a photo, the photo must first be taken by yourself or another provider using a handheld device, and associated with the patient’s record. Please see the Commure Pro on Apple Help or Commure Pro on Android Help for instructions on this process. Once the photo is part of the patient’s record, you can attach it to a charge transaction while entering a new charge, or while editing an existing one. To associate a photo with a charge transaction, follow these steps:- Click the Photos button located at the top right of the Charge Transaction screen. The Patient Photos display opens in the center area of the screen and shows a Summary list of the patient’s photos. For each photo, you can see the Date/Time it was taken, the Title it was given by the person who took the photo (if they did not assign a title, a default title of YYYYMMDDHHSS is assigned), the person who took the photo (Created By), a thumbnail image of the photo, and Delete and Purgeable/Non-Purgeable buttons. The Link column on the far left contains a checkbox. A checkmark in the Link column indicates that the photo is associated with the current charge transaction.
-
(Optional) Adjust the Patient Photos display.
- You can move the Patient Photos display to a more convenient location by grabbing the title bar, dragging the window to a new spot, and dropping it.
- You may change the order in which Photos are sorted by clicking on a column heading. For example, clicking the Title heading would sort the photos alphabetically by photo title, or clicking the Link heading would sort the photos according to those that are linked to the charge versus those that are not.
- To view the actual image of a photo, click anywhere on the row for a photo (except on the checkbox in Link column). The photo opens inside an image viewer.
-
While viewing an image, you can take any of the following actions:
- Continue to enter data on the Charge Transaction screen (that screen is still active).
- Adjust the photo using the viewer controls.
- Click the Previous button or the Next button to navigate to additional photos in the Summary list.
- Click the Close button at the top right to close the image viewer and go back to the Summary list of photos.
- Once you identify a photo that you want to link to this charge translation, check the box for that photo’s row in the Link column. You can link multiple photos to the same charge transaction. To remove the link for a photo that is no longer applicable, uncheck the box.
- To save the link(s) and close the Patient Photos display, click the OK button at the bottom right corner of the window. The photo(s) will be associated with the charge transaction once you Submit the transaction. Notice that the Photos button now shows a number to indicate the number of photos that are associated with this transaction. In the Patient List > Charges display option, the Details pane will show “Attached photos: n” where “n” is the number of photos linked to the charge transaction. In addition, the Charges > Holding Bin option can also be configured to show the number of photos attached to the transaction. See Viewing Charges in the Holding Bin (Classic) for more information.
Entering Comments on a Charge Transaction
There are two fields available for free text comments on every charge transaction: Comments and Biller Comments.- The Comments field is available on the Charge Transaction screen for all users, and the comment entered in the field is visible to anyone who has access to view or edit the transaction. Providers can use the Comments field to enter notations about the transaction or to communicate billing questions to supervisory physicians or billing administrators. When the provider enters a comment and clicks Submit, the transaction may also be automatically held for review, or the user may be presented with a prompt asking them if they want to hold the transaction for review (based on a setting in their user profile). If held automatically, or if the user responds Yes to the prompt, the charge transaction is held with a reason of Comment Review, so that an administrator can review the question. For more information, see Holding a Charge Transaction for Review.
- The Biller Comments field is available only to users with Level 1 or 2 access, who have been granted permission to see this field (based on a setting in their user profile). Billing staff can use this field to make notations about billing issues with a particular charge transaction. Information entered in this field is visible only to Level 1 or 2 users who have access to view or edit the transaction.
To enter a comment, follow these steps:
- Locate the Comments and Biller Comments fields, in the COMMENTS section at the bottom left of the Charge Transaction screen. The fields are closed by default. If a comment has already been entered, the first few lines of text are visible. To expand the fields so that you can view or enter text, click anywhere in either of the comment fields.
- Enter your comment in the field.
- To close the comments area when you are done, click anywhere outside of the COMMENTS section.
-
Finish entering the charges, diagnoses, and detail information, and then select Submit to submit your transaction.
If you entered a comment in the Comments field (as opposed to the Biller Comments field), then depending on the value of a setting in your user profile, the charge transaction may now be automatically held for review with a Hold Reason of Comment Review. Or, you may be prompted with the following message: “You have entered a comment. Hold charge for review?”
- Select Yes to hold the transaction for review (with a Hold Reason of Comment Review) and submit.
- Select No to submit without holding the transaction for review.
- Select Continue Editing to return to the Charge Transaction screen without submitting.
Checking a Charge Transaction for Errors
There are two ways to check your charge transaction for errors:-
You can check for errors at any time, on demand, by clicking the Edits button, located in the top right corner of the screen. The transaction is immediately checked for coding errors (also known as code edits) on the data you have entered so far. You might do this if you think there is a potential problem with the data you entered.
- If there are no errors, the system displays a message to that effect.
- If there are errors, the problem(s) are displayed in red text in a message box near the top of the screen. You can expand or collapse this message box by clicking the Edits button:

-
When you click the Submit button, the system automatically checks for errors.
- If there are no errors, the transaction is saved as a completed transaction.
- If there are errors, the problem(s) are displayed in red text in a message box near the top of the screen, and you are presented with options to continue editing (to correct the problems), to save the transaction with errors (as a draft or as a completed transaction), or to discard the transaction. If you choose to correct the problems, then after doing so and clicking the Submit button again, the transaction is saved as completed.
Submitting a Charge Transaction
View a How-To Video on Submitting the Charge Transaction Once a user has entered as much information as possible for the charge transaction, they must submit it. There are four ways to submit a transaction. The method depends on whether or not the transaction is ready to be billed to the patient.- Submit the transaction as complete: The provider confirms that the transaction is complete and ready for billing. For a full explanation of submitting completed charges, see Submitting a Charge Transaction as Complete.
- Submit the transaction as complete and send it immediately to the Outbox: This option is available only to Level 1 or 2 administrators. The administrator confirms that the transaction is complete, and can safely bypass the Holding Bin and be sent immediately to final billing. See Submitting a Transaction and Sending Immediately to the Outbox.
- Submit the transaction as a draft: The provider has entered partial charge information, but the transaction is still incomplete. The provider would like to complete the transaction at a later time, and is not ready to submit the transaction for billing. For a full explanation of submitting charges as drafts, see Submitting a Charge Transaction as a Draft.
- Hold the transaction for review: The provider has completed the transaction to the best of their ability, but it is either missing information, or has coding issues. They want to send the transaction to the Holding Bin where a billing administrator or supervisory physician can review their work, and make any necessary corrections before final billing. For a full explanation of holding charges for review, see Holding a Charge Transaction for Review.
Submitting a Charge Transaction as Complete
View a How-To Video on Submitting the Charge Transaction If you entered all of the necessary information for the transaction and you feel that it is ready to be billed, you can click the Submit button to submit it as a completed transaction. At a minimum, in order to save a transaction as completed, you must enter a Service Date, Billing Provider, Billing Area, Service Site, and at least one charge code. In addition, you may also be required to enter at least one diagnosis code, depending on how your administrator has configured the system. The transaction then follows the normal course of billing, as configured by your administrator. The transaction either goes to the Holding Bin (a holding area where billing administrators can review and make corrections to transactions) or it goes to the Outbox (a staging area for transactions that are ready for final billing). Your administrator determines which types of charges (those with or without errors) are sent to the Holding Bin, as opposed to being sent directly to the Outbox. If the transaction has errors, the options available to you are based on whether the error requires immediate resolution (referred to as a forced code edit), or does not require immediate resolution (referred to as a not-forced code edit). To submit a charge transaction as completed, follow these steps:- Enter all of the necessary data on the Charge Transaction screen.
-
Click the Submit button, located in the lower right corner.
The system now automatically checks the transaction for errors.
- If the transaction has a forced coded edit error, you are required to resolve the issue before you can save the transaction as completed. You may see either of the dialog boxes below:
- Continue Editing (to fix the issue and then Submit again).
- Save As Is (to save as a draft without correcting the issue). o “This charge transaction was NOT SAVED due to errors. Choose the next step. Please note that if you discard the transaction all changes will be lost.” This message is seen on a “forced” code edit, when your user profile is not configured to allow saving forced code edit as drafts. You have options to:
- Continue Editing (to fix the issue and then Submit again)
-
Discard Transaction (to exit without saving the transaction).
- If the transaction has a non-forced code edit error, and your department or user profile is configured to send transactions with errors to the Holding Bin, the problems are listed in a message box near the top of the screen. An additional dialog box displays this message: “The charge transaction has been saved as a COMPLETED transaction, but code edits now exist. Choose the next step.” You have options to:
- Continue Editing (to fix the issue and then Submit again).
- Save as Draft (to save as a draft without correcting the issue).
-
Save As Is (to save as a completed transaction, without correcting the issue; the transaction will go to the Holding Bin for review by billing staff).
- If the transaction has a non-forced code edit error, but your department or user profile is configured to send transactions with errors to the Outbox anyway, the problems are listed in a message box near the top of the screen. An additional dialog box displays this message: “This charge transaction has been saved as a COMPLETED transaction and sent to the Outbox, but it has errors. Would you like to send back to the Holding Bin to correct errors now?” You can choose:
- Yes (to fix the issue and then Submit again).
- No (to send to the Outbox without correcting the issue).
- If the transaction has no errors, it is transferred to either the Holding Bin or the Outbox, based on the settings described above. No further action is required on your part.
-
Post-submission checks are now performed on the charge transaction:
- If you were able to submit the transaction as complete, and PQRS is enabled at your organization, the application now checks the transaction to see if it qualifies for quality reporting. If it does, the Commure Pro Clinical Metrics screen is displayed so that you can submit quality measure information. See Answering the Clinical Metrics Questions.
- If the transaction meets the criteria for a code edit that launches a custom form, that custom form is now displayed (for both draft and completed charge transactions). See Completing the Fields on a Custom Form.
Submitting a Transaction and Sending Immediately to the Outbox
Depending on how your system is configured, most or all of your organization’s completed charge transactions go to the Holding Bin, where they are verified by billing administrators before they are sent to the Outbox for final billing. However, when entering or editing a charge transaction, a Level 1 or 2 administrator may have the ability to bypass the Holding Bin and send the transaction directly to the Outbox, if enabled in their user profile: If this feature is enabled, an administrator can use the Outbox button on the Charge Transaction screen, whenever they determine that a charge transaction is complete, properly coded, and ready for immediate billing. This submits the transaction and immediately sends it to the Outbox, bypassing the Holding Bin process. As a result, the transaction is billed in a more timely fashion. Follow the steps below to submit a charge as complete and immediately send it to the Outbox:- Enter all of the necessary data on the Charge Transaction screen.
-
Click the Outbox button, located in the lower right corner.
The system automatically checks the transaction for errors.
- If the transaction has no errors, the transaction is submitted as completed, and it is immediately transferred to the Outbox.
- If the transaction has errors, the problems are listed in a message box at the top of the screen. Depending on the type of error, you can choose whether to edit the charge to correct the errors, submit the charge as complete and send it to the Outbox even though it has errors, or exit without correcting the errors (and submit the charge as a draft).
-
Post-submission checks are now performed on the charge transaction:
- If you were able to submit the transaction as complete, and PQRS is enabled at your organization, the application now checks the transaction to see if it qualifies for quality reporting. If it does, the Commure Pro Clinical Metrics screen is displayed so that you can submit quality measure information. See Answering the Clinical Metrics Questions.
- If the transaction meets the criteria for a code edit that launches a custom form, that custom form is now displayed (for both draft and completed charge transactions). See Completing the Fields on a Custom Form.
Submitting a Charge Transaction as a Draft
View a How-To Video on Submitting the Charge Transaction (including submitting as a draft) Once the details of a charge have been entered, providers can choose to submit the transaction as a draft. A provider might do this if they knew the charge transaction was incomplete, and wanted to save it until they had time to enter the remaining details. A user’s ability to save charges as draft is based on a setting in their user profile. Submitting the transaction as a draft prevents it from being sent to the Holding Bin or Outbox, and gives the provider a chance to complete the transaction before it is sent to final billing. Although providers can edit a transaction while it is in the Holding Bin, and may even be able to edit it while it is in the Outbox, the provider has no control over how long the charge stays in either of these states. Once an administrator moves the charge to final billing it will no longer be editable. Therefore, it is better for providers to submit the charge as a draft if they know that it is incomplete. These draft charges have a status of Draft in various displays of charge data. Draft transactions entered on the Desktop Charge Capture application can be viewed or edited in that same application, as well as on a handheld device. Since draft transactions are not complete, they are not eligible for quality reporting, and the Commure Pro Clinical Metrics screen never appears for them (see Answering the Clinical Metrics Questions). To submit the charge as a draft, do as follows:- Enter as much charge data as possible on the Charge Transaction screen. At a minimum, even for a draft charge, you must enter a Service Date, Billing Provider, Billing Area, and Service Site.
- If desired, enter a comment describing the information that is needed to complete the charge, as a reminder to yourself.
- Check the Draft checkbox in the lower right corner, and then click the Submit button.
- Post-submission checks are now performed on the charge transaction. If the transaction meets the criteria for a code edit that launches a custom form, that custom form is displayed. See Completing the Fields on a Custom Form.
Viewing and Completing a Draft Charge
From the Patient List or Patient Search options a user can see the draft charges that they entered using the Desktop Charge Capture application, as well as those that they entered on their handheld device. Drafts entered on the web have a status of Draft, while those entered on a handheld device have a status of Draft (HH). From the Patient List or Patient Search options you can also make any necessary corrections or additions to draft charges, and then submit them as completed transactions. If your organization has implemented PQRS, then once you complete a draft transaction, it becomes eligible for quality reporting.- Select a patient on the Patient List tab, or select a patient on the Patient Search tab and click on the Details icon .
- Click on the Charges display item. The Charges summary list is displayed.
- Identify the draft charge that you would like to complete by reviewing the summary list of charges, and then click on it. Draft charges are displayed in red. The Charge Detail screen is displayed below the summary list, with buttons to Submit, Edit, Copy, or Delete the transaction.
-
Examine the details of the charge and then:
- If you determine that the charge is ready to submit to billing as is, click the Submit button.
- If you determine that edits are necessary, click the Edit button to open the Charge Transaction screen. Make any necessary changes and then click the Submit button at the bottom of the Charge Transaction screen.
-
Post-submission checks are now performed on the charge transaction:
- If PQRS is enabled at your organization and the transaction qualifies for quality reporting, the Commure Pro Clinical Metrics questionnaire is displayed so that you can submit quality measure information. See Answering the Clinical Metrics Questions.
- If the transaction meets the criteria for a code edit that launches a custom form, that custom form is now displayed. See Completing the Fields on a Custom Form.
Holding a Charge Transaction for Review
View a How-To Video on Submitting the Charge Transaction (including holding for review) Once the details of a charge transaction have been entered, a provider may be able to hold the charge transaction for review. A provider might hold a transaction for a variety of Hold Reasons, such as Review Requested (they want someone to review the charge transaction for accuracy) or Hold until Discharged (they want the charge to be held until the patient is discharged). A provider’s ability to hold a transaction for review using the Review Requested reason or any other custom reason (such as Hold Until Discharged or Missing Documentation) is based on several configuration settings.See also Entering Comments on a Charge Transaction for information about holding a charge for review using the Comment Review reason when you enter a comment on the charge transaction.
- Enter as much data as possible on the Charge Transaction screen.
- (Optional) Enter a comment describing the problem or question with the transaction. This comment will be visible to the person who reviews the transaction.
-
Hold the charge for review using one of the options below. Note that the way the Hold for Review option looks and behaves depends upon how many Hold Reasons you are authorized to use.
- If you are authorized for only one Hold Reason, then a Hold for Review checkbox is displayed, as either checked or unchecked, just above the Cancel button at the bottom right of the screen. To hold the transaction for review, check the box (or leave it checked if is already checked by default) and then click the Submit button. The transaction is held for whatever Hold Reason you are authorized to use, which could be Review Requested, or some other custom reason.

- If you are authorized for more than one Hold Reason, a Hold for Review link with an Up Arrow is displayed instead. For example:


- If the Hold for Review link does not have a number next to it, click the Up Arrow to display the list of reasons, select one or more reasons, and then click Submit.
- If the Hold for Review link does not have a number next to it, you can click the Hold for Review link itself, and then click Submit.
- If the Review Requested reason is one of the reasons available to you, the transaction is automatically held for that reason.
-
If the Review Requested reason is not available to you, then you are prompted to select a custom reason for which to hold the transaction.
- If the Hold for Review link has a number next to it, you can simply click the Submit button to hold the transaction for review based on the reasons that are selected for you by default.
Do not check the Draft checkbox. The charge must be submitted as complete and sent to the Holding Bin in order for an administrator or another physician to review it. If the charge is saved as a draft, it is not sent to the Holding Bin, and cannot be reviewed by others.
-
Post-submission checks are now performed on the charge transaction:
- If PQRS is enabled at your organization, the application now checks the transaction to see if it qualifies for quality reporting. If it does, the Commure Pro Clinical Metrics questionnaire is displayed so that you can submit quality measure information. See Answering the Clinical Metrics Questions.
- If the transaction meets the criteria for a code edit that launches a custom form, that custom form is now displayed. See Completing the Fields on a Custom Form.
- On the Charges display option (available on the Patient List tab or via the Details icon from a variety other options).
- On the Charges tab: a variety of Classic Charge Reports or Revenue Reports, such as Holding Bin (Classic or Revenue Report), Held for Review (Revenue Report), Worklist (Classic), Search (Classic), or any other Revenue Report where the Mark as Reviewed feature is enabled.
Completing PQRS/MIPS Clinical Metrics Forms
Commure Pro Desktop Charge Capture makes it easy for physicians to participate in the Merit-based Incentive Payment System (MIPS) sponsored by the Centers for Medicare and Medicaid Services (CMS). If Commure Pro PQRS (Physician Quality Reporting System) is implemented at your organization, each time you enter a charge transaction, it is evaluated to determine if it fits the quality reporting criteria. Patient information such as age and gender, and the charges and the diagnoses that you enter, are all taken into account. The reporting frequency for the each measure determines how often you are prompted to answer the Commure Pro Clinical Metrics form (each time a provider uses a particular charge code, once per visit, once per calendar month, once per reporting period, and so on). When appropriate, you are prompted to answer a series of clear and concise quality measure questions. Your answers to the quality measure questions are then conveyed to CMS using either of the methods below:- Registry method: After you answer the quality measure questions, the answers are recorded by the Commuere Pro application. You can then monitor your performance throughout the year using the Charges > PQRS Report option. At the end of the reporting period, Commure Pro reports the information to the CMS.
- Claims Billing method: After you answer the quality measure questions, those answers are translated into one or more CPT II codes and modifiers which are automatically added to the charge transaction. The codes are then submitted along with the original charges to your billing system, and are then reported to the CMS when the claim is submitted for payment.
Answering the Clinical Metrics Questions
Every time you enter a charge transaction and submit it as a completed charge transaction, it is evaluated to determine if it fits the criteria for one or more quality measures. If it does, you are presented with the Commure Pro Clinical Metrics screen, which guides you through the question or questions for each qualifying measure. All, some, or none of the questions on the screen may be required, as determined by your system administrator:-
If all of the questions are required, or if there is a mix of required and non-required questions:
- At a minimum, you must answer all of the required questions and then Submit your responses. You cannot Cancel out of the Clinical Metrics screen.
- If you leave any of the non-required questions unanswered when you Submit your responses, it means that you have chosen to report nothing for those questions, resulting in a possible loss of the incentive revenue or a penalty. You will not be prompted to answer that measure’s questions again for that patient during the measure’s reporting time frame. For example, if a measure’s reporting frequency is once per calendar month, and you submit answers for only one out of the three questions for Joe Smith in January, then that one answer is your total submission for that measure for Joe Smith in January.
-
If none of the questions are required, you have two options:
- You can answer some or all of the questions, and then Submit your responses. Again, if you leave any of the non-required questions unanswered, this means that you have chosen to report nothing for that question for that specific patient, and this could possibly result in a loss of the incentive revenue or a penalty. You will not be prompted to answer that measure’s questions again in the same reporting time frame.
- You can Cancel out of the Clinical Metrics screen entirely, without answering any questions. If in the same reporting time frame you later edit the same qualifying charge transaction, or enter a new qualifying charge transaction, you will be prompted to answer the same measure’s questions again.
-
Enter the charges, diagnoses, and header information for your charge transaction as normal, and then select the Submit button.
If the charge transaction qualifies for quality reporting, the Clinical Metrics screen is displayed.
If you instead save the charge as a draft, the Commure Pro Clinical Metrics screen is not displayed; quality data is not collected for draft charges.
-
Answer each question as on the screen; you may need to scroll down to see all of the questions.
- Select the Info icon at the top right to toggle between showing or not showing the full description of the measure.
- Required questions are indicated by a red exclamation mark to the left of the question.
- If none of the questions are required, the Cancel button is enabled. Select Cancel to exit without saving any of your responses.
-
Select Submit to submit the charge transaction with your answers to the clinical metrics questions.
- If your organization is using the Registry method, your answers are recorded by the system and will be reported to the CMS at the end of the reporting period. You may be able to view your personal performance on the Charges > PQRS Reporting tab. See PQRS/MIPS Reporting Options for Registry Participants (Classic).
- If your organization is using the Claims Billing method, the appropriate CPT II codes and modifiers are now automatically added to the charge transaction and the entire transaction is submitted to the server.
Making Changes to Charge Transactions with PQRS/MIPS Data
When a new completed transaction is saved, the PQRS feature automatically records quality data in the registry (Registry method) or adds CPT II codes to the charge transaction (Claims Billing method). With the Claims Billing method, the auto-added CPT II codes are added after the transaction is submitted on the Desktop Charge Capture or Mobile Charge Capture application; the user does not see them being added. If a user views or edits the transaction after it has been submitted, they can see the auto-added CPT II charges, if the ability to view them has been enabled in their user profile. Auto-added CPT II codes show a “(P)” for PQRS after them to distinguish them from the charges that the provider entered. There may be occasions when a provider, biller, or administrator needs to make changes to either the original charges for services that the provider entered, or to the quality data. A user can only make changes if the charge transaction is still in an editable state, as described in Restrictions to Editing Charge Data. When a user edits a charge transaction the has associated quality data, it may affect the auto-added CPT II codes on the transaction, or it may trigger an error status. The table below lists some common scenarios in which a user might need to make corrections to quality data, along with the effect that each change will have. Scenarios When Entering Charges for Services Scenario 1: Accidental Cancel on Clinical Metrics Screen| Scenario | Solution |
|---|---|
| You accidentally selected the Cancel button on the Clinical Metrics screen (possible only if all questions are non-required). | When Cancel is selected, no quality data is recorded (Registry method) or no CPT II codes are added (Claims Billing method). To try again, open the charge transaction for editing and select Submit. The Clinical Metrics screen displays again. Answer the questions and select Submit. |
| Scenario | Solution |
|---|---|
| You selected Submit, but later realized that one or more questions were answered incorrectly or some non-required questions were left unanswered. | Once Submit is selected, the Clinical Metrics screen cannot be accessed again. To fix this, either delete the entire charge transaction and re-enter it so the Clinical Metrics screen displays again, or (Claims Billing users with permission only) edit the charge transaction, remove incorrect CPT II codes, and manually add missing CPT II codes. |
| Scenario | Solution |
|---|---|
| After submitting Clinical Metrics, you deleted original charges or diagnoses from the transaction. | Removing original charges or diagnoses does not automatically remove associated quality measures or CPT II codes. To fix this, either delete and re-enter the entire charge transaction, or (Claims Billing users with permission only) edit the transaction and remove both the incorrect charge or diagnosis codes and their associated CPT II codes marked with “(P)”. |
| Scenario | Solution |
|---|---|
| You submitted Clinical Metrics and then realized that a related charge or supporting diagnosis was missing. | Edit the charge transaction, add the missing charge or diagnosis, and select Submit without modifying existing CPT II codes. The transaction is re-evaluated, and if new measures apply, the Clinical Metrics screen displays again. |
| Scenario | Solution |
|---|---|
| A user deletes an auto-added CPT II code. | Users without permission cannot perform this action. Users with permission trigger a PQRS Measures Mismatch error. The CPT II code is deleted and not reinstated. |
| Scenario | Solution |
|---|---|
| A diagnosis associated with all charges on the transaction is deleted. | The diagnosis is removed from all charges, including auto-added CPT II codes, and is not reinstated. |
| Scenario | Solution |
|---|---|
| A user selects All or None to associate or disassociate diagnoses across charges. | Users without permission affect only visible charges. Auto-added CPT II codes remain unchanged. Users with permission affect all charges, including auto-added CPT II codes. |
| Scenario | Solution |
|---|---|
| A user associates or disassociates a diagnosis on a manually entered charge. | The change applies only to that manually entered charge. Auto-added CPT II codes are not affected. |
| Scenario | Solution |
|---|---|
| A user associates or disassociates a diagnosis on an auto-added CPT II code. | Users without permission cannot perform this action. Users with permission affect only the selected auto-added CPT II code. |
Copying Transactions That Have PQRS/MIPS Data
Users may copy charge transactions for which they have completed a Commure Pro Clinical Metrics form. When copying such a transaction, only the original charges for service are copied (along with their modifiers, diagnoses, and charge header information). The responses to the questions on the Commure Pro Clinical Metrics form, or the CPT II charges that were auto-added, are not copied to the new transaction. Prior to saving the copied transaction, the user may change the charge header information, remove some of the copied charges/diagnoses, or add new charges/diagnoses. Once the user saves the new transaction, the entire transaction is evaluated to see if it meets quality reporting criteria, and if so, the Commure Pro Clinical Metrics screen is displayed so that the user can fill it out.Completing Custom Forms
The Commure Pro application can automatically launch Custom Forms based on code edits so that they are readily accessible to providers and administrators at the point of care. If implemented at your organization, each time you submit a charge transaction, it is evaluated to determine if it meets any code edit criteria, and if so, any custom forms associated with those code edits are then launched. The form can then be immediately completed and submitted, and then routed to a printer or fax for action and analysis (routing requires integration work by Commure Pro services). Some examples of forms associated with code edits include:- PCP Notification Forms: A code edit can be configured to launch a PCP (Primary Care Physician) Notification form when a provider enters a specific charge or diagnosis code. When the provider submits a charge transaction that matches the criteria of the code edit, the PCP Notification form is automatically displayed to the user for completion.
-
Performance and quality measures: A code edit can be configured to launch a performance or quality measure form when a provider enters a specific charge, such as a charge for an operation or a discharge. Information about performance and quality measures can then be gathered to assess patient care and measure institutional performance. Examples of quality measure forms can be:
- Did patient receive smoking cessation instructions? (CHF patient); or
- Did patient receive aspirin upon arrival? If not why? (AMI patient)
Completing the Fields on a Custom Form
Every time you enter a charge transaction and submit it, it is evaluated to determine if it fits the criteria for one or more code edits. If it meets the criteria for a code edit, and that code edit has a Custom Form associated with it, the form is then automatically displayed. The number and type of fields on the form are completely customizable and depend on your organization’s needs.-
Enter the charges, diagnoses, and header information for your charge transaction as normal, and then select the Submit button.
If the charge transaction meets the criteria for a code edit that has an associated form, the form screen is displayed.
Even if you save the charge as a draft, the Form screen is displayed.
-
Complete the fields on the screen; you may need to scroll down to see all of the questions. Since the form is completely customizable, it might display any of the following:
- A variety of read-only patient, insurance, provider, or charge transaction fields.
- Additional fields for you to complete, such as free text comments or other data. Complete the fields as appropriate for the patient.
- The Scratchpad field from the Sign-Out module. If this field is present, then when you select a Billing Area on the charge transaction, the system retrieves the data from the Scratchpad field on the Sign-Out form for the same department (to which the Billing Area belongs). You can leave this field unchanged, or you can modify it. Changes that you make to the Scratchpad field here may or may not be carried over to the Sign-Out module; it depends on how your organization has configured the Custom Form.
- Select Save to save the form data as completed, or Save as Draft to save it as a draft form (you can later edit and complete the form if necessary). In some cases, the form may now be automatically routed to a printer or fax. For example, a PCP Notification form might be automatically faxed to the Primary Care Physician.
Making Changes to Charge Transactions that have Associated Custom Forms
There may be occasions when you need to make changes to either the original charges for services that you entered, or to the associated form. You can only make changes to a charge transaction if it is still in an editable state, as described in Restrictions to Editing Charge Data. The table below lists some common scenarios in which you might need to make corrections:| Scenario | Solution |
|---|---|
| You submitted a charge transaction, and may also have completed an associated custom form, but you realize that the charge transaction is either incorrect or incomplete. Now you want to fix the charge transaction. | If the charge transaction is still in an editable state (as described in Restrictions to Editing Charge Data), open the transaction for editing as you normally would. Make your changes to the charge transaction and click Submit. If the updated charge transaction meets the criteria for the code edit, one of two things can happen depending on system configuration. Another instance of the form may be launched automatically, or the system may notify you that a form already exists and ask if you want to create another one. If appropriate, complete a second form and select Save. This creates a second instance of the same form for the same charge transaction. You can delete the previous instance of the form if appropriate by selecting the form on the Patient List > Forms display option and clicking Delete. |
| You entered your charges for services and completed all the fields on an associated custom form. Now you want to delete some of the charges or diagnoses on the charge transaction and believe the associated form data should also be deleted. | If the charge transaction is still in an editable state (as described in Restrictions to Editing Charge Data), open the transaction for editing as you normally would. Make your changes to the charge transaction and click Submit. If a second form is displayed or if you are prompted to add another one, click Cancel. The initial form is not automatically deleted when the charge transaction is updated. If the form is no longer needed, you can delete it by selecting the form on the Patient List > Forms display option and clicking Delete. |
| You entered your charges for services and completed all the fields on an associated custom form. You realize you made an error and now want to delete the entire charge transaction and the associated form. | If the charge transaction is still in an editable state (as described in Restrictions to Editing Charge Data), select the transaction on the Patient List > Charges display option and click Delete. The transaction is deleted along with its associated form. |
| You selected the Save button on a Forms screen but believe one or more questions were answered incorrectly or some fields were left incomplete. Now you want to correct or complete the form fields. | If the charge transaction itself is correct and only the data on the custom form is incorrect or incomplete, you can edit the form. Select the form on the Patient List > Forms display option and click Edit. Make your changes and then click Save on the Forms screen. |
Copying Transactions That Have Associated Forms
Users may copy charge transactions that have an associated form. When copying such a transaction, only the charges for service are copied (along with their modifiers, diagnoses, and charge header information). Prior to saving the copied transaction, the user may change the charge header information, remove some of the copied charges/diagnoses, or add new charges/diagnoses. Once the user saves the new transaction, the entire transaction is evaluated to see if it meets the code edit criteria, and if so, a new Forms screen is displayed so that the user can fill it out.Entering Charges for Multiple Service Dates (on a Single Patient)
There may be instances when you would like to enter the same charge, or set of charges, for multiple service dates, for a given patient. For example:- For an inpatient visit, you might want to bill the same evaluation and management code for several days at a once.
- You might prefer to bill at the end of the week, for all of the days in the week that just completed.
- Click the Additional Dates Add button . A pop-up menu displays the following two choices: Add Date and Add Date Range.
-
Enter the appropriate date(s) or date range.
- Add Date: Select this option to add a new field for a single date in the CHARGE DETAILS section. Then click into the field select a date from a pop-up calendar (or, just type a date into the field).
- Add Date Range: Select this option to add two new fields for a date range in the CHARGE DETAILS section. Then click into each field to select the beginning and end dates from a pop-up calendar (or, just type dates into the fields).
- Enter the remaining information for the charge transaction, such as additional charge header details, diagnosis codes, charges codes, modifiers, and comments. See the following topics for more information:
-
Determine how to save the multiple transactions:
- Submit them as a drafts: Click the Draft checkbox and then click Submit.
- Submit them as completed: Click Submit.
- If the “main” service date has errors, the error is displayed in red text in the Edits box at the top of the screen, and a dialog box with the standard choices for addressing the error are displayed below it. For example, you may see choices to Continue Editing (to fix the problem), Save as Draft (without fixing the problem), Save As Is (without fixing the problem), or Cancel (exit without saving the transaction). See Submitting a Charge Transaction as Complete for more information. We recommend that you choose Continue Editing to fix the issue now. If you do so, you can correct the problem once, and then click Submit again, and the correction that you make will then be applied to all of the transactions for all of the service dates that you entered. If you instead choose to save as Draft, or Save As Is, you are then presented with a Confirmation box described in the bullets below, showing you the error status of each charge transaction for each service date. You then have the option of opening each transaction for each service date, and correcting and submitting each transaction individually.
- If there are no errors for the “main” service date (or if you fixed the errors as described in the bullet above), a series of transactions for the additional service dates are now created. If there are no errors with those either, then you are essentially done. You may be presented with a confirmation box that summarizes the number of charge transactions that were created. Click Finish to close the box.
- If there are errors on any of the transactions for the additional service dates, a Confirmation box is displayed, showing you the status of each charge transaction for each service date. Any transactions with errors show the error in red text.
- Correct the error, and then click the Submit button at the bottom of the Charge Transaction screen.
- Then click on the next transaction with an error (listed in the Confirmation box on the left side of these screen) and repeat the process.
- When all charges are corrected and submitted, click the Finish button in the Confirmation box.
Entering Charges for Multiple Patients via Batch Charge Entry
Batch Charge Entry provides an easy, simplified workflow in which providers can quickly and accurately enter the same diagnosis and charge codes for multiple patients on their patient list. Often, providers see patients who require the same diagnoses, treatments, and care. Some common scenarios include:- A provider in a dialysis unit sees up to fifty patients during a 4-hour shift. In most cases, the charge information remains the same for all patients. The only piece of information that changes is the patient name.
- A PCP evaluates his/her patients during a routine evaluation. For the most part, these are E&M encounters that share the same diagnosis and CPT codes; the only information that changes is the patient name.
Using the Batch Charge Entry Tab
If implemented by your institution, the Batch Charge Entry feature is available from the Charges tab by clicking the Batch Charge Entry subtab. This tab allows you to perform the following functions:- View, enter, and edit charges from one of the four viewing options
- Select multiple patients on your list to apply a charge
Common Features and Functions of Batch Charge Entry
There are a number of features and functions on the Batch Charge Entry tab that are common to other Charge Capture screens. These are described in the following table:| Common Features/Functions | Description |
|---|---|
| Charge Headers | These fields are associated with the charge transaction and are located at the top of the screen. |
| Patient List Controls | You can use a number of common features to help manage the display of your patient list, such as the Manage and Patient List drop-downs, and the Refresh icon. |
| Sorting Function | To sort the patient visits on your Visits list, click any one of the column headers. |
| Hold for Review Option | Use the Hold for Review option to place the batch charges in the Holding Bin for further review and action by the Billing department. |
- Charge Transaction Headers: The top section includes all the fields that are associated with the charge transaction as a whole. These fields are based on your system’s configuration. Required fields are marked with a red asterisk. Typically, four charge transaction headers are displayed on the Batch Charge Entry tab: Service Site, Service Date, Billing Provider, and Billing Area. Others may be available as determined by your administrator.
- Selected Charges: The middle section allows you to view, enter, and edit charges and diagnoses for the patients on your patient list.
- Visits: The bottom section is your patient list. The standard information displayed on your Visits list are the charge status (left-hand column), Name of patient, DOB, Gender, MRN, Visit #, Visit Type, Admit/Appt Date, Discharge Date/Time, Reason for Visit, and Location. A column for Scheduled Provider may also be added to the report via an XML customization; contact your Commure Pro representative to add this column.
Entering Charge Transaction Header Information for a Batch
The charge transaction header is located at the top of the Batch Charge Entry screen. It includes the fields that are associated with each charge transaction that you create or edit. These fields displayed in the charge transaction header are based on your system’s configuration. For Batch Charge Entry, four charge transaction headers are required. Other fields may be available as determined by your institution.-
Select the appropriate charge transaction headers on the Batch Charge Entry tab. The standard required charge transaction headers include:
- Service Date (required): Enter the date when the service took place by either typing the date in your country’s standard format (either mm/dd/yyyy or dd/mm/yyyy), or by clicking on the Calendar icon. The default is Today’s date.
- Billing Prov (required): Your system administrator can configure the system to automatically default the appropriate provider names into these fields for you. If the defaulted value is incorrect, you can enter a different name or clear the field to leave it blank. If the field is initially blank, you can enter the appropriate provider’s name. To perform any of these actions, click on the Double Down Arrow.
- Svc Site (required): Select a service site from the drop-down list to indicate where the procedure took place (for example, your choices here might be inpatient, outpatient, or doctor’s office).
- Bill Area (required): Select a billing area from the drop-down list to specify the area to which the charge should be credited. Billing areas are typically subcategories of departments. The billing areas available to you here are based on those associated with the departments to which you (the current user) belong.
Entering Charge and Diagnosis Codes for a Batch
The middle section of the Batch Charge Entry option provides a means to enter a batch of charges and provides access to all the features found on the Charge Transaction screen.- Click the Add/Edit Charges button. The Batch Charge Entry transaction screen appears. If you had previously selected some charge and diagnosis codes, they are displayed; you can make edits to the selected charges and diagnoses as necessary.
-
Use any of the regular methods to select charge and diagnosis codes. You can select charges from the Favorites or Department categories, Search for codes, or enter them as free text. You can even use charge macros or diagnosis macro groups. At least one charge code is required to create a charge transaction.
- Entering Charge Codes on a Charge Transaction
- Entering Diagnosis Codes on a Charge Transaction
- Adding a Modifier to a Specific Charge Code
You cannot use the diagnosis Existing list, since you are working with multiple patients at once. Nor can you use Custom Screens. - When you are finished, you should verify that the information you have selected is accurate. Next, click Submit. The charge information is saved. You are then returned to the Batch Charge Entry main screen where the charges and associated codes are displayed in the Selected Charges section.
Applying and Saving Charges to the Patients in a Batch
When you save a batch of charges, the charges are associated with all the patients that you selected. The charges are then processed for errors. Depending on your user profile, in addition to the Save Charges option, you may also have access to the Hold For Review option and/or the Save As Draft option. Follow the steps below to apply the charge(s) to multiple patients on your patient list.- To apply a charge to multiple patients on your list, click each patient row. To de-select a visit, click the row again. You can also click Select All or Select None to select or de-select all the patients in your list.
- When you have finished selecting the patients, review your charge information and patient selections again.
-
Determine how you want to save the batch of charges:
- To save the batch of charges as completed, click the Save Charges button at the bottom of the screen. The charge are sent to either the Holding Bin or the Outbox, based on your department/user preferences.
- To save the batch of charges as drafts, click the Save as Draft button at the bottom of the screen. The charges remain in a Draft status until you complete them. See Viewing and Completing a Draft Charge.
- To hold the batch of charges for review, click either the Hold for Review button at the bottom of the screen, or the Up Arrow button next to it, to display a list of Hold Reasons. Select or unselect the various Hold Reasons, so that only the ones that apply to this batch of charges are chosen. Then click the Save Charges button.
- Click the Save Charges or Save as Draft button to apply the charge to all the selected patients. The following confirmation message is displayed: “You are about to create a charge transaction for [nn] patients. Do you wish to proceed?”
-
Click OK to save the charge batch. Or, click Cancel to discard the charge batch and return to the Batch Charge Entry main screen.
After clicking OK, if there are any code edits or errors, a message prompt appears for the first patient transaction with an issue. For example, you might see “Edits were detected while saving charge(s) for a visit. Do you wish to continue saving charge(s) for all remaining visits?”
You can stop the process and fix the code edit conflict, or continue and edit individual charge transactions later via the status icons.
During batch charge entry processing, only charge transaction code edits and errors are reported. To review and correct patient-specific code edits or errors, you must go to the Worklist or Holding Bin tabs.
-
If a code edit message is displayed, take one of these actions:
- Click OK to continue saving the charge batch. Batch Charge Entry continues to process the charges for all of the remaining patients.
- Click Cancel to cancel this operation. The charge is not applied to the remaining patients and you are returned to the Batch Charge entry main screen.
- A black check mark ( ) indicates that a charge has successfully been applied to the patient visit. Click this icon to view the charge information.
- A red exclamation mark () indicates that the charge was created but that there are errors. Click this icon to open the Charge Transaction screen where you can review the error information and correct any issues with this patient’s charge.
A Note about Batch Charge Entry and PQRS/MIPS or Custom Forms
When using the Batch Charge Entry function, the Commure Pro Clinical Metrics screen does not display after saving a batch of charges, even if the charges qualify for quality reporting. Providers must enter charges in the standard fashion in order to answer the clinical metrics questions. Batch Charge Entry does support Custom Forms that are triggered by code edits, such as PCP Notification forms. When a user enters a charge transaction that triggers a custom form and then saves the transaction for multiple patients in a batch, the form is automatically displayed for each patient. See Completing Custom Forms.Using the Commure Pro Cerner Charge Capture App
If your organization has implemented the Commure Pro-Cerner Charge Capture app, then you can access charge information that resides in Commure Pro, directly from the Cerner application (without having to log out of Cerner and into Commure Pro). The Commure Pro-Cerner Charge Capture app is a plug-in that resides within the Cerner application, and provides a familiar summary of charges entered thus far for a given patient visit. From this summary screen, you can add a new charge, or take a variety of actions against charges that have already been entered. New or edited charge transactions, along with their associated diagnoses and charge details, are immediately saved in the Commure Pro system, and are also visible in the Commure Pro-Cerner Charge Capture app within Cerner.Launching the Commure Pro-Cerner Charge Capture App
- In the Cerner® application, select a patient and a visit.
-
Click the option for the Commure Pro-Cerner Charge Capture app. The location and name of the option within Cerner depends on how your administrator has configured it. For example, it might be called Enter Charges (Commure Pro) or Commure Pro Link, and it might be located in a “MPage” workflow or in the Patient Menu on the left.
The Commure Pro-Cerner Charge Capture app is displayed, showing a summary of the charge status for each day of the patient’s visit.
- If no charges have been entered for a visit day, it displays an Add Charge link in the Actions column. Single-day visits also show the patient’s diagnoses and descriptions.
- If a charge has already been entered for a visit day, it displays an Actions column containing several buttons ( ), visit date (as a clickable link, for example: 03/14/2019-Day-2), billing provider, charge codes and modifiers, charge descriptions, quantity, diagnosis codes, and diagnosis descriptions.
-
Take any of the actions below:
- Entering a New Charge Using the Commure Pro-Cerner Charge Capture App
- Copying a Charge Using the Commure Pro-Cerner Charge Capture App
- Marking a Charge as Reviewed Using the Commure Pro-Cerner Charge Capture App
- Editing a Charge Using the Commure Pro-Cerner Charge Capture App
- Deleting a Charge Using the Commure Pro-Cerner Charge Capture App
- If you have multiple patient charts open in Cerner, you can only open the Charge Transaction screen for one of those patients at a time (a warning message is displayed if you try to open it for another patient).
- When the Charge Transaction screen is open for a given patient, the summary of charges in the Commure Pro-Cerner Charge Capture app shows an In Progress link in the Actions column, to let you know that the window is open. You can click the In Progress link to go back to the open Charge Transaction screen.
- If the open charge is generated by copying from a different visit date, the Copy icon will be highlighted and behave similarly to the In Progress link.
- If the Commure Pro Charge Transaction screen is open for a patient, and then you close that patient’s Cerner chart, or you close the Cerner application entirely, the Charge Transaction screen closes without saving.
Entering a New Charge Using the Commure Pro-Cerner Charge Capture App
- In the Cerner® application, select a patient and a visit, and then click the option for the Commure Pro-Cerner Charge Capture app. The Commure Pro-Cerner Charge Capture app is displayed, showing the charge status for each day of the patient’s visit.
-
Determine for which visit day you want to enter a charge and then click the appropriate item in the Actions column
- If no charges have been entered for a visit day, click the Add Charge link.
- If a charge has already been entered for a visit day, and you want to add another charge for that same day, click the Add button .
- For single-day visits, if diagnosis defaulting is enabled in your user profile, then all diagnoses on the Cerner visit are defaulted onto the charge transaction.
- For multi-day visits, if diagnosis defaulting is enabled in your user profile, then your system administrator determines the maximum number of diagnoses that will be defaulted. For example, if the maximum is configured to 12, then up to 12 diagnoses are selected, with those that have been assigned a priority taking precedence over those that have not. For more information on how diagnoses are defaulted, see How Diagnosis Information Flows Between Commure Pro and Cerner.
- Enter the details for the charge transaction, as outlined in Basic Steps for Entering a New Charge Transaction.
- Click Submit to save your new transaction and close the Charge Transaction screen. The charge is displayed in the Commure Pro-Cerner Charge Capture app. Note that any new diagnoses that you entered on the Charge Transaction screen are added to the patient’s visit diagnosis list in Cerner (except for diagnoses entered on draft charges, or free text diagnoses).
Copying a Charge Using the Commure Pro-Cerner Charge Capture App
- In the Cerner® application, select a patient and a visit, and then click the option for the Commure Pro-Cerner Charge Capture app. The Commure Pro-Cerner Charge Capture app is displayed, showing the charge status for each day of the patient’s visit.
- Locate the charge transaction that you want to copy as the source for a new transaction and click the Copy button in the Actions column.
-
Depending on how your user profile is configured, Copy may now do the following:
- It may automatically copy the comments and biller comments from the previous transaction.
- It may automatically copy the modifiers from the previous transaction.
- It may automatically copy the diagnosis codes from the previous transaction, or it may display those diagnosis codes and allow you to select the ones you want to copy (if any).
The Charge Transaction screen is now displayed. All of the charge codes (and possibly the comments, modifiers, and diagnosis codes) from the earlier transaction are entered for you. You should review the copied information and make any necessary modifications for this transaction. For complete instructions on how to properly fill out the Charge Transaction screen, please refer to Basic Steps for Entering a New Charge Transaction.It will not copy any photos that were associated with the previous transaction to the new transaction. - Click Submit to save your new transaction and close the Charge Transaction screen. The charge is displayed in the Commure Pro-Cerner Charge Capture app. Note that any new diagnoses that you entered on the Charge Transaction screen are added to the patient’s visit diagnosis list in Cerner (except for diagnoses entered on draft charges, or free text diagnoses).
Marking a Charge as Reviewed Using the Commure Pro-Cerner Charge Capture App
Once a charge transaction has been held for review for a particular reason, it must be reviewed and resolved by a supervisory physician or a billing administrator before it can be sent to billing. In order to be able to resolve a charge that is held for review, the user must be designated as a “reviewing user” in their user profile, and they must also have permission to resolve the particular reason that the charge was held for review. If a charge has been held for review, and you have the authority to resolve it, then a Mark as Reviewed button will be available in the Actions column. Follow the steps in Option A or B below to review the charge transaction, and then mark it as reviewed. Option A: Marking as reviewed without opening the charge for editing:- In the Cerner® application, select a patient and a visit, and then click the option for the Commure Pro-Cerner Charge Capture app. The Commure Pro-Cerner Charge Capture app is displayed, showing the charge status for each day of the patient’s visit.
- Locate the charge transaction that requires review—these are indicated by a Mark as Reviewed button in the Actions column.
- Review the charge codes, modifiers, quantity, and diagnosis information for the charge, as it is displayed in the summary.
- If the transaction is correct as entered, click the Mark as Reviewed button in the Actions column.
- When prompted to confirm whether you are sure that you want to mark the selected transaction(s) as reviewed, click Yes. All of the Hold Reasons that you are authorized to resolve are cleared on the transaction and the Mark as Reviewed button is no longer displayed in the Actions column.
- In the Cerner® application, select a patient and a visit, and then click the option for the Commure Pro-Cerner Charge Capture app. The Commure Pro-Cerner Charge Capture app is displayed, showing the charge status for each day of the patient’s visit.
- Locate the charge transaction that requires review—these are indicated by a Mark as Reviewed button in the Actions column.
- Click the date link (for example: 03/14/2019-Day-2) in the Visit Date column to open the transaction for editing. The Charge Transaction screen is displayed. On the Charge Transaction screen, a comment appears in the Edits box the top of the screen, listing one or more reasons why the charge transaction was held for review, such as Held for Review: Comment Review, Held for Review: Review Requested, or some other custom reason.
- Review the charge and make any edits as needed to resolve the reason(s) why the transaction was held for review.
-
Determine whether all of the Hold Reasons have been completely resolved:
- If you resolved only some of the Hold Reasons that you are authorized to resolve, click the Up Arrow on the Mark As Reviewed link to look at the list of reasons. Any reasons that are listed in regular text with a Reviewed button next to it are those that you are authorized to resolve, while those with a gray background cannot be resolved by you. Click the Reviewed button next to any reason that you did in fact resolve (and don’t click the Reviewed button for any that you did not resolve). Then click the Submit button. The hold reasons that you resolved are cleared, and the charge is re-displayed in the Commure Pro-Cerner Charge Capture app. Since you did not resolve all of the hold reasons that you were authorized to resolve, the Mark as Reviewed button is still displayed in the Actions column.
- If you resolved all of the Hold Reasons that you are authorized to resolve, just click the Mark As Reviewed button. All of the Hold Reasons that you are authorized to resolve are automatically cleared and the charge is re-displayed in the Commure Pro-Cerner Charge Capture app. Since you resolved all of the hold reasons that you were authorized to resolve, the Mark as Reviewed button is no longer displayed in the Actions column.
If the Mark as Reviewed button does not have an Up Arrow button next to it, that means you have only one Hold Reason that you are authorized to resolve. Just click the Mark as Reviewed button to resolve that reason. Your edits are saved and the charge is re-displayed in the Commure Pro-Cerner Charge Capture app. Since you resolved all of the hold reasons that you were authorized to resolve, the Mark as Reviewed button is no longer displayed in the Actions column.
Editing a Charge Using the Commure Pro-Cerner Charge Capture App
- In the Cerner® application, select a patient and a visit, and then click the option for the Commure Pro-Cerner Charge Capture app. The Commure Pro-Cerner Charge Capture app is displayed, showing the charge status for each day of the patient’s visit.
-
Locate the charge transaction that you want to edit and click the date link (for example: 03/14/2019-Day-2) in the Visit Date column.
The Charge Transaction screen opens. Depending on how your user profile is configured, either of the following may now happen:
- The diagnoses previously entered on the charge transaction remain unchanged, or
- The diagnoses previously entered are completely replaced by the patient’s current list of diagnoses that are associated with the visit in Cerner.
- Make any of the edits described in Editing Charge Transactions.
- Click Submit to save your changes and close the Charge Transaction screen. If the diagnoses were replaced in Step 2, those changes are saved as well (unless you Cancel out of the transaction). The updated charge is displayed in the Commure Pro-Cerner Charge Capture app. Note that any new diagnoses that you entered on the Charge Transaction screen are added to the patient’s visit diagnosis list in Cerner (except for diagnoses entered on draft charges, or free text diagnoses).
Deleting a Charge Using the Commure Pro-Cerner Charge Capture App
- In the Cerner® application, select a patient and a visit, and then click the option for the Commure Pro-Cerner Charge Capture app. The Commure Pro-Cerner Charge Capture app is displayed, showing the charge status for each day of the patient’s visit.
- Locate the charge transaction that you want to delete and click the Delete button in the Actions column.
- When prompted to confirm your deletion, click Yes to permanently delete the charge. The charge is removed from the summary in the Commure Pro-Cerner Charge Capture app.
Editing Charge Transactions
There are a variety of options in the Desktop Charge Capture application that allow users to make changes to charge transactions. Regardless of which option the user selects to initiate the editing process, the functionality of the Charge Transaction screen that is used for editing those charges is identical. See Opening a Charge Transaction for Editing for instructions on how to initiate the charge editing process. A charge transaction may or may not be editable, depending on the status of the charge itself, as well as several settings in your user profile. Please refer to Restrictions to Editing Charge Data for information on this topic. If a charge transaction is eligible for modification, some of the changes that you can make include the following:| Action | Where Documented |
|---|---|
| Delete a diagnosis code or charge code that was entered in error. | Deleting a Diagnosis Code or Charge Code |
| Add or remove (associate or disassociate) one or more diagnosis codes from a specific charge code. | Adding or Removing a Diagnosis from a Specific Charge Code |
| Order the charges differently. | Changing the Order of Charge Codes |
| Order the diagnoses differently. | Changing the Order of Diagnosis Codes |
| Delete a modifier that was entered in error. | Removing a Modifier from a Specific Charge Code |
| Order the modifiers differently. | Changing the Order of Modifier Codes |
| Associate a new or different photo with the charge transaction. | Associating a Photo with a Charge Transaction |
| Hold a charge transaction for review due to unresolved errors. | Holding a Charge Transaction for Review When Editing It |
| Delete an entire charge transaction. | Deleting a Charge Transaction from Patient List or Patient Search Tabs |
Restrictions to Editing Charge Data
Your ability to edit charges in the Desktop Charge Capture application is based on several settings in your user profile, the transaction’s status, and the date of the visit. In order to edit the transaction, it must meet all of the criteria below that is applicable to the current user.-
Restrictions based on access level and user settings:
- Level 2 and 3 users can edit the transaction if they entered it themselves, or if they are the billing provider on the transaction. In addition, they may also be able to edit the transactions that were entered by other providers in their assigned departments, but only if those transactions are available for viewing and they have permission to edit them.
- Level 1 administrators can edit any charge that they can view.
-
Restrictions based on the status of the charge transaction:
- Charges with a status of Draft, Draft (HH), or Holding Bin can be edited.
- In addition, users may also be able to edit transactions that have a status of Outbox, but only if authorized to do so.
- Charges with a status of Sent to Billing cannot be edited by any user.
-
Restrictions based on the date of the visit:
- Level 3 users can edit the transaction only if it is still within the editable date range defined in their user profile. When the duration allowing for edits is exceeded, Level 3 users are prevented from editing charges in all phases, including charges with a status of Draft, Draft (HH), Holding Bin, or Outbox.
- Level 1 and 2 users do not have restrictions based on the date of the visit.
Since handheld users can work in a disconnected state, they are not notified when a charge is being edited by another user on the web. If a user is editing a charge on the web, and a handheld user submits changes to the same charge from their mobile device, the handheld submission will succeed. When the web user tries to save their changes, they are notified that their changes were not saved because the transaction has since been modified by another user. The web user must re-open the transaction (containing the handheld user’s edits) in order to make any additional changes.
Opening a Charge Transaction for Editing
To edit a transaction that has not yet been saved, simply make your changes directly on the Charge Transaction screen, and then submit your work. If the transaction has already been submitted, you must first locate the transaction, open the Charge Transaction screen for editing, make your changes, and then submit the transaction. Or in the case of some Revenue Reports, you may be able to make basic changes to the charge directly on the report screen. The options from which a charge transaction can be accessed in order to make edits are:| Tab or Option | Quick Steps | Where Documented |
|---|---|---|
| Patient List tab | Select a patient list, then a patient, and then the Charges display option. Click on the charge that you want to edit. In the Charge Detail pane, click the Edit button. | Editing a Charge Transaction from the Patient List or Patient Search Tab |
| Patient Search tab | On the Patient Search tab, search for a patient and then select them in the results section. Click the Patient Details button to open the Patient Data Display. Select the Charges display option and then click on the charge that you want to edit. In the Charge Detail pane, click the Edit button. | Editing a Charge Transaction from the Patient List or Patient Search Tab |
| Charges tab | Under the Charges tab, there are a series of sub-tabs for Classic Charge Reports and Revenue Reports. Many of these report-based options can be used to edit charges. Click on a link for a specific charge to open the charge transaction screen for editing. The link might look like any of these: - A charge status link such as Holding Bin. - An error status link such as Code Edits or Validity Error or None. - A charge category link such as IP E&M. - A charge code link such as 99232. Some Revenue Reports may also allow you to make basic changes directly on the report screen. | Editing Charges by Opening the Charge Transaction Screen |
| Direct Editing | Some Revenue Reports may allow you to make basic changes directly on the report screen. | Editing Charges Using Direct Editing |
| Commure Pro-Cerner Charge Capture App | Some organizations provide direct access to the Charge Transaction screen from Cerner®, via the Commure Pro-Cerner Charge Capture app. In Cerner: select a patient and visit, launch the Commure Pro-Cerner Charge Capture app, and then click on a date link (for example, 03/14/19-Day-2) for a specific charge to edit it. | Using the Commure Pro-Cerner Charge Capture App |
| Commure Pro-Cerner Charge Capture App | Edit a charge using the Commure Pro-Cerner Charge Capture App. | Editing a Charge Using the Commure Pro-Cerner Charge Capture App |
Editing a Charge Transaction from the Patient List or Patient Search Tab
The Patient List and Patient Search tabs allow the user to select a specific patient and then view, enter, or edit charge transactions. The only difference between the them is that on the Patient List tab a provider can select a patient from their personal short patient list, while on the Patient Search tab a provider must first search for, and then select, a patient who is not on their short patient list. Billing administrators do not have personal short patient lists. In this case, the Patient Search tab is their primary access to individual patient data, and may also be used by them to edit charges. Once the user selects a charge transaction to edit from either of these options, the system opens the Charge Transaction screen. To edit a charge from the Patient List or Patient Search tab, follow these steps:- Select a patient on the Patient List tab, or select a patient visit on the Patient Search tab and click on the Details icon .
- Click on the Charges display item. The Charges summary list is displayed.
- Locate the charge that you would like to edit, and click on it. The Charge Detail screen is displayed below the summary list, with buttons to Edit, Copy, or Delete the transaction.
- Click on the Edit button. The Charge Transaction screen opens. You may now edit any of the information displayed here. See the remaining sections of this chapter for instructions on how to make changes.
Deleting a Diagnosis Code or Charge Code
View a How-To Video on Modifying the Selected Charge Codes (including adding/removing charges). View a How-To Video on Modifying the Selected Diagnosis Codes (including adding/removing diagnoses). To delete a diagnosis or charge code that was posted in error, follow these steps:- Open the charge transaction for editing (if it is not already open) as described in Basic Steps for Entering a New Charge Transaction.
-
Review the list of diagnoses or charges in the Selected Codes section on the right side of the screen. Depending on how the charge was entered, you may see either of the following icons:
- A Delete button appears at the far right of each diagnosis or charge code that was selected from a Favorites or Department category, or found via Searching. Click Delete to delete the incorrect item.
- A Yellow Exclamation icon appears next to any charges that were generated from a custom Critical Care or Infusion screen. Charges generated from these types of custom screens cannot be deleted directly on the main charge transaction screen. Instead, open the custom screen from which the charge was generated and then edit your responses to reflect the correct services that were performed (or remove your responses, to indicate that no services were performed). See Selecting Charges from the Custom Workflows Category.
Some diagnosis codes may not be appropriate for use as a primary diagnosis. If deleting a diagnosis code results in a non-primary diagnosis moving up to the primary position, a Red Exclamation icon is displayed next to the diagnosis (hover your cursor over the exclamation mark to see a message explaining the problem). You may want to enter a new primary diagnosis and/or move the non-primary one out of the first position.
Adding or Removing a Diagnosis from a Specific Charge Code
View a How-To Video on Modifying the Selected Charge Codes (including adding/removing diagnoses from a specific charge). In the CHARGES area, located in the Selected Codes section on the right side of the screen, each charge that you selected is listed. Beneath each individual charge, all of the diagnosis codes on the transaction are listed.- If a diagnosis is associated with the charge code, it shows in black text.
- If a diagnosis is not associated with the charge code, it shows in light gray text.
- Open the charge transaction for editing (if it is not already open) as described in Basic Steps for Entering a New Charge Transaction.

-
For a particular charge code:
- Click on an associated diagnosis (black) to disassociate it from the charge code (it changes to gray).
- Click on a diagnosis that is not associated (light gray) to associate it with the charge code (it changes to black).

-
To remove or disassociate all the diagnosis codes from all of the charges:
- Click the None link after the Select DXs option.
-
To add or associate all the diagnosis codes to all of the charges again:
- Click the All link after the Select DXs option.
Changing the Order of Diagnosis Codes
View a How-To Video on Modifying the Selected Diagnosis Codes (including changing the order). You can change the order of the diagnoses for the entire transaction either before or after charge codes have been entered. Do not change this order indiscriminately, since this order often matters most to insurance companies.- Open the charge transaction for editing (if it is not already open) as described in Basic Steps for Entering a New Charge Transaction.
-
In the Selected Codes section, under DIAGNOSES, drag the diagnosis whose position needs to be changed and drop it into the desired position.
Some diagnosis codes may not be appropriate for use as a primary diagnosis. If you drag such a code into the primary position, a Red Exclamation icon is displayed next to the diagnosis (hover your cursor over the exclamation mark to see a message explaining the problem). You may want to enter a new primary diagnosis and/or move the non-primary one out of the first position.
- In the Selected Codes section, under CHARGES, locate the particular charge code whose diagnoses you want to reorder. Then drag the diagnosis whose position needs to be changed and drop it into the desired position.
Changing the Order of Charge Codes
Often, the order of the charge codes is important when billing to insurance companies, and may need to be adjusted if you initially select them in the wrong order.- Open the charge transaction for editing (if it is not already open) as described in Basic Steps for Entering a New Charge Transaction.
- In the Selected Codes section, under CHARGES, drag the charge whose position needs to be changed and drop it into the desired position.
Removing a Modifier from a Specific Charge Code
To delete a modifier, follow these steps:- Open the charge transaction for editing (if it is not already open) as described in Basic Steps for Entering a New Charge Transaction.
- In the Selected Codes section, under the CHARGES area, locate the charge with the modifier that you want to remove.
-
Hover your mouse cursor over the modifier to expose the X next to it, for example:
Changing the Order of Modifier Codes
Often, the order of the modifiers on the charge codes is important when billing to insurance companies, and may need to be adjusted if you initially select them in the wrong order.- Open the charge transaction for editing (if it is not already open) as described in Basic Steps for Entering a New Charge Transaction.
- In the Selected Codes section, under the CHARGES area, locate the particular charge code whose modifiers you want to reorder. Then drag the modifier whose position needs to be changed and drop it into the desired position.
Holding a Charge Transaction for Review When Editing It
While viewing or editing a charge transaction, a user may decide that there are outstanding issues that cannot be immediately resolved. This is often the case when billing administrators review charges that were entered by providers. In this case, even if the transaction was not held for review at the time it was initially submitted, the user may be able to hold the transaction for review at this time, as long as their user profile is configured to allow them to hold a charge transaction for at least one reason. See Configuring the Hold for Review Workflow for more information about configuring the Hold for Review feature for users. If the hold for review feature has been enabled for you, you can hold a charge transaction for review when editing the transaction by either checking the Hold for Review checkbox, or selecting a reason from the Hold for Review drop-down list. The way the Hold for Review option looks and behaves (checkbox versus drop-down list) depends upon how many Hold Reasons you are authorized to use. The procedure is the same whether you are editing the transaction, or creating a new one. See Holding a Charge Transaction for Review for more detailed instructions.Deleting a Charge Transaction from Patient List or Patient Search Tabs
If you find that an entire charge transaction has been entered in error, you can easily delete it to remove it, as long as it is still in an editable state, as described in Restrictions to Editing Charge Data. To delete a charge transaction from the Patient List or Patient Search options:- Select a patient on the Patient List tab, or select a patient on the Patient Search tab and click on the Details icon .
- Click the Charges display item. The Charges summary list is displayed.
- Locate the charge that you would like to delete, and click on it. The Charge Detail screen is displayed below the summary list, with buttons to View, Edit, Copy, or Delete the transaction.
- Click the Delete button.
- Click Yes to permanently delete the charge or No to close the window without deleting the charge.
Importing Charges from Third Party Systems
Desktop Charge Capture has the capability to import charges from third party charge capture systems. This supports workflows where charges are captured by existing specialized charge capture applications, and the organization wants to standardize the way those charges are processed by using the rich capabilities of the Commure Pro Desktop Charge Capture application. There are two different methods that can be used to import charges into Commure Pro:- Import via an Inbound Charge Interface (HL7): This method requires customized programming by Commure Pro services. The incoming HL7 messages can have billing statuses assigned to them (such as Draft, Holding Bin, or Outbox). The charges then acquire that same status in the Commure Pro system after they are interfaced.
- Import via a Comma Separated Values (CSV) File: The charges from the third party system are collected in a CSV file, and then imported into the Commure Pro system. A specific format must be used for the CSV file; contact your Commure Pro representative for detailed information. Each charge in the CSV file can be flagged with a billing status (Draft, Holding Bin, or Outbox). Once imported, the charges acquire that same status in the Commure Pro system.
- If the charges need to be reviewed and edited for coding issues, assign the status of Holding Bin, so that once imported, they appear in the Holding Bin.
- If the charges do not need to be reviewed, but you want to batch them and send them out for final billing using the Commure Pro billing router, assign the status of Outbox.
| Status assigned in HL7 Message or CSV File | Value of the setting: Send Imported Transactions to Holding Bin | Final status of charges that have no errors | Final status of charges that have errors |
|---|---|---|---|
| Draft | Ignored | Draft | Draft |
| Holding Bin, or Outbox | Enabled | Holding Bin | Holding Bin |
| Holding Bin, or Outbox | Disabled | Outbox | Depends on the Send Transactions with Validity Errors or Non-Forced Code Edits to Holding Bin setting. If set to Yes: Holding Bin If set to No: Outbox |
-
The CSV file containing the third party charges must be generated and copied to a specific directory on the Commure Pro platform. This can be accomplished in one of two manners:
- An administrator exports the charges from the third party system to a CSV file, using tools provided by the third party system. The administrator then copies the CSV file to a specific directory on the Commure Pro platform. Contact your Commure Pro representative for the directory name, as it varies based on your system’s configuration. You should make a note of the directory name for future reference.
- Depending on the capability of your third party system, Commure Pro personnel may be able to configure it to export the charge data into a CSV file and then automatically transfer it to the proper Commure Pro directory at regular intervals. This requires no manual intervention by the administrator.
-
The Commure Pro system automatically detects the presence of the CSV file and processes it, importing the charges into the Desktop Charge Capture application.
Errors associated with the import process are handled on a charge-by-charge basis. If a charge cannot be imported, its control number is written to an import log file, along with a rejection reason. The entire rejected charge is also written to the log file to facilitate reprocessing it at a later date. The location of the log files is determined by your Commure Pro representative. Your representative may also be able to configure the system to automatically send the logs for each import, or just imports with errors, to an administrator’s e-mail address.
- All imported charges are flagged with an error type of Imported Charge, so that they may be easily identified in reports and displays. This error status is purely informational, and does not stop users from sending the charge transactions from the Holding Bin to the Outbox.
- At the time of import, the system automatically processes all code edits that have been implemented by the organization. If any errors are found, the charge is also flagged with an appropriate error type, such as Free Text or Code Edits.
-
At the time of import, a charge is held or not held for review based on either the charge’s held for review status in the import file, or on the how the charge’s Billing Provider is configured in Commure Pro.
- The charge is held for the Review Requested reason if any of the following statements are true:
- The charge has a held for review status in the import file, or…
- The Billing Provider is a Commure Pro user and their Admin > User > Charge Capture > State of Hold for Review Checkbox setting is configured to either “Show, Checked” or “Hide, Checked,” or…
- The Billing Provider is not a Commure Pro user, and the “pkadmin” user’s Admin > User > Charge Capture > State of Hold for Review Checkbox setting is configured to either “Show, Checked” or “Hide, Checked.”
- The charge is held for a custom reason (such as Biller Review or Missing Documentation) if either of the following statements are true:
- The Billing Provider is a Commure Pro user, and they have a Role that is listed as the Hold Role on a custom hold reason, with a default value of “Checked,” or…
- The Billing Provider is not a Commure Pro user, and the “pkadmin” user has a Role that is listed as the Hold Role on a custom hold reason, with a default value of “Checked.”
- The third party system can export negative charges to signify the deletion or reversal of previously imported charges. In the various displays of charge data, negative charges are highlighted in the following manner: charge codes are enclosed in parentheses and displayed as red text, and descriptions are displayed as red text. For example: (99201) Office-outpat visit, new lev - 1.
- The imported charges are treated in the same manner as any other charge posted directly in the Desktop Charge Capture or Mobile Charge Capture application. Depending on their charge status, they may be edited, viewed, or otherwise manipulated in the Holding Bin, Worklist, Search, Outbox, and Patient Data Display options.
Charge Import Requirements and Limitations
The following list itemizes the basic requirements and limitations of the charge import process:- The charge import is a stand-alone process. The Commure Pro Application Server (also known as the Mobilizer server) does not need to be running in order to receive charges from the third party system.
- The charge import is designed to work only with the Commure Pro Repository, a Commure Pro proprietary back-end system.
-
Identifiers in imported charges must resolve to entities already known by the Commure Pro system:
- Both the patient and account on the imported charge must refer to valid records in the Commure Pro patient registry. The charge is rejected if both the patient and account do not resolve to existing registration records.
- Provider aliases on the imported charge must resolve to providers that already exist in the Commure Pro system. Providers can not be auto-created and free text providers are not accepted.
- CPT/HCPC, ICD-9, or ICD-10 codes referenced by the charge or diagnosis must exist in the Commure Pro system. For diagnoses, the import can match on the ICD-10 code or the Intelligent Medical Objects (IMO®) term. If the codes do not exist then the charge or diagnosis defaults to free-text and are flagged accordingly in the Holding Bin.
- The import file does not allow creation of arbitrary charge transaction headers. Only the charge transaction headers defined on the Institution tab are supported.
- If a Billing Area or Service Site is not specified on the imported charge, the Commure Pro application can handle this in a variety of manners:
- If the Billing Provider on the charge has a default value specified for the Billing Area or Service Site charge header, that value is assigned to the imported charge.
- If the Billing Provider on the charge does not has a default value specified for the Billing Area or Service Site charge header, then the charge is rejected.
- If the Billing Provider is not a Commure Pro user (and so does not have any charge headers defined), then the application checks the value of the Billing Area or Service Site header on the user specified in a PKConfiguration setting. The default user for this setting is the “PKADMIN” user, but it can be configured to any user. You may create a dummy user specifically for this purpose; if you do so, Commure Pro recommends creating a Level 0 user and calling it “DONOTCHANGE, INBOUND CHARGES.” Alternatively, if you want all charges to be rejected when the Billing Provider is not a Commure Pro user, set it to “NOUSER.”
- If configured for the “PKADMIN” user or any other user, and that user has a default value specified for the Billing Area or Service Site charge header, that value is assigned to the imported charge.
- If configured for the “PKADMIN” user or any other user, and that user does not have a default value specified for the Billing Area or Service Site charge header, then the charge is rejected.
- If configured for “NOUSER,” then the charge is rejected.
- For imports via an Inbound HL7 Interface only: Free text comments associated with imported charges can be configured to populate the Comments and/or Biller Comments fields. Each field can accommodate a maximum of 1024 characters. If configured to populate the Biller Comments field, but biller comments are not configured to be shown within the Commure Pro application (via Admin > Institution > Charge Capture > Show Biller Comments (Web only) (L 0-2)), then the comments are stored in the Commure Pro database but are not visible on the Charge Transaction screen.
-
The third party CSV import file is organized around individual charges, with each row in the file, after the header row, representing a single charge on a transaction.
- The import file does not allow aggregation of charges; each charge, along with its related diagnoses, form an independent entity.
- Charge transactions are uniquely identified by an external alias (a unique identifier for the charge) and an external authority (a unique identifier for the third party system). The combination of alias and authority must be unique system-wide.
- If a charge with an external authority/alias matches an existing charge in the Commure Pro system, then the existing charge is replaced with the new charge. There is no attempt to merge individual fields; therefore an update operation must include the entire charge.
- An optional external identifier can be used at the charge code level, in addition to an external identifier at the charge transaction level. This will prevent the creation of duplicate charges within a transaction, in the event that the interface processes the same message more then once (which could occur for example, if the dispatcher were restarted in the middle of processing a batch file). The external identifier is part of the FT1 segment of the HL7 message, and is named “ExternalId.” The external identifier must be unique within a given charge transaction (but does not need to be unique universally). If omitted, no duplication checking is done.
Customizing the Charge Transaction Screen to Suit your Needs
u can modify the layout and contents of the Charge Transaction screen in several ways, as indicated by the topics above. Any changes that you make are retained for all future sessions. This diagram illustrates some of the changes you can make: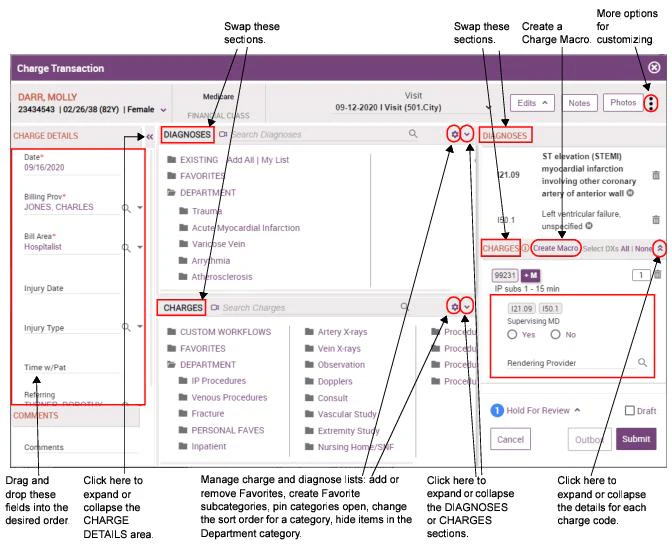
Customizing the CHARGE DETAILS and COMMENTS Section (Left Pane)
You can customize the CHARGE DETAILS and COMMENTS section (the left portion) of the Charge Transaction screen as follows:- Change the order of fields within the CHARGE DETAILS section. Click on a field name, drag it to the desired location, and drop it into place.
- Minimize or Maximize the CHARGE DETAILS and COMMENTS section. To close the CHARGE DETAILS and COMMENTS area entirely, click the Collapse button located at the top right of the CHARGE DETAILS heading. To re-open the area, click the Expand button , located at the top of the collapsed section (you can also click on the words “CHARGE DETAILS AND COMMENTS” in the gray vertical bar on the far left side of the screen). The section remains as you set it (open or closed) for all future charge entry sessions, until you change it again.
Customizing the DIAGNOSES and CHARGES Section (Center Pane)
You can customize the DIAGNOSES and CHARGES section (the center portion) of the Charge Transaction screen as follows:- Swap the order of the DIAGNOSES and CHARGES sections. The initial orientation of these sections is determined by your administrator, based on a setting in your user profile. However, you can move the CHARGES section so that it is located above the DIAGNOSES section, or vice versa, depending on which item (charges or diagnoses) you prefer to enter first. To do so, click the More button in the upper right corner, select Screen Settings, and then set Show Diagnoses on top (center section) to Yes or No.
- Show or hide the numeric charge/diagnosis codes. You can show or hide the numeric CPT and ICD-10 codes on the Charge Transaction screen, in addition to the diagnosis and charge descriptions. To show the codes, click the More button in the upper right corner, select Screen Settings, and then set Display charge and diagnosis codes to Yes (the default). To hide the codes, click the No button. This setting affects all codes in the Favorites, Existing, and Department categories. It also shows or hides the codes in the search results when you perform a search for a code from the Diagnosis or Charges Search field.
- Show or hide inactive diagnoses on the Existing list. You can show or hide any discontinued diagnoses on the patient’s Existing list on the Charge Transaction screen. Diagnosis codes are updated each year, and as a result, a code that was included on your patient’s Existing list in the past (such as old ICD-9 codes) may be inactive today. To show the discontinued diagnoses, click the More button in the upper right corner, select Screen Settings, and then set Show inactive existing diagnoses to Yes (the default). To hide the discontinued diagnoses, click the No button. This setting affects only the diagnoses on the patient’s Existing list (and not those on the Favorites or Department categories). Please note that this is different from a patient diagnosis that has been marked as resolved or inactive because the patient no longer has the condition. Patient diagnoses that were marked as resolved or inactive never show on the Existing list on the Charge Transaction screen.
-
Manage the contents of the Favorites and Department categories in the DIAGNOSES and CHARGES sections. See the topics below:
- Managing Charge Favorites and Department Categories
- Managing Diagnosis Favorites and Department Categories
-
Pin open a category in the DIAGNOSES and CHARGES sections. See the topics below:
- Pinning a Charge Category or Subcategory Open
- Pinning a Diagnosis Category or Subcategory Open
Customizing the Selected Codes Section (Right Pane)
You can customize the Selected Codes section (the right portion) of the Charge Transaction screen as follows:- Automatically open the next charge after clicking Submit, Mark as Reviewed, or Send to Outbox. If you are opening charges for editing from the Holding Bin, Worklist, or Search tabs, you can enable the application to automatically open the next charge transaction on the report when you click Submit, Mark as Reviewed, or Outbox on the current transaction. This allows you to step through all of the charges on the report more quickly. Note that on the Worklist and Search tabs, this feature only works when the report results show charge transactions (it does not work if the report shows visit days that do not yet have charges entered). This feature is disabled by default. To enable it, click the More button in the upper right corner, select Screen Settings, and then set Enable Open Next on Submit, Mark as Reviewed, or Send to Outbox to Yes.
- Swap the order of DIAGNOSES and CHARGES sections. You can swap the order of the DIAGNOSES and CHARGES sections in the Selected Codes area, so that charges are above diagnoses, or vice versa. To do so, click the More button in the upper right corner, select Screen Settings, and then set Show Selected Diagnoses on top (right section) to Yes (the default) or No.
-
Show or hide charge details. You can choose to show or hide the details associated with each selected charge code (this includes the charge headers and diagnosis codes), using the Expand Down and Collapse Up buttons, located on the far right side of the CHARGES heading in the Selected Codes area.
- Click Expand Down to expand the area downward and show the charge headers and diagnosis codes.
- Click Collapse Up to collapse the area upward and hide the charge headers and diagnosis codes.
- Add or remove codes to/from your Modifier Favorites list. See Managing Your Modifier Favorites List.
- Create a personal Charge Macro based on the currently entered charges. See Creating a New Charge Macro for the Charge Favorites Category.