- Providers: Edit properties for individual providers, or merge providers (see Providers)
- Import Provider Directory: Import provider contact information from a file, to be used as a reference for telephone and address information (see Importing a Provider Directory)
Providers
The Providers option screen under the System Management tab has several functions related to the management of provider information. The Upload Providers option gives you the ability to upload providers into the Commure Pro system from a Comma Separated Values (CSV) file. You can also search for providers by name, ID, alias, or role. After selecting a provider, you can edit their information or merge information from another provider record into theirs. The Provider Management screen allows you to manage provider attributes (demographic information) for any provider, whether or not they are a user of the Commure Pro system. To manage user attributes (settings that apply to the user’s Commure Pro account), use the User tab instead of the System Management tab. See About Users and Providers for an explanation of the difference between users and providers. To access the provider management option:- Click the Admin tab, followed by the System Management tab.
- Click the Providers option.
The ability to manage providers is not supported in the Direct Integration to MEDITECH® with Downtime Solution system configuration.
Uploading Providers from a CSV File
Use the Upload Providers option to load providers into the Commure Pro system from a Comma Separated Values (CSV) file. This is useful in system configurations where provider data is not automatically interfaced from the source hospital information system. The upload function can be used for an initial load of provider data at implementation, as well as to update provider information regularly.The ability to upload providers is not supported in the Direct Integration to MEDITECH® with Downtime Solution or Direct Integration to Cerner™ with Downtime Solution system configuration.
- From Providers option, click the Upload Providers button.
- In the Upload Providers screen, click the Choose File button.
- In the Choose File dialog, locate the comma-separated values (CSV) file that you want to load. See CSV File Format for details on the format the file should use.
- Select the CSV file with provider information you want to load, then click Open.
- In the Upload Providers screen, click the Next button.
- A list of unmapped column names appears. The column headings from the uploaded CSV file must be mapped to the Commure Pro field types.
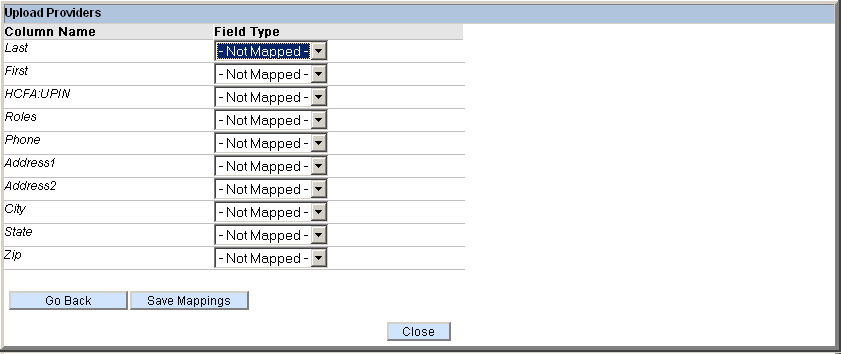
- For each Column Name (from the CSV file), click the drop-down list next to it and select the Field Type to which you want to map it in the Commure Pro system. Repeat for each column name in the file that you wish to map. Mapping of the Last Name field is required; mapping of the remaining fields is optional.
- If you want to edit the CSV file, you can do so and re-import it (or import a different file), by clicking the Go Back button and then repeating the above steps to map the column headings in the CSV file to the fields in Commure Pro.
- Once you are satisfied with the column/field mappings, click the Save and Apply Mappings button to save your mappings. (Note: Once you have successfully saved a mapping, the next time you upload a provider CSV file, a Load Mappings button appears. You can click this button to reload the same mappings and use them with the new CSV file.) The next screen shows the mappings and lists the provider information imported from the CSV file mapped to the proper fields.
- If you want to edit the information and re-import the CSV file (or import a different file), you have another opportunity here to click the Go Back button and repeat the process.
- When you are satisfied with the results, click the Upload button. The system displays whether or not the process was successful. If any rows in the CSV file were not imported due to errors, they are saved in a separate CSV file, which can be viewed or saved by clicking the Download Error Rows button.
- Even after you have saved the uploaded providers, you still have another opportunity to go back and edit the information and re-import the CSV file (or import a different file) by clicking the Go Back button. Click the Close button when finished. Once the data is saved, the information is immediately available in the Commure Pro application.
CSV File Format
The CSV file that is uploaded into the system can include the following fields:- Last Name
- First Name
- Departments
- Roles
- Home Phone
- Work Phone
- Fax Number
- Other Phone
- Work Street 1
- Work Street 2
- Work City
- Work State
- Work Zip
- Work Other
- Provider Identification Number (For example, a UPIN, hospital ID number, or IDX number. Each number must be unique for each provider in the CSV file. In other words, no two providers can have the same UPIN, hospital ID number, or IDX number.)
Sample CSV File
The first line of the CSV file should consist of column headings. Each subsequent row should contain the information for one provider. For example, the following is an example of a file that uses the column headings Last Name, First Name, HCFA:UPIN, HH:IDXNUM, Work Phone, Work Street1, Work Street2, Work City, Work State, and Work Zip:- Last Name|First Name|HCFA:UPIN,HH:IDXNUM|Work Phone|Work Street1|Work Street2|Work City|Work State|Work Zip
- Brown|Ardith|U23432|54222|617-123-4567|55 Main Street|Suite 56|Boston|MA|02215
- Darwin|Charles|U12345|54321|617-456-1234|36 Park Street|Boston|MA|02115
- Edwards|Fran|U54321|54333|617-789-6789|55 Main Street|Suite 44|Boston|MA|02115 The column name for the provider ID number is of special importance. Each provider can have multiple ID numbers, as in the example above, where each provider has both a UPIN number and an IDX number. When uploading, these column names should be mapped to the Alias field. The system then creates an alias field that uses the column name as its label, and populates that field with the ID numbers from the individual rows in the CSV file. For example, if the labels in the CSV file are HCFA:UPIN and HH:IDXNUM, it creates two alias fields called HCFA:UPIN and HH:IDXNUM in Commure Pro, and populates them with each provider’s number from the respective column in the CSV file.
- Last Name|…|Depts
- Brown|…|“Cardiology|Cardio/Thoracic Surgery” In this example, when you map column names to field types, you would map the column name Depts to the field type Departments.
Searching for Providers
You can search for a provider by name, ID, alias, or role or by a combination of name/ID/alias and role. To search for a provider:- If you want to search for a provider by name, ID, or alias, enter a few letters from the provider’s first or last name, ID, or alias in the Provider Name/ID/Alias field and then click Search.
- If you want to search for a provider by role, select a role from the drop-down list and then click Search. Available roles may include PCP (Primary Care Physician), ADMIN, HOSPITALIST, CAREMANAGER, USER, or PROVIDER.
- To see the entire list, just click the Search button without entering any information in either the Provider Name/ID/Alias or Role field. All providers who match the search criteria are displayed in the master list below the search fields. The master list shows provider last name, first name, Commure Pro username (if the provider is also a user), source (from where the record was created), and UPIN number.
Adding a New Provider Manually
Prior to adding a new provider via this option, you should determine whether the person you are about to add is also a user of the Commure Pro system. If the provider is also a user, you should instead create their record via the Create User, or Create User from Provider option. Please refer to About Users and Providers for more information. Whether or not an administrator has permission to add a new provider is based on the following setting in their user profile: Admin - User - User Permissions - Level 0/1/2: Can Add/Edit Commure Pro Providers To add a new provider:- Click Add (to the right of the Search button) in the Provider Management screen. The Add Provider window appears.
- In the Add Provider window, enter the following provider information:
- Last Name (required)
- First Name (optional)
- Aliases:
- If the provider is not an administrator, enter up to three unique aliases.
- If the provider is an administrator, do not enter an alias. Administrators cannot have aliases.
Alias names are displayed in the format Label (Authority:Type). For example, for the alias IDX Number (HH:IDXNUM), the authority (data source) is HH and the alias type is IDXNUM. Types are internal identifiers that are configured at installation time in a configuration properties file. The list of Roles is configurable for your site.
- Roles: Check all that apply (any combination of PCP, ADMIN, HOSPITALIST, CAREMANAGER, USER, or PROVIDER). The list of Roles is configurable for your site. Make sure to check the PROVIDER role.
- Gender (required)
- DOB (Date of Birth): Enter a date in the format MM-DD-YYYY.
- Address 1
- Address 2
- City, State, and Zip
- Home Phone
- Work Phone
- Fax Number
- Other Phone
- Messaging Phone
- Provider Groups (read-only field)
- Facilities with Ordering Privileges (read-only field that is populated from MEDITECH)
- When you have finished entering the provider’s information, click Save.
Editing Providers
Whether or not an administrator has permission to edit provider information is based on the following two settings in their user profile: Admin - User - User Permissions - Level 0/1/2: Can Add/Edit Commure Pro Providers Admin - User - User Permissions - Level 0/1/2: Can Edit Interfaced Providers To edit an existing provider:- Perform a search (see Searching for Providers) and select a provider from the resulting master list.
- Click the Edit button (below the provider details) on the right side of the screen.
- Make any additions or changes in the Edit Provider screen.
- Click Save. Most of the information you enter in the Edit Provider screen replaces any previous values regardless of their source, whether from an HL7 interface, loaded from a file, or manually added. However, note that you are prevented from making edits to the provider number if this data has been interfaced from a back-end system.
Creating Users from Existing Providers
You may wish to grant access to the Commure Pro system to a provider who already exists in the back-end system but who is not yet a user of the Commure Pro system. To do so, use the Create User from Provider function on the User tab. See About Users and Providers and Creating a User from an Existing Provider for details.Merging Providers
Provider information can enter the Commure Pro system from many different sources:- As you create users manually (with the Create User function), you can flag them as providers (on the User Permissions screen).
- Providers associated with a particular patient on a processed Add/Discharge/Transfer (ADT) message are automatically added to the Commure Pro system as providers. Multiple provider records coming this source may use different aliases for the same provider.
- When you create a user from a provider (with the Create User from Provider function) who was created from an ADT message, their alias in the ADT message becomes their alias in Commure Pro.
- When providers are uploaded from a file, multiple instances of the same provider can exist with different aliases in the same file.
- Providers uploaded from a file may already exist with different aliases in Commure Pro. As each unique alias is loaded, a new provider record is created in Commure Pro even if the provider name is the same on each record. From the Provider Maintenance pane (Admin > System Management > Providers) you can merge two provider records with conflicting aliases (different aliases for the same provider name) into a single record.
- From the Provider Maintenance pane (Admin > System Management > Providers), search for and select a provider from the resulting master list. The provider details appear on the right side of the screen. The provider record selected in this step will become the target of the merge operation (that is, this record will survive with modified contents after the merge).
- Click the Merge button (below the provider details) on the right side of the screen. The Merge Provider screen shows the target provider record (the Merge Survivor) in the upper right corner.
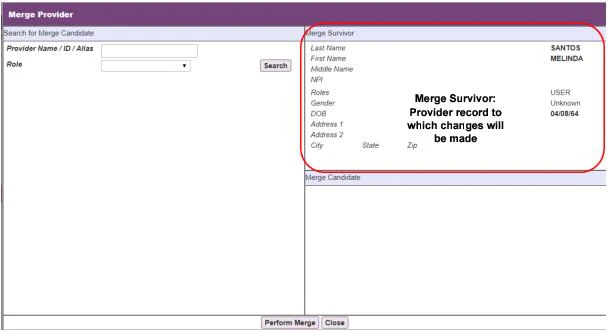
- Use the search tools on the left (under Search for Merge Candidate) to locate a provider record to merge into the Merge Survivor. In the search results, the records that have a value in the Username column represent providers who are already users of the Commure Pro system. Providers who are users may not be selected as merge candidates.
- Select a provider who does not have a username. A detailed view of the provider record that will be merged into the survivor is displayed in the lower right corner of the window (under Merge Candidate).
- Click Perform Merge in the lower left corner of the Merge Provider window to start the merge process. This button is displayed only for Merge Candidates who are not users.
- If the two records that are being merged have different aliases, the Resolve Alias Conflicts window appears. The conflicting aliases are shown in the top portion of the window. The bottom portion of the window shows a preview of the merged record. Any fields that will be added or changed by the merge are highlighted in yellow. For example, if the merge would add a new role, that role is highlighted in yellow.
- If there are conflicting aliases, the label [Conflict] is displayed in red for the unresolved field. Select one of the aliases by clicking the radio button under Surviving Provider or Candidate Provider at the top of the window. A preview of the merged record that would result from either choice appears in the lower portion of the window.
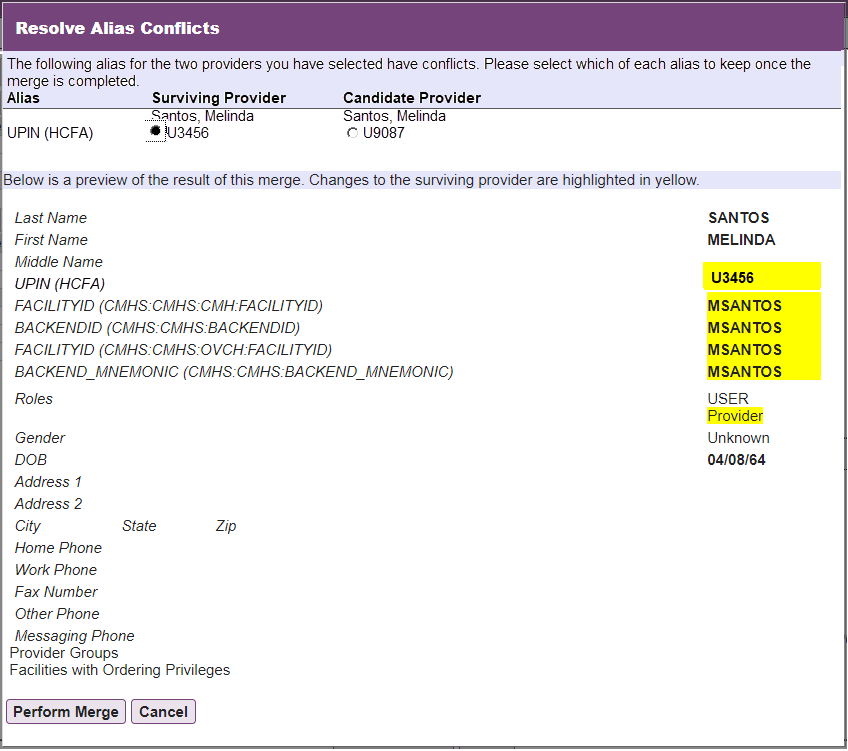
- To accept the proposed merge, click Perform Merge.
- The Surviving Provider is updated with the merged information, and the Candidate Provider is deleted from the system.
Importing a Provider Directory
The Provider Directory comprises a list of providers and their contact information that users can access on the web and all handheld platforms. The directory displays basic contact information for any providers that your institution wishes to maintain in the system. For example, users may be able to look up phone numbers (home, office service, pager, or mobile), specialties, departments, addresses, or e-mail addresses. This information may be available for providers associated with your organization, referring providers, and/or providers in your geographic area. This list of providers is completely separate from all other providers in the Commure Pro system. It may be easiest to conceptualize the Provider Directory as a stand-alone “telephone book” containing provider contact information. This list is in no way associated with providers used during the charge entry process, nor is it associated with the list of providers who are users of the Commure Pro system. Administrators can upload a comma-separated value (CSV) formatted text file through the web to enter provider directory information into the system. For an administrator to be able to import a provider directory, two conditions must be met:- The Provider Directory module must be enabled for the institution.
- The administrator must have the setting below enabled in their user profile. Only your Commure Pro representative can turn on this feature. Admin - User - User Permissions - Level 0/1: Can Import Provider Directory
The ability to import a provider directory from a file is supported on both MEDITECH®, Cerner™, and HL7-based systems.
- Click the Admin tab, followed by the System Management tab.
- Click the Import Provider Directory option.
- In the Import Provider Directory screen, click the Browse button.
- In the Choose File dialog, locate the comma-separated values (CSV) file that you want to load into the Provider Directory. See CSV File Format for details on the format the file should use.
- Select the CSV file with provider information you want to load, then click Open.
- In the Import Provider Directory screen, click the Load Data button.
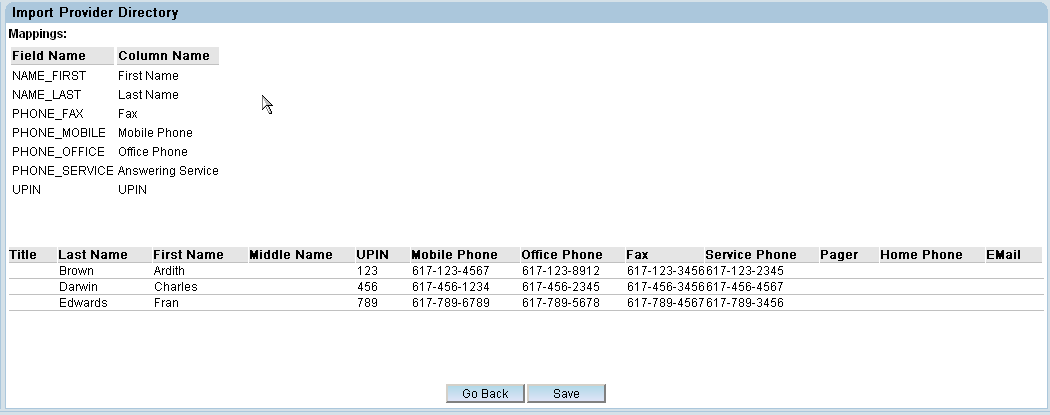
- A list of unmapped field types appears. These fields can be mapped to the column headings in the imported file.
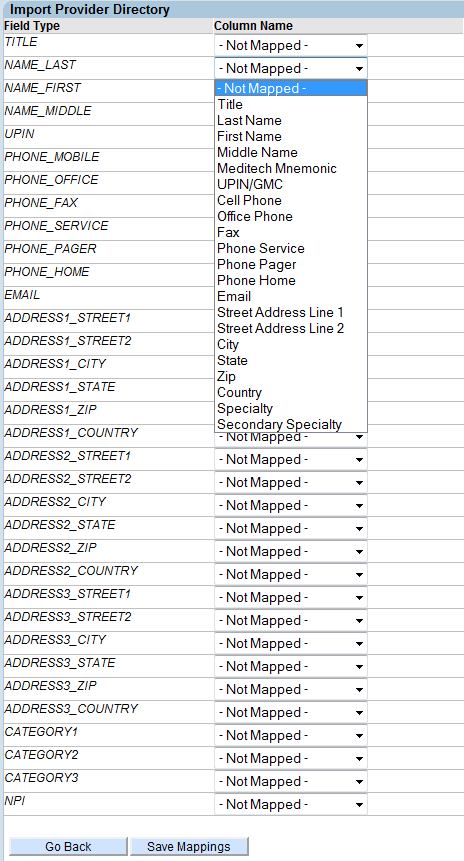
- For each Field Type, click the drop-down list next to it and select the Column Name (from the CSV file) that you want to map to that field in Provider Directory. Repeat for each column heading in the file that you wish to map. Mapping of the Last name field is required; mapping of the remaining fields is optional.
- If you want to edit the CSV file, you can do so and re-import it (or import a different file), by clicking the Go Back button and then repeating the above steps to map the fields in Provider Directory to the column headings in the CSV file.
- Once you are satisfied with the field/column mappings, click the Save Mappings button to save your mappings. The next screen shows the mappings and lists the provider information imported from the CSV file mapped to the proper fields.
- If you want to edit the information and re-import the CSV file (or import a different file), you have another opportunity here to click the Go Back button and repeat the process.
- When you are satisfied with the results, click the Save button. If the save operation is successful, the message Success! is displayed.
- Even after you have saved the provider directory, you still have another opportunity to go back and edit the information and re-import the CSV file (or import a different file) by clicking the Go Back button. Once the data is saved, whenever an Android or Apple user who has the Provider Directory module enabled syncs, the provider information loaded on the system is available on their device. The information is immediately available on the web platform.
CSV File Format
The CSV file with provider information can contain both hard-coded information and category fields. See Hard-Coded Information and Category Information for more information.Hard-Coded Information
Hard-coded information that can be included in a CSV file to be loaded into the Provider Directory module can include the following fields:- Title
- Last name (this is the only field that is required to be mapped)
- First name
- Middle name
- User PIN (UPIN)
- National Provider Identifier (NPI) number
- Mobile phone number
- Office phone number
- Fax number
- Answering service phone number
- Pager number
- Home phone number
- E-mail address In addition, the following information can be included for up to three addresses:
- Street line 1
- Street line 2
- City
- State
- Zip code
- Country
Sample CSV File
The first line of the CSV file should include the column headings. For example, the following is an example of a file that uses the column headings Last Name, First Name, UPIN, Mobile Phone, Office Phone, Fax, and Answering Service:- Last Name,First Name,UPIN,Mobile Phone,Office Phone,Fax,Answering Service
- Brown,Ardith,123,617-123-4567,617-123-8912,617-123-3456,617-123-2345
- Darwin,Charles,456,617-456-1234,617-456-2345,617-456-3456,617-456-4567
- Edwards,Fran,789,617-789-6789,617-789-5678,617-789-4567,617-789-3456
Category Information
You can include category designations in CSV files to be loaded into Provider Directory. The category information is visible on a given provider’s informational display. In addition, on the web, users can search for providers by category. Each institution can define up to three categories. Include the category name on the first line of the CSV file, and the information corresponding to that category on the line for each provider. For example:- Last Name,…,Specialties
- Brown,…,Cardiology
- Darwin,…,Endocrinology
- Edwards,…,Neurology If there are multiple entries for a single category, for example if a provider has more than one specialty, surround the comma-separated entries with double quotes. For example:
- Last Name,…,Specialties
- Brown,…,“Cardiology,Cardio/Thoracic Surgery” In this example, when you map field types to column names (step 5 of the procedure in Importing a Provider Directory), you would map the field type CATEGORY1 to the column name Specialties.