Editing User Settings in Bulk
The Bulk User Edit feature lets administrators configure settings for multiple users at one time. All properties configured using this method override the existing user values. These changes cannot be undone, so be sure to always use this feature with extreme care. Bulk User Edit is accessible to the users listed in the table below.| Accessible To: | If: |
|---|---|
| Level 0/1 administrators | If their Level 0/1: Can Use Bulk User Edit parameter is set to Yes (under User > User Permissions) |
| Level 2 administrators | If their Level 2: Can Edit Users in Assigned Departments parameter is set to Yes (under User > User Permissions), and alsoIf their Level 2 (w/edit users): Can Use Bulk User Edit parameter is set to Yes (under User > User Permissions) |
Bulk User Edit Interface
To access the Bulk User Edit feature, select the Admin tab and then the Bulk User Edit tab.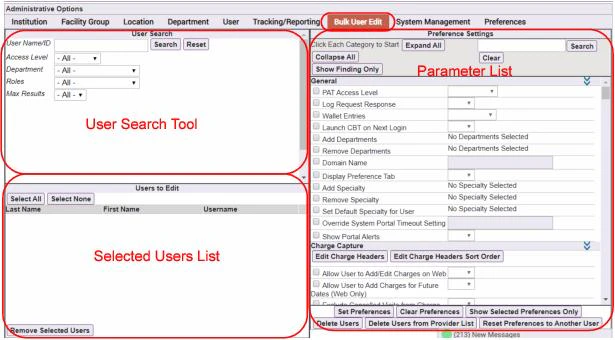
Selecting Users
To select users for bulk editing:- Enter any of the following search criteria, in any combination, in the User Search Tool area in the top left corner of the screen:
- User Name/ID: Enter one or more alphanumeric characters in the user’s first name, last name, system username, or personnel ID.
- Access Level: Select PAT access level 1, 2, or 3.
- Department: Select one of the available departments.
- Roles: Select any role other than All to narrow your search scope to users with a particular role, such as referring providers only.
- Max# of Search Results: Select the maximum number of results you would like to see displayed in one screen.
- Click the Search button.
- From the resulting list, select those users who you want to add to the Users to Edit list. Click once in a row to select a particular user, click again to de-select the user.
- Click the Add Selected Users button. All users that you selected from the User Search results are added to the Users to Edit pane, to be edited in bulk.
- To reset the search criteria, click the Reset button. Then repeat the preceding steps until you have selected all users who you want to edit.
De-selecting Users
To remove users from the selected users list:- Select or de-select one or more users from the list in the lower left corner of the Bulk User Edit screen using one of the following methods:
- Select an individual user by clicking its row.
- Select all users by clicking the Select All button.
- De-select all users by clicking the Select None button.
- Click Remove Selected Users. All selected users are removed from the list.
Setting Parameters for Selected Users
When your list includes only the users to be edited:- Check the box at the beginning of the row of each parameter you want to assign. Checking a parameter box enables the choices available for that parameter.
-
Set the value using one of the following methods, depending on the parameter:
- By selecting one value from a drop-down list of multiple choice selections
- By entering text into a text box
- By checking boxes in a check box list, for example to select the modules that you want to be available for all selected users
- To clear the selected parameters, click the Clear Preferences button. Repeat the preceding steps to select the desired parameter values.
- To assign the selected parameters to the selected users, click Set Preferences.
-
A question box pops up with a message stating, “This will set the
<n>selected preference(s) for the<n>user(s) you have chosen. This can not be undone, are you sure that you want to continue?” If you are, click Yes; otherwise, click No. - If you click Yes, the parameters are set as configured for the selected users. An information box then appears, informing you that the preferences have been successfully set. Click OK to dismiss the box.
- Verify the new settings for the selected users on the User tab.
Copying Preferences from Another User
When your Selected Users List includes only the users to be edited:- Click the Reset Preferences to Another User button. A confirmation dialog box displays all currently selected users, and provides a search field to locate the user with the preferences to copy.
- Click the Search button , scroll to locate and select the user that has the preference settings that you want to copy to the currently selected users.
- Click Save. The preference settings of all users from the Selected Users List are updated with the configuration preferences of the selected user.
Displaying Parameters by Category
The Expand All and Contract All buttons let you alternate between two Parameter List views. Click Contract All to view the category headers that are used to organize each list of parameters. Click the Expand/Contract Category icon associated with a category header to expand one or more specific categories only. Click Expand All to see each complete parameter list under its associated category heading.Editing Charge Headers for Selected Users
Once you have selected the list of users, you can edit Charge Headers for those users:- Click the Edit Charge Headers button. The Charge Transaction Headers window opens.
- Use this dialog as described in Add/Edit Charge Headers.
Editing the Sort Order of Charge Headers
You can re-order the display of charge headers beyond the standard sort functionality that is available through the Edit Charge Headers button. A second button, Edit Charge Headers Sort Order, enables you to re-position charge headers with more granularity than is available through standard sort operations. To re-order individual charge headers from the Reorder Charge Transaction Headers window, select each header that you want to move and use the four buttons (Top, Up, Down, Bottom) to move these headers into the correct sort order.Notes About Bulk Editing
The following sections provide helpful pointers when using the Bulk User Edit option.Changing Simple Preferences
In general, changing a value for a preference overwrites the former value for that field. For example, when you set Allow User to Create Charge Macros to Yes or No, the new selection simply overwrites the former selection.Changing Preferences Related to Sending Transactions to the Holding Bin
The user preferences related to sending transactions to the Holding Bin are interrelated and function differently from others in the Bulk User Edit option. These settings contains the following list of checkbox options:- Send All Transactions to Holding Bin:
- Selecting Yes for this option in Bulk User Edit sets the Send All Transactions to Holding Bin option for all of the chosen users to Yes, which in turn also sets all of the related child options to Yes (Send Transactions with Validity Errors or Non-Forced Code Edits to Holding Bin, Send Transactions with Free Text to Holding Bin, Send Transactions with Comments to Holding Bin, and Send Imported Transactions to Holding Bin).
- Selecting No for this option in Bulk User Edit sets only the Send All Transactions to Holding Bin option for all of the chosen users to No,
- Send Transactions with Validity Errors or Non-Forced Code Edits to Holding Bin, Send Transactions with Free Text to Holding Bin, Send Transactions with Comments to Holding Bin, and Send Imported Transactions to Holding Bin: Selecting Yes or No for any of these options sets only those options to Yes or No for the chosen users. It does not affect any of the other options. For example, if you set Send Transactions with Validity Errors or Non-Forced Code Edits to Holding Bin to Yes, then the Send Transactions with Validity Errors or Non-Forced Code Edits to Holding Bin option is set to Yes for all chosen users. If one of the users also already had the Send Transactions with Free Text to Holding Bin option set to Yes, that option would remain set to Yes.
Autonomous Coding Settings
The Charge Capture category includes settings for managing Autonomous Coding (AC) across multiple users at once:- Hold Autonomously Coded Charge for Review — controls whether charges generated by Autonomous Coding are automatically placed in the holding bin for manual review before submission. Options: Yes, No, or Prompt.
- AC Schedule Start Date — sets the date when Autonomous Coding becomes active for the selected users.
- AC Schedule END Date — sets the date when Autonomous Coding is deactivated for the selected users.
Adding or Removing Roles or Modules
You can add one or more modules by enabling the Add Modules setting, which belongs to the Device section of the Bulk User Edit Preference Settings. When you click this setting, the list of available modules displays. Note that the Patient List module is always included on all handheld platforms, so it is not included among the other modules. You can remove a module by enabling the Remove Module setting and then selecting the module to remove from the drop-down list.In environments using multiple mobilizers, changes to this setting do not take effect until you clear the cache on each of the mobilizer servers.
Adding Wallet Entries
Level 0 and level 1 administrators can use this option to add basic wallet entries for a defined group of users. Note that you must configure the individual usernames and passwords manually via the following setting: Admin - User - General - Wallet Entries Or, in some cases, these may be automatically created the first time a user attempts to access the external system. The section entitled Adding an External System Definition provides more information about automatic creation of wallet entries.Exporting and Importing User Data
Authorized administrators can export user data to a file from the Bulk User Edit screen. Use the search filters in the User Search pane to obtain a complete or partial list of all users that are currently configured in the system. When the list of users you want displays under the User Search results on the Bulk User Edit screen, click the Export (Excel) button. You are prompted to open or save a zip file, which includes an Excel document containing the following data for each of the selected users:- User name: The user’s login name
- Departments: The list of departments to which the user belongs
- Roles: The list of roles that the user has in the system (for example, “Provider” or “Referring”)
- User level: The user’s administrative level
- User numbers: The user’s provider ID number (and associated facility)
- Created date: The creation date for this user’s account in the system.
- Modified date: The most recent date that data pertaining to this user was changed in the system.