Availability of Code Edits on Web versus Handheld Platforms
Once configured, code edits are available as follows:- All classes and types of code edits are applied to charges entered on the web platform.
- All classes and types of code edits, with the exception of code edits that launch custom forms (see Code Edits that Launch Custom Forms), are applied to charges entered on the Android and Apple platforms.
Types of Code Edits
When a user submits a transaction as completed on either the web or handheld platform, the application checks all the attributes of the transaction to see if it meets the criteria of any of the code edit definitions that are enabled in your system. There are many different criteria fields that can be used to define a particular code edit. These criteria fields can be used in any combination desired, but there are a series of nineteen “common” code edit types, which is simply to say, nineteen different ways in which the code edit criteria fields are most commonly used. Each of these common code edit types has a name, such as Patient - Age or Modifier - Inappropriate. If you use a combination of criteria fields that is different from the nineteen common types, then this is called a Combination Edit. Simply put, a Combination Edit is a unique combination of criteria fields. Finally, each new system comes pre-loaded with a set of standard code edits for nine of the common code edit types. All of these pre-loaded code edits are designed to find errors with the transaction and have “Error Message” specified as the Action on the code edit definition (Actions are described later in this topic). The table below lists the different types of code edits along with those that have pre-loaded standard code edits:| Common Code Edit Types | Includes Pre-Loaded Standard Code Edits? | Where Documented |
|---|---|---|
| CPT | Yes | CPT (Type 2) |
| CPT Comparison - Add On Codes | Yes | CPT Comparison - Add On Codes (Type 10) |
| CPT Comparison - Duplicate | Pre-loaded, but not standard | CPT Comparison - Duplicate (Type 3) |
| CPT Comparison - Global Period | Yes | CPT Comparison - Global Period (Type 3) |
| CPT Comparison - Multiple Codes | CPT Comparison - Multiple Codes (Type 17) | |
| CPT Comparison - Required QTY | CPT Comparison - Required QTY (Type 15) | |
| Diagnoses - Dx Alert | Diagnoses - Dx Alert (Type 8) | |
| Diagnoses - Medical Necessity | Diagnoses - Medical Necessity (Type 6) | |
| Diagnoses-Min and Max Number | Diagnoses - Min and Max Number (Type 19) | |
| Diagnoses - Validate Dx Combination | Diagnoses - Validate Dx Combination (Type 16) | |
| Diagnoses - Validate Dx Order | Diagnoses - Validate Dx Order (Type 18) | |
| Diagnoses - Validate Primary Dx | Yes | Diagnoses - Validate Primary Dx (Type 14) |
| Headers - Excluded | Headers - Excluded (Type 11) | |
| Headers - Included | Headers - Included (Type 9) | |
| Headers - Referring MD | Yes | Headers - Referring MD (Type 7) |
| Modifier - Inappropriate | Yes | Modifier - Inappropriate (Type 5) |
| Modifier - Missing | Modifier - Missing (Type 13) | |
| Patient - Age | Yes | Patient - Age (Type 1) |
| Patient - Gender | Yes | Patient - Gender (Type 0) |
| Visit - Place of Service | Yes | Visit - Place of Service (Type 4) |
| Combination Edit (a code edit that combines criteria from several different types of common code edits above into a single unique code edit) | Combination Edit (Type 12) |
| Action | Description of Behavior | Where Documented |
|---|---|---|
| Error Message | This action is used in cases where the organization wants the provider who entered the transaction to fix one or more errors that have been found on the transaction. An error message describing the problem is displayed to the provider on the Charge Transaction screen and a dialog box listing the user’s options for resolving the errors or saving the transaction is also displayed. If the provider does not resolve the errors, a Code Edit error status is assigned to the transaction. If the transaction is sent to the Holding Bin (depending on the user’s configuration), an administrator can then use the Code Edits filter to select, review, and correct these transactions. Typically, once the errors are resolved by making corrections to the transaction, the Code Edit error status is removed from the transaction. Your system comes pre-loaded with a set of standard Error Message code edits for nine different types of code edits. You can also create as many custom Error Message code edits as needed. | Code Edits that Show Error Messages |
| Codes Held for Review | This action is typically used in cases where the organization wants an administrator to review the transaction to ensure proper coding and completeness, and does not want or expect the provider to fix any errors. By using the Trigger Role and View Role criteria fields on the code edit’s definition, no errors are shown to the provider entering the transaction, but the transaction is in fact assigned a Code Held error status and is sent to the Holding Bin (depending on the user’s configuration). In the Holding Bin, an administrator can use the Code Held filter to select and review these transactions. Corrections may or may not be made to the transaction, but in either case, the Code Held error status may remain assigned to the transaction even after it has been reviewed. This error status does not stop an administrator from sending the transaction to the Outbox.Codes Held for Review code edits are always custom code edits. | Code Edits that Hold Codes for Review |
| PQRS Form | This action is used by organizations that are participating in the Merit-based Incentive Payment System (MIPS) sponsored by the Centers for Medicare and Medicaid Services (CMS). When the provider submits a charge transaction that meets the criteria for a given quality measure, a Commure Pro Clinical Metrics form with that measure’s questions is displayed. Once the provider completes the questions on the form, their answers are recorded and conveyed to CMS using either the Registry method or the Claims Billing method. Your Commure Pro representative loads a set of code edits for all the quality measures that your organization intends to implement at the time of initial installation. They may be loaded as either standard or custom code edits, depending on the situation. | Code Edits that Launch PQRS/MIPS Forms |
| Custom Form | This action is used by organizations that want to present a custom form to the provider when they enter a charge transaction that meets specific criteria. For example, when a provider enters a specific charge or diagnosis code, a PCP Admission or Discharge Notification form might be displayed. Once the provider completes the form, it can then be routed to a printer or a fax.Custom Form code edits are always custom code edits. | Code Edits that Launch Custom Forms |
Code Edits that Show Error Messages
This section describes the behavior of code edits that have “Error Message” specified as their Action. This is the most common class of code edit and is used in cases where the organization wants the provider to attempt to correct one or more errors on the transaction. If not corrected by the provider at the time the transaction is entered, the transaction is assigned a Code Edit error status. In the Holding Bin, administrators can use the Code Edits filter to find, review, and correct these transactions. An Action of “Error Message” can be used on any type of code edit definition, such as Diagnoses - Dx Alert, Patient - Age, Combination Edit, and so on. When a user submits a transaction as completed on either the web or handheld platform, the application checks all the attributes of the transaction to see if it meets the criteria of any of the code edit definitions that are enabled in your system. If the charge transaction meets the conditions described in the code edit definition, and the code edit has “Error Message” as the defined Action, then the errors are listed in the Edits message box near the top of the Charge Transaction screen.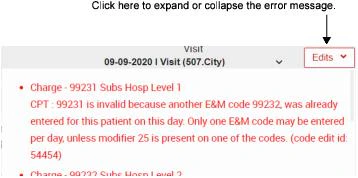
Users can also click the Edits button at the top of the screen at any time prior to submitting the transaction, to check their work and see if it contains any errors.
-
If the transaction has a forced coded edit error, the user is required to resolve the issue before they can save the transaction as completed. If the user does not know how to resolve the issue, they must either save the transaction as a draft, or discard it entirely. The options available to the user (saving as a draft or discarding) depend on the following user setting:
Admin - User - Charge Capture - Allow User to Save Transactions with Forced Code Edits as Draft
This setting has two choices: Yes or No.
- If Allow User to Save Transactions with Forced Code Edits as Draft is set to Yes, this message is displayed: “This charge transaction has been saved as a DRAFT due to errors. Choose the next step.” The user can:
- Continue Editing: To correct the issue and then Submit the transaction again.
- Save As Is: To not correct the issue and save the transaction as is (which is a draft, with a Code Edit error status).
- If Allow User to Save Transactions with Forced Code Edits as Draft is set to No, this message is displayed: “This charge transaction was NOT SAVED due to errors. Choose the next step. Please note that if you discard the transaction all changes will be lost.” The user can only:
- Continue Editing: To correct the issue and then Submit the transaction again.
- Discard Transaction: To discard the transaction without saving it.
- If Allow User to Save Transactions with Forced Code Edits as Draft is set to Yes, this message is displayed: “This charge transaction has been saved as a DRAFT due to errors. Choose the next step.” The user can:
-
If the transaction has a non-forced code edit error, and the user’s department or user profile is configured to send transactions with errors to the Holding Bin, then this message is displayed: “The charge transaction has been saved as a COMPLETED transaction, but code edits now exist. Choose the next step.” The user has options to either:
- Continue editing: To correct the issue and then Submit the transaction again.
- Save As Draft: To not correct the issue and save the transaction as a draft (with a Code Edit error status).
- Save As Is: To not correct the issue and save the transaction as completed (the transaction will be sent to the Holding Bin with a Code Edit error status where a biller can review and resolve the errors).
-
If the transaction has a non-forced code edit error, but the user’s department or user profile is configured to send transactions with errors to the Outbox anyway, a dialog box displays this message: “This charge transaction has been saved as a COMPLETED transaction and sent to the Outbox, but it has errors. Would you like to send it back to the Holding Bin to correct errors now?” The user can select:
- Yes: To correct the issue and then Submit the transaction again.
- No: To not correct the issue and send the transaction to the Outbox (with a Code Edit error status).
- If the transaction has no errors, it is sent to either the Holding Bin or the Outbox, depending on where the user’s department or user profile is configured to send transactions with no errors. No further action is required by the user.
Code Edits that Hold Codes for Review
This section describes the behavior of code edits that have “Codes Held for Review” specified as their Action. These transactions do not necessarily have errors that can be fixed, but rather, they are cases where the organization wants to “hold the code/transaction for administrative review,” to ensure full and proper coding and documentation. For example, flu vaccines may need to be reviewed for an accompanying injection code, or Level 5 (highest level) Consults may need to be reviewed to ensure proper billing. In most cases, the organization does not want the provider to see any error messages, since there may be nothing to fix. However, they do want the transaction to be sent to the Holding Bin, so that it can be reviewed. A Code Held error status is assigned to these transactions, so that administrators can use the Code Held filter to find and review these transactions. An Action of “Codes Held for Review” can be used on any type of code edit definition, though it is most commonly used with the following types:- CPT
- Diagnoses - Dx Alert
- Modifier - Inappropriate
- Headers - Excluded (for the Billing Provider header)
- Combination Edit (that combines the criteria from any of the above types) Additional criteria fields that are also commonly used include:
- Visit > Financial Class
- Provider > Trigger Role and View Role
- Provider > Department or Billing Area Typically both the Trigger Role and the View Role criteria are specified on this type of code edit’s definition, which also makes it a role-based code edit. Role-based coded edits are used when you want to hide the code edit messages from some users, and show it to others. The Trigger Role determines for whom the code edit fires. The View Role determines who can see the Code Held error status. When the code edit is configured using these attributes, the following occurs: when a user with the Trigger Role (usually specified as the Provider role) enters the transaction, the code edit fires behind the scenes and assigns a Code Held error status. However, the provider does not see any error dialog boxes. Since the transaction has an error, it is sent to the Holding Bin (assuming that the provider and/or department are configured to send transactions with errors to the Holding Bin). In the Holding Bin, a user with the View Role (usually specified as the Administrator or Biller role) can see that the transaction has the Code Held error status. They can use the Code Held filter to select and review these transactions. They may or may not make corrections to the transaction, but in either case, the Code Held error status may remain assigned to the transaction even after it has been reviewed/corrected. Despite this error status, the administrator can still send the transaction to the Outbox after they have reviewed it. See Role-Based Code Edits for more examples and specific use cases.
Code Edits that Launch PQRS/MIPS Forms
This section describes the behavior of code edits that have “PQRS Form” specified as their Action. If your organization purchases the optional PQRS feature, your Commure Pro representative will load the necessary code edits for the quality measures that your organization wants to implement. Code edits that launch PQRS Forms are either standard or custom code edits, depending on how your Commure Pro representative loads them. PQRS/MIPS code edits can be of any type; the majority of them are Combination Edits, but there are also some CPT, Diagnoses - Diagnosis Alert, and Patient - Age ones as well. The PQRS Combination Edits are usually constructed by combining any or all of the following criteria:- CPT
- Patient - Age
- Patient - Gender
- Diagnoses - Dx Alert If the charge transaction meets the criteria of the PQRS/MIPS code edit, instead of displaying the regular code edit dialog boxes, the Commure Pro Clinical Metrics screen is displayed. On this screen, the provider is prompted to answer a series of clear and concise quality measure questions. The provider’s answers to the quality measure questions are either a) stored by the system for later reporting to the CMS via the Registry, or b) translated into one or more CPT II codes and modifiers which are automatically added to the charge transaction and submitted along with the original charges to your billing system for submission to the CMS. See Configuring PQRS/MIPS for more information.
- In order for PQRS/MIPS code edits to work, your organization must purchase the optional PQRS feature.
- PQRS/MIPS code edits also require a second component: the quality measure definitions. The measure definitions describe additional information about each measure, such as the wording of the questions presented to the user, the list of possible responses, whether the measure is required, whether it is active, and so on. These aspects are configured in Admin > System Management > PQRS Measures. For more information, see Configuring PQRS/MIPS.
- All of the quality measure definitions are loaded into every system at the time of installation and are then updated annually by your Commure Pro representative. The PQRS/MIPS code edits that are associated with the measures you intend to implement are also loaded initially and updated annually by your Commure Pro representative. The Active flags on both the quality measure definitions and the PQRS/MIPS code edit definitions are disabled by default.
- There are two items that must be enabled in order for PQRS/MIPS code edits to work:
- For each quality measure that your organization wants to implement, your Commure Pro representative must enable the Active flag on the quality measure definition. This is done in the Admin > System Management > PQRS Measures option, upon purchasing the PQRS feature.
- For each quality measure that your organization wants to implement, you must enable the Active flag on the corresponding PQRS/MIPS code edit definition. This is done in the Admin > Institution > Charge Capture > Code Edits > Configure Code Edits option. On the PQRS/MIPS code edit definition, you will note that the Action field is set to “PQRS Form” and the specific quality measure is selected in the field below. See Activating or Deactivating Code Edits. As mentioned above, all of the necessary PQRS/MIPS code edits are loaded in your system as either standard or custom code edits. As a result, there is no reason to create a new PQRS/MIPS code edit from scratch. If you want to modify a PQRS/MIPS code edit’s definition, you may do so, but if they are standard code edits, you may make only limited modifications. See Modifying Code Edits Using the Edit Icon for a list of the attributes that you are allowed to modify, along with instructions on how to do so. If you want to make more substantial changes than allowed, you can instead copy the PQRS/MIPS standard definition to create a new custom code edit, modify the newly created custom code edit as desired, and then deactivate the original PQRS/MIPS standard code edit.
Code Edits that Launch Custom Forms
This section describes the behavior of code edits that have “Custom Form” specified as their Action. Code edits that launch Custom Forms are custom code edits that are created by client administrators. These code edits can be of any type. If the charge transaction meets the criteria of the code edit, instead of displaying the regular code edit dialog boxes, a specific Custom Form is displayed. For example, you might define a code edit that fires when a provider enters specific charge or diagnosis codes, in order to trigger a PCP Admission or Discharge Notification form. When the provider submits a charge transaction that meets the criteria of the code edit, the appropriate a PCP Notification form is displayed. The system might automatically retrieve patient, provider, or charge information (such as the diagnosis from the charge transaction) and display it on the form. In addition, the form might contain additional free text fields that the user can complete, in order to send additional information to the primary care provider.Code edits that launch Custom Forms fire only on the Desktop Charge Capture application. They do not fire when a qualifying charge transaction is entered on a handheld device.
- A Form template must be designed and made Active in the Admin > Institution > Forms option. The Available for Code Edits attribute on the template definition must be enabled. Consult your Commure Pro representative for assistance in designing the form template.
- In the code edit definition, the Action field must be set to “Custom Form,” and a specific Form template (as described in the bullet above) must then be selected.
- In the code edit definition, the Active field must be checked so that the code edit is activated for use. See Activating or Deactivating Code Edits.
Role-Based Code Edits
Specific non-forced and forced code edits can be designated as role-based code edits. Role-based code edits behave differently depending on the user’s role. The Trigger Role and View Role criteria fields are used to define a role-based code edits.- For code edits that have an Action of “Error Message,” only the View Role criteria can be used.
- For code edits that have an Action of “Codes Held for Review,” both the Trigger Role and the View Role criteria can be used.
- For code edits that have an Action of “Custom Form” or “PQRS Form,” only the Trigger Role criteria can be used. There are subtle, yet significant, differences in behavior when Trigger Roles and/or View Roles are used with each of these Actions. Please review the examples below carefully.
- “Error Message” as the Action: When the code edit’s Action is “Error Message,” you can define a View Role as part of the criteria for the code edit, but you should always leave the Trigger Role field blank.
In Commure Pro versions prior to 9.2.0, the opposite was true: the Trigger Role field would typically have been completed and the View Role field would have been left blank. Upon upgrading to version 9.2.0 or later, any code edits with an Action of “Error Message” that were configured in this manner will be converted to the opposite case (the value in the Trigger Role field will be moved to the View Role field). Also note that in version 9.2.0 and later, defining both a Trigger Role and a View Role is a misconfiguration that will result in unwanted behavior.
- When entering a charge transaction, if the user has the specified View Role, the code edit dialog boxes are presented to the user, and they will see the details of the code edit in the Edits message box. They will also see the Code Edit error status on the Patient List > Charges display option, and in the report options on the Charges tab. The transaction is saved as a completed transaction (with errors) and it is sent to the Holding Bin or the Outbox, depending on where the user and/or department are configured to send charges with errors.
-
When entering a charge transaction, if the user does not have the specified View Role, the code edit fires behind the scenes, but the code edit dialog boxes are not presented to the user, and they will not see the details of the code edit even if they click the Edits button. Nor will they see the error on the Patient List > Charges display option, or in the report options on the Charges tab. The transaction is saved as a completed transaction (with errors) and it is sent to the Holding Bin or the Outbox, depending on where the user and/or department are configured to send charges with errors.
- “Codes Held for Review” as the Action: When the code edit’s Action is “Codes Held for Review,” you can define both a Trigger Role and a View Role as part of the criteria for the code edit, and in fact, these two criteria fields would typically be used together on a code edit that has “Codes Held for Review” as the Action. These two criteria fields allow for more robust handling of the transaction based on roles. For this type of code edit, the Trigger Role defines the role of the person entering the transaction, that should trigger the code edit to fire, and cause the transaction to have a Code Held error assigned to it. The View Role defines the role of the person who should be able to see that the transaction has a Code Held error status. (See also Code Edits that Hold Codes for Review for background on why this type of behavior is desired for a Codes Held for Review type of code edit.) The Codes Held for Review role-based code edits behave as follows:
-
When entering the charge transaction, if the user has the specified Trigger Role, the code edit fires behind the scenes on the charge transaction, and a Code Held error status is assigned to the transaction. However, the code edit dialog boxes are not presented to the Trigger Role user when entering the charge transaction, and they will not see the details of the code edit if they click the Edits button. Nor will they see the error on the Patient List > Charges display option, or in the report options on the Charges tab. The transaction is saved as a completed transaction (with errors) and it is sent to the Holding Bin or the Outbox, depending on where the user and/or department are configured to send charges with errors.
- When entering the charge transaction, if the user does not have the specified Trigger Role, the code edit does not fire, and the transaction is saved without error. So for example, if a person with the View Role (but not the Trigger Role) enters the transaction, the code edit does not fire, and the transaction is saved without error. The main advantage of the Codes Held for Review role-based coded edit is that you can control both *for whom *the code edit fires, and who can see the Code Held error status. For example, you might create a Codes Held for Review code edit with a Trigger Role of “Provider” and a View Role of “Administrator.” When entering a charge transaction, the code edit fires behind the scenes only for those users who have the Trigger Role (Providers in our example). It is then saved with a Code Held error status, and as such, can be routed to the Holding Bin along with other charges that have errors. However, the Trigger Role user is not bothered with any error messages and is not even aware that an error status has been assigned. The View Role users (Administrators in our example), on the other hand, will see the error status in the Holding Bin and can then review the transaction for completeness and accuracy. Of note, if the View Role user were to enter the same transaction, the code edit would not fire for them.
| Trigger Role | View Role | Expected Result |
|---|---|---|
| Completed (typically a “Provider” role) | Completed (typically an “Administrator” or “Biller” role) | When the Trigger Role user enters the transaction, the code edit fires and a Code Held error status is assigned, but the Trigger Role user does not see any error messages or the error status. When the View Role user looks at the same transaction in any option, they can see the Code Held error status. Since the transaction has an error status assigned, it is sent to the Holding Bin (assuming that the Trigger Role user/department is configured to send transactions with errors to the Holding Bin).If the View Role user enters the transaction, the code edit does not fire. |
| Completed (typically a “Provider” role) | Blank | When the Trigger Role user enters the transaction, the code edit fires and the Trigger Role user sees the Code Held error message and error status. All other users can also see the Code Held error status on the above transaction. When any other user role enters the transaction, the code edit does not fire. |
| Blank | Completed (typically an “Administrator” or “Biller” role) | When any user enters the transaction, the code edit fires. If the user has the View Role, they can see the Code Held error message and error status. No other users can see the Code Held error status on the above transaction. |
| Blank | Blank | When any user enters the transaction, the code edit fires and the user can see the Code Held error message and error status. All other users can see the Code Held error status as well. |
- “PQRS Form” or “Custom Form” as the Action: When the code edit’s Action is “PQRS Form” or “Custom Form,” you can define only a Trigger Role as part of the criteria for the code edit (the View Role field is disabled and cannot be used). PQRS Form or Custom Form role-based code edits behave as follows:
- When entering the charge transaction, if the user has the specified Trigger Role, the code edit fires and the PQRS or Custom Form is displayed so that the user can complete it.
- When entering the charge transaction, if the user does not have the specified Trigger Role, the code edit does not fire, and the form is not displayed. The main advantage of a PQRS Form or Custom Form role-based coded edit is that you can control *for whom *the code edit fires, and therefore, which persons are required to complete the form. For example, you might define a PQRS Form code edit, or Custom Form code edit (such as a PCP Notification form), with a Trigger Role of “Provider.” When entering a charge transaction, the code edit fires only for those users who have the Trigger Role (Providers in our example), so that they can complete the form. Users who do not have the Trigger Role (such as Administrators) will never be presented with the PQRS Form or Custom Form (a PCP Notification form in this example) since they typically would not have the information to complete those forms.
Department-Based Code Edits
Specific non-forced and forced code edits can be designated as department-based code edits. Department-based code edits fire only if the billing area on the charge transaction (via the Billing Area charge header field), or the department to which the billing area belongs, is specified in the code edit definition. When a user clicks the Submit button on a charge transaction, department-based code edits behave as follows:- If the billing area on the charge transaction (or the department to which it belongs) is specified in the code edit definition, the code edit fires for all users. The code edit dialog boxes are presented to the user, and they will see the details of the code edit in the Edits message box. All users will also see the error on the Patient List > Charges display option, and in the report options on the Charges tab. The transaction is saved as a completed transaction (with errors) and it is sent to the Holding Bin or the Outbox, depending on where the user and/or department are configured to send charges with errors.
- If the billing area on the charge transaction (or the department to which it belongs) is not specified in the code edit definition, the code edit does not fire. No dialog boxes are presented to the user, and they will not see any errors if they click the Edits button. Nor will any errors be listed on the Patient List > Charges display option, or in other report options on the Charges tab. The transaction is saved as a completed transaction (without errors) and it is sent to the Holding Bin or the Outbox, depending on where the user and/or department are configured to send charges without errors.
- “Error Message” as the Action: If the transaction meets the code edit’s criteria and fires, it will be assigned a Code Edit error status.
- “Codes Held for Review” as the Action: If the transaction meets the code edit’s criteria and fires, it will be assigned a Code Held error status.
- “PQRS Form” or “Custom Form” as the Action: If the transaction meets the code edit’s criteria and fires, the PQRS Form or Custom Form will be displayed.
Steps for Configuring Code Edits
When you first implement the Commure Pro system, there are some basic configuration steps that must be followed, so that all of the code edits you want to use are enabled for your users. The basic steps are as follows:| Step | Where Configured | Where Documented |
|---|---|---|
| 1. Review the standard pre-loaded code edits and deactivate the ones that you don’t want to use (all of the standard code edits are Active by default, except for the PQRS/MIPS standard code edits). | Admin > Institution > Charge Capture > Code Edits > Configure Code Edits > various methods | Activating or Deactivating Code Edits |
| 2. For the standard edits that you want to use, determine which ones should be forced; set the Force User to Resolve Error flag for these. | Admin > Institution > Charge Capture > Code Edits > Configure Code Edits > Preview icon | Modifying Code Edits Using the Preview Icon Modifying Code Edits Using the Edit Icon |
| 3. Determine whether you need to create any additional custom code edits, and if so, create them. | Admin > Institution > Charge Capture > Code Edits > Configure Code Edits > Add Code Edit | Creating New Custom Code Edits |
| Or, you can also import custom code edits from another system/environment. | Admin > Institution > Charge Capture > Code Edits > Configure Code Edits > Import link | Importing/Exporting Code Edit Definitions |
| 4. (Optional) When creating custom code edits, you may find it useful to create Code Lists for long lists of codes that you need to reference repeatedly. | Admin > Institution > Charge Capture > Code Edits > Manage Code Lists > Add list | Creating a Code List for Use in Custom Code Edits |
| 5. (Optional) After making changes to code edit definitions, or adding new ones, you may want to use the error checking tool to check for duplicate definitions or other errors. | Admin > Institution > Charge Capture > Code Edits > Configure Code Edits > Find Code Edit Problems | Checking for Problems in Code Edit Definitions |
| 6. (Optional) If you make changes to the code edit definitions after your charge capture system has already been used in production mode, you may want to revalidate the charges in the Holding Bin, so that the new or modified code edit definitions are applied against the existing charges. | Admin > Institution > Charge Capture > Code Edits > Revalidate Charges | Revalidating Charges in the Holding Bin |
Activating or Deactivating Code Edits
In the Admin > Institution > Charge Capture > Code Edits > Configure Code Edits option, the green or red Active Indicator ( or in the Active column of the summary list tells you whether a particular code edit is activated (green) or deactivated (red). Deactivated code edits are also shown in light gray text in the table. To activate or deactivate a specific code edit, follow these instructions:- Select Admin > Institution > Charge Capture > Code Edits > Configure Code Edits.
- Use any of these methods to activate or deactivate a definition:
- Click the Active Indicator ( or in the Active column of the summary list (it immediately changes color to indicate that the code edit’s active status has changed).
-
Hover your mouse cursor over the Preview icon on the summary list, and then click either Yes or No in the Activate field (see Modifying Code Edits Using the Preview Icon).

- Edit the code edit definition and either check or uncheck the Active flag (see Modifying Code Edits Using the Edit Icon).
Creating New Custom Code Edits
To create a custom code edit, you must complete a series of fields on the Code Edit Add/Update screen. All of the fields on this screen are described in Definitions of All Fields on the Code Edit Add/Update Screen. The fields are broken into two sections on the screen:- In the top half of the screen, there are a series of fields that apply to all code edit types. These fields define the basic structure of the code edit, such as the code label, the type of action that will be triggered (Error Message, Codes Held for Review, PQRS Form, or Custom Form), the charge codes for which the code edit will fire, and whether it is active or forced.
- In the bottom half of the screen, there are additional criteria fields. How you complete these additional fields will determine the type of code edit that is created. There are nineteen common types of code edits that are typically used at client sites, such as Patient - Age or Modifier - Inappropriate. In addition, you can create a Combination Edit. This is a code edit that combines criteria from several different types of code edits, into a single unique code edit.
- You can review the common types of code edits, select one, and create your own custom version of that type of edit by completing the fields necessary for that type. When you save the code edit, the system evaluates the criteria fields that you used, and if you completed the correct ones, then the code edit is saved as the desired type. See Instructions for Creating Each Type of Code Edit.
- You can design the code edit that you want by completing any of the criteria fields that you think are appropriate. When you save the code edit, the system evaluates the criteria fields that you used and determines the type for you. Based on the fields that you entered, you might have created one of the nineteen common types, or you might have created a unique Combination Edit. See Combination Edit (Type 12) and also Definitions of All Fields on the Code Edit Add/Update Screen. The basic steps for creating a new custom code edit are the same for all types of code edits:
- Select Admin > Institution > Charge Capture > Code Edits > Configure Code Edits. The Manage Code Edits screen is displayed.
- ID: A unique internal ID number for this code edit, automatically assigned by the system.
- Label: The label or name for the code edit. For standard pre-loaded code edits, the Label is assigned by Commure Pro. For custom code edits, the Label is whatever name you give the code edit when you define it.
- Categories: The type of code edit.
-
Active: An indicator of whether the code edit is active and will fire on a charge transaction (a green circle or deactivated (a red circle. See Activating or Deactivating Code Edits for more information. Deactivated code edits are shown in light gray text in the table.
- Created at: The date the definition was initially created in the system.
- Updated at: The date the definition was last updated.
- Updated by: The username of the last person who made a change to the code edit definition. Or if updated during a new implementation or upgrade, the word “upgrade” is shown.
- Edit icon: There are two possible Edit icons in this column. Click to open the Code Edit Add/Update screen so that you can modify the code edit’s definition.
- For custom code edits: The column shows the Edit icon , which indicates that it all attributes of the definition can be modified.
-
For standard code edits: The column shows the Edit icon with an “S” overlay (for S tandard), which indicates that only limited modifications are allowed.

-
Preview icon: Hover your mouse cursor over the Preview icon to quickly review the details of the code edit definition. This screen also the following options at the bottom:
- Activate: Click Yes to set the Active flag on this code edit definition (make the code edit active), or click No to uncheck the flag (make it inactive).
- Forced: Click Yes to set the Force User to Resolve Error flag on this code edit definition (make the code edit forced), or click No to uncheck the flag (make it unforced).
-
Copy icon: Click to copy a code edit definition in order to create a new (similar) one. The Code Edit Add/Update screen is displayed with the newly copied definition, so that you can make any necessary changes before saving it.

- Delete icon : Click to delete the code edit definition. This icon is not available for standard code edits.
- Select the Add Code Edit link at the top of the screen. Or, find a definition similar to the one that you want to create, and click the Copy icon to copy it as a starting point. You can use the Search field at the top right corner of the screen (as described above) to find the particular code edit definition that you want to copy.
-
Complete the fields on the Code Edit Add/Update screen as follows:
- Review all of the fields in the top half of the screen. At a minimum, you must complete the three required fields (Label, Action, and CPT). Then determine whether the code edit should be Active or Force User to Resolve Error.
The Silent field has no function and should be left unchecked. This field will be removed in a future version.- Complete one or more criteria fields in the bottom left of the screen. As you complete each criteria field, it is added to the Selected Criteria section on the bottom right side of the screen. For some fields, you can reference a Code List, if you created it in advance. See Creating a Code List for Use in Custom Code Edits.
- Definitions of All Fields on the Code Edit Add/Update Screen provides information about all of the fields on Code Edit Add/Update screen.
- Instructions for Creating Each Type of Code Edit provides guidance in creating specific types of code edits.
- (Optional) To delete any criteria that you added in error, hover your cursor over that criteria in the Selected Criteria section. When you see the Delete icon for that item, click it.
- Click the Submit button to save the new custom code edit definition. The code edit is saved and immediately available for use (as long as the code edit definition has the Active flag checked).
Modifying Code Edits
There are two ways to modify code edits, listed below.- Use the Preview icon to quickly modify just the Active and/or Force User to Resolve Error flags (see Modifying Code Edits Using the Preview Icon).
- Use either of the Edit icons ( or to modify some or all aspects of a code edit’s definition (see Modifying Code Edits Using the Edit Icon).
Modifying Code Edits Using the Preview Icon
You can use the Preview icon to quickly change the Active and/or Force User to Resolve Error flags on a code edit definition. This can be done for both standard and custom code edits.- Select Admin > Institution > Charge Capture > Code Edits > Configure Code Edits. The Manage Code Edits screen is displayed.
- Locate the standard or custom code edit that you want to modify and hover your mouse cursor over the Preview icon. (You can use the Search field at the top right corner of the screen to find the particular code edit definition that you want to modify.)
- Modify the code edit as follows:
- Activate: Click Yes to set the Active flag on this code edit definition (make the code edit active), or click No to uncheck the flag (make it inactive).
- Forced: Click Yes to set the Force User to Resolve Error flag on this code edit definition (make the code edit forced), or click No to uncheck the flag (make it unforced).
- Click the X in the upper right corner to exit.
Modifying Code Edits Using the Edit Icon
The Edit icon can be used to modify some or all aspects of the code edit definition. The icon looks and behaves differently, depending on whether the definition is for a standard or custom code edit:- For custom code edits, the Edit icon looks like this: . You can modify any attribute of a custom code edit’s definition.
- For standard code edits, the Edit icon has an “S” overlay for S tandard:. You can modify only a limited set of attributes on a standard code edit’s definition, listed below:
- The Active and Force User to Resolve Error flags.
- The Financial Class and Visit Type to which the code edit is applied (on the Visit tab).
- The Trigger Roles,View Roles, and Departments (which also includes the Billing Areas) to which the code edit is applied (on the Provider tab).
- Please note that the Silent field has no function and should be left unchecked. This field will be removed in a future version. To modify a code edit’s definition, follow these steps:
- Select Admin > Institution > Charge Capture > Code Edits > Configure Code Edits. The Manage Code Edits screen is displayed.
- Locate the code edit that you want to modify. To find it easily, you can click on the Categories column heading to sort by code edit type and then scroll down to the code edit type that you want, or you can type a portion of the name or category, such as “Measure_12” or “Addon,” in the Search field.
-
Click the Edit icon ( or
The Code Edit Add/Update screen is displayed. For standard code edits, only the fields listed above are editable; all others fields are disabled.
- Modify any of the fields on the screen as necessary. See Definitions of All Fields on the Code Edit Add/Update Screen for descriptions of all the fields.
- Click Submit to save your changes.
Deactivating versus Deleting Code Edits
Depending on the type of code edit, you can either deactivate or delete the code edit definition.- Standard code edits: These definitions cannot be deleted, but you can deactivate them if you do not want to use them. See Modifying Code Edits Using the Preview Icon.
- Custom code edits: You can either deactivate or delete a custom code edit definition.
- Deactivating a definition allows you to reactivate it at a later date, if necessary. See Activating or Deactivating Code Edits.
- Deleting a definition removes it permanently. You might do this if the definition was entered in error, or if you are sure that you will never use it again. See Deleting Custom Code Edits.
Deleting Custom Code Edits
You can delete a custom code edit definition as follows:- Select Admin > Institution > Charge Capture > Code Edits > Configure Code Edits. The Manage Code Edits screen is displayed.
- Locate the custom code edit that you want to delete and click the Delete icon . (You can use the Search field at the top right corner of the screen to find the particular code edit definition that you want to delete.) A dialog is displayed asking you to confirm the deletion.
- Click Ok to delete the definition, or Cancel to exit without deleting it.
Creating a Code List for Use in Custom Code Edits
When creating custom code edits you may find that you often have to enter long lists of codes for the CPT field or for some of the criteria fields. In fact, the same long list of codes might be necessary for several different code edits. Instead of typing the full list each time, you can create a Code List, give the list a name, and then re-use it in multiple different code edits. You can create code lists for the following items: CPT Codes, Diagnosis Codes, Modifiers, Financial Classes, Departments, Roles, and Commure Pro Visit Types.- Select Admin > Institution > Charge Capture > Code Edits > Manage Code Lists. The Manage Code Lists screen is displayed.
- ID: The internal ID number for this code list.
- Label: The label or name for the code list. For code lists associated with standard pre-loaded code edits, the Label is assigned by Commure Pro. For custom code lists, the Label is whatever name you give the code list when you define it.
- Type: The type of code list (for example, CPT, Diagnosis, Modifier, etc.).
- Updated by: The username of the last person who made a change to the code list. Or if updated during a new implementation or upgrade, the word “upgrade” is shown.
- Updated at: The date the list was last updated.
-
Edit icon: There are two possible icons in this column.
- For code lists used by custom code edits: The column shows the Edit icon , which indicates that the code list can be edited. Click to open the Code List Add/Update screen so that you can modify the list.
-
For code lists used by standard code edits: The column shows the Edit icon with an “S” overlay (for S tandard), which indicates that the code list cannot be edited.
-
Copy icon: Click to copy a code list in order to create a new (similar) one. The Code Edit List Add/Update screen is displayed with the newly copied list, so that you can make any necessary changes before saving it.
- Delete icon : Click to delete a code list. This icon is not available for code lists associated with standard code edits.
- Select the Add Code List button at the top of the screen and then select the item for which you want to create a list (CPTs, Diagnoses, Financial Classes, etc.). The Code Edit List Add/Update screen is displayed. The top section of the screen shows the Type of code list (CPT, Diagnosis, Financial Class, etc.) and also contains a field for the Name of the list. The bottom portion of the dialog is where you select the entries for the list.
- In the Name field, give the code list a name that the describes the contents and/or purpose of the list.
-
In the next field, select the entries for the code list. To select one or more specific entries, use any of the methods below.
- Enter the items one by one: Type any portion of the entry’s name or description. Or, if the item has a code (such as a CPT, diagnosis, or modifier code), you can type the code. When the list of possible matches is displayed, click on the one that you want. Repeat as many times as necessary.
- Enter the items in bulk (for CPT and Diagnosis lists only): Click the Bulk Entry icon . When the Bulk Text dialog is displayed, enter several codes, using any combination of these techniques:
- Enter a list of codes, separated by commas. For example: 711.20, 711.21, 711.22
- Designate a wild card using a partial code and a question mark (matches one character) or a partial code and an asterisk (matches any number of characters). For example: 711.* or 71?.10
- Enter a range of codes, separated by a dash. For example, 711.20-711.29. Please note that ranges cannot be used in conjunction with wild cards.
- Or, if you have the list of codes in another document or spreadsheet, you can copy that list (as long as the codes use the formats described in the bullets above), and paste it into the Bulk Text dialog box.
-
View the entire list and select an entry from it (for Financial Class, Department, Role, Commure Pro Visit Type, and Modifier lists only): Click the Search icon to see all of the entries for the selected item, and then select an entry by clicking on it. Repeat as many times as necessary.

- Click Save to save the new code list (or Cancel to exit without saving).
Definitions of All Fields on the Code Edit Add/Update Screen
Listed below is a description of all of the fields on the Code Edit Add/Update screen. They are broken into two categories:Fields that Apply to All Code Edit Types
The fields at the top of the Code Edit Add/Update screen are applicable to all types of code edits, and should be either completed or evaluated each time a new code edit is created. Label (Required field) Enter a label that describes the code edit you are creating. The code edit label is for informational purposes only; only administrators will see this when creating/modifying code edits. Active Determine whether this code edit should be Active (whether it should fire during charge entry). You may want to leave this box unchecked while you are designing a code edit, and then check it once you are certain that it is ready for use. Force User to Resolve Error Determine whether the user should be forced to resolve the code edit before they can save the charge transaction as completed (commonly referred to as a forced code edit). This means that the user must make some change to the charge transaction, such as adding a modifier, or changing CPT or diagnosis code, so that the transaction no longer contains the issue that caused the code edit to fire. If the user does not know how to resolve the issue, they must either save the transaction as a draft, or discard it entirely. The options available to the user (saving as a draft or discarding) depend on the following user setting: Admin - User - Charge Capture - Allow User to Save Transactions with Forced Code Edits as Draft Please note the following:- If you select “Codes Held for Review” as the Action for the code edit, then the Force User to Resolve Error box is disabled so that it cannot be checked. Typically Codes Held for Review code edits are designed to fire so that the transaction can be reviewed by billing staff. However, there is no real resolution for these code edits (such as adding a particular modifier or changing a diagnosis code) that will cause the code edit to stop firing. As a result, you would not want the code edit to be forced, since the user would never be able to save the transaction as completed. See Code Edits that Hold Codes for Review.
- If you select “Error Message” as the Action for the code edit, assign a View Role, and also check the Force User to Resolve Error box, the code edit will be visible (and forced) only for users who have that View Role. See Role-Based Code Edits. Silent This field has no function and should be left unchecked. This field will be removed in a future version.
- Error Message: When selected, the regular code edit dialog boxes are displayed to the user, along with an error message in the Edits box at the top of the Charge Transaction screen (as described in Code Edits that Show Error Messages). You can compose the text of the error message that is shown to the user in the text box just below the Action field. Depending on the type of code edit that you are defining, there may be variables that you can use in your message. See Instructions for Creating Each Type of Code Edit, to determine if there are variables that you can use. If the user does not fix the errors at the time they submit the transaction, a Code Edit error status is assigned to the transaction, and it is sent to the Holding Bin (assuming the user is configured to send transactions with errors there). Administrators can use the Code Edits filter in the Holding Bin to locate and review these transactions. A note about variables: Different code edit types use different or possibly overlapping variables. Therefore it is not recommended to use variables in a combination code edit, as you might encounter unexpected results.- Codes Held for Review: When selected, the regular code edit dialog boxes are not displayed to the user (assuming that the code edit has been defined with a Trigger Role and a View Role, which is the typical configuration for this type of code edit; see Role-Based Code Edits). Instead, a Code Held error status is assigned to the transaction behind the scenes and it is sent to the Holding Bin for administrative review (also assuming that the user is configured to send transactions with errors there). These transactions do not necessarily have errors that can be fixed, but rather, they are cases where the organization wants to “hold the code/transaction for administrative review,” to ensure full and proper coding and documentation. Administrators can use the Code Held filter in the Holding Bin to locate these transactions. Administrators can see the Code Held error status, as well as the text of any error message that you compose in the text box just below the Action field. Depending on the type of code edit that you are defining, there may be variables that you can use in your message. See Instructions for Creating Each Type of Code Edit, to determine if there are variables that you can use. A note about variables: Different code edit types use different or possibly overlapping variables. Therefore it is not recommended to use variables in a combination code edit, as you might encounter unexpected results.- PQRS Form: When selected, the Commure Pro Clinical Metrics screen is displayed to the user after they submit the charge transaction. This screen presents the appropriate question or questions for the qualifying measure. If you choose this option, you are then required to select the specific quality measure number in the box just below the Action field. See Code Edits that Launch PQRS/MIPS Forms for more information.
- Custom Form: When selected, a Custom Form is displayed to the user after they submit the charge transaction. The form can contain patient, provider, or charge transaction information, as well as fields for the provider to complete. If you choose this option, you are then required to select the specific custom form in the box just below the Action field. Only those form definitions that have the Available for Code Edits attribute enabled are available for selection. See Code Edits that Launch Custom Forms for more information. CPT (At least one of the fields in the CPT section is required) The CPT field, along with the All and Exclude checkboxes, determines for which charge codes the code edit will fire.
- If you want the code edit to fire for all charge codes, check the All box. When you check this box, the other options for selecting charge codes (described in the bullets below) are disabled.
- If you want to exclude a specific list of codes, check the Exclude box. This means that the code edit will fire for all charge codes, except the ones that you select below.
-
To select one or more specific charge codes, use any of the options below. The code edit will fire for the specific charge codes that you enter here, or it will fire for all charge codes except the ones that you enter here (if the Exclude box is checked).
- Enter the codes one by one: Type the charge code, or any portion of the charge code’s description, in the CPT field. When the list of possible matches is displayed, click on the one that you want. Repeat as many times as necessary.
- Enter the codes in bulk: Click the Bulk Entry icon . When the Bulk Text dialog is displayed, enter several codes, using any combination of these techniques:
- Enter a list of codes, separated by commas. For example: 99231, 99232, 99233
- Designate a wild card using a partial code and a question mark (matches one character) or a partial code and an asterisk (matches any number of characters). For example: *231 or 9923?
- Enter a range of codes, separated by a dash. For example: 99231-99239. Please note that ranges cannot be used in conjunction with wild cards.
- Or, if you have the list of codes in another document or spreadsheet, you can copy that list (as long as the codes use the formats described in the bullets above), and paste it into the Bulk Text dialog box.
- Select a Code List that you created previously: If you previously created a Code List that contains the charge codes you want, you can reference that list here. Click the Code List icon and then enter the list’s name in the CPT list search dialog box. When the list of possible matches is displayed, click on the one that you want. See Creating a Code List for Use in Custom Code Edits for instructions on creating a Code List.
Criteria Fields
The criteria fields at the bottom of the Code Edit Add/Update screen are organized in a series of tabs. In general, completing one or more fields on a specific tab or subtab correlates to creating a code edit of a specific type. However, you may complete fields on multiple tabs to create a Combination Edit. Keep in mind that most code edits (especially those with an Action of “Error Message”) are used to detect invalid or incorrect data that was entered by the user on the charge transaction screen. So in some cases, the criteria fields are used to describe the invalid data combinations.Patient Tab
The Patient tab contains the fields below. Age The Age criteria is typically used to define a Patient - Age code edit. Enter the age range for which you want the code edit to fire.- Start: Define the low end of the date range. Enter a number between 0 and 999 in the first field, and then indicate whether this is days (d), months (m) or years (y).
- End: Define the high end of the date range. Enter a number between 0 and 999 in the first field, and then indicate whether this is days (d), months (m) or years (y). You are not required to use the same unit in both the start and end. For example, you could define an age range as Start 29d to End 24m (29 days to 24 months).
Visit Tab
The Visit tab contains the fields below. Place of Service search The Place of Service criteria is typically used to define a Visit - Place of Service code edit. Enter the places of service for which you want the code edit to fire. Commure Pro Visit Type search The Commure Pro Visit Type criteria can be used with many different types of code edits. When you enter a Commure Pro Visit Type, the code edit fires only when the patient visit is of the specified visit type, for the codes you listed in the CPT field, and when the other conditions of the code edit are met as well (as defined on the other criteria tabs). Financial Classes search The Financial Class criteria can be used with many different types of code edits. When you enter a financial class, the code edit fires only when the patient visit has the specified financial class associated with it, for the codes you listed in the CPT field, and when the other conditions of the code edit are met as well (as defined on the other criteria tabs).Provider Tab
The Provider tab contains following fields:Trigger Role search, View Role search, and Department search. These criteria fields are used to control for which users or departments the code edit should fire, as well as which users should be able to see the error status on those transactions that meet the code edit’s criteria. Leave these fields blank if you want the code edit to be visible to, and behave in the same manner for, all users and all departments. Trigger Role search Enter the role(s) of the users for which this code edit should fire (or leave this field blank if you want the code edit to fire for all users). A brief explanation of usage is below, but please see Role-Based Code Edits for a more detailed explanation along with use cases.- Codes Held for Review: When the code edit’s Action is “Codes Held for Review,” you can define a Trigger Role, if desired. The Trigger Role defines the role of the person entering the transaction, that should trigger the code edit to fire, and cause the transaction to have a Code Held error assigned to it. Or, leave the Trigger Role field blank if you want the code edit to fire for all users.
- Error Message: When the code edit’s Action is “Error Message,” you should never define a Trigger Role as part of the criteria for the code edit. This is a misconfiguration that will result in unwanted behavior.
- PQRS Form or Custom Form: When the code edit’s Action is “PQRS Form” or “Custom Form,” you can define a Trigger Role, if desired. The Trigger Role defines the role of the person entering the transaction, that should trigger the code edit to fire, and cause the PQRS Form or Custom Form to be displayed so that the user can complete it. Or, leave the Trigger Role field blank if you want the code edit to fire for all users (and therefore display the PQRS Form or Custom Form to all users). View Role search (Enabled only when the Action is “Codes Held for Review” or “Error Message”). Enter the role(s) of the users that should be able to view the Code Held or Code Edit error status on transactions for which this code edit has fired (or leave this field blank if you want all users to be able to view the error status). See Role-Based Code Edits for a more complete explanation, along with use cases.
Headers Tab
The Headers tab contains the fields below. The criteria fields on this tab are typically used to define either a Headers - Included or a Headers - Excluded code edit. Name Select the header that you want to be either completed or left blank. If the header is not found in the drop-down list, that means it does not have a Code Edit Label defined. You must enter a Code Edit Label on the header definition before you can create the code edit. Action Determine whether you want the header to be completed (Header - Included code edit) or left blank (Header Excluded code edit).- Include: Select this option when you want the header field to be completed by the user, either with any value, or with a value from a specific list of allowed choices. When Include is selected, the code edit checks for a value in the specified header field, and if no value (or a value that is not on the allowed list) is found, the code edit fires.
- Exclude: Select this option when you want the header field to be left blank, or to not contain a value from a specific list on non-allowed choices. When Exclude is selected, the code edit checks for a value in the specified header field, and if any value (or a value this is on the non-allowed list) is found, the code edit fires. Values This field is optional, and produces different results depending on whether Include or Exclude was chosen in the Action field above.
-
When Include is chosen in the Action field:
- If you want the user to complete the header field with one of a specific set of values, choose them here. Type a few characters of the desired value to see a list of possible matches, and the select a value from the list. Only acceptable values for the specified header are shown. You may select as many values as desired. The code edit will fire if the user does not choose one of these values on the charge transaction.
- If you want the user to complete the header field with any value, then leave the Values field blank.
-
When Exclude is chosen in the Action field:
- If there is a specific set of values that you do not want the user to enter in the header field, choose them here. Type a few characters of the desired value to see a list of possible matches, and the select a value from the list. Only acceptable values for the specified header are shown. You may select as many values as desired. The code edit will fire if the user chooses one of these values for the header field on the charge transaction. However, it will not fire if the user chooses any other value for the header field.
- If you do not want the user to enter any value in the header field (in other words, if you want the header field to be blank), then leave the Values field blank.
Diagnoses Tab
The Diagnoses tab has a series of subtabs and fields. Typically, you would complete the fields on one subtab in order to create a code edit of a particular type. For example, to create a Diagnoses - Dx Alert code edit, complete the fields on the Dx Alert subtab. On a given subtab, only the criteria fields appropriate for that type of code edit are enabled. The other fields are visible, but they are not enabled. First, click on the subtab that you want (for the type of code edit you want to create), and then complete the fields that are enabled for that subtab. The data you would enter for each criteria field differs, depending on the type of code edit you want to create. See Instructions for Creating Each Type of Code Edit for specific instructions for each field, depending on the type of code edit you are creating. Click the None tab (the default) if you do not want to use any of the subtabs or fields on the Diagnoses tab. Dx Primary search (Enabled on all subtabs) Enter the primary list of diagnosis codes for which the code edit should fire. Dx Secondary search (Enabled only on the Validate Dx Order and Validate Dx Combination subtabs) Enter the secondary list of diagnosis codes. The Dx Primary search and the Dx Secondary search fields both work in a manner similar to the CPT field. You can enter diagnosis codes in any of these manners:- Enter the codes one by one: Type the diagnosis code, or any portion of the code’s description, in the field. When the list of possible matches is displayed, click on the one that you want. Repeat as many times as necessary. Please note that when you select a specific code in this manner, you are using the IMO search vocabulary to find a specific ICD-9 or ICD-10 code on which your code edit will fire.
-
Enter the codes in bulk: Click the Bulk Entry icon . When the Bulk Text dialog is displayed, enter several codes, using any combination of these techniques:
- Enter a list of codes, separated by commas. For example: M35.00, M35.01, M35.02, M35.03
- Designate a wild card using a partial code and a question mark (matches one character) or a partial code and an asterisk (matches any number of characters). For example: M35.* or M3?.10
- Enter a range of codes, separated by a dash. For example, M35.00-M35.03. Please note that ranges cannot be used in conjunction with wild cards.
- Or, if you have the list of codes in another document or spreadsheet, you can copy that list (as long as the codes use the formats described in the bullets above), and paste it into the Bulk Text dialog box.
- Select a Code List that you created previously: If you previously created a Code List that contains the diagnosis codes you want, you can reference that list here. Click the Code List icon and then enter the list’s name in the search dialog box. When the list of possible matches is displayed, click on the one that you want. See Creating a Code List for Use in Custom Code Edits for instructions on creating a Code List. Trigger When Dx (Enabled only on the Validate Dx Combination subtab) Select Included or Excluded to specify the following:
- Included: Select Included to trigger a code edit in cases where a diagnosis code from the Dx Secondary list is used (included) on the same transaction as a diagnosis code from the Dx Primary list. Use this option to find an invalid combination of diagnosis codes.
- Excluded: Select Excluded to trigger a code edit in cases where a diagnosis code from the Dx Secondary list was not used (excluded) on the same transaction as a diagnosis code from the Dx Primary list. Use this option to find an incomplete combination of diagnosis codes (cases where two diagnosis codes should be used together, but the second one is missing).
Modifier Tab
The Modifier tab has two subtabs (Missing and Inappropriate) with a Modifier field on each of them. Complete the Modifier field on one subtab or the other, depending on which type of code edit you want to create (Modifier - Missing or Modifier - Inappropriate). See Instructions for Creating Each Type of Code Edit for specific instructions for each type of code edit. Click the None tab (the default) if you do not want to use the Modifier criteria field. Modifiers search Enter the modifiers that should cause the code edit to fire.CPT Comparison Tab
The CPT Comparison tab has a series of subtabs and fields. Typically, you would complete the fields on one subtab in order to create a code edit of a particular type. For example, to create a CPT Comparison - Add on Fields code edit, complete the fields on the Add on Fields subtab. On a given subtab, only the criteria fields appropriate for that type of code edit are enabled. The other fields are still visible, but they are not enabled. First, click on the subtab that you want (for the type of code edit you want to create), and then complete the fields that are enabled for that subtab. The data you would enter for each criteria field differs, depending on the type of code edit you want to create. See Instructions for Creating Each Type of Code Edit for specific instructions for each field, depending on the type of code edit you are creating. Click the None tab (the default) if you do not want to use any of the subtabs or fields on the CPT Comparison tab. Required Quantity (Enabled only on the Required QTY subtab) Enter the minimum quantity that is required for the secondary CPT. You might use this option in cases where users are entering charges for a vaccine administration and drug, and a specific quantity is required depending on the type of vaccine(s) selected. Display (Enabled only on the Global Period subtab) Enter a phrase that you would like to display to the user when a global period is in effect for a visit day. You may enter up to ten alpha and/or numeric characters in this field. For example, if you were configuring a global code edit for a 10 day period, you might enter “Global 10.” Once a user has entered a charge transaction on a given day with at least one charge code from the Secondary CPT field, then all non-coded visit days within the global period (defined in the Days field) will show this phrase after the Add link. Day (Enabled only on the Add On Codes and Global Period subtabs) Using the Start and End fields, define the beginning and ending timeframe during which the secondary CPT code is found, in relation to the primary CPT code. You can use the following parameters:- -1: The primary CPT is on the day before the secondary CPT.
- 0: The primary CPT is on the same day as the secondary CPT.
- 1 to 999: The primary CPT is n number of days after the secondary CPT. 999 indicates an unlimited number of days after. For example, you could define a timeframe as Start 0 and End 999, which would mean that the primary CPT is on the same day or up to an unlimited number of days after the secondary CPT.
- All: Indicates that the system will check for the existence of the secondary CPT on all charge transactions associated with all visits for the patient during the specified timeframe.
- Trigger: Indicates that the system will check for the existence of the secondary CPT on only those charge transactions that are associated with the same visit that triggered the code edit (the visit associated with the charge transaction on which the primary CPT code was found), during the specified time frame. Secondary CPT search (Enabled on all subtabs) Enter the secondary CPTs. When selecting CPT codes, this field works in a manner similar to the CPT field in the top half of the screen. You can enter the codes one by one, enter the codes in bulk , or select a Code List that you created previously . See CPT for instructions.
- Include: Select Include to find cases where a CPT code from the CPT list and the Secondary CPT list are both used on the same charge transaction. Use this option to find an invalid combination of CPT codes.
- Exclude: Select Exclude to find cases where a CPT code from the CPT list was used on the charge transaction, but a CPT from the Secondary CPT list was not used. Use this option to find an incomplete combination of CPT codes (cases where two CPT codes should be used together, but the second one is missing). Exceptions (Enabled only on the Global Period subtab) If there are any exceptions allowed for this code edit (reasons why the secondary CPT would be allowed within same timeframe as the primary CPT), enter them here. Enter a modifier in the Modifier field, and then select the modifier’s position. Then click the Add button to add the exception.
Instructions for Creating Each Type of Code Edit
If you want to create a specific type of code edit, then you must complete the specific criteria fields that are necessary for that type of code edit. Each section below gives a definition of the code edit type, describes the standard code edits of that type that are pre-loaded in your system (if any), and also describes the fields that you must complete in order to create your own custom code edit of that type.- Common Code Edit Types:
- CPT (Type 2) (includes standard code edits)
- CPT Comparison - Add On Codes (Type 10) (includes standard code edits)
- CPT Comparison - Duplicate (Type 3) (includes one pre-loaded custom code edit)
- CPT Comparison - Global Period (Type 3) (includes standard code edits)
- CPT Comparison - Multiple Codes (Type 17)
- CPT Comparison - Required QTY (Type 15)
- Diagnoses - Dx Alert (Type 8)
- Diagnoses - Medical Necessity (Type 6)
- Diagnoses - Min and Max Number (Type 19)
- Diagnoses - Validate Dx Combination (Type 16)
- Diagnoses - Validate Dx Order (Type 18)
- Diagnoses - Validate Primary Dx (Type 14) (includes standard code edits)
- Headers - Excluded (Type 11)
- Headers - Included (Type 9)
- Headers - Referring MD (Type 7) (includes standard code edits)
- Modifier - Inappropriate (Type 5) (includes standard code edits)
- Modifier - Missing (Type 13)
- Patient - Age (Type 1) (includes standard code edits)
- Patient - Gender (Type 0) (includes standard code edits)
- Visit - Place of Service (Type 4) (includes standard code edits)
- Combination Edit (Type 12)
- See also:
- Code Edits that Show Error Messages (includes standard code edits)
- Code Edits that Hold Codes for Review
- Code Edits that Launch PQRS/MIPS Forms (includes standard code edits)
- Code Edits that Launch Custom Forms
CPT (Type 2)
CPT code edits are constructed from a list of CPT codes. The list contains any CPT codes that the organization has determined are inappropriate for use. If the user selects one of these CPT codes, a warning message appears. The standard CPT code edit that is pre-loaded in your system includes the following:| Code Edit ID | Description |
|---|---|
| Medicare Excluded | A list of CPT codes that are not covered by Medicare. |
- Follow Step 1 through Step 3 in Creating New Custom Code Edits.
- In the Action field, choose the appropriate Action (usually “Error Message”), and then enter the error message that you would like to display to the user. In the error message text you can use this variable:
- ^0: The CPT code that was entered by the user (and that should not be used). Sample: “CPT ^0 is a non-covered service and should not be used.” - – In the CPT field, enter the (disallowed) CPT codes for which the code edit should fire. Do not check the All or Exclude boxes.
- In the Action field, choose the appropriate Action (usually “Error Message”), and then enter the error message that you would like to display to the user. In the error message text you can use this variable:
- Click Submit to save the code edit.
CPT Comparison - Add On Codes (Type 10)
(Formerly known as CPT-CPT-Time-Missing) CPT Comparison - Add On Codes code edits are constructed from a primary list CPT codes and a secondary list of CPT codes. The primary list of CPT codes are commonly referred to as add-on codes, and they should not be used in a transaction, unless they are accompanied by a base CPT code from the secondary list of CPT codes. The system first checks each CPT code entered on the current transaction against the primary list of CPT codes. If a code matches, then the system checks whether a code in the secondary list of CPT codes exists for the same patient, within the specified time frame, by the same provider. The two CPT codes do not have to be in the same transaction. If a code from the secondary list of CPT codes is not found within the time frame, the code edit fires. The time frame is the number of days before and after the secondary CPT, during which the primary CPT is allowed to be used. The standard CPT Comparison - Add On Codes code edits that are pre-loaded in your system include the following:| Code Edit ID | Description |
|---|---|
| Addon(1-906) | The CPT is an add-on code. A CPT from the secondary list must also be entered for this patient on the same day. |
- Follow Step 1 through Step 3 in Creating New Custom Code Edits.
- Complete the fields on the screen as follows:
- Action: Choose the appropriate Action (usually “Error Message”), and then enter the error message that you would like to display to the user. In the error message text you can use these variables:
- ^0: The primary CPT code (the add-on code that was entered by the user).
- ^1: The secondary CPT code (the base code that is missing). Sample: “CPT ^0 is an add-on code. CPT ^1 must also be entered for this patient on the same day.” - – CPT: Enter the primary list of CPT codes for which the code edit should fire. Do not check the All or Exclude boxes.
- CPT Comparison tab > Add on Codes subtab:
- Day: Using the Start and End fields, define the beginning and ending timeframe during which the primary CPT code is allowed to be used, in relation to the secondary CPT code. You can use the following parameters:
- Action: Choose the appropriate Action (usually “Error Message”), and then enter the error message that you would like to display to the user. In the error message text you can use these variables:
- -1: The primary CPT is on the day before the secondary CPT.
- 0: The primary CPT is on the same day as the secondary CPT.
- 1 to 999: The primary CPT is n number of days after the secondary CPT. 999 indicates an unlimited number of days after. For example, you could define a timeframe as Start 0 and End 999, which would mean that the primary CPT code (the add on code) is allowed to be used on the same day or up to an unlimited number of days after the secondary CPT code (the base code). - o Secondary CPT search: Enter the secondary CPTs. You can enter the codes one by one, enter the codes in bulk , or select a Code List that you created previously . See CPT for instructions.
- Click Submit to save the code edit.
CPT Comparison - Duplicate (Type 3)
The CPT Comparison - Duplicate code edit is a check for duplicate charge transactions—it displays a warning message to the user when they attempt to submit a second or subsequent charge transaction for a patient visit that already has at least one charge transaction associated with it. You should note that this code edit does not compare the specific charge codes on the charge transactions, it simply checks for the existence of more than one transaction, entered by any user, for a particular visit. This code edit is constructed from a primary list of CPT codes (all codes), a secondary list of CPT codes (all codes), and one or more Commure Pro visit types. This code edit is also visit specific, meaning that it only checks for the existence of a secondary CPT code on the same visit as the current transaction. The code edit error message contains a link to the other (duplicate) charge transaction. There is only one CPT Comparison - Duplicate code edit that is pre-loaded in your system:| Code Edit Label | Description |
|---|---|
| Duplicate Transactions for Visit Types (Upgrade) | This code edit ensures that only one charge transaction is entered per visit, for specific visit types. The code edit checks for the existence of any CPT code on a second or subsequent transaction, for the same visit as the current transaction. If found, the code edit fires. |
- Select Admin > Institution > Charge Capture > Code Edits > Configure Code Edits. The Manage Code Edits screen is displayed.
- Select the “Duplicate Transactions for Visit Types (Upgrade)” code edit. To find it easily, enter “duplicate” in the Search field.
- Click the Edit icon . The Code Edit Add/Update screen is displayed.
-
The following fields are pre-defined on this code edit. You can change some to suit your needs, while others should remain unchanged:
- Label: The default name is “Duplicate Transactions for Visit Types (Upgrade).” Commure Pro recommends leaving the name unchanged, so that Commure Pro support can easily locate this code edit if necessary.
- Action: The Action is defined as “Error Message” and should not be changed. The default error message is “Duplicate Charges,” but you may change this if desired. Sample: “This may be a duplicate charge transaction. Another transaction was billed on the same service date for this visit.” - – CPT: This field is set to All to indicate that the system should perform this code edit check for all CPT codes. This field should not be changed.
- Visit tab:
- Commure Pro Visit Type selection: Select the Commure Pro Visit Type(s) for which you want to check for duplicate charge transactions. Most clients use this code edit for outpatient visit types, but it can also be used for inpatient visit types.
- CPT Comparison tab > Duplicate subtab:
- Enable: This box is checked by default to enable this code edit, but you may check or uncheck the box as desired to enable or disable it. Please note that at least one Commure Pro Visit Type must also be listed on the Visit tab in order for this code edit to fire.
- Click Submit to save your changes.
CPT Comparison - Global Period (Type 3)
(Formerly known as CPT-CPT-Time) CPT Comparison - Global Period code edits are constructed from a primary list of CPT codes, a secondary list of CPT codes, and a time frame during which the primary CPT is not allowed to be used, in relation to the secondary CPT. The system first checks the CPT codes entered on the current transaction against the primary and secondary lists of CPT codes. If a CPT code on the current transaction matches on one list (for example, on the primary CPT list), then all other charges in the system during the specified time frame for this patient are checked against the other list (for example, the secondary CPT list). If a charge transaction containing a charge code from the other list is found for the same patient, within the specified time frame, by the same provider, then the code edit fires. The time frame is the number of days before and after the secondary CPT, during which the primary CPT is found (and not allowed). A common example is a global 10 day period code edit. The primary list of CPT codes is a list of E&M codes. The secondary list of CPT codes is a list of surgical procedure codes. The E&M codes should not be used on the same day, or within 10 days after the surgical procedure codes, unless specific modifiers are used on the E&M codes. If a user enters an E&M code, the system would check for the existence of a surgical code on the same day or 10 days before the E&M code. Or conversely, if the user enters a surgical code, the system would check for the existence of an E&M code on the same day or 10 days after the surgical code. If a match were found in either case, the code edit would fire. Some exceptions are allowed: the two CPT codes may be allowed within the time frame if either the primary or the secondary CPT code has an appropriate modifier and is in the appropriate relative time frame. Modifier exemptions can be applied to either the primary or the secondary code, and apply in three distinct timeframes (any prior day, the same day, and any future day), resulting in six possible sets of exemptions.| Exemption Type Number (used in the export file) | Exemption Type Name | CPT To Which the Modifier is Attached | Relative Time Frame |
|---|---|---|---|
| 1 | ON_PRIMARY_PRIMARY_AFTER | Primary CPT code | Primary is after Secondary |
| 2 | ON_SECONDARY_SECONDARY_AFTER | Secondary CPT code | Secondary is after Primary |
| 3 | ON_PRIMARY_SAME_DAY | Primary CPT code | Primary and Secondary are on the same day |
| 4 | ON_PRIMARY_PRIMARY_BEFORE | Primary CPT code | Primary is before Secondary |
| 5 | ON_SECONDARY_SAME_DAY | Secondary CPT code | Primary and Secondary are on the same day |
| 6 | ON_SECONDARY_SECONDARY_BEFORE | Secondary CPT code | Secondary is before Primary |
- If the code edit is defined to fire only in certain circumstances (for example, for certain financial classes, or certain departments), then the global message will adhere to those rules and only display for certain financial classes or departments.
- The global message will respect the following setting, just as the overall code edit does:For charges in this department, apply CPT-CPT code edits to sets of charges with different providers (Web only). When set to No, the message displays for only the provider who entered the surgical CPT code. When set to Yes, the message displays to all providers in the same department as the provider who entered the surgical CPT code.
- If more than one global period is in effect for a given visit day (for example, if the patient had more than one surgical procedure over several days), only one global message is shown. The standard CPT Comparison - Global Period code edits that are pre-loaded in your system include the following:
| Code Edit ID | Description |
|---|---|
| All EM SameDay | Only one E&M code may be entered per patient per day unless modifier 25 is present on one of the codes. |
| Global0 | This edit checks E&M codes against a set of procedure codes that CMS considers to be global services when billed on the same day. Modifier 25 or 57 can be used to override the edit if the procedure performed is significant and separately identifiable from the E&M service. |
| Global10 Mod(1-2) | This edit checks E&M codes against a set of procedure codes that CMS considers to be global services when billed on the same day or within a 10 day post-op window. Modifier 24 can be used to override the edit if the E&M code is an unrelated E&M service during post-op. Alternatively, modifier 25 can be used if the E&M code represents significant and separately identifiable E&M service. |
| Global90 Mod(1-3) | This edit checks E&M codes against a set of procedure codes that CMS considers to be global services when billed on the same day, the previous day, or within a 90 day post-op window. Modifier 57 or 24 can be used to override the edit(s) if the service resulted in a decision for surgery. |
| Inpt Adm Check | This edit ensures that an inpatient admission code is only used once per inpatient visit. |
| Discharge Check | This edit ensures that an inpatient discharge code is only used once per inpatient visit. |
| Consult Check | This edit ensures that an inpatient consult code is only used once per physician per inpatient visit. |
- Follow Step 1 through Step 3 in Creating New Custom Code Edits.
- Complete the fields on the screen as follows:
- Action: Choose the appropriate Action (usually “Error Message”), and then enter the error message that you would like to display to the user. In the error message text you can use these variables:
- ^0: The primary CPT code.
- ^1: The secondary CPT code. Sample: “CMS considers ^0 to be part of the global services for ^1 when billed on the same day or within a 10 day post-op window. Consider adding modifier 24 to ^0 if it is an unrelated E&M service during post-op or modifier 25 to ^0 if it is a significant and separately identifiable E&M service.” - – CPT: Enter the primary CPT codes for which the code edit should fire (for example, the list of E&M codes). Do not check the All or Exclude boxes.
- CPT Comparison tab > Global Period subtab:
- Display: (Optional) Enter a phrase that you would like to display to the user when a global period is in effect for a visit day. You may enter up to ten alpha and/or numeric characters in this field. For example, if you were configuring a global code edit for a 1 - 10 day period, you might enter “Global 10.” Once a user has entered a charge transaction on a given day with at least one charge code from the Secondary CPT field, then all non-coded visit days within the global period relative to the Secondary CPT (defined in the Days field) will show this phrase after the Add link.
- Day: Using the Start and End fields, define the beginning and ending time frame during which the primary CPT code is found (and not allowed), in relation to the secondary CPT code. You can use the following parameters:
- Action: Choose the appropriate Action (usually “Error Message”), and then enter the error message that you would like to display to the user. In the error message text you can use these variables:
- -1: The primary CPT is on the day before the secondary CPT.
- 0: The primary CPT is on the same day as the secondary CPT.
- 1 to 999: The primary CPT is n number of days after the secondary CPT. 999 indicates an unlimited number of days after. For example, you could define a timeframe as Start 0 and End 999, which would mean that the primary CPT is on the same day or up to an unlimited number of days after the secondary CPT. - o Visits: Indicates on which visits, during the specified timeframe, the code edit will check for the existence of the secondary CPT.
- All: Indicates that the system will check for the existence of the primary and secondary CPT on all charge transactions associated with all visits for the patient during the specified timeframe.
- Trigger: Indicates that the system will check for the existence of the primary and secondary CPT on only those charge transactions that are associated with the same visit that triggered the code edit (the visit associated with the charge transaction on which either the primary or secondary CPT code was found), during the specified time frame. For example, let’s say the patient had the following encounters:- t An outpatient visit on Jan 1 at 9:00 am
- An inpatient visit starting on Jan 1, admitted at 12:30 pm. The patient had surgery at 1:00 pm, and a physician visit in the room at 4:00 pm.
If you defined a time frame of 0,0 and chose Trigger, the result would be that the outpatient visit would be codeable without error. However, a code edit would fire for the two visit codes on the same inpatient visit, indicating that a modifier was required. If you defined a time frame of 0,0 and chose All, a code edit would fire for all of the visit codes, indicating that a modifier was required. - o Secondary CPT search: Enter the secondary CPTs (for example, the surgical CPT codes). You can enter the codes one by one, enter the codes in bulk , or select a Code List that you created previously . See CPT for instructions.
- Exceptions: If there are any modifier exceptions allowed for this code edit (reasons why the primary CPT would be allowed within same time frame as the secondary CPT), enter them here. Enter a modifier in the Modifier field, and then select the modifier’s position. Then click the Add button to add the exception.
- Click Submit to save the code edit.
CPT Comparison - Multiple Codes (Type 17)
CPT Comparison - Multiple Codes code edits are constructed from a primary list of CPT codes, and a secondary list of CPT codes. This code edit compares the CPT codes used on the charge transaction and finds cases where the combination of codes that were used is either invalid or incomplete. For example, either the transaction contains two codes that should not be used together on the same charge transaction for the same service date, or the transaction contains a specific CPT code that should be used in combination with another CPT code, but the second CPT code is missing. When a user enters a charge transaction that contains either a) a CPT code from the both the first list and second list, or b) a CPT code from the first list but not the second list, then the code edit fires. Unlike the CPT Comparison - Global Period code edit type, this is code edit checks only a single charge transaction for invalid or incomplete combination of CPT codes. There are no standard CPT Comparison - Multiple Codes code edits pre-loaded in your system. To define a new CPT Comparison - Multiple Codes code edit:- Follow Step 1 through Step 3 in Creating New Custom Code Edits.
- Complete the fields on the screen as follows:
- Action: Choose the appropriate Action (usually “Error Message”), and then enter the error message that you would like to display to the user. You can use the following variables in the error message.
- ^0: The CPT code from the CPT list that was used on the charge transaction.
- ^1: The CPT code from the Secondary CPT list. In the invalid combination case, this variable displays the CPT code from the Secondary CPT list that was used on the charge transaction. In the incomplete combination case, this variable lists the entire Secondary CPT list. If the Secondary CPT list is long, you may not want to use this variable. Sample for invalid combinations: “You have selected ^0 and ^1. You may not submit these two CPT codes on the same transaction.”Sample for incomplete combinations: “You have selected ^0. You must also select one of these CPT codes: ^1.” - – CPT: Enter the primary list of CPT codes. Typically you would not check the All box or the Exclude box for this type of code edit.
- CPT Comparison tab > Multiple Codes subtab:
- Secondary CPT search: Enter the secondary list of CPT codes. For the Secondary CPT search field, you can enter the codes one by one, enter the codes in bulk , or select a Code List that you created previously . See CPT for instructions. - o Secondary CPT Options: Select either Include or Exclude to specify the following:
- Action: Choose the appropriate Action (usually “Error Message”), and then enter the error message that you would like to display to the user. You can use the following variables in the error message.
- Include: Select Include to find cases where a CPT code from the CPT list and the Secondary CPT list are both used on the same charge transaction. This code edit is looking for an invalid combination of CPT codes.
- Exclude: Select Exclude to find cases where a CPT code from the CPT list was used on the charge transaction, but a CPT from the Secondary CPT list was not used. This code edit is looking an incomplete combination of CPT codes (cases where two CPT codes should be used together, but the second one is missing).
- Click Submit to save the code edit.
CPT Comparison - Required QTY (Type 15)
(Formerly known as CPT-CPT-Units) CPT Comparison - Required QTY code edits are constructed from a primary list of CPT codes, a secondary list of CPT codes, and a number of units (the minimum quantity that should be associated with the secondary CPT code). The system first checks each CPT code entered against the primary list of CPT codes. If a code matches, all other CPT codes on the transaction are checked against the secondary list of CPT codes. If a second code also matches, the system checks whether the second code has, as a minimum, the number of units listed in the code edit. You might use this option in cases where users are entering charges for a vaccine administration and drug, and a specific quantity is required depending on the type of vaccine(s) selected. There are no standard CPT Comparison - Required QTY code edits pre-loaded in your system. To define a new CPT Comparison - Required QTY code edit:- Follow Step 1 through Step 3 in Creating New Custom Code Edits.
- Complete the fields on the screen as follows:
- Action: Choose the appropriate Action (usually “Error Message”), and then enter the error message that you would like to display to the user. You can use the following variables in the error message:
- ^0: The primary CPT.
- ^1: The minimum quantity required for the secondary CPT.
- ^2: The secondary CPT (that requires the minimum quantity). Sample: “When using CPT ^0, a minimum of ^1 units is required for CPT ^2.” - – CPT: Enter the primary list of CPT codes for which the code edit should fire. Do not check the All or Exclude boxes.
- CPT Comparison tab > Required QTY subtab:
- Required Quantity: Enter the minimum quantity that is required for the secondary CPT.
- Secondary CPT search: Enter the list of secondary CPT codes, for which a minimum quantity is required, when they are used with the primary CPT. You can enter the codes one by one, enter the codes in bulk , or select a Code List that you created previously . See CPT for instructions.
- Action: Choose the appropriate Action (usually “Error Message”), and then enter the error message that you would like to display to the user. You can use the following variables in the error message:
- Click Submit to save the code edit.
Diagnoses - Dx Alert (Type 8)
(Formerly known as Notifications) Diagnoses - Dx Alert code edits are constructed from zero or more CPT codes and one or more diagnosis codes. They are used to display a message to the user based on the information in the transaction. The only standard Diagnoses - Dx Alert code edits that might be pre-loaded in your system are the PQRS Diagnoses - Dx Alert code edits. These are enabled only if your organization has purchased the optional PQRS feature. See Code Edits that Launch PQRS/MIPS Forms. To define a new Diagnoses - Dx Alert code edit:- Follow Step 1 through Step 3 in Creating New Custom Code Edits.
- Complete the fields on the screen as follows:
- Action: Choose the appropriate Action (usually “Error Message”), and then enter the error message that you would like to display to the user. You can use the following variables in the error message:
- ^0: The ICD code that should trigger the code edit (as specified on the Diagnoses > Dx Alert tab).
- ^2: The CPT code that should trigger the code edit (if specified in the CPT field). Sample: “You have selected diagnosis ^0 with CPT ^2. Be sure to fill out the CHF Assessment Form for this patient.” - – CPT: If you want the code edit to fire only when a specific charge code or is used on the transaction, enter the list of CPT codes in the CPT field. Or if you want the code edit to fire for all charge codes, leave the CPT field blank, and check the All checkbox instead.
- Diagnoses tab > Dx Alert subtab:
- Dx Primary search: Enter the list of diagnosis codes for which the code edit should fire, when used with the CPT codes listed in the CPT field (or when used with any CPT code, if All is chosen). You can enter the codes one by one, enter the codes in bulk , or select a Code List that you created previously . See Dx Primary search for instructions.
- Action: Choose the appropriate Action (usually “Error Message”), and then enter the error message that you would like to display to the user. You can use the following variables in the error message:
- Click Submit to save the code edit.
Diagnoses - Medical Necessity (Type 6)
(Formerly known as CPT-ICD or CPT-ICD-Missing) Diagnoses - Medical Necessity code edits are constructed from a CPT code and a list of diagnosis codes that should accompany the given charge. These are the diagnosis codes that would justify the medical necessity of the given charge. If the entered CPT code is not accompanied by one of the ICD codes in the list, then the code edit fires, and a warning message is displayed. There are no standard Diagnoses - Medical Necessity code edits pre-loaded in your system. To define a new Diagnoses - Medical Necessity code edit:- Follow Step 1 through Step 3 in Creating New Custom Code Edits.
- Complete the fields on the screen as follows:
- Action: Choose the appropriate Action (usually “Error Message”), and then enter the error message that you would like to display to the user. You can use the following variables in the error message:
- ^0: The primary CPT code (that needs a specific diagnosis).
- ^1: The list of appropriate diagnosis codes for the CPT code. If the list of appropriate codes is very long, you may not want to include this variable in your message. Sample: “The diagnosis that you have selected does not meet the medical appropriateness criteria for ^0. Acceptable diagnoses are: ^1.” - – CPT: Enter the list of CPT codes that require a specific diagnosis, to justify the medical necessity of the charge. Do not check the All or Exclude boxes.
- Diagnoses tab > Medical Necessity subtab:
- Dx Primary search: Enter the list of diagnosis codes that are medically appropriate for the charge codes that you entered in the CPT field. You can enter the codes one by one, enter the codes in bulk , or select a Code List that you created previously . See Dx Primary search for instructions.
- Action: Choose the appropriate Action (usually “Error Message”), and then enter the error message that you would like to display to the user. You can use the following variables in the error message:
- Click Submit to save the code edit.
Diagnoses - Min and Max Number (Type 19)
Diagnoses - Min and Max Number code edits check for a minimum and/or a maximum number of diagnoses allowed per CPT code on the charge transaction. If a CPT code on the charge transaction does not have the minimum number of diagnoses specified, or exceeds the maximum number of diagnoses specified, then the code edit fires. You can specify just a minimum, just a maximum, or both a minimum and a maximum.- If no minimum is specified, then the transaction can be saved as a completed transaction with zero diagnoses, and the code edit will not fire.
- If no maximum is specified, then the transaction can be saved as a completed transaction with up to 99 diagnoses, and the code edit will not fire. There are no standard Diagnoses - Min and Max Number code edits pre-loaded in your system.
| Department Settings | Code Edit | |
|---|---|---|
| Error Handling | The department settings cause a Validity Error to occur if the number of diagnoses on the transaction does not match the department settings. If the user is not allowed to save charge transactions as a draft, then they must either enter the correct number of diagnoses, or discard the transaction (if your organization does not allow users to save charges as drafts, this workflow can be problematic). If the user is allowed to save transactions as a draft, then they can save the transaction as a draft without correcting the problem, but the charge does not go to the Holding Bin until the user completes the charge or the draft expires. | The code edit (if not set as Forced) allows the user to save the transaction as completed even if they do not have the correct number of diagnoses. There is no requirement to save the transaction as a draft if they do not correct the issue. As a result, they can save it as completed (with a Code Edit error) and the transaction will go to the Holding Bin where a billing administrator can correct it (assuming the user is configured to send charges with errors to the Holding Bin). |
| Configuration | You must configure every department independently. | You can configure a single code edit that affects all users in all departments, or you can configure several different code edits for individual departments or groups of departments (using the Department criteria in the code edit’s definition).In addition, the code edit can be configured as a role-based code edit with the View Role set to billing administrators only. This will cause the code edit to fire behind the scenes for providers and send the charge to the Holding Bin without ever showing an error to the provider (see Role-Based Code Edits). |
| Logic for Maximum Number of Diagnoses | The department setting for a maximum number of diagnoses is for the charge transaction as a whole. | The code edit’s criteria for a maximum number of diagnoses is per CPT code. |
- Follow Step 1 through Step 3 in Creating New Custom Code Edits.
- Complete the fields on the screen as follows:
- Action: Choose the appropriate Action (usually “Error Message,” although you might want to select “Codes Held for Review” and make this a role-based code edit; see Code Edits that Hold Codes for Review), and then enter the error message that you would like to display to the user. You can use the following variables in the error message:
- ^0: The minimum number of diagnoses specified in the code edit definition.
- ^1: The maximum number of diagnoses specified in the code edit definition. Sample: “Please enter between ^0 and ^1 diagnoses for this CPT code.” - – CPT: If you want the minimum or maximum number or diagnoses to be validated for all charge codes, leave the CPT field blank, and check the All checkbox (most likely scenario). Or, if you want the minimum or maximum number or diagnoses to be validated only when specific charge codes are used on the transaction, enter the list of CPT codes in the CPT field.
- Diagnoses tab > Min/Max # of Dx subtab:
- Diagnoses count per CPT: Enter the minimum and or maximum as described below:
- Action: Choose the appropriate Action (usually “Error Message,” although you might want to select “Codes Held for Review” and make this a role-based code edit; see Code Edits that Hold Codes for Review), and then enter the error message that you would like to display to the user. You can use the following variables in the error message:
- Min (1-99): Enter the minimum number of diagnoses that you want to require the user to enter per CPT code. Leave this field blank if you do not want to require a minimum number of diagnoses.
- Max (1-99): Enter the maximum number of diagnoses that you want to allow the user to enter per CPT code. Leave this field blank if you do not want to set a maximum number of diagnoses (although there is a fixed maximum of 99 diagnoses).
- Click Submit to save the code edit.
Diagnoses - Validate Dx Combination (Type 16)
(Formerly known as ICD-ICD-Excluded) Diagnosis - Validate Dx Combination code edits are constructed from zero or more CPT codes, a primary list of ICD codes, and a secondary list of ICD codes. This code edit compares the diagnoses used on the charge transaction and finds cases where the combination of codes that were used is either invalid or incomplete. For example, either the transaction contains two codes that should not be used together on the same charge transaction for the same service date, or the transaction contains a specific diagnosis that should be used in combination with another diagnosis, but the second diagnosis is missing. The rule can be applied to cases where a specific CPT code is used, or it can be generically applied to all charge transactions. When a user enters a charge transaction with the specified CPT code (or any CPT code), and the transaction also contains either a) an ICD code from the both the first list and second list, or b) an ICD code from the first list but not the second list, then the code edit fires. There are no standard Diagnoses - Validate Dx Combination code edits pre-loaded in your system. To define a new Diagnoses - Validate Dx Combination code edit:- Follow Step 1 through Step 3 in Creating New Custom Code Edits.
- Complete the fields on the screen as follows:
- Action: Choose the appropriate Action (usually “Error Message”), and then enter the error message that you would like to display to the user. You can use the following variables in the error message.
- ^0: The diagnosis code from the Dx Primary list that was used on the charge transaction.
- ^1: The diagnosis code from the Dx Secondary list. In the invalid combination case, this variable displays the diagnosis code from the Dx Secondary list that was used on the charge transaction. In the incomplete combination case, this variable lists the entire Dx Secondary list. If the Dx Secondary list is long, you may not want to use this variable. Sample for invalid combinations: “You have selected ^0 and ^1. You may not submit an acquired and congenital diagnosis on the same transaction.”Sample for incomplete combinations: “You have selected ^0. You must also report one of these diagnoses: ^1.” - – CPT: If you want the diagnosis combination to be validated only when a specific charge code is used on the transaction, enter the list of CPT codes in the CPT field. Or if you want the diagnosis combination to be validated for all charge codes, leave the CPT field blank, and check the All checkbox instead.
- Diagnoses tab > Validate Dx Combination subtab:
- Dx Primary search: Enter the primary list of diagnosis codes.
- Dx Secondary search: Enter the secondary list of diagnosis codes. For both of these fields, you can enter the codes one by one, enter the codes in bulk , or select a Code List that you created previously . See Dx Primary search for instructions. - o Trigger When Dx: Select either Included or Excluded to specify the following:
- Action: Choose the appropriate Action (usually “Error Message”), and then enter the error message that you would like to display to the user. You can use the following variables in the error message.
- Included: Select Included to find cases where a diagnosis code from the Dx Primary list and the Dx Secondary list are both used on the same charge transaction. This code edit is looking for an invalid combination of diagnosis codes.
- Excluded: Select Excluded to find cases where a diagnosis code from the Dx Primary list was used on the charge transaction, but a diagnosis from the Dx Secondary list was not used. This code edit is looking an incomplete combination of diagnosis codes (cases where two diagnosis codes should be used together, but the second diagnosis is missing).
- Click Submit to save the code edit.
Diagnoses - Validate Dx Order (Type 18)
Diagnoses - Validate Dx Order edits are constructed from zero or more CPT codes, a primary list of ICD codes, and a secondary list of ICD codes. There are cases where a diagnosis for an underlying condition should be listed in higher position than certain other diagnoses on the transaction. This code edit finds cases where the diagnosis for the underlying condition is not listed in a higher position than the other diagnoses on the transaction. The rule can be applied to cases where a specific CPT code is used, or it can be generically applied to all charge transactions (the more common scenario). When a user enters a charge transaction with the specified CPT code (or any CPT code), and the transaction also contains an ICD code from the first list, which is listed in a lower position on the transaction than an ICD code from the second list, the code edit fires. There are no standard Diagnoses - Validate Dx Order code edits pre-loaded in your system. To define a new Diagnoses - Validate Dx Order code edit:- Follow Step 1 through Step 3 in Creating New Custom Code Edits.
- Complete the fields on the screen as follows:
- Action: Choose the appropriate Action (usually “Error Message”), and then enter the error message that you would like to display to the user. You can use the following variable in the error message.
- ^0: The ICD code that should be listed in a higher position higher than the other diagnosis code(s).
- ^1: The ICD code(s) that should be listed in a lower position. Sample: “The diagnosis ^0, for the underlying disease, should be listed in a higher position than diagnosis ^1.” - – CPT: Select the All checkbox (this code edit is typically used to fire for all charge codes).
- Diagnoses tab > Validate Dx Order subtab:
- Dx Primary search: Enter the diagnosis code(s) for the underlying condition, that should always be listed in a position superior to the diagnosis code(s) listed in the Dx Secondary field below.
- Dx Secondary search: Enter the diagnosis code(s) that should always be listed in a position lower than the diagnosis code(s) listed in the Dx Primary field above. For both of these fields, you can enter the codes one by one, enter the codes in bulk , or select a Code List that you created previously . See Dx Primary search for instructions.
- Action: Choose the appropriate Action (usually “Error Message”), and then enter the error message that you would like to display to the user. You can use the following variable in the error message.
- Click Submit to save the code edit.
Diagnoses - Validate Primary Dx (Type 14)
(Formerly known as Dx-Dx-Time or Primary ICD Checking) Diagnosis - Validate Primary Dx code edits fire when more than one provider within a department enters the exact same primary diagnosis code (or a diagnosis code within the same category) for the same patient on the same service date. Diagnosis codes with the same digits preceding the decimal point are diagnoses in the same category. The code edit definition determines how specific the diagnosis matching should be (when the diagnoses are exactly the same, or when the diagnoses are within the same category). For example, if the code edit were defined to match on diagnoses within the same category, then when a provider enters diagnosis I48.1 as the primary diagnosis for a patient, and a second provider then enters I48.4 as the primary diagnosis for the same patient on the same service date, the code edit will fire, since both diagnoses are in the same category (both start with I48). Please note that this code edit checks the primary diagnosis at the transaction level only (it does not check the diagnoses associated with each individual charge code). Also, when this type of code edit is enabled, it applies to all diagnosis codes—you cannot specify that it should fire when only certain diagnoses are used. The standard Diagnoses - Validate Primary Dx code edit that is pre-loaded in your system includes the following:| Code Edit ID | Description |
|---|---|
| Prim Dx Checking | This code edit fires when more than one provider within a department enters the exact same primary diagnosis code, or a diagnosis in the same category, for the same patient on the same service date. |
- Follow Step 1 through Step 3 in Creating New Custom Code Edits.
- Complete the fields on the screen as follows:
- Action: Choose the appropriate Action (usually “Error Message”), and then enter the error message that you would like to display to the user. You can use the following variables in the error message.
- ^0: The ICD code from the other transaction (that is similar to the diagnosis code from this transaction).
- ^1: The category of the ICD codes. Sample: “Two providers in the same department cannot enter the same primary diagnosis (or a diagnosis in the same category) for the same patient on the same date. The diagnosis category on this transaction is ^1, and another provider has already entered ^0 on another transaction for the same date.” - – CPT: Select the All checkbox (this code edit is designed to always fire for all charge codes).
- Diagnoses tab > Validate Primary Dx subtab: Select one of the radio buttons below to specify the conditions under which the code edit should fire:
- Match on exact code: The code edit fires only when the exact same diagnosis code used as the primary diagnosis on both transactions.
- Match on digits before decimal point: The code edit fires when a diagnosis within the same category (one that has the same digits preceding the decimal point) is used as the primary diagnosis on both transactions.
- Click Submit to save the code edit.
- Action: Choose the appropriate Action (usually “Error Message”), and then enter the error message that you would like to display to the user. You can use the following variables in the error message.
Headers - Excluded (Type 11)
(Formerly known as Header Excluded) Headers - Excluded code edits are constructed from zero or more CPT codes, zero or more ICD9 codes, and a specific charge-level or transaction-level header that is required to be blank. The code edit fires when the specified header is completed (not blank), but only for charge transactions that have the specified header enabled for the selected billing provider. The Headers - Excluded code edit can be constructed such that it checks for completed headers on all charge transactions, or for completed headers only when certain charge or diagnosis codes are used. This is useful when certain transaction-level or charge-level headers should be left blank, when certain CPT and ICD codes are used on the transaction.- With transaction-level headers, if you also specify a charge or diagnosis code, the code edit checks for a value on the specified transaction-level header only if the transaction contains that charge or diagnosis code.
- With charge-level headers, if you also specify a charge or diagnosis code, the code edit checks for a value on the charge-level header only on those specific charge codes, or only on the charge codes that have that diagnosis code associated with them. The charge-level header is allowed to have a value on other charge codes on the transaction. Please note that you can also indicate a specific list of values that are not allowed to be entered in the header field (while still allowing the header field to be completed with any other value).
- Follow Step 1 through Step 3 in Creating New Custom Code Edits.
- Complete the fields on the screen as follows:
- Action: Choose the appropriate Action (usually “Error Message”), and then enter the error message that you would like to display to the user. You can use the following variables in the error message:
- ^0: The CPT code for which this header should be left blank (if specified in the CPT field).
- ^1: The header name.
- ^2: The ICD code for which this header should be left blank (if specified in the Diagnoses > Dx Alert tab). If a diagnosis is not specified, then this variable shows the non-allowed values from the Headers > Values field. Sample usage with an Injury Type header: “When using CPT ^0 and diagnosis ^2, the ^1 field must be left blank.” - – (Optional) CPT: If you want the header to be left blank only when a specific charge code is used on the transaction, enter the list of CPT codes in the CPT field. Or if you want the header to be left blank for all charge codes, leave the CPT field blank, and check the All checkbox instead.
- (Optional) Diagnoses tab > Dx Alert tab: If you want the header to be left blank only when a specific diagnosis is used on the transaction, complete the field below. If you want the header to be left blank for all diagnoses, skip this field.
- Dx Primary search: Enter the diagnosis or diagnoses for which the header should be left blank. You can enter the codes one by one, enter the codes in bulk , or select a Code List that you created previously . See Dx Primary search for instructions.
- Headers tab:
- Name: Select the header that you want to be left blank. If the header is not found in the drop-down list, that means it does not have a Code Edit Label defined. You must enter a Code Edit Label on the header definition before you can create the code edit.
- Action: Select Exclude.
- Values: This field is optional.
- Action: Choose the appropriate Action (usually “Error Message”), and then enter the error message that you would like to display to the user. You can use the following variables in the error message:
- If there is a specific set of values that you do not want the user to enter in the header field, choose them here. Type a few characters of the desired value to see a list of possible matches, and the select a value from the list. Only acceptable values for the specified header are shown. You may select as many values as desired. The code edit will fire if the user chooses one of these values for the header field on the charge transaction. However, it will not fire if the user chooses any other value for the header field.
- If you do not want the user to enter any value in the header field (in other words, if you want the header field to be blank), then leave the Values field blank.
- Click the Add button to add the criteria for this header to the code edit definition.
You may select only one header field.
- Click Submit to save the code edit.
Headers - Included (Type 9)
(Formerly known as Header Required) Headers - Included code edits are constructed from zero or more CPT codes, zero or more ICD9 codes, and a specific charge-level or transaction-level header that is required to be completed. The code edit fires when the specified header is blank, but only for charge transactions that have the specified header enabled for the selected billing provider. The Headers - Included code edit can be constructed such that it checks for blank headers on all charge transactions, or for blank headers only when certain charge or diagnosis codes are used. This is useful when certain CPT and ICD codes are required to have certain transaction-level or charge-level headers completed.- With transaction-level headers, if you also specify a charge or diagnosis code, the code edit checks for a blank transaction-level header only if the transaction contains that charge or diagnosis code.
- With charge-level headers, if you also specify a charge or diagnosis code, the code edit checks for a blank charge-level header only on those specific charge codes, or only on the charge codes that have that diagnosis code associated with them. The header is allowed to be blank on other charge codes on the transaction. Please note that you can also indicate that the header be completed with a specific value (rather than just any value).
- Follow Step 1 through Step 3 in Creating New Custom Code Edits.
- Complete the fields on the screen as follows:
- Action: Choose the appropriate Action (usually “Error Message”), and then enter the error message that you would like to display to the user. You can use the following variables in the error message:
- ^0: The CPT code for which this header is required (if specified in the CPT field).
- ^1: The header name.
- ^2: The ICD code for which this header is required (if specified in the Diagnoses > Dx Alert tab). If a diagnosis is not specified, then this variable shows the required values from the Headers > Values field. Sample usage with an Injury Type header: “You have selected a diagnosis which is an injury code, ^2. You must choose a value for the ^1 field. ICD9s in the range 800-999.9 are Injury Codes.” - – (Optional) CPT: If you want the header to be completed only when a specific charge code is used on the transaction, enter the list of CPT codes in the CPT field. Or if you want the header to be completed for all charge codes, leave the CPT field blank, and check the All checkbox instead.
- (Optional) Diagnoses tab > Dx Alert subtab: If you want the header to be completed only when a specific diagnosis is used on the transaction, complete the field below. If you want the header to be completed for all diagnoses, skip this field.
- Dx Primary search: Enter the diagnosis or diagnoses for which the header should be completed. You can enter the codes one by one, enter the codes in bulk , or select a Code List that you created previously . See Dx Primary search for instructions.
- Headers tab:
- Name: Select the header that you want to be completed. If the header is not found in the drop-down list, that means it does not have a Code Edit Label defined. You must enter a Code Edit Label on the header definition before you can create the code edit.
- Action: Select Include.
- Values: This field is optional.
- Action: Choose the appropriate Action (usually “Error Message”), and then enter the error message that you would like to display to the user. You can use the following variables in the error message:
- If you want the user to complete the header field with one of a specific set of values, choose them here. Type a few characters of the desired value to see a list of possible matches, and the select a value from the list. Only acceptable values for the specified header are shown. You may select as many values as desired. The code edit will fire if the user does not choose one of these values on the charge transaction.
- If you want the user to complete the header field with any value, then leave the Values field blank.
- Click the Add button to add the criteria for this header to the code edit definition.
You may select only one header field.
- Click Submit to save the code edit.
Headers - Referring MD (Type 7)
(Formerly known as Referring MD) Headers - Referring MD code edits are constructed from a list of CPT codes that must have a referring physician associated with the given charge. If the referring physician transaction header is blank, the code edit fires. The standard Headers - Referring MD code edits that are pre-loaded in your system include the following:| Code Edit ID | Description |
|---|---|
| Ref Physician | This code edit includes a list of CPT codes that require a Referring MD to also be included on the charge Transaction. |
- Follow Step 1 through Step 3 in Creating New Custom Code Edits.
- Complete the fields on the screen as follows:
- Action: Choose the appropriate Action (usually “Error Message”), and then enter the error message that you would like to display to the user. There are no variables that you can use in the error message. Sample: “This CPT code requires a referring MD.” - – CPT: Enter the list of CPT codes that require a referring MD. Do not check the All or Exclude boxes.
- Headers tab:
- Name: Select the Referring charge header.
- Action: Select Include.
- Values: Leave this blank.
- Click the Add button to add this header information to the code edit.
- Click Submit to save your code edit. This code edit will be saved as a Headers - Included code edit, rather than a Headers - Referring MD code edit (there is no way to create a Headers - Referring MD code edit via the Configure Code Edits option). However, it will function exactly the same as a Headers - Referring MD code edit.
Modifier - Inappropriate (Type 5)
(Formerly known as CPT Modifier) Modifier - Inappropriate code edits are constructed from a CPT code and one or more modifiers that are inappropriate for the given charge. If the entered CPT code is associated with an inappropriate modifier, the code edit fires. The standard Modifier - Inappropriate code edits that are pre-loaded in your system include the following:| Code Edit ID | Description |
|---|---|
| Mod Not Allowed | This edit includes a list of E&M codes (including add-on codes) for which specific modifiers are inappropriate. |
- Follow Step 1 through Step 3 in Creating New Custom Code Edits.
- Complete the fields on the screen as follows:
- Action: Choose the appropriate Action (usually “Error Message”), and then enter the error message that you would like to display to the user. In the error message text you can use these variables:
- ^0: The inappropriate modifier code.
- ^1: The CPT code (for which the modifier is inappropriate). Sample: “The modifier ^0 is inappropriate for the CPT ^1.” - – CPT field: Enter the list of CPT codes for which the modifier is inappropriate. Do not check the All or Exclude boxes.
- Modifier tab > Inappropriate subtab:
- Modifiers search: Enter the modifiers that are inappropriate for the codes listed in the CPT field.
- Action: Choose the appropriate Action (usually “Error Message”), and then enter the error message that you would like to display to the user. In the error message text you can use these variables:
- Click Submit to save the code edit.
Modifier - Missing (Type 13)
(Formerly known as CPT-Modifier Missing) Modifier - Missing code edits are constructed from a CPT code and a list of modifiers that must accompany the given charge. If the user enter one of these CPT codes without including one of the modifiers specified in the list, then the code edit fires. There are no standard Modifier - Missing code edits pre-loaded in your system. To define a new Modifier - Missing code edit:- Follow Step 1 through Step 3 in Creating New Custom Code Edits.
- Complete the fields on the screen as follows:
- Action: Choose the appropriate Action (usually “Error Message”), and then enter the error message that you would like to display to the user. In the error message text you can use this variable:
- ^0: The missing modifier (that should be entered with the specified charge codes). Sample: “If you are the admitting and/or attending physician, please select the modifier ^0.” - – CPT: Enter the list of CPT codes for that require a specific modifier. Do not check the All or Exclude boxes.
- Modifier tab > Missing subtab:
- Modifiers search: Enter the modifiers that should be entered with the charge codes listed in the CPT field.
- Action: Choose the appropriate Action (usually “Error Message”), and then enter the error message that you would like to display to the user. In the error message text you can use this variable:
- Click Submit to save the code edit.
Patient - Age (Type 1)
(Formerly known as Age) Patient -Age code edit rules are constructed from a list of CPT codes that are inappropriate for a specified age range. Age ranges are constructed in days, months, or years: 0 represents birth and 999 represents no upper limit. If a user enters the specified CPT code for a patient in the specified (inappropriate) age range, a warning message is displayed. The message may also suggest appropriate alternatives to the entered CPT code. The standard Patient - Age code edits that are pre-loaded in your system include the following:| Code Edit ID | Description |
|---|---|
| Critical Care Pedi(1-18) | Certain Pediatric Critical Care codes should only be used for patients within specific age ranges. |
| Prev Care(1-49) | Certain Preventive Care codes should only be used for patients within specific age ranges. |
| Age Sleep(1-2) | Certain Sleep Study codes should only be used for patients within specific age ranges. |
| Age Sedation(1-2) | Certain Sedation codes should only be used for patients within specific age ranges. |
| Age Flu(1-4) | Certain Flu Vaccine codes should only be used for patients within specific age ranges. |
- Follow Step 1 through Step 3 in Creating New Custom Code Edits.
- Complete the fields on the screen as follows:
- Action: Choose the appropriate Action (usually “Error Message”), and then enter the error message that you would like to display to the user. In the error message text you can use these variables:
- ^0: The low end of the invalid age range. It is typically used as follows: “This service is inappropriate for patients age ^0 and older.”
- ^1: The high end of the invalid age range. It is typically used as follows: “This service is inappropriate for patients age ^1 and under.” See also the Alternate CPT search field below, as this field can add more information to your message.
- Action: Choose the appropriate Action (usually “Error Message”), and then enter the error message that you would like to display to the user. In the error message text you can use these variables:
- CPT: Enter the CPT codes that are invalid for the patients within the defined age range. Do not check the All or Exclude boxes.
- Patient tab:
- Age: Enter the age range for which the charge codes that you listed in the CPT field are invalid.
- Start: Define the low end of the date range. Enter a number between 0 and 999 in the first field, and then indicate whether this is days (d), months (m) or years (y).
- End: Define the high end of the date range. Enter a number between 0 and 999 in the first field, and then indicate whether this is days (d), months (m) or years (y). You are not required to use the same unit in both the start and end. For example, you could define an age range as Start 29d to End 24m (29 days to 24 months).When dealing with months and years, keep in mind that the age range includes the entire month/year. For example, the range Start 0d to End 24m would include the entire 24th month (in other words, this age range is for patients less than 2 years old).If a given CPT code is valid (allowed) for an age range somewhere in the middle, such as for a patient aged 1 to 5 years, then two code edits are needed to define the timeframes before and after the valid age range. In our example, the first code edit would define the age range before 1 year (you might define this as Start 0m to End 11m, which includes the entire 11th month), and the second code edit would define the age range after 5 years (you might define this as Start 6y to End 999y). - o (Optional) Alternate CPT search: Enter the list of suggested alternate (acceptable) CPT codes for patients within the defined age range. You can enter the codes one by one, enter the codes in bulk , or select a Code List that you created previously . See CPT for instructions. These codes do not impact whether or not the code edit fires, they are simply a suggested list of alternate codes that can be included in the message that is displayed to the user. If you enter one or more codes here, the following text will be automatically added to the end of your code edit message: “Appropriate codes include [the CPT codes listed in this field].”
- Patient tab:
- Click Submit to save the code edit.
Patient - Gender (Type 0)
(Formerly known as Gender) Patient - Gender code edits are constructed from a list of CPT codes that are inappropriate for a specified gender. Genders can match on male or female. If a user enters the specified CPT code for a patient with the specified (inappropriate) gender, a warning message is displayed. The standard Patient - Gender code edits that are pre-loaded in your system include the following:| Code Edit ID | Description |
|---|---|
| Female Only CPTs | This edit includes a list of CPT codes that are inappropriate to be used with Male Patients. |
| Male Only CPTs | This edit includes a list of CPT codes that are inappropriate to be used with Female Patients. |
- Follow Step 1 through Step 3 in Creating New Custom Code Edits.
- Complete the fields on the screen as follows:
- Action: Choose the appropriate Action (usually “Error Message”), and then enter the error message that you would like to display to the user. In the error message text you can use these variables:
- ^0: The patient’s gender.
- ^1: The CPT code (that is inappropriate for the patient’s gender). Sample: “The CPT ^1 is inconsistent with the patient’s listed gender of ^0.” - – CPT: Enter the list of CPT codes that are inappropriate for the specified gender. Do not check the All or Exclude boxes.
- Patient tab:
- Gender: Enter the gender for which the CPT codes are inappropriate.
- Action: Choose the appropriate Action (usually “Error Message”), and then enter the error message that you would like to display to the user. In the error message text you can use these variables:
- Click Submit to save your code edit.
Visit - Place of Service (Type 4)
(Formerly known as Place of Service) Visit - Place of Service code edits are constructed from a CPT code and a list of service sites that are inappropriate for the given charge. Acceptable service sites are those listed in the Service Site Types reference list. If the entered CPT code is associated with an inappropriate place of service, the code edit fires. The standard Visit - Place of Service code edits that are pre-loaded in your system include the following:| Code Edit ID | Description |
|---|---|
| POS1 | This edit includes a list of CPT codes that are inconsistent with an outpatient or office setting Place of Service. |
| POS2 | This edit includes a list of CPT codes that are inconsistent with an inpatient setting Place of Service. |
| POS3 | This edit includes a list of CPT codes that are inconsistent with an observation setting Place of Service. Since the name and system identifier for the “observation” place of service can vary by client, you must contact your Commure Pro representative in order to implement the observation code edit as a standard code edit. Or, as an alternative, you can create a custom Visit - Place of Service code edit for observation, as described in the steps below. For 2015, the E & M CPT codes that are not allowed with an Observation place of service are:99201, 99202, 99203, 99204, 99205, 99211, 99212, 99213, 99214, 99215, 99221, 99222, 99223, 99231, 99232, 99233, 99238, 99239, 99281, 99282, 99283, 99284, 99285, 99288, 99304, 99305, 99306, 99307, 99308, 99309, 99310, 99315, 99316, 99318, 99324, 99325, 99326, 99327, 99328, 99334, 99335, 99336, 99337, 99339, 99340, 99341, 99342, 99343, 99344, 99345, 99347, 99348, 99349, 99350Here is a suggested error message for users: “This service is inconsistent with an observation setting. Consider using Observation codes 99217, 99218, 99219, 99220, 99234, 99235 or 99236.” |
- Follow Step 1 through Step 3 in Creating New Custom Code Edits.
- Complete the fields on the screen as follows:
- Action: Choose the appropriate Action (usually “Error Message”), and then enter the error message that you would like to display to the user. You can use the following variable in your message:
- ^0: The CPT code (that is inappropriate for the place of service). Sample: “The CPT ^0 is inconsistent with an inpatient setting. Consider another code based on this site of service.” - – CPT: Enter the list of CPT codes that are inappropriate for a specific place of service. Do not check the All or Exclude boxes.
- Visit tab:
- Place of Service search: Enter the places of service that are inappropriate for the codes listed in the CPT field.
- Action: Choose the appropriate Action (usually “Error Message”), and then enter the error message that you would like to display to the user. You can use the following variable in your message:
- Click Submit to save your code edit.
Combination Edit (Type 12)
With a Combination Edit, you can create a code edit that combines the following attributes into a single unique code edit:- CPT
- Patient - Age
- Patient - Gender
- Visit - Financial Class
- Visit - Place of Service
- Visit - Commure Pro Visit Type
- Provider - Departments
- Provider - Trigger Roles or View Roles
- Headers
- Diagnoses - Dx Alert Combination Edits fire only if all of the code edit criteria is true/matched. For example, you might create a Combination Edit to ensure that specific CPT codes are used only for females over the age of 14, as might be necessary for maternity or ob/gyn charge codes. In this case you would use the CPT field along with the Patient - Age and Patient - Gender criteria fields. You might define the code edit as:
- CPT = All maternity and ob/gyn CPT codes that are appropriate only for females over 14 years old
- Patient - Age = 0Y to 13Y
- Patient - Gender = Female This sample code edit will fire only when the specified CPT codes are used for a female patient who is 0 to 13 years old, thereby disallowing their use for this patient population. The maternity and ob/gyn codes will already be disallowed for males, based on Commure Pro’s standard Patient - Gender code edits.
- Follow Step 1 through Step 3 in Creating New Custom Code Edits.
- Complete the fields on the Code Edit Add/Update screen as follows:
- Action: Choose the appropriate Action (usually “Error Message”), and then enter the error message that you would like to display to the user. There are no variables that you can use in the error text. Sample: “This CPT code is not allowed for patients of this age and gender.” - – CPT: Enter the primary CPT codes for which the code edit should fire. Depending on the criteria necessary for the code edit, you may need to check the All or Exclude boxes.
- Enter the specific criteria necessary for the code edit. You may complete any combination of the criteria fields below; see Criteria Fields for information about any of these fields.
- Patient - Age (just an age range, with no alternate codes defined)
- Patient - Gender
- Visit - Financial Class
- Visit - Place of Service
- Visit - Commure Pro Visit Type
- Provider - Departments
- Provider - Trigger Roles or View Roles
- Headers (only one header field may be selected, to either Exclude or Include)
- Diagnoses - Dx Alert
- Click Submit to save the code edit.
Importing/Exporting Code Edit Definitions
You can import and export the custom code edit definitions that you have defined in the Commure Pro system as necessary. The most likely usage of this feature is as follows:- During initial implementation, you might build and test your code edits in your Commure Pro test environment. Once you are ready to go live, you could export the code edits from your test environment and import them into your production environment.
- After initial implementation, you might occasionally make minor changes to the code edits in your production environment. You may then want to periodically export the code edits from your production environment and import them into your test environment, to keep the two systems in sync. Since your system is pre-loaded with all of the necessary standard code edits, the import and export functions that are available to Level 1 administrators import and export only custom code edits. Your Commure Pro representative has access to an additional option which they can use to update/import the standard code edits at the beginning of each new year. See the following topics for information specific to importing each type of code edit, along with instructions.
- Information about the Import Process for Custom Code Edit Definitions
- Information about the Import Process for Standard Code Edit Definitions
- Steps for Importing Custom or Standard Code Edit Definitions When importing either type of code edit definition, many of the individual elements that are used in the definitions must already exist in the Commure Pro system. These include all CPT codes, diagnosis codes, modifiers, financial classes, places of service, Commure Pro visit types, departments, billing areas, roles, and charge headers (with Code Edit Labels) that are used in the definitions or in the referenced code lists. Therefore, if you are exporting/importing from one system to another, such as Test to Production, or vice versa, you should first make sure that all of the necessary entries exist in both systems. If you do not, when you attempt to edit the code edit definition in the Configure Code Edits option, an error message will alert you to the missing data. You will not be allowed to edit the code edit until the data (header, financial class, etc.) has been updated in your system.
- In the Configure Code Edits option: The Import link allows you to import all four of the code edit files that contain the code edit definition information. The Export link always exports all four files.
- In the Manage Code Lists option: The Import link allows you to import the file containing your Code Lists (usually named codeeditaux_YYYYMMDDHHMM.txt.). The Export link always exports all four files.
Information about the Import Process for Custom Code Edit Definitions
A Level 1 administrator can import files containing a complete set of custom code edits, or files that contain only a partial set, such as files that contain just a few new custom code edits. The import process for custom code edits checks the code edit definitions that you are attempting to import against the code edit definitions that already exist in the system (both standard and custom). When determining whether a custom code edit is a duplicate of another, certain aspects of the code edit definition are not compared and are never overwritten:- Active flag
- Silent flag
- Force User to Resolve Error flag
- Error Message The fields below are also not compared, but are overwritten:
- Visit > Financial Class criteria
- Visit > Commure Pro Visit Type criteria
- Provider > Department and/or Billing Area criteria
- Provider > Trigger Role or View Role criteria Listed below are some examples of the processing that takes place when importing custom code edit definitions:
- Example 1, potential match to existing custom code edit: In a simple example, if you have an existing custom code edit with the Active flag set to No and the Forced user to Resolve Error flag set to Yes, and you attempt to import an exact duplicate of that custom code edit, except that the Forced user to Resolve Error flag is set to No, the potential import will be considered a “match” and the existing code edit will remain unchanged in your system (deactivated and forced).
- Example 2, potential match to existing custom code edit: In a more complex example, let’s say you have an existing custom code edit with the Force User to Resolve Error flag set to Yes, and a Financial Class of “HMO.” If you attempt to import a custom code edit definition that is identical to this, except that the Force User to Resolve Error is set to No and the Financial Class is set to “MEDICARE,” the code edit in the import file will be considered a “match” for the existing one. The system will update the existing custom code edit as follows: the Force User to Resolve Error flag will remain unchanged (set to Yes) and the Financial Class will be overwritten (changed to “MEDICARE”).
- Example 3, potential match to existing standard code edit: In a similar case, if the same code edit in the previous example happened to match an existing standard code edit (that had the Force User to Resolve Error flag set to Yes, and a Financial Class of “HMO”), once again it would be considered a “match” for the existing one. The system will update the existing standard code edit as follows: the Force User to Resolve Error flag will remain unchanged (set to Yes) and the Financial Class will be overwritten (changed to “MEDICARE”). The existing code edit will remain as a standard code edit.
- Example 4, no match to existing code edit: If a custom code edit definition that you are attempting to import does not match an existing standard or custom code edit in the system, it is imported as a new custom code edit. When a new custom code edit definition is imported, the Active flag is set to Yes by default, and all other flags and criteria are set as they are defined in the import file. If you select the Replace All Custom Edits on Import checkbox when importing, the import process deletes all existing custom code edits prior to loading the custom definitions in the import file (standard code edit definitions are not affected). Here are some scenarios where you might check this box:
- When testing code edits during the initial implementation process, you might check this box so that you can start with a clean slate with each import.
- To keep your test and production systems in sync, you can export code edit definitions from one system and import them to another (from production to test, or vice versa). When you do so, you might check the box so that obsolete custom definitions are cleared from the destination system.
- If your PQRS/MIPS code edits were originally loaded as custom code edits, then when your Commure Pro representative updates them at the beginning of the new year, they might export all of your custom code edit definitions to a file, edit the file to replace the old PQRS/MIPS code edit definitions with the new year’s definitions, and then check the Replace All Custom Edits on Import box when importing that same file back into the system. This process will a) clear the previous year’s custom PQRS/MIPS code edits and replace them with the new year’s custom PQRS/MIPS code edits, and b) clear all other non-PQRS/MIPS custom code edits and replace them with the same custom code edits again.
Information about the Import Process for Standard Code Edit Definitions
A Level 0 administrator (typically, a Commure Pro representative) can update/import the Commure Pro standard code edits (which can sometimes include the PQRS/MIPS code edits that your organization has chosen to implement), at the beginning of each new year. To do so, they must check the Commure Pro Standard Edits box during the import process. This checkbox is visible only to Level 0 users. This section describes what happens when a Commure Pro representative checks the Commure Pro Standard Edits box during the import process.The PQRS Measures must be imported prior to importing the Commure Pro standard code edits, or the code edit import will fail. See Steps for Configuring PQRS for more information.
- Active flag
- Silent flag
- Force User to Resolve Error flag
- Error Message
- Visit > Financial Class criteria
- Visit > Commure Pro Visit Type criteria
- Provider > Department and/or Billing Area criteria
- Provider > Trigger Role or View Role criteria Listed below are some examples of the processing that takes place when importing standard code edit definitions:
- Example 1, potential match to existing standard code edit: In a simple example, if you had previously set the Active flag to No on an existing standard code edit (to deactivate it), when your Commure Pro representative attempts to import that same code edit at the new year, the potential import will be considered a “match.” The criteria fields on the existing code edit will be updated (if the new definition contains changes), but the Active flag will remain unchanged (set to No).
- Example 2, potential match to existing standard code edit: In a more complex example, let’s say you had previously modified an existing standard code edit by setting the Force User to Resolve Error flag to Yes and adding a Financial Class. When your Commure Pro representative attempts to import that same code edit at the beginning of the new year (with the Force User to Resolve Error flag set to No, and no Financial Class defined), the code edit in the import file will be considered a “match” for the existing standard one. The criteria fields on the existing code edit will be updated (if the new definition contains changes), but the Force User to Resolve Error flag and the Financial Class will remain unchanged.
- Example 3, potential match to existing custom code edit: In a similar case, let’s say you had an existing custom code edit with the Force User to Resolve Error flag to Yes and a Financial Class defined. If your Commure Pro representative attempts to import a standard code edit at the beginning of the new year that is identical to the existing custom one, except that the Force User to Resolve Error flag is set to No, and no Financial Class is defined, the code edit in the import file will be considered a “match” for the existing custom one and will not be imported. Instead, the existing custom code edit will be converted to a standard code edit, but will otherwise remain unchanged.
- Example 4, no match to existing code edit: If a code edit definition that they are attempting to import does not match an existing standard or custom code edit in the system, it is imported as a new standard code edit. When a new standard code edit definition is imported, the Active flag is set to Yes by default, except for PQRS/MIPS standard code edits, which have the Active flag set to No by default. The import process for standard code edits automatically deletes all existing standard code edits that are not included in the import file. The end result is that obsolete standard code edits are automatically removed.
Steps for Importing Custom or Standard Code Edit Definitions
To import standard or custom code edits, follow the steps below. Please note that the PQRS Measures must be imported prior to importing the Commure Pro standard code edits, or the code edit import will fail. See Steps for Configuring PQRS for more information.- Select the Admin > Institution > Charge Capture > Code Edits > Configure Code Edits or Manage Code Lists option.
- Click the Import link at the top of the screen. A dialog box is displayed, allowing you to select the import file(s). In the Manage Code Lists option, there is a single field to import only the file containing your Code Lists. In the Configure Code Edits option, there are four fields (Edits, Messages, AuxLists and Preferences) to import all four of the files.
-
Click the Browse button to search for and select the text file(s).
- In the Manage Code Lists option, select the codeeditaux_YYYYMMDDHHMM.txt file.
- In the Configure Code Edits option, you must import all four of code edit files together as a set. The only exception to this rule is when the codeeditpref_YYYYMMDDHHMM.txt file is blank (except for the headings); in this case you may leave Preferences field blank. Select these files for each field:
- Edits: Choose the codeedit_YYYYMMDDHHMM.txt file.
- Messages: Choose the codeeditmsg_YYYYMMDDHHMM.txt file.
- AuxLists: Choose the codeeditaux_YYYYMMDDHHMM.txt file.
- Preferences: Choose the codeeditpref_YYYYMMDDHHMM.txt file.
- (Optional) Check the Commure Pro Standard Edits box if necessary. This checkbox is visible to only Level 0 users (typically Commure Pro staff). Check this box to import files that contain only standard code edits. The import files should not contain any custom code edits, nor should they contain only partial sets; the files should always contain all of the Commure Pro standard code edits (which can sometimes include the PQRS/MIPS standard code edits).
-
(Optional) Check the Replace All Custom Edits on Import box if necessary. Check this box to import files that contain only custom code edits, and only if you want to delete all custom code edits in the system prior to importing the new code edit definitions in the import file.
As a safety feature, if the import process fails for any reason, the custom code edits are not deleted, and are reverted back to their previous state prior to the import attempt.
- Click the Import button. The code edits are imported into the Commure Pro system.
- Click the Refresh button to update the Manage Code Edits screen and see your newly imported code edits.
Steps for Exporting Custom Code Edit Definitions
When exporting custom code edit definitions, all of the elements involved are exported, including the definitions and any referenced code lists. The code edits are broken into the four text files below, and the filenames are appended with the date and time that the code edits were exported. See Format for Importing/Exporting Code Edit Definition Files for more detailed information about the format and contents of each file.- codeedit_YYYYMMDDHHMM.txt
- codeeditaux_YYYYMMDDHHMM.txt
- codeeditmsg_YYYYMMDDHHMM.txt
- codeeditpref_YYYYMMDDHHMM.txt Please note that the export process exports only custom code edits. Standard code edits cannot be exported.
- Select the Admin > Institution > Charge Capture > Code Edits > Configure Code Edits or Manage Code Lists option.
-
Click the Export link at the top of the screen.
The code edit definitions are exported to a zip archive file containing the four text files.
The exported files use a text file format (with a .txt extension), which should not be changed.
- Click the Save to save the file, or Open to open the file.
Format for Importing/Exporting Code Edit Definition Files
When you export custom code edit definitions, they are broken into the four text files below. The export files use a comma separated values format (with a .txt extension), and the filenames are appended with the date and time that the code edits were exported.| Filename | Description | Where Documented |
|---|---|---|
| codeedit_YYYYMMDDHHMM.txt | Contains the actual code edit definitions. | The Codeedit_YYYYMMDDHHMM.txt File |
| codeeditaux_YYYYMMDDHHMM.txt | Contains any code lists referenced by the code edit definitions. | The Codeeditaux_YYYYMMDDHHMM.txt File |
| codeeditmsg_YYYYMMDDHHMM.txt | Contains the text of the code edit messages to users. | The Codeeditmsg_YYYYMMDDHHMM.txt File |
| codeeditpref_YYYYMMDDHHMM.txt | Contains information about code edits that use Role, Department or Commure Pro Visit Type criteria. | The Codeeditprefs_YYYYMMDDHHMM.txt File |
The Codeedit_YYYYMMDDHHMM.txt File
This file contains the actual code edit definitions. For all code edits with the exception of Combination Edits, a single row represents a single code edit definition. For each Combination Edit, there are multiple rows, as described below:- A single “parent” row that indicates that this is a Type 12 Combination Edit. This row also contains the CPTs from the CPT field on the definition.
- One or more “child” rows for each additional criteria in the definition. These rows are similar to the rows for other code edit types, except that they contain a value in the ParentExternalID column, which indicates that they are a child of the parent row.
| Column Name | Required Column? | Description | Acceptable Values or Formats |
|---|---|---|---|
| ref | Required | Every row, including both “parent” and “child” rows for Combination Edits, must have a unique value in the ref column. This can be a number or a text description.During import, the contents of this column are imported as the Label for the code edit, only if the Name column (last column) is left blank. (If there is a value in the Name column, that is imported as the Label, and the value in this ref column is disregarded.) Note that a unique system-generated number is always assigned as the code edit’s ID.During export, the system-assigned ID number for the code edit definition is exported to this column. | Any text or numeric value. Samples: “Custom Age code edit 1” “105” |
| parent | Required only for child rows in Combination Edits | For all code edits types except Combination Edits, this column should be blank. For Combination Edits:-For the “parent” row, this column should be blank.-For the “child” row, this column should contain the value in the ref column of the “parent” row to which it belongs. | Any text or numeric value. Samples: “Custom Combination code edit 1” “11567” |
| EditType | Required | A numeric code indicating the type of code edit. | 0=Parent-Gender 1=Patient-Age 2=CPT 3=CPT Comparison-Global Period 4=Visit-Place of Service 5=Modifier-Inappropriate 6=Diagnoses-Medical Necessity 7=Headers-Referring MD 8=Diagnoses-Dx Alert 9=Headers-Included 10=CPT Comparison-Add On Codes 11=Headers-Excluded 12=Combination Edit 13=Modifier-Missing 14=Diagnoses-Validate Primary Dx 15=CPT Comparison-Required QTY 16=Diagnoses-Validate Dx Combination 17=CPT Comparison-Multiple Codes 18=Diagnoses-Validate Dx Order 19=Diagnoses-Min and Max Number |
| CPT | Required | The CPT codes for which the code edit should fire (listed in the CPT field on the code edit definition). The column can contain * to indicate All, a comma-separated list of CPT codes, or a reference to a Code List in the codeeditaux.txt file. | All CPT codes: * A list of CPT codes: “99231,99232,99233” A 7 digit numeric reference to a code list: “1500701” |
| Rule | Not Required | Depending on the code edit type, this column can contain a variety of values. These values are usually related to the criteria for the code edit type. | Sample values include:Age range: “1Y,4Y”A code for Gender: 0=Male 1=FemaleTime frame and CPT code: “0,0,93925”Time frame and a 7 digit numeric reference to a code list in the codeeditaux.txt file: “0,0,1000303”A 7 digit numeric reference to one or more code lists in the codeeditaux.txt file: “1000501” “1000501,1000502”Internal IDs for places of service: 0=Other 1=Inpatient 2=Outpatient 3=OfficeDiagnosis code(s). When exporting, diagnosis codes show the ICD-9 code followed by the ICD-10 code, along with an indicator of the vocabulary (^I9 or ^I10): “428.0^I9,I50.9^I10”When importing, you can use the vocabulary indicators or not. If not specified, the system will assume the vocabulary based on the configured ICD-10 cut-over date: “428.0,428.1”Modifier: “AI”Minimum quantity and CPT code: “3,90461” |
| ExceptionValues | Required only for Headers-Included and Headers-Excluded code edits | Depending on the code edit type, this column can contain a variety of values. These values are usually additional information related to the criteria. | Code Edit Label for a Header-Included or Header-Excluded edit: “INJT”Alternative codes for a Patient-Age edit: “99468,99469”Modifier Exceptions for a CPT Comparison-Global Period edit: “24,24” |
| ExceptionTypes | Not Required | Depending on the code edit type, this column can contain a variety of values. These values are usually additional information related to the criteria. | Header values for a Header-Included or Header-Excluded edit: “Worker’s Comp”Modifier Exemption Types for a CPT Comparison-Global Period edit: “3,3” (see table in CPT Comparison - Global Period (Type 3)) |
| Insurance | Not Required | If the Visit-Financial Class criteria is used, the Financial Class is listed in this column. This is the Context for the Financial Class as defined in Admin > System Management > Reference Lists. | ”Medicare” |
| MessageRef | Required | A reference to the row in the codeditmsg.txt file that contains the text of the message that is displayed to the user. | A 5 digit numeric reference to a row in codeeditmsg.txt: “13353” |
| Forced | Not Required | An indicator of whether the Force User to Resolve Error flag is set on the code edit. If left blank during import, the Force User to Resolve Error flag is set to “false.” | true false |
| VisitSpecific | Not Required | An indicator of whether the Visits flag is set to “Trigger” on the code edit. This can only be set to true for CPT Comparison-Global Period code edits; it should be false for all other code edit types. If left blank during import, the Visits flag is set to “false,” which equates to “All” in the user interface. | true false |
| FormRef | Not Required | This column is obsolete and should be left blank. | |
| MeasureExternalID | Required only for PQRS/MIPS code edits | Used with PQRS/MIPS code edits only, this is the quality measure number. The required format is “PQRS_nnnn” where “nnnn” is the measure number. This column should be blank for all other code edit types. | ”PQRS_0003” |
| Silent | Not Required | This field has no function and should be set to false on import. This field will be removed in a future version. | true false |
| ExcludedCodes | Not Required | An indicator of whether the Excluded flag is set for the CPT codes on the code edit (indicating that the code edit applies to all CPT codes except those listed in the CPT field. If left blank during import, the Excluded flag is set to “false.” | true false |
| Name | Not Required | The Label for the code edit.During import, the contents of this column are imported as the Label for the code edit definition. If left blank, the contents of the ref column are imported as the Label.During export, the code edit’s Label is exported to this column. | ”Maternity Edit for Females Under 14” |
The Codeeditmsg_YYYYMMDDHHMM.txt File
Each row in this file contains the text for a unique code edit message, each of which has a reference number. The same message may be used by many different code edits.| Column Name | Required Column? | Description | Acceptable Values or Formats |
|---|---|---|---|
| ref | Required | The reference number for this code edit message. This reference number is used in the codeedit.txt file. | 5 digit number |
| Description | Required | The text of the code edit message that is displayed to the user. It may contain variables such as ^0 or ^1; the meaning of the variable depends on the code edit type. | Sample: “CPT ^0 is invalid because another E&M code ^1, was already entered for this patient on this day. Only one E&M code may be entered per day, unless modifier 25 is present on one of the codes.” |
The Codeeditaux_YYYYMMDDHHMM.txt File
Each row in this file contains a unique Code List, each of which has a reference number. The same code list may be used by many different code edits.| Column Name | Required Column? | Description | Acceptable Values or Formats |
|---|---|---|---|
| ref | Required | The reference number for this code list. This reference number is used in the codeedit.txt file. These values must be between 1000000 and 1499999 for Commure Pro Standard code edits, and between 1500000 and 2000000 for custom code edits. | 7 digit number |
| auxtype | Required | The type of code list. | 1=CPT 2=Modifier 3=Diagnosis 4=Department 5=Role 6=Financial Class 7=Commure Pro Visit Type |
| Array | Required | The entries in the code list, separated by commas. For CPT, Modifier, and Diagnosis lists, the entries should be the CPT, Modifier, or Diagnosis codes. For Department, Role, and Visit Type lists, the entries should be the Department, Role, or Visit Type names. For Financial Class lists, the entries should be the Context for the financial class, as defined in Admin > System Management > Reference Lists > Financial Class. | Sample CPT code list: “99221,99222,99223,99231” |
| Name | Not Required | The Name for the code list.During import, the contents of this column are imported as the Name for the code list. If left blank, the contents of the ref column are imported as the Name.During export, the code list’s Name is exported to this column. | The label can be either numeric or text.Samples: “1000307” “Eval and Mgmt CPTs” |
The Codeeditprefs_YYYYMMDDHHMM.txt File
This file contains information about code edits that use Trigger Role, View Role, Department, Billing Area, or Commure Pro Visit Type criteria. When a code edit uses any of these criteria, a row is added to this file for each Trigger Role, View Role, Department, Billing Area, and Commure Pro Visit Type, along with a reference number to the code edit that uses the criteria.| Column Name | Required Column? | Description | Acceptable Values or Formats |
|---|---|---|---|
| codeeditpreftype | Required | The type of preference. | 1=(obsolete, not used) 2=Department 3=Trigger Role 4=Commure Pro Visit Type 5=Billing Area 6=View Role |
| typeref | Required | The specific department, trigger role, Commure Pro visit type, billing area, or view role used in the code edit. Or the ref in the codeeditaux.txt for the code list that contains the departments, trigger roles, Commure Pro visit types, or view roles (you cannot create a code list for billing areas). | Sample department preference: Cardiology Or, if a code list is used: 7 digit number |
| CodeRef | Required | The ref in the codeedit.txt file for the code edit definition that uses this preference. | 5 digit number |
| web | Required | An indication of whether this preference should be applied to users on the web platform. | 0=Not applied on web platform 1=Applied on web platform |
| hh | Required | An indication of whether this preference should be applied to users on the handheld platform. | 0=Not applied on handheld platform 1=Applied on handheld platform |
| aux | Required | An indication of whether the departments, trigger roles, Commure Pro visit types, or view roles are itemized in a code list. | 0=A code list is not used 1=A code list is used |
Checking for Problems in Code Edit Definitions
At any time, you can use the Find Code Edit Problems tool to check for issues with your code edit definitions. You might use this diagnostic tool just prior to initial implementation, or any time that you modify or add new code edit definitions. When you initially import or create new code edit definitions, the application automatically checks for errors and duplicates. However, there are still a few issues that can occur. For example:- If you used an item such as a department, role, financial class, or code list in a code edit definition, and then later deleted that department/role/financial class/code list, the code edit definition would become invalid. The diagnostic tool reports these issues as “BAD DATA” errors. For this type of error, you won’t be able to view or edit the code edit definition in the Configure Code Edits option, because you will encounter the same “BAD DATA” error that was found by the diagnostic tool. To fix these issues, you should export the definition so that you can view its details (see Steps for Exporting Custom Code Edit Definitions), delete the invalid definition in the Configure Code Edits option (see Deleting Custom Code Edits), and then re-create the definition using valid items (see Creating New Custom Code Edits).
- You might have a code edit definition that contains five CPT codes, and another that contains those same five codes plus a sixth one. Since this is not technically a duplicate, the application would have allowed you to save both definitions. However, the diagnostic tool would highlight these two definitions as an “OVERLAP” issue, so that you could address it as necessary. In this example, you might delete the first definition, and keep only the second, more inclusive definition.
- If you have any legacy code edits that have the Silent flag checked and do not have a View Role defined, the diagnostic tool reports these issues as “UNSUPPORTED - ‘[code edit name]’ (id: nnnnn) is configured to be silent but does not have view roles.” Starting in version 9.2.0, the Silent flag no longer has any function and was replaced by role-based code edits (the Silent field will be removed in a future version). Any code edits using this flag should be reviewed, the Silent flag should be changed to unchecked, and the code edit should possibly be changed to use a View Role and/or Trigger Role. See Role-Based Code Edits for more information.
- The CPT Comparison - Duplicate custom code edit exists on every system starting in Commure Pro version 8.3.1. If an administrator accidentally deletes it, or creates a duplicate/overlapping version of it, the diagnostic tool would alert the administrator to that fact. To use the diagnostic tool, follow these steps:
- Select the Admin > Institution > Charge Capture > Code Edits > Configure Code Edits option.
- Click the Find Code Edit Problems link at the top of the screen. The application checks for code edit problems and then displays the Error Information dialog box. If no errors are found, the box displays a “No problems found” message. If problems are found, they are itemized in the dialog (for example: “BAD DATA - Addon203 - Unknown Financial Class, context: HMO” or DUPLICATE - 77612 is duplicated by Addon137”).
- Click OK to close the dialog box and then make corrections to your code edit definitions as necessary.
Revalidating Charges in the Holding Bin
The Revalidate Charges feature recalculates the error status of all of the charges that are currently in the Holding Bin (those that have a Holding Bin status), based on the current settings for code edits and code edit definitions. By default, when performing searches based on error status in the Charges > Holding Bin option, the filters retrieve charge transactions based on the error status of the charge transaction as of the last time it was saved. If you change some system settings, such as the Admin > Institution > Charge Capture > Check Validity of Service Date setting, or if you change the code edit definitions (such as implementing additional code edits, or deactivating others), some of the charges that previously had an error (a charge status of Code Edits or Date Warning), might now be calculated as having no errors (a charge status of None), or vice versa. However, a Holding Bin search by error status would still retrieve them using their old error status, unless you first ran the Revalidate Charges option. This option recalculates the error status of all charges in the Holding Bin, based on your new settings and code edit definitions. Searches performed after the Revalidate Charges option was used would retrieve charge transactions based on the newly calculated error statuses. Searches performed in the Charges > Search option would behave in a similar manner as described for the Holding Bin, before and after running the Revalidate Charges option. If you are in the process of implementing a new system, most likely you will not have to use this feature, as you will make all of your code edit changes prior to implementing the system, when there are not yet any charges in the Holding Bin. However, if you make changes to your code edit definitions after you have been using the system in production mode, then you may want to use this option. For example, if you implement code edit changes at the beginning of each new year, you would then run the Revalidate Charges option, so that the charges in the Holding Bin will be retrieved with the correct error status.- Select the Admin > Institution > Charge Capture > Code Edits > Revalidate Charges option. The Revalidate Charges dialog is displayed with the following cautionary message: “Selecting this option will re-execute all code edits against charges within the holding bin. Depending on the number of charges in the holding bin, system performance may be affected. We recommend you run this off-hours to minimize the effect on system performance. Press OK to continue. ”
- Click OK to revalidate the charges, or Close to exit without revalidating.