- Click the Admin tab.
- Click the Institution tab
Viewing the Institution Tab
The Institution tab consists of a toolbar, a workspace, and the Edit Settings drop-down list. Once you log in with Level 1 or 2 access, make sure that your Status is Complete, so that you can access all other areas of functionality. To check your status:- Log in to Commure Pro.
- Click the Admin tab.
- Click the Preferences tab to view the General Settings screen.
- Verify that the Complete/Incomplete Status is set to Complete. If it is, you can configure the system. If the Complete/Incomplete Status setting is Incomplete, you must save the user settings. To do so, click Save at the bottom of the screen. This updates the user status to Complete, and you can configure the system.
Reference Guide for Institution Settings
To configure settings for the institution, select the group of settings you want to configure from the Edit Settings drop-down list. The View Reports button is always accessible on the Institution tab, regardless of which settings you are viewing or configuring. For information on the types of reports you can generate from the Institution tab, see System Reports. The Export System Settings and Import System Settings buttons enable Level 0 and Level 1 administrators to export several types of data to an Excel file. You can import some of this data (system settings only) to another system. For more information, see Export and Import of System Settings.Status Summary
When you first log in to Commure Pro and click the Admin tab, the institution Status Summary screen appears. The Status Summary screen displays a summary of system information for a particular date range. You can click on any of the links to see a variety of reports, described below. You can also create the same reports using the View Reports button (see System Reports for more information).- Summary Date Range: Use this drop-down list to display information by date range. Once you change the date range, the page refreshes with the updated information.
- The Users section displays the number of unique active users who have logged into the system during the date range specified in the Summary Date Range field.
- Unique Active Users: This option displays the Usage Report (see Usage Report for more information).
- The Activity section displays the number of syncs, web sessions, and errors generated in all sessions during the date range specified in the Summary Date Range field.
- MobileWeb Sessions: This option has no function.
- Web Sessions: This option displays the Session Log for sessions of type: Web (see Session Logs for more information).
- Mark the check box to the left of the row or click [All] to select all sessions.
- Click Download Selected Logs.
Interface Activity
In the Edit Settings drop-down list, clicking Interface Activity displays the Interface Activity screen. Interface Activity allows administrative users to view an overview of the status of messages that have come through the interface for a specific timeframe. Detailed reports can also be run for specific message types, patients, or statuses to see more information, including the actual HL7 message.- Activity Overview: Provides information about all interface activity that has taken place in the past five days. Each instance type is identified for each day in this five-day range, and the report provides totals for all records from each instance that were processed, rejected, and ignored.
- View Messages: Displays a screen that lets you specify criteria for displaying system messages for a specific patient. Enter your search criteria and then click Submit Query.
- Select one of the following options in the Select the search Criteria drop-down menu, and enter the value in the field that displays underneath.
- Account Number
- Patient Identifier
- Patient First Name
- Patient Last Name
- To further refine your search, you can enter a having a status option from among the following:
- Any
- Ready
- Processing
- Rejected
- Processed
- Ignored
- Your query can also contain a timeframe by using either the within the last ‘n’ days or within the date/time fields, and you can select a value in the limited to field to limit the number of results.
Blank field values match any record. SQL-like rules apply, so % can be used as a wildcard for field matches.
- Advanced View Messages: Displays a screen that lets you specify more system message criteria with a combination of search fields, and allows searching for messages that are not specific to a patient. Enter your search criteria and then click Submit Query.
 This screen has all the search fields of View Messages with these additional fields:
- Message Type: Select from message types such as A01, A05, A08, O01, O17, P03, and R01. If a particular message type is not present in the list, click the Refresh Message and Data Instances button to clear the existing database cache and run a query to update the Message Types database list.
- Data Instance: Select from the data instances. Your selections may vary depending on your configuration and preferences. If a particular data instance is not present in the list, click the Refresh Message and Data Instances button to clear the existing database cache and run a query to update the Data Instance database list.
- Message Text: Enter a text string to search for.
- Message Arrival Date: Enter a date to search for.
Due to the complexity of this screen, the performance is not as optimal as the View Messages screen is. Message query results are limited to 1,000 rows. If this limit is exceeded, the “limited to” field is automatically reset to 20 when a user selects the Submit Query button.
Exporting Message Query Results
After the query results are displayed, you can export the results to a .zip file that contains a CSV file. The CSV file includes the following message details:- Account Number
- Patient Identifier
- Message Arrival Date
- Patient First Name
- Patient Last Name
- Message Type
- Message Instance
- Message Status ID
- Status
- Message Status Date
- Message ID
- Processing Time (ms)
- Reason of Failure
- Message Text
If the number of query results requires more than one page to display all results on-screen, all of those results are exported to the CSV file. So results may have different rows than those displayed on-screen.
- With query results displayed, click the Export Results button.
- After you have confirmed that the file was downloaded successfully, click OK to close the message window.
- Extract the .zip file to view the CSV file. By default, the CSV file is named ViewMessagesExport.csv. You may want to rename the file to give it a unique name so it is not overwritten the next time a Messages Export CSV file is extracted.
Site Administration Settings
For Level 0 users who are site administrators (typically Commure Pro support personnel), there is a preference setting screen on the Institution tab, available from the Edit Settings drop-down list, called Site Administration. This function allows a site administrator to enable or disable various functions of the Commure Pro system, to manage password requirements, and to manage the appearance of the web login screen.System Name (displayed on login page)
(Web, Android, Apple) The system/environment name that is displayed on the login screen can be changed to suit your organization’s needs. On the web application, the system/environment name is located just below the Username and Password fields, while on Apple devices it is displayed in the Host field, and on Android devices it is displayed at just above the Commure Pro logo on the Login screen. For example, you might want to display a combination of your organization’s name and the system environment, such as General Hospital - Production System, or General Hospital - Training System. Simply ask your Commure Pro representative to enter the label that you want to use in this field.Data View Type
(Web) Determines which version of the user interface is available to users when they log in to the system.- Classic: Select this option if you want to restrict all users to the Classic view. This view will be familiar to any users who have used previous versions of Commure Pro software, with the patient list displaying on the left and with tabs laid out horizontally at the top of the screen for viewing any other functionality that the user has permission to access.
- Revenue Reports and EPCS Config: Select this option if you want to restrict all users to the Revenue Reports view. This view is a new layout that is defined by Dashboards and Reports that customers can configure and customize in a variety of ways. Note that this view is currently supported for use only by Charge Capture customers and customers using ePrescribing (restricted to EPCS administrators only).
- Both: Select this option if you want the ability to configure some users to have one view, and other users to have another view. If you choose this option, then a corresponding Data View Type setting becomes available at the user level, so that you can configure each user for the view that you wish them to have. For example:
- Charge Capture clients might configure providers to use the Classic view, and billing administrators to use the Revenue Reports view.
- Advanced Clinical Results clients using EPCS might configure the majority of their users to use the Classic view, and EPCS administrators to use the Revenue Reports view (since that it the only view where certain EPCS settings can be configured).
Login Page Upper Custom Message Frame Height
(Web) You can create a message that is displayed directly above the login area on the web login screen. For example, you might display information about scheduled system downtimes, who to contact for support issues, or general information about your organization. This field determines the height of the message window. Commure Pro recommends 75, ask your Commure Pro representative to modify this value. They may need to clear the web cache for the size change to take effect (see Clear Web & Session Caches). See Customizing the Information Displayed on the Web Login Screen for instructions on how to create the actual text of the message.Login Page Lower Custom Message Frame Height
(Web) Similar to the previous field, this field determines the height of the message area for a custom message that you can create to appear below the login area. The default value of this field is 75, which is the recommended value for displaying a single line of text. See Customizing the Information Displayed on the Web Login Screen for instructions on how to create the actual text of the message.Portal Timeout (minutes)
(Web) This field determines the length of inactivity allowed, in minutes, before users are automatically logged out of the portal. The default value for this setting is 20 minutes, with acceptable values ranging between 1-720 minutes. As an institution-level setting, this controls the timeout period for all users. An additional setting is available at the user-level for those users who require a shorter or longer timeout range. See General Settings for information on individual user timeout settings.Changes to this setting take effect the next time users login.
When the portal timeout is reached due to inactivity, the Session Timed Out window is displayed and users must login again if they do not respond to the prompt.
Hide from Active Order List after “n” Hours (For Flagged Order Definitions)
(Web, Android, Apple) Specifies the duration that active Order Definitions remain on the Active Orders List. When their activity period expires, Order Definitions that are set to become automatically hidden are added to the Inactive Orders list. For more information about automatically hiding Order Definitions, see the Auto-hide from Active Order List setting.This setting displays only when the CPOE application is enabled (using the Site Administration setting).
Recipients for CPOE Critical Alert Notifications
(Web) Specifies the e-mail address(es) of people to notify when no recipients have been specified for the following location preferences:- Recipients for CPOE Configuration Error Alerts,
- Recipients for Print Alerts
- Recipients for Interface Alerts
- Recipients for File Server Alerts
This setting displays only when the CPOE application is enabled (using the Site Administration setting).
Recipients for Charge Capture Routing Alert Notifications
(Web) For clients that have implemented Charge Routing (routing of charges to an external system by defining Destination Groups, Destinations, and Route Actions), this setting specifies the e-mail address(es) of people to notify when any charges within a transaction are found to not have a Destination based on the Route Action settings. See Configuring Charge Routing to External Systems for more information.Remote Help Server
(Web, Android, Apple) This setting determines from which of Commure Pro’s remote help servers help is retrieved.- Test (the default): This is Commure Pro’s remote test help server; select this option for client test environments. Depending on the organization’s security policy, you may need to make an exception to the firewall to allow access to the following URL: https://test-help.commure.com
- Production: This is Commure Pro’s remote production help server; select this option for client production environments. Depending on the organization’s security policy, you may need to make an exception to the firewall to allow access to the following URL: https://help.commure.com
- Other: Allows the entry of a different remote help server (specified in the next setting). Client systems should not use this option; it is used by Commure Pro staff for testing purposes.
Help Server URL
(Web, Android, Apple) If you selected “Other” for the Remote Help Server setting, specify the URL of the remote server here.Filters Sticky by Modules
(Web) Determines how the configuration of date filters will be retained and applied across the various Commure Pro modules. When this preference is set to:- No: Configuration of date filters in one module is applied globally across all of the Commure Pro modules. For example, if a clinician sets the date filter to 72 hours in the Vitals application, this date filter setting is retained when the clinician navigates to other modules within the portal. This is the system default configuration.
- Yes: Configuration of date filters in one module remains ‘local’ to this module instead of being applied globally across the other modules. For example, a clinician might want the Vitals date filter to 72 hours as described above, but want the date filter for I/Os to be 24 hours. When the clinician navigates between modules, the date filter setting is retained within each module. When the clinician returns to the Vitals date filter, this setting remains set at 72 hours.
When this is set to Yes, then the Vitals option Display at most N full day(s) is hidden. Setting Filters Sticky by Modules to No displays the option.
Respect EMR eSign Privileges (Meditech)
Controls whether to verify Commure Pro signing privileges against Meditech privileges.- If set to No, Commure Pro preferences are respected (default value).
- If set to Yes, the system checks the facility preferences as follows:
- R for Reports – eSignature for documents (scanned/transcribed “notes” in eSignature) and write sign note in NoteWriter. Controls signing of any document not classified as an order in the Inbox (such as scanned/transcribed “notes” grouping) and signing of notes in the NoteWriter module.
- O for Orders – eSignature is permitted for the orders “grouping.” Controls any order incoming to the Inbox, but not writing orders in the CPOE module, which is controlled by a different CPOE privilege.
- B for Both – eSignature (Orders) and write note (NoteWriter)/eSignature (Notes – eSignature is permitted for the orders “grouping,” scanned/transcribed documents, and notes. NoteWriter permits sign of notes.) Allows both orders, documents, and notes to be signed in Inbox and notes to be signed in the NoteWriter module.
- N or empty means the provider does not have permissions to do the activity specified.
Bulk User Edit
(Web) This field enables or disables the Bulk User Edit function on the web application. When enabled, the Bulk User Edit tab appears as a sub-tab below the Admin tab (the default setting). An administrator can use the Bulk User Edit tab to set preferences for several users at once, without having to edit each user’s profile individually on the User tab. Once enabled here, this function can then be enabled/disabled per user via the following setting: Admin - User - User Permissions - Level 0/1: Can Use Bulk User EditProvider Directory
(Web, Android, Apple) This field enables or disables the Provider Directory option system-wide. The Provider Directory allows users to look up contact information for providers related to the organization, or within the geographic area. Once enabled here, it is enabled for all web users. However, it can be enabled/disabled per user on the handheld platform via the following setting: Admin - User - Device - Active Handheld ModulesCharge Capture
(Web) This field enables or disables charge capture functions for all users on the web platform. Charge capture functions include the entry and management of charge data. Once enabled here, charge capture functions can be enabled/disabled per user via the following setting: Admin - User - Charge Capture - Allow User to Add/Edit Charges on the WebTo enable this module on the handheld platform, see Manage Handheld Modules [Edit].
Outpatient Visits
(Web) This setting determines whether the Schedule tab and the Worklist tab are available on the web application. The Schedule tab displays visit information for visits with a scheduled date (as opposed to an admission date). Users can see visits that were entered directly in the Commure Pro system, as well as those from non-Commure Pro systems. Once enabled here, the Schedule tab can be enabled/disabled per user via the following setting: Admin - User - Patient List - Scheduling Access The Worklist tab is a secondary tab located under the Charges main tab. It is available only in Desktop Charge Capture systems. Once enabled here, it can be enabled/disabled per user via the following setting: Admin - User - Charge Capture - Set Charge Desktop View Access Allergies, Clinical Notes, Lab Results, Medications, Problem List, Test Results, Vitals, I/Os, and Orders (Web) These fields enable or disable the clinical modules of the same names on the web platform. Each of these clinical modules includes displays of patient clinical data. Once enabled here, these modules can be enabled/disabled per user via the following setting: Admin - User - Patient List - Can View Clinical Results (Web Only)To enable this module on the handheld platform, see Manage Handheld Modules [Edit].
CPOE Medications
(Web) This setting should be enabled for sites with Commure Pro CPOE™. When enabled, the Medication Orders window in the patient data display area appears the same way that the Orders window appears when the Medication order type is selected. When CPOE Medications is enabled, additional columns are included in the display area and the format of the description is consistent between both the Medications and Orders modules with the exception of the Drug Class filter which is specific to the Medications module and displays Tier 1 and Tier 4 drug classes. To revert to the previous Medication Orders window display (a view that does not match the Orders window when the Medication order types is selected), enable the Medications setting. (You are prevented from enabling both simultaneously, so enabling Medications automatically disables the CPOE Medications setting).Patient Assignment
(Web) This setting determines whether the ability to re-assign patients to other providers and/or services is available on the Patient Search, Schedule, and Sign-Out Summary tabs of the web application. Once enabled here, this function can be enabled/disabled per user via the following setting: Admin - User - Patient List - Allow Patient AssignmentPatient List
(Web) This setting determines whether the Patient List module is enabled on the web platform. The Patient List module allows a user to view a list of those patients with whom they have an active relationship. When enabled for an institution, this function can then be enabled/disabled per user via the following setting: Admin - User - Patient List - Patient List is Accessible on WebTo enable this module on the handheld platform, see Manage Handheld Modules [Edit].
Patient Summary
(Web) This field determines whether the Patient Summary module is enabled on the web platform. The Patient Summary module includes displays of new unviewed clinical results data. Once enabled here, this function can be enabled/disabled per user via the following setting: Admin - User - Patient List - Patient Summary is Accessible on WebTo enable this module on the handheld platform, see Manage Handheld Modules [Edit].
Patient Registration
(Web) This setting determines whether the functions surrounding manual registration are enabled on the web application. Although the manual registration functions are disabled by default, they can be enabled in any of the configurations listed below. If you plan to use manual registration in either of the two direct integrations, contact your Commure Pro representative.- Commure Pro with Commure Pro Repository™
- Direct Integration to MEDITECH® with Downtime Solution
- Direct Integration to Cerner™ with Downtime Solution
In the direct integration configurations, all manually registered patient and visit data are stored in the Commure Pro system only, and are not sent back to the source system.
Patient/Visit Search
(Web) This setting determines whether the Patient Search tab is enabled on the web application. The Patient Search tab allows users to search for and view information about patients that are not on their patient list. When enabled at the institution level (the default), this function can then be enabled/disabled per user via the following setting: Admin - User - Patient List - Allow Patient/Visit SearchMAR Medication Data
(Web, Android, Apple) This setting determines whether Medication Administration Record (MAR) information is available system-wide on both the handheld and web platforms. When enabled, the MAR data associated with medication orders from the source system is visible as an additional display option in the medication module (for all users who have access to that module).Forms
(Web) This setting enables or disables the Forms module system-wide. The Forms module includes options for entering and managing customizable form data. Once enabled here, this function can be enabled/disabled per user (via the User tab, Forms settings).Sign-Out
(Web) This setting enables or disables the Sign-Out module system-wide. The Sign-Out module includes options for entering and managing sign-out form and task data. Once enabled here, this function can be enabled/disabled per user (via the User tab, Sign-Out settings).To enable this module on the handheld platform, see Manage Handheld Modules [Edit].
Vitals Capture
This setting has no function and should be set as “No.”NoteWriter
(Web) This setting enables or disables the NoteWriter module system-wide. The NoteWriter module is an integrated document template application that enables health care providers to create and maintain clinical documentation electronically. There are also tracking and reporting options available on the web platform. Once enabled here, this function can be enabled/disabled per user (via the User tab, NoteWriter settings).CPOE
(Web) This setting enables or disables the CPOE module system-wide. The CPOE module is an integrated order entry application that enables health care providers to enter and track patient orders electronically on the web platform. Once enabled here, this function can be enabled/disabled per user (via the User tab, CPOE settings).To enable this module on the handheld platform, see Manage Handheld Modules [Edit].
Home Medications
(Web) This setting enables or disables the Home Medication display option on the web platform. As home medications are typically entered as part of Medication Reconciliation, you must enable the Medication Reconciliation application in order to reconcile a patient’s home medications.Medication Reconciliation
(Web) This setting enables or disables the display of the Medication Reconciliation functionality within the Home Medications pane. You must enable the Home Medications setting (described above) in order to view the link that provides access to this pane. A user’s ability to access the individual types of medication reconciliation is determined by individual CPOE user preferences. ePrescribing (Web) This setting enables or disables ePrescribing functionality system-wide. Once enabled, additional configuration is required.CPOE Facility Groups
(Web) This setting determines whether administrators are given the option to select from multiple Facility Groups. Weight Based DosingHIE
(Web) This setting enables or disables the Health Information Exchange (HIE) option system-wide. The HIE option allows health care providers to view the source(s) from which their patients’ clinical data are derived. Once enabled here, additional HIE features can be enabled/disabled per user (via the User tab, HIE settings; see HIE Settings). These additional settings are enabled by default. Your system administrator should also configure the Source reference list (see Source Reference List).Enable Emergency Access
(Web) This setting enables the system to allow administrators to give Clinical Emergency Access or Admin Emergency Access to a user when needed. See User Permissions for more information on these user settings.Enable SDF Integration
(Web) This setting provides support for processing various events related to charge activities. Updating a charge header’s Recent short list, or moving expired drafts from the Holding Bin to the Outbox are two examples of an event being processed. Customers upgrading to Commure Pro version 9.2.0.2.20 or later must enable this setting in order use Charge Capture in either Classic or Revenue Reports mode. In addition, your Commure Pro representative must make several PKConfiguration file changes.Enable Commure Pro Messaging
(Web, Android, Apple) This setting enables or disables the Commure Pro Messaging module system wide. The Commure Pro Messaging module allows users of the Commure Pro system to send text messages to each other. The text messages can include images and patient links. Once enabled here, this function can then be enabled/disabled per user via the following setting: Admin - User - General - Enable Commure Pro MessagingEnable Federated Messaging
(Web, Android, Apple) This setting is only available when Commure Pro Messaging is enabled for the site. It controls if Commure Pro Messaging users can exchange messages with providers that are using another messaging client. For example, Commure Pro Messaging is one messaging client, and users with Commure Pro Messaging enabled can communicate with each other, but only with each other. Federated Messaging lets Commure Pro Messaging users communicate with each other and with users on a messaging client that is different from Commure Pro Messaging. Before enabling Federated Messaging, contact your Commure Pro support representative to ensure you have all of the required details needed for configuring this functionality.- Disabled: (the default) Commure Pro Messaging users can only communicate with other Commure Pro Messaging users.
- Enabled: Commure Pro Messaging users can communicate with Commure Pro Messaging users, as well as providers using other supported messaging clients who are in the same facility (or facilities) as the Commure Pro Messaging user.
This functionality requires that Commure Pro Messaging users be in a Department that is in a Facility that is registered in Directory Services.
Commure Pro Messaging Server URL
(Web, Android, Apple) This setting determines the URL of the Commure Pro Messaging server. In cases where the organization has only one Commure Pro application server, the Commure Pro Messaging traffic will be handled by that one server and this setting can be left blank (the default value). In cases where the organization has more than one application server, this setting should contain the URL of the server that has been configured to handle the Commure Pro Messaging traffic. Please consult your Commure Pro representative before entering or changing the value for this setting.Allscripts MDC Handheld Integration
(Apple) This setting enables or disables system-wide the ability to access the Allscripts® OneContent™ Mobile Deficiency Completion (MDC) Apple application, directly from the Commure Pro Apple application. Once enabled here, the URL of the host server that enables this access must also be configured, via the departmental setting below: Admin - Department - General - Allscripts MDC Handheld Host URL This function can then be enabled/disabled per user via the following setting: Admin - User - Device - Allow Access to Allscripts MDC Handheld DeficienciesAirStrip ONE Handheld Integration
(Apple) The feature associated with this setting is currently in BETA testing. This setting enables or disables system-wide the ability to access a third party patient monitoring application, directly from the Commure Pro Apple application, using AirStrip ONE® technology. Once enabled here, this function can then be enabled/disabled per user via the following setting: Admin - User - Device - Allow Access to AirStrip ONE HandheldPatient Photos
(Web, Android, Apple) This setting controls whether the Patient Photos module is enabled system-wide and also whether its associated administration settings are available to users. This setting is Disabled by default, which means that Patient Photo functionality and settings are not available for any users. When this setting is Enabled, photo functionality is available for users on the desktop and mobile platforms. When Patient Photos is enabled, the following administrative settings become available to control photo purge and user access:- Manage the amount of photos that accumulate by purging photos after a specified number of days. Admin - Institution - Patient List - Purge Patient Photos after N Days-
- Control user permissions and access to patient photo functionality. These settings control users ability to register patients with a photo, take photos for existing patients, as well as view, edit, and delete photos. Admin - User - Patient Photos - Allow Taking Photos for an Existing Patient Admin - User - Patient Photos - Patient Photo View Permission Admin - User - Patient Photos - Patient Photo Edit/Delete Permissions
Default Options-New Results/Patient Summary Defaults
(Web) This setting allows administrators to set the default preferences for clinical information categories that a new user will see in either the New Results display option or the Patient Summary tab. When new users first log into the system, they will only see new clinical information (Allergies, Clinical Notes, Medication, Problems, Test Results, or Lab Panels) enabled by the administrator in this setting. Users will be able to change these settings using the Options button in either the New Results display option or the Patient Summary tab if they want different information to display.Number of Elements retrieved for “Load More” (Portal)
(Web, Android, Apple) For the Clinical Notes and Lab Results display options on the Physician Portal, and also for the Patient Photos module on Android and Apple devices, only the most recent notes, lab results, and photos are displayed for the selected patient. This setting defines the number of elements (notes, lab results, or photos) that are initially displayed. The default number of elements is 100 and you can specify between 25-250 elements to be retrieved at a time. When more notes, lab results, or photos exist than are configured for display, the user can load more data. When additional data is loaded, it is displayed based on this setting. For example, if 400 lab results are available for a selected patient, the most recent 100 are initially displayed. Then, each time the user clicks the Load More Data button, the next 100 results are loaded, until all 400 are displayed.Simulated Portal “Load More” Delay (QA Only)
This delay setting can be used to simulate long fetch times when retrieving Notes/Labs after the Load More Data button is clicked. This setting is used only by Commure Pro staff for testing purposes and should not be used without consulting your Commure Pro representative.Password Rules
(Web, Android, Apple) By default, passwords for the Commure Pro system must be at least three characters long, with no other formatting requirements. However, consult your Commure Pro representative to implement any of the following password requirements. Once you establish your password rules, you can communicate these rules to your users by configuring the related setting Password Help Text.Minimum Password Length
(Web, Android, Apple) Use this setting to require that the password have a minimum length of between 3 and 20 characters. The default value for this setting is 8.Passwords Must Include at Least One Number and One Letter
(Web, Android, Apple) Use this setting to require that the password have at least one number and one letter. By default, this option is set to Yes.Passwords Must Be Mixed-Case
(Web, Android, Apple) Use this setting to require that the password have both uppercase and lowercase letters.Passwords Can Include Special Characters
Passwords can include any of the following special characters: ~!@#$%^&\*()\_-+={[}]|\:;"'<,>`.?/
Force Password Change Upon Initial Login (portal only)
(Web) Use this setting to require users to create a custom password when they log into the portal for the first time.If this setting is configured to force a password change at initial login, the password change screen will display for any newly-created users, as well as any users whose passwords have not been reset a minimum of one time.
Force Password Change after “n” Days
(Web, Android, Apple) Use this setting to require users to create a new custom password after a configurable number of days (within the range of 1 to 365 days). Select Yes to require password changes.Number of Days Until Forced Password Change
(Web, Android, Apple) If the previous setting is set to Yes, enter a value to specify the number of days after which passwords should be changed (within the range of 1 to 365 days). The default value is 30 days. After the specified number of days, the password change screen will display for all users whose passwords have not been reset a minimum of one time. This includes any newly-created users. Once passwords are reset for a user, then the password change screen displays after the specified number of days. Also note that the pkadmin user is never forced to change passwords.Password Help Text
Specifies the message informing users about rules to follow when they create their password from the Password user preference (Admin > User > Edit Settings [General]). Administrators (level 0 and 1) can define a custom message (200 character limit) using both alpha numeric and special characters. In addition to displaying next to Password, this custom message is also included on any screen involving creation of users (Admin > User > Create User) or when copying preferences to a new user (Admin > User > General > Copy Preferences to Another User > New User).Allow Queuing Print Jobs to Printer Regardless of Printer State
Use this setting to configure how CPOE routing responds to printer problems (see also Configuring How Routing Responds to Printer Problems for more information):- Yes: To ignore when printers report an unavailable state and send Route Actions to the printer queue, relying on the site’s monitoring infrastructure to identify and respond to printer problems.
- No: To re-direct Route Actions for re-processing when printers report an unavailable state and report the specific printer problem on the Submission Record Details window (Admin > Tracking / Reporting > Submission Status tab > [select from Submitted column]).
Temporarily Disable System Access
Level 0 administrators and selected level 1 administrators (if granted access through user preference) can disable all Commure Pro applications with a single setting and prevent users from accessing these applications during maintenance window periods, such as during upgrades or validation testing. When all applications are disabled, users are prevented from logging into the application unless they are exempt from this restriction (instructions for exempting users is provided below). Instead, users with restricted access see the message “Access to the system is temporarily disabled. Please try again later. Contact your administrator for more details.” See Restricting Access to the System During Maintenance for detailed instructions. Additional configuration options let administrators disable the CPOE and/or Medication Reconciliation options individually. For more information, see Settings for Disabling System Access.Entire System (Portal and Handheld Syncs)
(Web, Android, Apple) Use this setting to disable the entire Commure Pro system, including all functionality for both the portal and mobile applications.Bypass List for Entire system
(Web, Android, Apple) Use this setting to exempt a group of users (defined by administrative access level) from the access restrictions that are enforced to prevent users from accessing the Commure Pro applications during maintenance, such as during upgrades or validation testing.Custom Message
(Web, Android, Apple) Use this setting to customize the message that displays to users when the system is temporarily disabled. When this field is left blank, users see the following default message during system maintenance. “Login Failed: Access to the system is temporarily disabled. Please try again later. Contact your administrator for more details.”Admin Tab (on the Portal)
(Web) Use this setting to disable the Admin tab on the Physician Portal. The primary reason for restricting access to this tab is to minimize administrative access during the schema upgrade portion of no-downtime upgrades. You can define a list of users who are exempt from this restriction using the associated setting Bypass List for Admin Tab), Of note, the “pkadmin” user always has access to the Admin tab, even if not listed on the Bypass List for Admin Tab.Bypass List for Admin Tab
Use this setting to exempt selected users (defined by administrative access level) from access restrictions that block users from accessing the Admin tab during maintenance, such as during upgrades or validation testing. You should be as selective as possible when exempting administrators from this restriction to ensure that administrative tools are not used during the schema upgrade process. The “pkadmin” user always has access to the Admin tab and does not need to be explicitly included on the bypass list.Drain Sessions on THIS mobilizer
In clustered environments employing a load balancer to distribute user web session load among all available mobilizer servers, authorized (level 0) administrators can use this setting to drain a single mobilizer of active web sessions during no-downtime upgrades. When you enable this setting for a single server in a clustered configuration, the server immediately stops accepting new sessions from the load balancer and you can monitor active web sessions to determine when all current sessions are completed so that you can proceed with the upgrade.Active Web Sessions on THIS Mobilizer
Displays the number of web sessions that are currently active. When you drain a mobilizer of active web sessions as part of upgrade, you can monitor web sessions directly from the Site Administration pane instead of having to navigate to the Tracking/Reporting tab. Note that the number reported as active includes your own login session, so you can proceed when this total is reduced to 1 active session.Active HH Sessions on THIS Mobilizer:
Displays the number of handheld sessions that are currently active. When you drain a mobilizer of active handheld sessions as part of upgrade, you can monitor these sessions directly from the Site Administration pane instead of having to navigate to the Tracking/Reporting tab.Commure Pro Speech Server URL
This setting is for a future enhancement and should not be used.Download Commure Pro Messages
This setting allows you to download a report of Commure Pro Messaging activity that occurred over the past 30 days. This file is saved to your Downloads folder, and includes the following details:- Date: Date and time a message was sent.
- Message: Text included in the message.
- Patient: Patient ID, MRN, and, if a patient link was sent, their first name and last name.
- Sender: Username, first name, and last name of the user who sent the message.
- Sender PAT Access Level: PAT Access Level of the user who sent the message.
- Recipient: Username, first name, and last name of the user who received the message, or the name of the group that received the message (if the group does not have a name this will be blank).
- Recipient PAT Access Level: PAT Access Level of the user who received the message (blank if it’s a group message).
- Click the Download Commure Pro Messages button.
Downloading this file may take a moment as messages are retrieved in batches until all from the past 30 days are compiled.
- Follow your browser’s instructions to open or save the file.
Write PK_LOG entries to file
Determines whether the system writes monitoring data to the database or to a file that can be retrieved and processed by the Argus monitoring software. Writing the monitoring data to a file improves overall performance by reducing the IO cost associated with writing this data to the database. The configuration options are:- Yes—The system writes the data to a file to be retrieved by the Argus monitoring software. The system generates a new compressed zip file at 30-minute intervals so that Argus can retrieve these files and delete them from the server when processing of the file is complete.
- No—The system writes Argus monitoring data to the database where this data is stored in the pk_log table.
Authentication Settings
Commure Pro has added new authorization capabilities to decrease security exposures for Commure Pro and our clients, to comply with current user federation models, and to simplify the ability to integrate with third party tool sets. Clients can choose to use SAML, OAuth, or neither. If you choose SAML or OAuth as your authentication method, you should also complete the additional fields that correspond to that choice.To work with these settings, you must have basic knowledge of these authentication and authorization methods and configurations.
Portal Authentication
Backend Authentication
Select the type of backend authentication that you wish to use for portal users. Your choices are:- Basic/Multi-Authentication: This option is for systems that have multiple repositories against which a user could possibly be authenticated, and in which case multi-authentication is enabled in the pkConfiguration file, including these system configurations and authentication protocols:
- Direct Integration to MEDITECH with Downtime Solution, using multi-authentication (MEDITECH Downtime, LDAP, AD, or other)
- Direct Integration to Cerner with Downtime Solution, using multi-authentication (Cerner Downtime, LDAP, AD, or other)
- Commure Pro with Commure Pro Repository, using multi-authentication (LDAP, AD, or other)
- SAML: SAML processing only occurs when the Backend Authentication setting is set to SAML. Security Assertion Markup Language (SAML) is an open standard for exchanging authentication and authorization data between parties, such as between an identity provider and a service provider. It is an XML-based markup language for security statements that service providers use to make access-control decisions.
Login Failed: User is not allowed to login to this URL. Use Basic Authentication URL. The following messages are displayed for unsuccessful logins:
- For an unsuccessful login when there is an IDP user, but no corresponding Commure Pro user:
Login Failed: [USERNAME] user has not been set up properly. Please contact a system administrator for more details. - For an unsuccessful login when there is an IDP user, but the corresponding Commure Pro user is a Basic Authentication user:
Login Failed: [USERNAME] is not allowed to login to this URL. Please contact a system administrator for the Basic Authentication URL. For an unsuccessful login when there is an IDP user, but the corresponding Commure Pro MultiAuth user has exceeded the maximum number of login attempts:
Login Failed: [USERNAME] user has been locked out. Please contact a system administrator to unlock this account.SAML Audience
SAML URL
The URL provided by the Identity Provider (IDP) setup for Commure Pro to navigate the user for IdP authentication.SAML Logout URL
The URL to navigate to at logout.Use SAML Request Parameter in Call to IDP
Specifies if the service provider (Commure Pro) sends a SAML request parameter in the call to the identity provider. Microsoft Azure SAML integrations require that the service provider send it (select Yes). Ping Identity SAML integrations do not require this.SAML Reply URL
This is commonly referred to as the Assertion Consumer Service URL. The identity provider sends the SAML response to this URL location at the service provider (Commure Pro). Microsoft Azure SAML integrations require this be provided. Ping Identity SAML integrations do not require this.SAML Certificate
The decrypted public string of the Certificate used by the IDP.Test SAML Configuration
This button test whether the URL and Certificate are valid. If the configuration is not valid, a popup displays:Information- SAML Certificate is invalid.
Handheld Authentication
Backend Authentication
Select the type of backend authentication that you wish to use for handheld users. Your choices are:- Basic/Multi Authentication: This option is for systems that have multiple repositories against which a user could possibly be authenticated, and in which case multi-authentication is enabled in the pkConfiguration file, including these system configurations and authentication protocols:
- Direct Integration to MEDITECH with Downtime Solution, using multi-authentication (MEDITECH Downtime, LDAP, AD, or other)
- Direct Integration to Cerner with Downtime Solution, using multi-authentication (Cerner Downtime, LDAP, AD, or other)
- Commure Pro with Commure Pro Repository, using multi-authentication (LDAP, AD, or other)
- OAuth: OAuth processing only occurs when the Backend Authentication setting is set to OAuth. OAuth, which stands for “Open Authorization,” is an open-standard authorization protocol or framework that describes how unrelated servers and services can safely allow authenticated access to their assets with out actually sharing the initial, related, single logon credential. This is known as secure third-party, useragent delegated authorization. In the OAuth environment, access tokens are issued to a Commure Pro user’s mobile device by an authorization server. The token is used during the OAuth process to grant users access to the Commure Pro application. An OAuth user name must be the same name configured the IdP as it is in Commure Pro.
OAuth URL
Enter the URL provided by the Identity Provider (IdP) that is integrated with Commure Pro. This is the address of the authorization server that validates a user name and issues an access token for that user. During the authorization process, the token is passed to the user’s handheld device and is then used to grant access to the Commure Pro application.OAuth Client ID
Enter the Identity Provider’s client ID for the Commure Pro application.OAuth Redirect URL
Enter the Commure Pro URL where you want the user to be redirected, after successful authorization.Device Settings
The Device Settings screen lets you set the default behavior for handheld devices within the organization. In addition to the settings described below, each organization can also determine the maximum number of concurrent synchronizations or web sessions that are allowed at any given time. The default limits are 8 synchronizations and 400 web sessions. If you would like to set different limits, simply tell your Commure Pro representative the limits you want to set for each, and they will make the necessary changes to the pkConfiguration file. When the limit is met, the user who is attempting to sync their device or log onto the web application receives a configurable message, such as “Server busy - please try again in 30 seconds.” A notification is also sent to monitoring. To display the Device Settings screen, select Device from the Edit Settings drop-down list. You can now configure the following settings:Require Login after Handheld Timeout
(Android, Apple) This setting determines whether the device will time out after inactivity.- Yes: Select Yes to implement a timeout after inactivity, and also enter a value between 1 and 1440 in the Require Login after ‘n’ minutes of Inactivity setting. The value defines the number of minutes of inactivity that must pass before the timeout takes effect. After timing out, handheld devices always require the user to log in (by entering their password or using biometric authentication), before granting access to the Commure Pro application.
On Apple devices, please note that after switching to a different application and then returning to the Commure Pro application, the user may be required to log in again, even if the timeout has not yet taken effect. This is due to the fact that when a user switches from the Commure Pro application to a different one, iOS puts the Commure Pro application into a suspended state. While in a suspended state, the timeout process behaves exactly as you would expect: if the user returns to Commure Pro before the timeout takes effect, they do not have to log in, and if they return after the timeout takes effect, they do have to log in. However, iOS can terminate a suspended application without warning if it needs to free up resources. If it terminates the Commure Pro application in this manner, then when the user returns to it, they will be required to log in again, even if the timeout has not yet taken effect.
- No: Select No if you do not want to implement a timeout for handheld devices (the Require Login after ‘n’ minutes of Inactivity setting is ignored).
Require Login after ‘n’ minutes of Inactivity
(Android, Apple) The default value for this setting is 20 minutes. This setting is dependent on the Require Login after Handheld Timeout setting:- If Require Login after Handheld Timeout is set to Yes, then this option determines the duration, between 1 and 1440 minutes, before the Commure Pro application times out because of inactivity.
- If Require Login after Handheld Timeout is set to No, then this setting is ignored, and handheld devices never time out.
To implement a timeout for web users, see Portal Timeout (minutes).
Lock User after ‘n’ Login Attempts on Handheld
(Android, Apple) This setting determines the number of incorrect login attempts via password, between 1 and 10, that a user can make before the Commure Pro application is disabled on their handheld device. The default setting is 5.- When the device is not connected to the server, if a user enters an incorrect password the number of times defined here (and stored on the device), the device becomes locked.
- When the device is connected to the server, this setting has no effect, and the Disable Access after ‘n’ Login Attempts to the Server via the Device setting is used instead.
This setting does not apply to login attempts via biometrics; invalid login attempts due to an unrecognized fingerprint or facial image will not lock the user out. See Allow HH users to login using Biometrics.
Handheld Authentication Type
(Android, Apple) This setting determines the type of authentication that is allowed when users log into the Commure Pro handheld application. Based on this setting, users are allowed to enter the following on the Login screen: only a Password, or either a Password or a numeric PIN (Personal Identification Number). If a user’s password is a complex one that contains a combination of alpha, numeric, or special characters, they might find it easier to use a numeric-only PIN. The choices are:- Do Not Allow Mobile PIN Authentication: (the default) Users may enter only a Password to log into the Commure Pro application.
- Use Commure Pro Managed PIN: Users may enter either a Password or a PIN to log into the Commure Pro application. To enable this feature, you must select this option at the Institution level, and also enable the Mobile Device Authentication Type setting for each user in their user profile. When enabled, the user is automatically prompted to establish their PIN when they install the Commure Pro application and log in for the first time. Or, they can wait and establish their PIN at a later time. Once the PIN is established, they can then use either their PIN or their password to log into the Commure Pro application (and easily switch between the two). When this option is selected, the following sub-settings are displayed:
For Apple devices, the Use Commure Pro Managed PIN option is not supported.
Minimum Number of PIN Digits
(Android) Enter the minimum number of digits that you want to allow for PIN authentication. The number must be between 4 and 10 (the default is 4).Maximum Number of PIN Digits
(Android) Enter the maximum number of digits that you want to allow for PIN authentication. The number must be between 4 and 10 (the default is 8).Enforce PIN Security
(Android) Select Yes to enforce rules surrounding the format of the PIN. When set to Yes, users cannot establish a PIN that is the same number repeated (for example: 1111), or one that is sequential (for example: 1234 or 4321). Select No to allow any numeric format.As some providers are merged in Commure Pro from multiple Meditech markets with different PINs, the system now supports PIN authentication for each instance.
Allow HH users to login using Biometrics
(Android, Apple) This setting determines whether a provider can use their fingerprint or facial image to log into the Commure Pro handheld application. On Apple devices this is known as Touch ID® and Face ID®. On Android devices this is known as Fingerprint Authentication. Certain later model devices are equipped with these features. When this security feature is enabled on a device, the user can touch their finger to the device’s sensor, or show their face to the device’s camera, which confirms their identity. This feature can be used to unlock the device from sleep mode, or it can be used within an application such as Commure Pro.- Yes: (the default) Providers can use biometrics to log into the Commure Pro application, instead of entering their password or PIN.
- No: Providers must enter either their password or PIN to log into the Commure Pro application.
There is a separate setting (Admin > Facility Group or CPOE > CPOE Preferences > Allow biometrics in place of validation method when submitting orders on a mobile device) to allow biometrics to be used when signing and submitting orders in the Mobile CPOE application. The two settings work independently; one does not affect the other.
If the Shared Device User user preference is set to Yes for a given user, then this setting is ignored and the ability to log into the Commure Pro application via biometrics is disabled for that user.
Disable Access after ‘n’ Login Attempts via the Web
(Web) This setting determines the number of incorrect login attempts, between 1 and 10, that a web user can make before access is disabled. The default setting is 3. Once web access is disabled, the user can still sync a device running Commure Pro’s Android or Apple application, but will not be able to access any of the data on the device.Disable Access after ‘n’ Login Attempts to the Server via the Device
(Android, Apple) Enter the number of incorrect login attempts via password, between 1 and 10, that are allowed before access to, or syncing of, the Commure Pro Android or Apple application is disabled on a handheld device. The default setting is 3.- When the device is not connected to the server, this setting has no effect, and the Lock User after ‘n’ Login Attempts on Handheld setting is used instead.
- When the device is connected to the server, and the user enters a password, the application checks against the password stored on the device first, and if it does not match, it then also checks against the password stored on the server (in the event that the user changed their password on the server). If the entered password fails on both accounts the number of times defined via this setting, the device becomes locked. Please note that this setting also applies to unprovisioned devices (in addition to provisioned ones); unprovisioned devices must communicate directly with the server in order to authenticate the user who is provisioning the device. If the user enters an incorrect password the number of times defined here, the device will not be provisioned.
This setting does not apply to login attempts via biometrics; invalid login attempts due to an unrecognized fingerprint or facial image will not lock the user out. See Allow HH users to login using Biometrics.
Clear Handheld Data after Maximum Login Attempts on Handheld
(Android, Apple) This setting determines whether patient data is cleared from the user’s handheld device after the maximum value of login attempts has been exceeded, based on the Lock User after ‘n’ Login Attempts on Handheld or Disable Access after ‘n’ Login Attempts to the Server via the Device setting (whichever is in effect). Select Yes (the default setting) to automatically erase the data. To keep the data, select No.Manage Handheld Modules [Edit]
(Android, Apple) This setting is visible to only Level 0 users who are site administrators. It is used to delete specific handheld modules system-wide (if those modules are not used) and to load the most recent versions of Commure Pro handheld software binaries onto the system. Click the [Edit] link to open the Manage Handheld Modules screen, which consists of the following tabs:- Handheld Modules: This tab shows the individual handheld modules that are active in the system and available for manipulation on the Admin tab. To delete a particular handheld module so that it is disabled for all users and no longer appears on the Admin tab, click the Handheld Modules tab, select a module, and then click the Delete button in the Quick Details box. You should not delete a handheld module unless you first discuss it with your Commure Pro representative. Once a handheld module is deleted, only a Commure Pro representative can reinstate it. The remaining active handheld modules can then be enabled Admin - User - Device - Active Handheld Modules
- Android Native Binaries: (Android) This tab shows the binaries for Commure Pro’s Android software application (along with version numbers) that have been loaded on the system. There are three components involved in the syncing of Android devices to a Commure Pro application server:
- The Commure Pro Android application version that resides on Android device.
- The Commure Pro Android application version that resides on the Commure Pro application server (shown here on the Android Native Binaries tab).
- The Commure Pro application server version (a.k.a, the mobilizer version).
- If the version that resides on the device is older than the one that resides on the server, the device is forced to undergo an upgrade to the same version that is installed on the server. The user is not allowed to use the Commure Pro application or sync to the server unless they complete this process (described in the document entitled Installing Commure Pro on Android™ Devices, located in the On-Line Help system).
- If the version that resides on the device is newer than the one the resides on the server, the device simply syncs as normal. Any new or fixed features in the newer Commure Pro Android application that are compatible with the Commure Pro application server (the mobilizer) will work, while any new features that require a newer server version will be disabled.
- Download the latest binaries from the Commure Pro Releases server.
- In the Manage Handheld Modules option, click the Upload New Android Binaries button, browse to the folder where you downloaded the binaries (in Step 1), select the .zip or .apk file, and then click Next.
- Wait for the binaries to upload (approximately one or two minutes), and once done, select Apply at the bottom of the screen.
Some clients have firewalls that isolate the Commure Pro server from the Internet. However, if you are using the Apple App Store distribution model, an exception must be made to the firewall, that allows the server to contact http://itunes.apple.com in order to retrieve a URL for the bundle identifier specified by the user. If this exception is not added to the firewall, or if the server cannot contact iTunes for any other reason, it won’t be able to send a URL down to the device and one of two things will happen:
- For 8R applications, an Upgrade button will not be displayed or the device will become unresponsive when a URL to upgrade the application is not available.
- For 9R and later applications, a message will be displayed to the user informing them that the server requires an upgrade and instructing them to contact their administrator (due to the missing URL).
Bundle Identifier
(Apple) Each Commure Pro Apple handheld application has a unique bundle identifier. This setting contains the bundle identifier for the Commure Pro application that is allowed to sync against the Commure Pro server. The bundle identifier also indicates whether or not that application can be found in the Apple® App Store. During upgrades, this setting is automatically set to the correct bundle identifier for the application generation that matches the Commure Pro server version. For example, upon upgrading to Commure Pro server version 8.0.0 (which has matching 8.0.0 handheld software in the 9R generation), the bundle identifier is automatically set to: com.Commure Pro.PK8009R-AppStore. Typically, the bundle identifier only changes when the generation changes. So if the generation remained at 9R for 8.0.1, then upon upgrading to Commure Pro server version 8.0.1, the bundle identifier would remain the same (com.Commure Pro.PK8009R-AppStore). For clients using the standard Commure Pro application available in the Apple App Store, this setting should never need to be changed.- For clients using custom B2B applications that are distributed via the Volume Purchase Program (VPP), the bundle identifier must be changed to reflect the client’s custom application name. For example, if General Hospital’s custom application were called PKGENHOSP, the bundle identifier would be: com.Commure Pro.PKGENHOSP. In most B2B cases, the “-AppStore” suffix is not included in the bundle identifier. In addition, the bundle identifier should be locked via the Lock Bundle Identifier setting so that is not changed during system upgrades. Contact your Commure Pro representative if you are unsure of the bundle identifier that you should use.
- For clients who are syncing test builds of the Commure Pro Apple handheld software against a test or training system, either the Bundle Identifier field must be cleared entirely (which tells the server to accept any bundle identifier), or the “-AppStore” suffix must be removed from the default bundle identifier. For example, in order to sync 9R test builds against Commure Pro server version 8.0.0, the bundle identifier would be: com.Commure Pro.PK8009R. In addition, the bundle identifier should be locked via the Lock Bundle Identifier setting so that is not changed during system upgrades.
Lock Bundle Identifier
(Apple) This setting indicates whether or not the current bundle identifier is locked. The bundle identifier should be locked when the client is using a custom B2B application or when syncing test builds against a test or training server. Locking the bundle identifier prevents it from being overwritten with the default bundle identifier during system upgrades. Select Yes to lock the bundle identifier. Select No to leave it unlocked (it will be automatically updated with the default bundle identifier during upgrades).Minimum Version
(Apple) This setting indicates the minimum Apple handheld application version that is allowed to sync to the Commure Pro server. Upon upgrading, this setting is automatically set to the correct Apple application version that should be used with the Commure Pro server version. For example, upon upgrading to Commure Pro server version 8.0.0, the Minimum Version is set to 8.0.0. Typically the Minimum Version field is updated whenever the server is upgraded and there is also a new Commure Pro Apple handheld version to go with the new server version. For example, if the Apple handheld application were updated for 8.0.1, then upon upgrading to server version 8.0.1, the Minimum Version would be automatically set to 8.0.1. But for minor point releases where no changes are made to the handheld application, the Minimum Version would remain static even if the server were upgraded (for example, server versions 8.0.1.1 and 8.0.1.2 would continue to use 8.0.1 as the Minimum Version). The correct Minimum Version is always automatically set during the upgrade process, and should never need to be changed manually. Keep in mind that this field defines the minimum handheld version that can sync to the server. For example, when Commure Pro version 8.0.1 is released, even if the server is not upgraded and remains at version 8.0.0 (and the Minimum Version field remains set at 8.0.0), handheld users could update to Apple handheld version 8.0.1 and still sync to the server (as long as the new handheld version still uses the same Bundle Identifier). This is desirable, since new handheld releases may provide bug fixes or new functionality, without requiring the server to be upgraded. Sample upgrade scenarios are listed below.In some of the scenarios below, a brief “Sync Failed” message may be displayed to the user just before they are prompted to update. This is correct behavior and can be disregarded.
- Commure Pro releases a new server version and a new handheld version of the same generation (for example, from 8.0.0 9R to 8.0.1 9R). The server is upgraded from 8.0.0 to 8.0.1.
- Standard application in the Apple App Store: The handheld user receives an update notice from Apple, but ignores it. The next time the user attempts to sync to the sever, the existing handheld application sends its bundle identifier and current version to the server. The server compares the handheld’s bundle identifier with the server’s Bundle Identifier (they will match) and the handheld’s version with the server’s Minimum Version (the handheld’s will be lower). The server sends down an upgrade notification (containing the URL and version). The user is redirected to App Store with the application already selected and selects Update. The application is updated (using the same bundle identifier). The user selects Open to re-launch the application. Since the generation has not changed (9R to 9R), the data on the device is not cleared.
- Custom B2B application through VPP: The handheld user receives an update notice from Apple, but ignores it. The next time the user attempts to sync to the sever, the existing handheld application sends its bundle identifier and current version to the server. The server compares the handheld’s bundle identifier with the server’s Bundle Identifier (they will match) and the handheld’s version with the server’s Minimum Version (the handheld’s will be lower). The server sends down an upgrade notification (it won’t contain a URL, since it’s B2B). The user is redirected to the App Store, selects the Updates tab and then selects Update next to the application name. The application is updated (using the same bundle identifier). The user selects Open to re-launch the application. Since the generation has not changed (9R to 9R), the data on the devices is not cleared.
- Commure Pro releases a new server version and a new handheld version of the same generation (for example, from 8.0.0 9R to 8.0.1 9R). The server is not upgraded (remains at 8.0.0).
- Standard application in the Apple App Store and custom B2B application through VPP: The handheld user receives an update notice from Apple and proceeds to update the application to the new handheld version. The user then attempts to sync the device. The server compares the handheld’s bundle identifier with the server’s Bundle Identifier (they will match) and the handheld’s version with the server’s Minimum Version (the handheld’s version will be higher than the server’s). The server allows the handheld to sync since the generation has not changed and the handheld’s version is equal to or higher then the Minimum Version. Or in another scenario, the user receives the update notice directly from Apple but ignores it. The handheld’s bundle identifier and version continue to match the server’s and the handheld continues to sync successfully.
- Commure Pro releases a new server version and a new handheld version in a new generation (for example from 8.0.0 9R to 9.0.0 10R). The server is upgraded from 8.0.0 to 9.0.0.
- Standard application in the Apple App Store: The handheld user does not receive an update notice directly from Apple, because the a new generation would represent a new (different) application. The next time the user attempts to sync to the sever, the existing handheld application sends its bundle identifier and current version to the server. The server compares the handheld’s bundle identifier with the server’s Bundle Identifier (they won’t match). The server sends down an upgrade notification (containing the URL and version). The user is redirected to the App Store with the new application selected and selects Install. The new application is installed (using the new bundle identifier). The user selects Open to launch the new application. This is a new installation of the 10R application; the user should delete the previous 9R application.
- Custom B2B application through VPP: If the client plans on upgrading the server, the existing custom application is updated to reflect the latest handheld changes (the bundle identifier is not changed for custom applications). The existing handheld application sends its bundle identifier and current version to the server. The server compares the handheld’s bundle identifier with the server’s Bundle Identifier (they will match) and the handheld’s current version with the server’s Minimum Version (the handheld’s will be lower). The server sends down an upgrade notification (it won’t contain a URL, since it’s B2B). The user is redirected to the App Store, selects the Updates tab and then selects Update next to the application name. The application is updated (using the same bundle identifier). The user selects Open to re-launch the application. Since the generation has changed (9R to10R), the data on the device is cleared.
- Commure Pro releases a new server version and a new handheld version in a new generation (for example from 8.0.0 9R to 9.0.0 10R). The server is not upgraded (remains at 8.0.0).
- Standard application in the Apple App Store: The existing handheld application does not receive an update notice directly from Apple, because the a new generation would represent a new (different) application. The handheld application is not updated. The handheld’s existing bundle identifier and version continue to match the server’s and the handheld continues to sync successfully.
- Custom B2B application through VPP: If the client does not plan on upgrading the server, the custom application is not updated. The handheld’s bundle identifier and version continue to match the server’s and the handheld continues to sync successfully.
Generate Handheld Authentication Token
(Apple) The Commure Pro Apple handheld application can be run in Maintenance Mode, which enables Commure Pro staff to investigate data related issues by inspecting the database that is stored on the device. In addition, if the application is inaccessible (crashing upon launch) and the client would like Commure Pro to retrieve charge or order data submissions before reinstalling the application, this feature allows us to do so without requiring physical access to the device, creation a backup, extraction of the database file, and so on. When using Maintenance Mode (also known as the SQL Console), the user can run SQL commands (supported by SQLite/SQLCipher), including retrieving data using a SELECT statement, and then displaying the results in a readable fashion. It also presents the retrieved data in a comma separated values (CSV) text format that can then be encrypted, copied, and pasted to another application, such as e-mail. The data can then be sent in a secure fashion to a Commure Pro staff member for examination. Maintenance Mode is available in both production and development versions of the handheld application. Several precautions have been put into place in order to prevent unauthorized users from accessing this tool, as well as to prevent end-users (physicians) from inadvertently accessing it:- On the handheld device, the user must access Settings > System Information > Database Maintenance (inside of the Commure Pro application) to turn this feature on.
- On the handheld device, the user must enter both their normal credentials (Commure Pro username and password) and an additional single-use password in order to gain access to the Maintenance Mode option within the Commure Pro application.
- On the Physician Portal, a Level 0 user must generate the single-use password using this option (the Generate Handheld Authentication Token option). This means that an end-user cannot access Maintenance Mode without assistance from an administrator.
- The single-use password uses a time-based algorithm which ensures that it is valid for only 60 seconds or less, and only for the specific device for which it was generated.
- Once the user exits Maintenance Mode, it is automatically turned off. In order to gain access again, the user must repeat the entire process above (turn on the feature, obtain a new single-use password, and re-enter their credentials).
- Potential impact on patient safety: By allowing the user to access the data stored in the device’s database, they could inadvertently delete or change important patient data, which could in turn impact patient safety.
- No audit trail: When in Maintenance Mode, the user is able to freely run SQL queries directly against the database on their device. The patient information that the user views during this activity is not recorded.
-
On the Apple device, turn on Maintenance Mode. a. The user should log into the Commure Pro application using their normal username and password. b. Select Settings > System Information > Database Maintenance. The Authentication Required dialog is displayed with a blank field for a single-use password. Make a note of the device name that is displayed in the dialog box, as you will need it for Step 2.
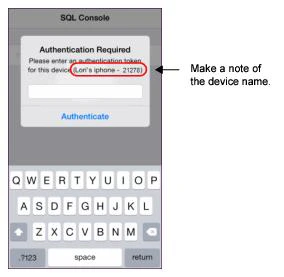 Only production builds of the Commure Pro handheld application require an administrator to generate a single-use password (as described in Step 2 below). If you are using a development or QA (test) build of the application, the password field on the Authentication Required dialog box is filled in automatically for you (and you can skip Step 2 entirely). Just select the Authenticate button to immediately access Maintenance Mode. If you receive an “Authentication Failed” message, it means the pre-filled password has already expired. Just select the button again.
 - On the Physician Portal, generate a single-use password: a. Log into the Physician Portal and select Admin > Institution > Device. b. Locate the Generate Handheld Authentication Token section, and in the Device field, search for and select the device name that you noted in Step 1g or 1b. A time-sensitive password is generated and displayed in th Token field. This password is valid for only 60 seconds or less; a countdown is displayed next to it so that you know how much time you have left to enter it on the Apple device. Once it expires, a new one is automatically generated, as long as you do not exit this option.
- On the Apple device, enter the single-use password from Step 2b into the password field in the Authentication Required dialog and then select Authenticate. If you receive an “Authentication Failed” message, it means the single-use password has already expired. Just retrieve a new one on the Physician Portal and retry.
- Enter the appropriate SQL command necessary to retrieve the desired data (consult a Commure Pro developer if you need assistance) and then select Go on the virtual keyboard.
- Send the retrieved data to a Commure Pro developer so that they may examine it.
-
b. Tap and hold anywhere in the displayed encrypted data, choose Select All from the pop-up menu, and then Encrypt & Copy. The data is copied to the clipboard in a non-readable encrypted format.-
c. Press the Home button twice to exit the Commure Pro application and show the list of open applications. Swipe up on the Commure Pro app to close it.
After you close the Commure Pro application, the Maintenance Mode option is automatically turned off in the Settings option. This entire process must be repeated in order to access it again.
Text for push notification
(Android, Apple) Use this setting to compose the text of the push notification. This text will be used for all push notifications about broadcast messages so make sure that it is generic in nature. For example, you might enter: “You have a new message about Commure Pro.”Number of Elements Sent to Handheld for “Load More Data”
(Android, Apple) This setting determines how many additional pieces of clinical data are sent to a user’s handheld device when the user selects the Load more data… link. There are various Institution-level settings for each module that limit the amount of data that is sent to handheld devices during an automatic or manual sync or refresh. For example, in the Clinical Notes module, the are Institution settings that control the number of instances of a given type of note, as well as the maximum number of days worth of data, that can be sent to a handheld device. The settings are configured to send a useful amount of clinical data, but not all of the data, in order to keep sync times manageable. However, there are occasions when a user needs to see additional historical data for a particular patient. A user can select Load more data… in a given module, to retrieve additional clinical results for the currently selected patient, and in effect, temporarily override these settings. The Load more data… link is available in the following modules: Clinical Notes, I/Os, Lab Results, Medications, Order Status, Test Results, and Vital Signs. Please note that this feature is not available for the Charge Capture, CPOE Orders, Problem List, or Allergies modules (the Allergies and Problem List modules always shows all allergies and problems for a patient). When a user selects Load more data…, a specific number of additional elements are sent to the device:- For the Clinical Notes, Lab Results, Medications, Order Status (standard), and Test Results modules, the number of elements that are sent is defined by the value of this setting.
- For the Vital Signs and I/Os modules, this setting is not used. Instead, the application sends another 24 hour’s worth of data each time the user selects Load more data…
Enable Secondary SSL Validation
(Android, Apple) This setting determines whether the server will perform secondary server certificate validation whenever a handheld device attempts to establish a new session with the server by performing either a device or a user login.- When set to Yes, both the certificate and the host name that the handheld uses to connect to the server are added to a list of elements containing server trust information, which is then sent to the server during login. The server examines the information and aborts the login process if the certificate chain is considered untrusted. This makes it difficult for an attacker to use proxies to intercept and inspect the https traffic. You should set this to Yes only if the server has a valid SSL certificate.
- When set to No (the default), this additional security check is not performed. You should set this to No for test or staging systems that do not have a valid SSL certificate.
- When using a released version of Apple handheld software (as opposed to a version that is in development/testing), the device is not allowed to sync to a server using the “http” protocol. The server must always use the more secure, encrypted “https” protocol. The following types of builds are considered “released versions” that must use the https protocol:
- Applications from the Apple® App Store
- Applications from the Volume Purchase Program for Business
- Stable test builds (STBs) distributed by Commure Pro
- On both Apple and Android devices, if the device detects that the server does not have a valid SSL certificate during the sync process, the handheld user receives a warning to that effect, and may elect to proceed or not. The user is warned only one time per server connection (unless the server’s certificate changes, or the user clears the data on the device).
Skip Device Update Queue for Manual Sync
(Android, Apple) This setting enables or disables a performance improvement for manual syncing of clinical data on handheld devices. It is effective only for those clients who have the Charge Capture module disabled site-wide (in other words, the Admin > Institution > Site Administration > Charge Capture option must be set to No).- Yes: A performance improvement is seen when providers perform a Manual Sync on their device.
- No: (the default) No performance improvement is seen when providers perform a Manual Sync on their device.
Allergy Settings
Although there are no settings for the Allergies module on the Institution tab, if your source system is a MEDITECH Magic system, you can customize how deleted allergies are displayed in Commure Pro. In the MEDITECH system, a deleted allergy is an allergy that was present on a past account but that is not listed on the current account. By default, deleted allergies are displayed in Commure Pro with a prepended comment of “(Out of Date),” as in this example: “(Out of Date) Penicillin.” Contact your Commure Pro representative if you would like to place the comment after the allergy instead of before, change the text of the comment, or remove the comment entirely.Charge Capture Settings
If Charge Capture is enabled for your facility, the Charge Capture Settings screen lets administrators modify the dictionary of CPT codes that Charge Capture applies, determine where all of the code edits run (either on the server or handheld or not at all), and enable or disable a variety of other system-wide charge capture features. When you select Charge Capture from the Edit Settings drop-down list on the Institution tab, the Charge Capture Settings screen appears. The Charge Capture Settings screen lets you configure the settings below.Administration
Update Charges/Modifiers
(Web, Android, Apple) This option is used to maintain the master list of standard CPT and modifier codes that are used in Charge Capture. Your Commure Pro representative loads these codes at initial implementation, and also updates them each year. This option allows administrators to change or add to the list of CPT and modifier codes. For example, if you have implemented Custom Charge Capture Screens (see Configuring Custom Charge Capture Screens) or Automated Code Entry (see Configuring Automated Code Entry), you might want to add charge codes that your own organization has defined for the billing of technical components. Click Edit to view the list of codes. Choose either CPT or Modifier from the Choose Vocabulary drop-down list to filter the list. For CPT codes, each code displays the following information in the Quick Details box:-
The charge Code. Typically, charge codes are composed of numbers and letters, but certain special characters are also allowed. These include the ampersand ( & ), the “at” sign ( @ ), and the forward slash ( / ). Do not use a dash ( - ), asterisk ( * ), or question mark ( ? ) in a custom charge code, as these characters used by Commure Pro’s code edit engine. In addition, do not use chevron brackets (
><). - An indication of the code’s Exclude status. You can check this flag to exclude the charge code from copy functions, from the Existing list, and from being displayed in the search results when a user performs a search for a charge code. For example, you might set the Exclude flag for some codes if your institution uses “dummy” CPT codes that should be exempt from copying forward of charge codes from one transaction to a new transaction. After you flag one or more charge codes for exclusion, you can configure user settings to determine behavior for this subset of codes, via the following settings: Admin - User - Charge Capture - Exclude Flagged Diagnoses/Charges on Copied Transactions Admin - User - Charge Capture - Exclude Flagged Diagnoses on Existing List Admin - User - Charge Capture - Hide Excluded Diagnoses/Charges from Search Results
A charge’s Active status overrides its Exclude status. For example, if a charge code is inactive (because either the Active flag is unchecked, or the charge transaction’s service date is not within the charge code’s effective date range), then it will not copy forward, regardless of its exclusion status.
- A flag to Disable Auto-link Diagnoses. By default, all diagnoses on a transaction are automatically associated with every charge on the transaction, and users can manually disassociate one or more of those diagnosis on an as needed basis. However, if you want the opposite to be true for this charge code, check this box. When checked, none of the diagnoses on the transaction are associated with this charge code by default, and users can manually associate one or more of them with the charge code on an as needed basis.
When selected, this attribute affects the Desktop Charge Capture application only. On mobile devices, all diagnoses are always automatically associated with every charge code by default (and users can manually disassociate one or more on an as needed basis).
- A Description of the charge
- Keywords that let users search for charges by keyword when entering charges
- Guidelines for using the charge code, that can be viewed by users during charge entry
- The Max Quantity allowed for this charge code, when using it on a charge transaction. You can enter any value between 1 and 99,999 (the default is 5).
- The Min Quantity allowed for this charge code, when using it on a charge transaction. You can enter any value between 1 and 99,999 (the default is 1).
- An Active indicator
- An Effective Date that defines when the code is available for use
- An Expiration Date that defines when the code is no longer available for use
- The modifier Code
- A Description of the modifier
- An Active indicator
- An indication of the code’s Exclude status
| Field Name | Field Length |
|---|---|
| Charge Code | 64 characters |
| Charge Description | 500 characters |
| Charge Keywords | 4000 characters |
| Charge Guidelines | 2000 characters |
| Modifier Code | 64 characters |
| Modifier Description | 500 characters |
For information on diagnosis code field lengths, see Field Length.
- Click the New Code button to add a new CPT code and complete the required fields: Code, Description, Guidelines, and Max Quantity in the Add Nomenclature Item:CPT box. Click Save to add the code.
- Click the Search Codes button to filter the list of CPT codes for your purposes. Select the type of search you would like to perform, either Search for Code or Search for Description. Then, enter the appropriate search string and click the Search button to perform the search and display the matching results.
Configure Service Sites
(Web, Android, Apple) This setting determines which service sites are available when entering charge transactions. Charge service sites (also known as places of service) indicate where the physician is when providing a service to the patient. These can be as simple as Inpatient, Outpatient, or ER, or as complicated as Campus A, Campus B, and Clinic C. Each of the charge service sites that you create here maps to a service site type in the Service Site Types reference list. Service site types are used with code edits to determine whether the procedure/E&M code entered is appropriate for the place of service. See Service Site Types Reference List for more information. You may decide to keep the list of charge service sites simple, and maintain a one-to-one relationship with the service site types, as in the example below. In this example, when a user enters a charge, they may select from only four charge service sites:Inpatient, Outpatient, Office, and ER.| Charge Service Site | Service Site Type |
|---|---|
| Inpatient | Inpatient |
| Outpatient | Outpatient |
| Office | Office |
| ER | ER |
| Charge Service Site | Service Site Type |
|---|---|
| North Inpatient | Inpatient |
| South Inpatient | Inpatient |
| North Outpatient | Outpatient |
| South Outpatient | Outpatient |
| Office | Office |
| ER | ER |
- Option A: In Charge Headers, for the Service Site header, select a particular charge service site as an initial and/or subsequent default (see Add/Edit Charge Headers). This charge service site will automatically be selected as a default for all charges entered by all users, although the user always has the option to select a different site. This type of default is only practical in situations where the majority of your services all take place in the same charge service site.
- Option B: When setting up ADT Visit Types (see ADT Visit Types), specify which charge service site should automatically be selected when a user enters a charge for each specific ADT visit type. Then in Charge Headers, for the Service Site header, select Default by ADT as the initial and/or subsequent default. This tells the system to look at the visit type for which the current charge is being posted, find it on the ADT Visit Type list, and pull the charge service site that you indicated should be used as the default for that visit type. Again, the user can always override the defaulted service site and choose a different one.
Code Edits
(Web, Android, Apple) Use this option to configure code edits for your system. When a user enters a charge transaction, the application checks it for errors, based on the code edit definitions that are enabled in your system. For example, Patient- Age code edit definitions contain rules for verifying that certain CPT codes are entered only for patients within appropriate age groups. Below is a brief summary of the configuration options. However, please see Configuring Code Edits for a more detailed explanation of each option, as well as complete instructions for configuring code edits.- Configure Code Edits: Use this link to view the current code edit definitions in your system, to enable or disable individual code edits, to define new custom code edits, or to modify existing code edits.
- Manage Code Lists: Use this link to define lists of commonly used codes (CPT Codes, Diagnosis Codes, Modifiers, Financial Classes, Departments, Roles, and Commure Pro Visit Types) that are referenced by your code edit definitions.
- Revalidate Charges: If you make changes to the code edit definitions after your charge capture system has already been used in production mode, you can use this option to revalidate the charges in the Holding Bin, so that the new or modified code edit definitions are applied against the existing charges.
Enable Batch Entry
(Web) Use this option to configure and enable the Batch Charge Entry feature. The default is set to No. Click Yes to enable the Batch Charge Entry settings at both the department and user levels. When the Enable Batch Entry setting is enabled at the department or user levels, the Charges tab displays the Batch Charge Entry subtab. This subtab allows users to apply the same charge transaction to multiple patient visits at once. See Configuring Batch Charge Entry for more information about this particular setting, as well as an overview of the Batch Charge Entry feature and complete instructions for configuring this feature for use. See Entering Charges for Multiple Patients via Batch Charge Entry for information about entering batch charge transactions once Batch Charge Entry has been configured.Default Value for “Show Visits” on Charges Display
(Web) This setting determines the default value (checked or unchecked) for the Show Visits checkbox on the Charges display option, which is available on the Patient List tab or in the standalone Patient Data Display (accessed by clicking the Details icon next to a patient name). This setting determines the default value for a new user the first time they access the Charges display option, for any existing user who has never previously modified the checkbox and therefore currently has no “sticky” value saved, or the first time a user accesses the display option immediately after clearing their web user settings via the Clear user web settings option. Once the user clicks the Show Visits box to check it or uncheck it, the checkbox is “sticky” from that point forward, and will override any new default set by an administrator.- Yes (the default): The Show Visits checkbox will be checked by default when a user first accesses the Charges display option.
- No: The Show Visits checkbox will be unchecked by default when a user first accesses the Charges display option.
Commure Pro-Cerner Integration: Log Performance Messages
(Web) Performance metrics for the Commure Pro-Cerner Charge Capture app are logged by default. However, Commure Pro support staff can use this setting to turn off the logging, thereby reducing the amount of calls made by the system for that purpose, which can be useful in some troubleshooting scenarios.- Yes (the default): The system will log performance metrics for the Commure Pro-Cerner Charge Capture app.
- No: The system will not log performance metrics.
Billing Configuration
Require ID for Billing Areas
(Web, Android, Apple) A billing area is the area to which you want to associate your charges. For example, a physician may work in two different departments, each of which handles charges in different ways, one going through the hospital and the other through a physician’s group. The physician can choose the appropriate billing area for each charge he or she enters. This setting determines whether a separate billing area ID is required when creating or editing billing areas for departments. Some inbound and outbound charge interfaces require an ID for each billing area in order for the charges to flow properly from one system to another. When you set this field to Yes, the ID field becomes a required field whenever an administrator creates or edits a billing area for a department, thereby ensuring that an ID is always present for the interface. For more information about billing areas, see Defining Billing Areas.Configure Billing Routers
(Web, Android, Apple) For clients using a Billing Interface, this setting lets you define the billing routers used by your organization. Billing Routers determine where the charge information is sent after the charges have been committed from the Outbox, so that your organization can manage its billing. For instructions on how to create or edit billing routers, see Defining Billing Areas. See also Configuring Charge Routing to External Systems for an overview of the different ways in which charge transactions can be routed to external systems.Billing File Purge Threshold
(Web) Specifies the duration (days) to store billing files on the server. After billing files have been retained for this number of days, they are deleted by an automatic purge task that runs on a daily basis. The default value for this setting is 60 days. Set this option to zero to disable purging and retain all billing-related files on the server indefinitely.Configure Visit Validation for Charging
Require Account Number
(Web, Android, Apple) This setting specifies whether an Account Number must be associated with a patient for the charge to be considered valid. Set this to Yes if you want a validity error to be generated if the user enters a charge on a patient visit that does not have an Account Number. The default is No.Require MRN
(Web, Android, Apple) This setting specifies whether a Medical Record Number (MRN) must be associated with a patient for the charge to be considered valid. Set this to Yes if you want a validity error to be generated if the user enters a charge on a patient that does not have an MRN. The default is Yes.Cancelled Visits are Billable
(Web, Android, Apple) This setting specifies whether a charge may be entered for a cancelled patient visit. The default is No. When this setting is enabled at the institution level, a corresponding setting is added for configuration of this functionality for individual users, allowing you to grant this permission to users more selectively: Admin - User - Charge Capture - Cancelled Visits Are BillableInactive Visits are Billable
(Web, Android, Apple) This setting specifies whether a charge may be entered for an inactive patient visit. The default is No.Charge Entry Controls
Add/Edit Charge Headers
(Web, Android, Apple) Charge headers are one of the essential elements in creating a charge. A charge header is a data field that is associated with a charge transaction (in addition to the obvious fields for charge code and diagnosis). A header can be associated with the entire charge transaction as a whole (commonly referred to as a “transaction-level header”), or it can be associated with each individual charge code on the transaction (commonly referred to as a “charge-level header”). Each charge header has a series of attributes, or properties, that define how that data field should behave, such as whether the field is visible when entering a charge transaction, whether the field is required, whether free text is allowed, etc. You can also define a parent/child relationship between headers. For example, you could define the Injury Date header to have a dependent header of Injury Type, so that if the user completes the Injury Date header, they are then prompted to complete the dependent Injury Type header. The attributes that are available for a charge header are described in Charge Header Attributes. There is a predefined set of standard charge headers that are associated with every charge transaction. You cannot delete standard charge headers, but some attributes of standard headers can be modified. For example, you can change their visibility status or whether free text is allowed.- The standard headers below are associated with the entire charge transaction as a whole:
- Billing Area
- Injury Date
- Injury Type
- Insurance Information
- Billing (Provider)
- Referring (Provider)
- Service Date
- Service Site
- Time with Patient
- Account (handheld only)
- The standard headers below are associated with the individual charge codes on the transaction. Upon initial implementation, the Visibility attribute for these headers is set to “Hidden, not populated.” If you want to use these headers, you must change the attribute to “Visible” or “Hidden, populated.”
- Rendering (Provider)
- Supervising MD Present
- Click Edit.
- Click Add Header at the bottom of the dialog to add a new header.
- Choose a Type from the drop-down list. Your selection in the Type drop-down determines which header attributes appear in the dialog that follows. See Charge Header Attributes for a list of the possible attributes.
- Complete each attribute field as necessary and click Save.
To edit an existing header
You may edit the properties of an existing header at either the institution or user level. However, please note that once a header has been created and saved, you cannot change the header’s type from one type to another (for example, from Picklist to Provider).- Click on a header row to highlight it.
- Click Edit.
- Make the necessary changes and click Save.
To delete an existing header
You can delete headers only at the institution level. Newly deleted headers will no longer appear on newly entered charges. When editing a charge that was created before the header was deleted, the old header will still be available and can be edited.- Click on a header row to highlight it.
- Click Delete.
- Click Yes to confirm that you want to delete it.
To sort the headers
You may change the sort order of existing headers at either the institution or user level.- Click Sort from the Institution Charge Transaction Headers dialog.
- Click a row to highlight it.
- Use the Top, Up, Down, Bottom buttons to move the row to the desired location.
- Click OK when you are done sorting.
Allow Users to Send Free Text Errors to Outbox (L 0-2)
(Web) This setting determines whether Level 0/1/2 administrators can send charge transactions with free text errors (such as free text provider names, free text charges, free text diagnoses, or free text NDC codes) from the Holding Bin to the Outbox, without first resolving the free text error (i.e., without replacing the free text entry with a valid entry from a reference list or the master lists of charge or diagnosis codes). Please note that there is a corresponding user-level setting for this permission: Admin - User - Charge Capture - Allow User to Override Free Text Errors and Send to Outbox (L 0-2) If the Institution and User settings have different values, the User setting overrides this Institution setting.Send Transactions for Manually Registered Patients to the Holding Bin
(Web, Android, Apple) This setting affects patients who were manually registered on the web or on a handheld device. It determines whether charge transactions for these patients are considered to have an error, which could in turn result in those charges being sent to the Holding Bin. There are three options:- Yes for all patients: Charges for all manually registered patients (whether registered on the handheld or the web, whether verified or not), are considered to have an error. The charges are sent to either the Holding Bin or the Outbox, based on where the user and department are configured to send transactions with errors. If the charges are in fact sent to the Holding Bin:
- Charges for verified patients can be found using the “Verified Man Reg Patients” Error Type filter. These charges do not show an actual error status on the transaction.
- Charges for unverified patients can be found using the “Unverified Patient” Error Type filter. These charges show a Unverified Patient error status on the transaction.
- Only for Unverified patients: Charges for manually registered patients that are unverified are considered to have an error.
- Unverified patients include patients that were manually registered (on the web or on a handheld device) and that were not subsequently verified. The charge transactions for these patients are considered to have an error, and will go to either the Holding Bin or the Outbox, based on where the user and department are configured to send transactions with errors. If the charges are in fact sent to the Holding Bin, they can be found using the “Unverified Patient” Error Type filter and they also show a Unverified Patient error status.
- Verified patients include patients that were manually registered (on the web or on a handheld device) and that were verified at the time of creation, or were subsequently verified by an administrator via the Patient Search tab. Charges for these patients are not considered to have an error. The charges are sent to either the Holding Bin or the Outbox, based on where the user and department are configured to send transactions that have no errors.
- No, not for any patients: Charges for all manually registered patients (whether registered on the handheld or the web, whether verified or not), are not considered to have an error. The charges are sent to either the Holding Bin or the Outbox,based on where the user and department are configured to send transactions that have no errors.
Allow Unverified/Verified Patient Charges to be Sent to Outbox
(Web, Android, Apple) This setting is dependent on how the Send Transactions for Manually Registered Patients to the Holding Bin setting is configured. If charges for manually registered patients are considered to have an error based on that setting, then this setting determines whether those charges are eligible to be sent to the Outbox.| Send Transactions for Manually Registered Patients to the Holding Bin | Allow Unverified/Verified Patient Charges to be Sent to Outbox | Description |
|---|---|---|
| Yes for all patients (charges for both verified and unverified do have an error) | Yes | Level 0/1 users and Level 2 users (with Level 2: Can Send Charges to Outbox set to Yes) can override the error on charges for verified and unverified patients and send those charges to the Outbox. |
| No | Users cannot send charges for verified or unverified patients to the Outbox and must take one of the actions described in the Case A bullet below. | |
| Only for Unverified (charges for unverified patients have an error, while charges for verified patients do not) | Yes | Level 0/1 users and Level 2 users (with Level 2: Can Send Charges to Outbox set to Yes) can override the error on charges for unverified patients and send those charges to the Outbox. (Nothing prohibits charges for verified patients from being sent to the Outbox.) |
| No | Users cannot send charges for unverified patients to the Outbox and must take one of the actions described in the Case B bullet below. (Nothing prohibits charges for verified patients from being sent to the Outbox.) | |
| No not for any patients (charges for both verified and unverified patients do not have an error) | Setting is disabled. | Since charges for both verified and unverified patients do not have an error, nothing prohibits those charges from being sent to the Outbox. |
- Case A (Send Transactions for Manually Registered Patients to the Holding Bin is configured as Yes for all patients, and Allow Unverified/Verified Patient Charges to be Sent to Outbox is configured as No):
- Move the visit to an authenticated patient, or merge the patient with an authenticated patient. Both of these actions are performed using the Merge option on the Patient Search tab.
- Case B: (Send Transactions for Manually Registered Patients to the Holding Bin is configured as Only for Unverified, and Allow Unverified/Verified Patient Charges to be Sent to Outbox is configured as No):
- Verify the unverified patient using the Verify option on the Patient Search tab.
- Move the visit to a verified or authenticated patient, or merge the patient with a verified or authenticated patient. Both of these actions are performed using the Merge option on the Patient Search tab.
Move Charges from Outbox to Holding Bin on Revalidation
(Web) This setting determines whether charges that are currently in the Outbox status are moved back to a Holding Bin status if a revalidation event occurs, and that revalidation finds an error on the transaction which would normally cause the transaction to be sent to the Holding Bin. Some common examples are as follows:| Revalidation Event | Example |
|---|---|
| Revalidation based on changes to visit data | On Day 1 of a new visit, the patient is not able to provide insurance information, and is therefore listed as self pay. A charge is entered for Day 1 and the charge is then sent to the Outbox. An ADT message is subsequently received updating the insurance information to Medicaid. The charge is now in an error status because the CPT is not covered by Medicaid (as defined by a code edit). |
| Revalidation based on changes to patient data | On Day 1 of a new visit, the patient’s age is incorrectly entered by registration staff. Critical care charges are entered for Day 1 based on the incorrect age and the charges are then sent to the Outbox. An patient update message is subsequently received, which updates the patient’s date of birth. The charges are now in an error status because the CPTs are for the incorrect age (as defined by a code edit). |
| Revalidation based on the entry of additional charges | An evaluation and management charge is entered on a given day and the charge is sent to the Outbox. Later in the day another evaluation and management charge is entered for the same day. Both charges are now in error status because two E&M charges are not allowed on the same day (as defined by a code edit). |
| Revalidation based on validity errors | A charge is incorrectly entered for today on an inpatient visit and the charge is then sent to the Outbox. The patient discharge is processed for yesterday. The charge is now invalid because the service date is after the discharge date (as defined by the Commure Pro Visit Type settings for valid date ranges for that visit type). |
- Yes: Any charge currently in the Outbox that goes into an error status due to a revalidation event is sent back to the Holding Bin.
- No (the default): Any charge currently in the Outbox that goes into an error status due to a revalidation event remains in the Outbox.
Check Validity of Service Date
(Web, Android, Apple) This setting determines whether the service date entered on a charge transaction is validated. The acceptable service date range for each type of visit is defined in the Commure Pro Visit Types option. If Check Validity of Service Date is set to Yes, then the service date entered on a charge transaction must be within the defined parameters for the visit type. If it is not, the user is not able to save the charge as a completed transaction. They must either change the date to be within the acceptable date range, or save the charge transaction as a draft. See also (Charge Capture, NoteWriter): Activate Date and (Charge Capture, NoteWriter): Deactivate Date.Extension Period before Draft Expires
(Web, Android, Apple) This setting specifies the number of days after which draft charge transactions should expire. The default value is 2 (days). Please note that there is a corresponding User level setting for the extension period: Admin - User - Charge Capture - Extension Period before Draft Expires If the Institution and User settings have different values, the User setting overrides this Institution setting. Note that this extension period is defined relative to the service date of the charge, not the creation date of the charge. Once a draft expires, its charge status automatically changes to Holding Bin (if created on the Desktop Charge Capture application) or Holding Bin (HH) (if created on a handheld), and it is now treated as any other charge in the Holding Bin. In the Holding Bin, the transaction is flagged with an error type of Expired Draft. Once a transaction appears in the Holding Bin with the error type of Expired Draft, this is a signal to billing administrators that some action should be taken. They can edit the expired draft to correct errors or fill in missing information, and eventually send the transaction to the Outbox for final billing. Alternatively, the billing administrator can delete the expired draft transaction entirely, if necessary. This functionality applies to expired draft transactions that were created on both the web and handheld platforms. For more information, see Managing Expired Drafts.Show Biller Comments (Web only) (L 0-2)
(Web) This setting controls the display of the Biller Comments field on the web Charge Transaction screen when users are entering or editing charges. The Biller Comments field lets users add billing-specific comments about a charge. When this setting is enabled, a User-level Show Biller Comments (Web only) field becomes available for Level 0-2 users, which allows administrators to enable or disable the Biller Comments field for those users, on a per user basis: Admin - User - Charge Capture - Show Biller Comments (Web only) When enabled here at the Institution level, the Biller Comments field also displays among the Report Fields available when a Level 0-2 user performs a charge search on the Charges > Search tab. The default is Yes.Set “Prompt for GC Modifier” Label
(Web, Android, Apple) This field lets you customize the message text displayed each time that users enter a charge, provided the user’s preference below is set to “Prompt-Always” or “Prompt-with Options.” The default text is “Was a resident involved in care?” Admin - User - Charge Capture - Configure GC ModifierCPTs Exempt from GC Modifier
(Web, Android, Apple) Use this option to specify a list of CPT codes that should never have a GC modifier added. For example, for evaluation and management services and other services based on time (such as critical care or psychotherapy), your organization may prefer not to use the GC modifier, since the teaching physician must be physically present for the entire period of time billed in order to qualify for the modifier. Click the [Edit] link to enter the list of CPT codes that should be exempt from a GC modifier. For any code that you list here, the user will not be prompted to add a GC modifier, nor will a GC modifier ever be automatically added to the CPT code. In addition, on the web and Apple platforms only, the application does not allow the user to manually add a GC modifier to one of these CPT codes. And finally, if a GC modifier is associated with one of these CPT codes on a charge transaction that is imported from a third party system, the GC modifier will be automatically removed from the transaction upon import.Enable Hold for Review
(Web, Android, Apple) Use this option to configure the Hold for Review feature. By default, every system is configured with a minimum of two standard Hold Reasons (Comment Review and Review Requested). Your organization can use just these two reasons with no alterations in how they are configured, or you can click the Manage link to modify their configuration, or even add additional Hold Reasons for a more robust Hold for Review process. See Configuring the Hold for Review Workflow for more information about this particular setting, as well as an overview of the Hold for Review process and complete instructions for configuring this feature for use.Custom Workflows
Auto-Added Code Entry
(Web, Android, Apple) Use this option to configure and enable the Automated Code Entry feature. When enabled, this feature automatically adds to, or adjusts, the charge transactions that users enter on a daily basis, based on client-defined criteria. For example:- Charges for technical components should often accompany the charges for professional services that are entered by providers. Automated Code Entry can automatically add charges for the technical components, along with the appropriate modifiers and quantities, to the professional service charges entered by providers.
- Providers may forget to add the appropriate modifier, or adjust the quantity, on the charges for professional services that they enter. Automated Code Entry can automatically add the modifiers and adjust the quantities of the professional service charges.
- See Configuring Automated Code Entry for a more thorough explanation of Automated Code Entry, as well as complete instructions on how to use this option to configure mappings for it.
- See Managing Charge Transactions with Auto-Added Codes for information about viewing and managing auto-added codes once Automated Code Entry has been configured.
Custom Charge Capture Screens
(Web, Apple) Use this option to configure a variety of Custom Charge Capture Screens. Custom Charge Capture Screens allow you to implement custom charge capture features that help users who are not familiar with coding rules to select the correct charge code or to enter more complete information:- Custom Screens: Custom Charge Capture Screens allow you to create custom charge capture screens that help users who are not familiar with coding rules to select the correct charge code. These screens ask the user a series of questions that identify the procedures or tasks that they performed, and based on their answers, automatically select the correct charge codes for them. These screens are typically used to assist in the billing of technical services, infusion services, or critical care services. The individual questions are created using the Manage Field Dictionary link, the questions are then placed on custom screens using the Manage Sections link, and certain aspects of infusion billing are managed using the Manage Infusion link. See Configuring Custom Charge Capture Screens for a more detailed explanation, as well as complete instructions for configuring custom screens.
- Charge Data Master (CDM): A Charge Data Master maps the disparate lists of charge codes from multiple facilities (CDM codes) to the single organization-wide list that is stored in the Commure Pro charge code list. When you implement a CDM in Commure Pro, the charges captured in the various facilities (and their corresponding CDM codes) can be routed to multiple billing systems. In addition, a CDM can be used to “explode” a single charge captured in Commure Pro into two CDM charges (to account for both the professional and technical components). See Implementing a Charge Data Master (CDM) for a more detailed explanation, as well as complete instructions for using the CDM Preferences link to manage mappings in bulk, or the Manage CDM option to manage mappings individually.
Configure NDC Collection
(Web) When billing for the administration of drugs such as vaccinations, Medicare and other insurance providers require organizations to submit the National Drug Codes (commonly referred to as NDC codes) that are associated with those drugs. Since a healthcare organization may use a wide range of generic or brand name drugs within a clinic or unit, the Commure Pro system allows you to map one or more NDC codes to a given charge code, using the Manage NDC link. During charge entry, when a provider enters a charge code that has one or more NDC codes mapped to it, the provider is automatically prompted to select the correct drug and its associated NDC code, as well as the quantity that was administered. The provider may only choose from those drugs that are mapped to the selected charge code. The selected NDC code is then saved with the charge transaction and submitted for billing. See Configuring the Selection of NDC Codes During Charge Capture for a more detailed explanation, as well as complete instructions for using the Manage NDC link to implement this feature.Providers cannot select NDC codes in the Mobile Charge Capture application.
Require NDC Collection to Save Charge
(Web) This setting determines whether the user is required to complete both the NDC and Qty (quantity) fields when they select a charge code that is mapped to one or more NDC codes, in order to save the charge transaction. For more information, see Configuring Institution Settings for NDC Collection.Allow Free Text NDC Values
(Web) This setting determines whether the user may enter a free text NDC code, when they enter a charge code that is mapped to one or more NDC codes. For more information, see Configuring Institution Settings for NDC Collection.Auto Add Zeros to Free Text NDC
(Web) This setting applies only when a user enters a free text NDC code. It determines whether to add leading zeros to the NDC code, if the user does not enter the correct number of digits in each section of the code. For more information, see Configuring Institution Settings for NDC Collection.RVU Management
(Web, Android, Apple) This option allows administrators to modify the RVU (Relative Value Unit) information for individual charge codes, using the Manage RVU Values link. In addition, administrators can use the Auto-Sorting link to determine whether specific ranges of charge codes are auto-sorted based on RVU values, whether RVU multipliers are used, and whether modifiers are automatically added to charge transactions. See Configuring RVU Management for a more detailed explanation, as well as complete instructions for using the Manage RVU Values and Auto-Sorting options to implement this feature.PQRS Reporting Period
(Web, Apple) Use this option to configure the reporting period for PQRS/MIPS submissions. This setting controls the period in which your organization can collect any quality measure data that are associated with completed charge transactions. The two options are:- January-December (default) is the annual reporting period. When selected, the reporting institutions can collect quality data over the course of the calendar year for annual submission of quality reports to the CMS.
- July-December is the six-month reporting option that is designed to enable those organizations that have implemented PQRS late in the year. When selected, the reporting institutions can collect quality data for the last six months of the calendar year for submission of quality reports to CMS.
If this option is chosen, you will not be able to collect and submit quality data for the period January through June.
For more information, see Configuring PQRS/MIPS.
Define Note Types for Charge-Note Reconciliation
(Web) Use this option to configure the types of clinical notes that are displayed on the Charges > Charge-Note Reconciliation option, and that are taken in to consideration when determining whether a visit is “documented” or “undocumented” on that report. You can select specific Note Types individually, or if your system has a large number of note types, you can instead select notes based on the Note Category into which they fall. An administrator should review this setting on a weekly basis to check for any new clinical note types that might have been created, and determine whether they should be included on the Charge-Note Reconciliation report.- Click the [ Edit ] link.
- In the Choose Grouping drop-down (located at the top right of the screen), choose either Note Type or Note Category, to indicate how you would like to select notes for inclusion on the report.
- Note Type: A list of note types is displayed. Check the box for all note types that you want to include on the Charge-Note Reconciliation report.
- Note Category: A list of note categories is displayed. For each category, the Note Types column on the far right tells you how many note types are included in this category. a. Check the box for all note categories that you want to include on the Charge-Note Reconciliation report. As you choose each category, the Quick Details box on the left displays the category name with a counter, such as “Physician Notes [20 of 20].” This is a clickable link. The counter indicates the number of selected note types out of the total note types in that category.- b. If you want to exclude a few of the note types from a category, click the link in the Quick Details box for that category. A list of all the note types in that category are displayed (all are selected by default). The Instances column on the far right tells you how many times each note type was used by a Billing Provider within the last 30 days, so that you can better determine which note types to select.- c. Uncheck the box for any note types that you do not want to include on the Charge-Note Reconciliation report and then click Close.
- Click Save on the Quick Details box.
- Any note statuses that indicate that the note is in a complete or final state should be mapped to “Final,” as this is how the report will determine whether the visit day is “documented.” Completed notes will show the Note Type name in blue text (for example: Consult).
- All other note statuses should be mapped to the appropriate Commure Pro status, such as “Draft,” “Awaiting Co-signature,” “Cancelled,” or “Scribe.” All of these additional statuses (as well as any unmapped statuses) will be considered “undocumented” and will show in red italics with the backend note status displayed in parenthesis after the Note Type name (for example: Progress Note (Draft) or Progress Note (Signed)).
Commure Pro-Cerner Integration: Number of Visit Diagnoses to Select upon IP Charge Creation
If your organization has implemented the Commure Pro-Cerner Charge Capture app, then your users can click a link in the Cerner® application to access the Commure Pro Charge Transaction screen in order to create or edit a charge. When creating a new charge for a multi-day visit, this setting determines the maximum number of diagnoses that will be retrieved from Cerner and automatically added to the Selected Codes section on the Charge Transaction screen (assuming the diagnosis defaulting is enabled for the user via Commure Pro-Cerner Integration: Default Ranked Diagnoses to Multi-Day Visits). The default value for this setting is 12. Please note that this is only one of several settings necessary to configure the Commure Pro-Cerner Charge Capture app, see Configuring the Commure Pro-Cerner Charge Capture App for complete instructions. Also, make sure that the value of this setting is not greater than the value of the setting below: Admin - Department - Charge Capture - Max # Diagnoses Allowed per TransactionHandheld
Handheld Missing Charge Label
(Apple) This setting is no longer supported as of Commure Pro version 8.2.0. This text field lets you enter a label for the Missing Charges filter on handheld devices. When you choose this filter in the Patient List module on the handheld device, it selects only visits that do not yet have charges posted. It does this for only certain visit types, as defined in the Commure Pro Visit Types option. See also Charge Capture: Include Appt in Missing Charge Filter (handheld only).Charge Header Attributes
Each charge header has a set of attributes that define how the field should behave when a user enters a charge transaction on the Desktop and Mobile Charge Capture applications This is true for both the standard headers and any custom headers that you might define. Listed below are all of the attributes that you might encounter when creating or editing a charge header. Not all of the attributes listed below apply to every header type. In the following table, the columns represent each of the charge header types. As you look down the column for each type, you can see which attributes are available for that type. If the table cell is blank, it means that the type does not use this attribute.| Header Type | Header Attribute | Date | Provider | Picklist | Text | Numeric | Time | Date/Time | Boolean (True/False) | ||||||||||||||||||
|---|---|---|---|---|---|---|---|---|---|---|---|---|---|---|---|---|---|---|---|---|---|---|---|---|---|---|---|
| Type | X | X | X | X | X | X | X | X | |||||||||||||||||||
| Header Name | X | X | X | X | X | X | X | X | |||||||||||||||||||
| System Identifier | X | X | X | X | X | X | X | X | |||||||||||||||||||
| Code Edit Label | X | X | X | X | X | X | X | X | |||||||||||||||||||
| Visibility | X | X | X | X | X | X | X | X | |||||||||||||||||||
| Read-only | X | X | X | X | X | X | X | X | |||||||||||||||||||
| Required | X | X | X | X | X | X | X | X | |||||||||||||||||||
| Allow free text | X | X | Free text validity error | X | Show Short List | X | X | Short List Max | X | X | Allow Access to Full List | X | X | Batch Charge Entry | X | X | X | X | X | X | X | X | |||||
| Charge Header | X | X | X | X | X | X | X | X | |||||||||||||||||||
| Copy when copying transaction | X | X | X | X | X | X | X | X | |||||||||||||||||||
| Fire code edits when hidden | X | X | X | X | X | X | X | X | |||||||||||||||||||
| Required User Number | X | Code Set | X | Initial Default Value | X | X | X | X | X | X | X | X | |||||||||||||||
| Subsequent Default Value | X | X | X | X | X | X | X | X | |||||||||||||||||||
| Roles | X | Provider must have ID in Visit Facility | X | Display Time Format | Add Dependent | X | X | X | X | X | X | X | X |
Type
(Web, Android, Apple) The Type field is editable only when adding a new custom charge header (it cannot be changed once a header has been saved). Select the type of header that you are adding (the allowed types are listed below). The attribute fields that follow depend on the type of charge header that you select here. For example, the Require User Number attribute applies only to Provider type headers.- Date: A field that allows the user to enter a date, such as Injury Date.
- Time: A field that allows the user to enter a time, such as C-Section Start Time or C-Section Stop Time.
- Date/Time: A field that allows the user to enter a both a date and a time, such as Date/Time Procedure Started.
- Boolean: A checkbox field. With this type of header, there are only two possible responses available to the user: checked or unchecked. An unchecked box equates to a No response, while a checked box equates to a Yes response. It is important to note that this type of header field always has a value of either Yes or No on the charge transaction, there is no “blank” or “unanswered” response. For a variation on this, see also the Picklist header type below, when used in conjunction with the Yes No reference list.
- Picklist: A field that allows the user to select from a list of values, such as Injury Type. You define the list of allowed values in a reference list, and then select that reference list as the Code Set attribute when defining the Picklist header. These header fields use a drop-down list format.
- Provider: A field that allows the user to select a provider, such as Referring MD. These fields are drop-down lists.
- Text: A field that allows the user to enter free text.
- Numeric: A field that allows the user to enter a number.
Header Name
(Web, Android, Apple) The name of the header itself. Give the header a name that works for your facility. When you edit a standard header, you can edit it’s label so that it works better for your facility. However, the text in the Header Type field always contains the standard label.System Identifier
(Web, Android, Apple) This field is used as an internal identifier that uniquely identifies the header, for use with inbound/outbound billing interfaces.Code Edit Label
(Web, Android, Apple) This setting is used to link a code edit definition to a transaction header. For example, some CPT or diagnosis codes require that certain header information be completed in order for the charge transaction to be considered valid. You could define a Headers - Included code edit to check that a given header is completed, when the specified CPT and/or diagnosis codes are used on a transaction. Similarly, you could also define a Headers - Excluded code edit to ensure that a particular header is left blank. On the Headers - Included or Headers - Excluded code edit definition, you would enter the Code Edit Label of the charge header that you want to be completed or left blank. Please note that the Code Edit Label must be exactly 4 characters long (alphanumeric). See Configuring Code Edits for more information. The Code Edit Label field is not editable on the following headers:- Billing Area
- Billing (Provider)
- Referring (Provider)
- Service Date
- Service Site
- Account (handheld only)
- Rendering Provider
- Supervising MD
Visibility
(Web, Android, Apple) This setting determines if a field is visible during charge creation. The choices for Visibility are:- Visible: Headers that are visible appear when you are creating or editing a charge, whether or not the field contains data.
- Hidden, populated: Headers with this designation do not appear when you are creating, editing or viewing a charge. If there are other settings for the user creating the charge that would populate this field, those settings are respected and the values will be set for this field, even though is it not visible to the user. A Hidden, populated field cannot be required (the Required attribute is not available).
- Hidden, not populated: Headers with this designation do not appear when you are creating, editing or viewing a charge. This field will not be populated when a charge is created, even if the charge is copied from an existing charge that contains data. A Hidden, not populated field cannot be required (the Required attribute is not available).
The standard Service Date header is always Visible, and cannot be changed to either of the Hidden statuses above.
Fire code edits when hidden
(Web, Android, Apple) This setting determines if a code edit should fire when the charge header’s Visibility property is “Hidden, populated.” In some cases, you may set up headers that default an account dynamic property, so that a code edit can be based on whether or not a value was found and defaulted for that header. If you do not want the user to edit the defaulted value for the header, you would set the header’s Visibility to “Hidden, populated.” When you check the Fire code edits when hidden setting, you then force a code edit to fire for the header, even though it is not visible to the user. If you leave the Fire code edits when hidden setting unchecked, a code edit is not fired for the hidden header.Read-only
(Web, Android, Apple) This setting determines if the field can be edited or only viewed.Required
(Web, Android, Apple) This setting determines if the field is required. A header that is marked Required will force completion of the field. If the user does not complete a required header and attempts to save the transaction, a message is displayed in the Edits box prompting them to complete it. Their only option at that point is to either complete the header or to discard the transaction. They cannot save the transaction as completed or as a draft unless they complete the required header. This setting not available if Visibility is set to either the “Hidden, populated” or “Hidden, not populated” state.Allow free text
(Web) This setting determines if a user can enter free text in a field that is set up as a picklist.This setting has no effect for Picklist headers that use the Yes No Reference List.
Free text validity error
(Web) If Allow free text is set to Yes and the user does enter free text, this setting determines if free text should be considered a Validity Error on the web and would require review by billing staff prior to being submitted to the billing system.Show Short List
(Web, Android, Apple) This setting is available only for custom Provider or Picklist headers, as well as some standard headers (Billing Area, Billing Provider, Injury Type, Referring Provider, Rending Provider, and Service Site). It allows you to define a shorter list of available values from which the user may choose. You may choose from the options below.This setting has no effect for Picklist headers that use the Yes No Reference List.
- None means that no short list is created.
- Configured Restrictions is available only for the standard Billing Area charge header. This setting allows you to define a short list of acceptable values for the Billing Area charge header that is based on the visit’s Commure Pro Visit Type and/or Location. For example:
- Let’s imagine that the Cardiac Surgery billing area were only used in an Inpatient setting at your organization, and that you had specified the same when defining the Cardiac Surgery billing area (see Defining Billing Areas). If you select this “Configured Restrictions” option, then the Billing Area header would show Cardiac Surgery as an available value only when entering charges for Inpatient visits.
- Let’s imagine that the Cardiac Surgery billing area were only used at East Hospital and West Hospital at your organization, and that you had specified the same when defining the Cardiac Surgery billing area (see Defining Billing Areas). If you select this “Configured Restrictions” option, then the Billing Area header would show Cardiac Surgery as an available value only when entering charges for services performed at those two locations.
- When defining a Billing Area, you can also specify both items (specific Commure Pro Visit Types and specific Locations). In this case, if you select this “Configured Restrictions” option, then the Billing Area header would show that billing area as an available value only when both the visit type and the location matched those specified in the billing area’s definition.
On mobile devices, if the Show Short List property is set to “Configured Restrictions,” the short list behaves as described above and shows only the billing areas from the restricted list. However, the Allow Access to Full List property is not respected on mobile devices when used in conjunction with “Configured Restrictions”—the full list is not shown, whether that property is set to Yes or No.
- Most Recent means that a short list is created by the application from the mostly recently used values for this field. If you think your users will be selecting the same values over and over again for this charge header field, you can display a Most Recent Short List. This makes it easy for them to find and select the same value again. Even when a Most Recent Short List is displayed, the user still able to search the full list of available values for this field. This enables the user to select other values for this charge header field when necessary. The length of the Most Recent Short List is determined by the following attribute:Short List Max.
- Fixed means that a short list of specific (fixed) values is defined by you, the administrator. You might display a Fixed Short List to provide users with easy access to those values that are most often selected for this charge header field. Whether or not the user can also search for and select other values for this charge header field is determined by the following attribute:Allow Access to Full List.
- When defining a Fixed Short List for a Provider header, you can choose any subset of providers to include on it.
- When defining a Fixed Short List for a Picklist header, you can choose any subset of the entries from a reference list that you have defined yourself, or from one of the reference lists that has been defined for your organization. Reference lists are defined on the System Management tab. See Creating a Reference List.
- For the Show Short List attribute, select Fixed.
-
For Picklist headers only, choose the Reference List you want to use from the Code Set drop-down list.
Reference lists and code sets are the same thing in Commure Pro and we use the terms interchangeably.
-
Click the Edit Short List button. The Edit Short List screen appears. The contents of the window are different for Provider versus Picklist headers: - o Provider headers: Search fields for Provider Name/ID/Alias and Role are displayed on the left side of the screen. Enter some criteria in the fields and then click Search to find the provider(s) that you want to add to the Fixed Short List.
- Picklist headers: All of the entries for the reference list that you selected in the Code Set field are display on the left side of the screen.
- Select one or more providers or reference list entries from the list on the left side of the screen.
- Click the Expand Right button to add the selected providers or reference list entries to the Short Fixed List.
- Repeat Steps 2-5 until you have selected all of the desired entries for the Short Fixed List.
- Use the Top, Up, Down, and Bottom buttons to order the items in your list.
- To remove an entry from your list, on the right side of the dialog, click the entry you want to remove and then click the Remove button (for providers) or the Expand Left button (for reference list entries).
- Click OK when you are done creating the Short Fixed List.
Allow Access to Full List
(Web, Android, Apple) This setting is available only when Fixed or Configured Restrictions is selected for the Show Short List attribute. It determines whether the user who is entering the charges can select from only the Fixed Short List or the Configured Restrictions entries, or whether they can also search for and select other values for the charge header field.- When Allow Access to Full list is not checked: When viewing this header during charge entry, the user sees only the Fixed Short List or the Configured Restrictions entries, and can select only those entries.
- When Allow Access to Full List is checked: When viewing this header during charge entry, the user sees the Fixed Short List or the Configured Restrictions entries, but also has access to the full list of available values for this field. This enables the user to select other values for this charge header field when necessary.
See the notes under Show Short List regarding how mobile devices behave when Show Short List is set to “Configured Restrictions,” in conjunction with Allow Access to Full List.
For information about how you can limit the additional Search feature based on provider Role, see Roles.
Short List Max
(Web, Android, Apple) This setting is available only when Most Recent is selected for the Show Short List attribute. Enter the maximum number of entries that you want to display on the Most Recent Short List.Batch Charge Entry
(Web) This setting determines whether the header is visible in the Charges > Batch Charge Entry option in the Desktop Charge Capture application (not applicable to Mobile Charge Capture). When enabled for a transaction-level header, the header is displayed at the top of the main Batch Charge Entry screen. When enabled for a charge-level header, the header is displayed on the Charge Transaction screen within the Batch Charge Entry option (when selecting the charge and diagnosis codes). There are four required charge transaction headers for the Batch Charge Entry option: Service Date, Billing Provider, Billing Area, and Service Site. These four headers have the Batch Charge Entry attribute selected by default and cannot be changed. To enable any additional transaction-level or charge-level headers to appear in the Batch Charge Entry option, you must select the Batch Charge Entry attribute for those headers. If you wish to use a set of parent/child dependent headers, you must select the Batch Charge Entry header attribute for the parent header, as well as for all of the dependent headers. See Add Dependent for more information about parent/child headers. Please note that the Visibility attribute must also be set to “Visible” in order for any header to display in the Batch Charge Entry option. This includes the four default headers listed above, any additional transaction-level headers including parent/child headers, and any additional charge-level headers. Also note that initial and subsequent default values are handled differently for charge transaction headers in the Batch Charge Entry option. See Initial Default Value and Subsequent Default Value for more information.Charge Header
(Web, Android, Apple) This setting determines at which level the charge header should be associated:- When the Charge Header attribute is unchecked: The header is associated with the entire charge transaction as a whole (commonly referred to as a “transaction-level header”). Billing Provider and Service Date are examples of this type of header; there is only one billing provider and one service date for the entire transaction.
- When the Charge Header attribute is checked: The header is associated with each of the individual charge codes on the transaction (commonly referred to as a “charge-level header”). Supervising MD Present and Rendering Provider are examples of this type of header. For example, your organization might use the Rendering Provider header if it bills for both professional and technical services on the same charge transaction. The charges for professional services would have a physician as the Rendering Provider, and the charges for the technical services provided by the facility (room preparation, nurse assistance, nurse administration of immunizations) would have a nurse as the Rendering Provider.
Copy when copying transaction
(Web, Android, Apple) This setting determines whether the value in this field will be copied forward when a user copies a charge transaction containing this header. For the Billing Provider header, the setting is checked by default, so that when a provider copies a transaction on which they were the billing provider, their name is copied forward to the new transaction as well. However, if providers in your organization frequently copy transactions entered by other providers, you may want to uncheck this option, so that the billing provider from the source transaction is not copied forward to the new transaction (requiring the user to then change it to their own name).Required User Number
(Web, Android, Apple) This setting determines whether the selected provider is required to have a number associated with them. The list of user numbers shown is configured in a backend configuration file. For example, you might see entries such as HCFA number, or UPIN number. If a number type is selected, then when a provider is selected on a charge transaction, the provider must have that type of number associated with their provider information (on the User tab, Provider Info settings). If not, the person entering the charge receives a code edit warning message. Select None if a provider number is not required.Code Set
(Web, Android, Apple) The values for a Picklist header are chosen from a code set that is created in the backend system, a reference list that has been defined for your institution, or a reference list that you have defined.Initial Default Value
(Web, Android, Apple) This setting determines the default value for the field the first time a user creates a charge for a given patient on a given visit. Whatever you select here as a default is applied on a per user, per patient, per visit basis. This means:- The first time Dr. Smith enters a charge for Jane Doe on visit A, this Initial Default Value is used.
- The second and all subsequent times that Dr. Smith enters charges for Jane Doe on the same visit (Visit A), the Subsequent Default Value takes effect. If two visits have the same account number, such as might be the case when an ER visit transitions to an inpatient visit, they are considered to be the same visit.
- The first time Dr. Smith enters charges for Jane Done on a different visit (visit B), the Initial Default Value is used again. Or, the first time Dr. Smith enters charges for a different patient, the Initial Default Value is used again.
- For providers who enter their own charges (and therefore enter their own name as the Billing Provider), this feature does not have any effect.
- For billing administrators who enter charges on behalf of providers, this feature allows them to view a list of only the billing areas that are appropriate for the provider whose charges they are entering. If the correct billing area is not available for any reason (for example, if a Billing Provider changed departments, and an administrator were trying to enter old charges for the previous department), then an Additional Billing Areas option is shown. The administrator can click it to view all billing areas to which they themselves have access (based on their Set Charge Desktop View Access), which is most likely a broader list that will include the billing area that they need for the charge.
- For a Text or Numeric header, you will see “Blank” and then a list of data fields that you can choose from, such as “Account Number,” “Referral Code,” “Primary Care Physician,” “Financial Class,” and so on. The “Aux Info” and “Aux Info 0-9” fields can contain any type of data element, and are typically used to populate a header with a value from an inbound interface (such as an interface from your source ADT/Registration system or an inbound charge interface). For example, you might have an inbound charge interface that sends an “authorization number” via the “Aux Info 0” field, which could populate a charge header called “Authorization Number” that had “Aux Info 0” field listed as its Initial Default Value. Please note that each Aux Info value can only be used once, for one charge header.
- For a Provider header, you will see “Blank,” “Specific User,” “User’s Name,” and then a variety of provider types such as “Attending,” Admitting,” and so on.
- For a Picklist header, you will see “Blank” and a list values from the code list.
- For the standard Billing Area and Service Site headers, you will see “Blank,” values from the billing area and service site code lists, or also “Default by ADT.” The “Default by ADT” option completes the Billing Area and Service Site fields with information associated with the visit that is interfaced from the ADT/Registration System. (See also Configure Service Sites and Defining Billing Areas.)
This note applies to both the web and handheld platforms, for the Billing Area header only. If the Initial Default Value for the header is set to “Blank,” and the user belongs to only one department, and that department has only one Billing Area, that billing area is automatically selected during charge entry.
- For the standard Billing Area header only, an option for “Default by Commure Pro Visit Type and Location” is also available. As described in Defining Billing Areas, you can specify that a billing area should only be used for certain Commure Pro Visit Types, or when the service is rendered in certain Locations. If you have configured your billing areas in this manner, then when you choose “Default by Commure Pro Visit Type and Location” as the Initial Default Value for the Billing Area charge header, it means that the system will attempt to default the appropriate billing area based on the patient’s type of visit, and/or the location where the service was rendered. If there is a single billing area that is a match for the visit type and/or location, then that Billing Area will default into the field. If there is more than one billing area that is a match, nothing will default.
- For a Date header, you can choose an initial default of Today, or you can choose from the values listed below. This information comes from the visit that is interfaced from the ADT/Registration System.
- Appt/Admit Date: This is the scheduled date associated with visit types that have only a scheduled or appointment date (such as Outpatient visits). It is not populated for visits that have an admit and discharge date (such as Inpatient or ER visits).
- Arrive Date: This is the admit date associated with visits that have an admit and discharge date (such as Inpatient or ER visits). It is not populated for visits that have a scheduled date (such as Outpatient visits).
- Birth Date: The patient’s date of birth.
- Discharge Date: This is the discharge date associated with visits that have an admit and discharge date (such as Inpatient or ER visits). It is not populated for visits that have a scheduled date (such as Outpatient visits).
- Injury Date: The patient’s date of injury, if one was recorded in your source system.
Subsequent Default Value
(Web, Android, Apple) This setting determines the value for the field each subsequent time a user creates a charge for a given patient on a given visit. You can configure the Subsequent Default Value to be the same as the Initial Default Value, or you can configure it to be different. Whatever you select here as a default is applied on a per user, per patient, per visit basis. This means:- The second and all subsequent times that Dr. Smith enters a charge for Jane Doe on Visit A, the Subsequent Default Value is used.
- If patient Jane Doe has a new visit (Visit B), then first time Dr. Smith enters a charge on Visit B, the Initial Default Value will be used, and the second and all subsequent times that Dr. Smith enters a charge for Jane Doe on Visit B, the Subsequent Default Value is used.
- If two visits have the same account number, such as might be the case when an ER visit transitions to an inpatient visit, they are considered to be the same visit. This means that if a provider enters a charge on the ER visit (and Initial Default Value is used), then when the same provider enters their first charge on the inpatient visit, the Subsequent Default Value will be used (since it will be considered the same visit).
- For providers who enter their own charges (and therefore enter their own name as the Billing Provider), this feature does not have any effect.
- For billing administrators who enter charges on behalf of providers, this feature allows them to view a list of only the billing areas that are appropriate for the provider whose charges they are entering. If the correct billing area is not available for any reason (for example, if a Billing Provider changed departments, and an administrator were trying to enter old charges for the previous department), then an Additional Billing Areas option is shown. The administrator can click it to view all billing areas to which they themselves have access (based on their Set Charge Desktop View Access), which is most likely a broader list that will include the billing area that they need for the charge.
- For a Text or Numeric header, you will see “Blank,” “Previous,” and then a list of data fields that you can choose from, such as “Account Number,” “Referral Code,” “Primary Care Physician,” “Financial Class,” and so on. The “Aux Info” and “Aux Info 0-9” fields can contain any type of data element, and are typically used to populate a header with a value from an inbound interface (such as an interface from your source ADT/Registration system or an inbound charge interface). For example, you might have an inbound charge interface that sends an “authorization number” via the “Aux Info 0” field, which could populate a charge header called “Authorization Number” that had “Aux Info 0” field listed as its Subsequent Default Value. Please note that each Aux Info value can only be used once, for one charge header.
- For a Provider header, you will see “Blank,” “Previous,” “Specific User,” “User’s Name,” and then a variety of provider types such as “Attending,” Admitting,” and so on.
- For a Picklist header, you will see “Blank,” “Previous,” and a list values from the code list.
- For the standard Billing Area and Service Site headers, you will see “Blank,” “Previous,” values from the billing area and service site code lists, and also “Default by ADT.” The “Default by ADT” option completes the Billing Area and Service Site fields with information associated with the visit that is interfaced from the ADT/Registration System. (See also Configure Service Sites and Defining Billing Areas.)
This note applies to both the web and handheld platforms, for the Billing Area header only. If the Subsequent Default Value for the header is set to “Blank,” and the user belongs to only one department, and that department has only one Billing Area, that billing area is automatically selected during charge entry.
- For the standard Billing Area header only, an option for “Default by Commure Pro Visit Type and Location” is also available. As described in Defining Billing Areas, you can specify that a billing area should only be used for certain Commure Pro Visit Types or when the service is rendered in certain Locations. If you have configured your billing areas in this manner, then when you choose “Default by Commure Pro Visit Type and Location” as the Subsequent Default Value for the Billing Area charge header, it means that the system will attempt to default the appropriate billing area based on the patient’s type of visit, and/or the location where the service was rendered. If there is a single billing area that is a match for the visit type and/or location, then that Billing Area will default into the field. If there is more than one billing area that is a match, nothing will default.
- For a Date header, you can choose a subsequent default of Today or Previous, or you can choose from the same default values as described above for the Initial Default Value field (Appt/Admit Date, Arrive Date, Birth Date, Discharge Date, or Injury Date).
Roles
(Web, Android, Apple) Your system might have several types of roles defined, such as User, Provider, Administrator, Referring Provider, or Hospitalist. Each person in your system can have one or more of these roles assigned to them (roles are assigned to persons via either of these options: Admin > User > Provider Info or Admin > System Management > Providers). When defining a Provider header, you can use the Roles setting to limit the persons that can be selected as a value for that header during charge entry. These limitations are enforced on both the web and handheld platforms.- If you select a single Role for a Provider header, only persons who have that role can be selected as a value for that charge header.
- If you select multiple roles for a Provider header, only persons who have at least one of those roles can be selected.
- If you do not select any roles for a Provider header, then any person can be selected as a value for that header, including users and non-users, providers and non-providers.
If you have defined a Fixed Short List for a Provider header, and also checked the Allow Access to Full List attribute, the Roles that you define here are the roles that are available to the user when they perform a Search for providers. For example, you might select providers that have a Billing Provider role as the entries for the Fixed Short List. But you might also want to allow users to search for Referring providers, if the provider they need is not on the Fixed Short List. In that case, you would check the Allow Access to Full List attribute. In addition, you would check the Billing Provider and Referring Provider roles here in the Roles attribute, thereby enabling them to search for both types of providers when necessary. See Show Short List and also Allow Access to Full List for more information.
Provider must have ID in Visit Facility
(Web, Android, Apple) This attribute applies only to Provider header types. If selected, then when the user searches for a provider in this header field, the system returns only those providers who have an ID in the same facility as the patient visit on which the charge is being entered (specifically, the provider’s alias authority must match the visit’s facility name). For organizations that have facilities in multiple dispersed locations, the list of providers can be very large; this setting helps narrow the list of possible matches for the end-user. Provider ID numbers can be viewed in Provider Info. If you enable this property and also select one or more roles in the Roles property, then a provider must have both an ID in the same facility as the patient visit and also a selected role, in order to appear in the list of available values for the provider header.Display Time Format
(Web) This attribute determines the format of time fields, and is available for only Time and Date/Time header types.- 12 Hr: Allows users to enter the time in 12 hour format, as in 08:00am or 08:00pm. If the user enters time in 24 hour format, it is converted automatically to 12 hour format.
- 24 h Hr: Allows users to enter the time in 24 hour military format, as in 08:00 or 20:00.
Add Dependent
(Web, Android, Apple) This attribute allows you to define a parent/child relationship between this header (the parent) and one or more dependent headers (the child headers). For example, you could define the Injury Date header to have a dependent header of Injury Type, so that if the user enters a date in the Injury Date header, they are then prompted to also complete the dependent Injury Type header. There are several important points that should be noted:- The header(s) that you intend to use as the dependent header(s) must already be defined as charge headers themselves, before you can add them as a dependent header for another header.
- If the header you intend to use as a dependent header has the Visibility attribute set to “Hidden, populated” or “Hidden, not populated,” the dependent header is not shown to the user on the Charge Transaction screen, and the dependency is ignored.
- Charge-level headers (those that have the Charge Header attribute selected) cannot have dependent headers, nor can they be used as dependent headers.
- In order to use a set of parent/child headers in the Charges > Batch Charge Entry option, the Batch Charge Entry attribute must be checked on the parent header and on all of its dependent child headers.
- The configuration of dependent headers at the Institution level can be overridden at the User level, just like all other header attributes. For example, if the dependent header’s Visibility attribute is set to “Visible” at the Institution level, but “Hidden, not populated” at the User level, then the user will not see the dependent header and the dependency will be ignored. Or if the dependent header has the Required to Save attribute checked at the Institution level, but it is not checked at the User level, then the user will be able to save the transaction without completing the dependent header.
- By design, the parent/child dependencies are based on the header configuration of the user entering the charge transaction. Our expectation is that in most cases, different types of users (providers and billers) who are reviewing the same charges will be configured with similar parent/child dependencies. However, parent/child dependencies can be configured differently for different users. For example, let’s say that a provider is configured to have a dependent header of Injury Type when Injury Date is completed, while a biller does not have that dependency set up. If the provider enters an Injury Date but does not complete the dependent Injury Type header, the transaction is assigned a Validity Error and sent to the Holding Bin (assuming the provider is configured to send transactions with errors there). When the biller looks at that same transaction in the Holding Bin, they will see that it has a Validity Error, but if they open the transaction, they will not see the error message in the Edits box detailing the reason for the error. The biller can resubmit the transaction, which will be saved without error, and then send the transaction to the Outbox.
- If not already created, create the header(s) that you want to use as dependent header(s), by following the steps in Add/Edit Charge Headers.
- When editing or creating the parent header, click the Add Dependent option.
- In the Dependent drop-down, select the first header (created in Step 1 above) that you want to be dependent to this parent header.
- Determine whether or not to the header should be Required to Save the transaction:
- When Required to Save is checked: If the user completes the parent header, then they must also complete the dependent header. If the user does not complete the dependent header and attempts to save the transaction, a message is displayed in the Edits box prompting them to also complete the dependent header. Their only option at that point is to either complete the dependent header or to discard the transaction. They cannot save the transaction as completed or as a draft unless they complete the dependent header. This behavior is the same as any other required header.
- When Required to Save is not checked: If the user completes the parent header, then they are encouraged to also complete the dependent header, but it is not mandatory. If the user does not complete the dependent header and attempts to save the transaction:
- On the web platform, a message is displayed in the Edits box prompting them to also complete the dependent header. However, they are allowed to proceed and save transaction as either a draft or a completed transaction even without completing the dependent header. In this case, the transaction is assigned a Validity Error status and is sent to the Holding Bin (if the user is configured to send transactions with errors there).
- On Android and Apple platforms, no message is shown to the user, but the transaction is saved with a Validity Error status and is sent to the Holding Bin (if the user is configured to send transactions with errors there)..
- Repeat Steps 3 and 4 for each header that you want to be dependent to this parent header.
- Select Save to save your changes to the parent header.
Clinical Notes Settings
The Clinical Notes Settings screen lets you set the default behavior for Android and Apple users within the health care facility. When you select Clinical Notes from the Edit Settings menu on the Institution tab, the Clinical Notes Settings screen opens. The Clinical Notes Settings screen lets you configure the following settings:Default # of instances for all clinical note types
(Android, Apple) This setting determines how many clinical notes for each patient are available to handheld users, for each type of clinical note. If your source system is MEDITECH® and your organization uses custom filters (as described below), then this setting determines how many clinical notes are available to handheld users, for each filter. The range is 1 (default) through 10.Maximum # of Days’ Worth of Notes to Keep Per Patient on the Handheld
(Android, Apple) This setting specifies the maximum number of days, between 1 and 180, worth of clinical notes data for each patient that will be stored on handheld devices. There are also some customizations that you can make to the Clinical Notes option. Contact your Commure Pro representative if you would like to implement any of these features:- You can create a custom display option for the center column of the Patient List tab on the Physician Portal (this is also the left column of the standard Patient Data Display) that shows only the clinical notes that belong to a specific category. For example, you might create a display option called “Scanned Documents” that shows only clinical notes of that type. Additionally, the drop-down filter in the custom display option can be hidden so the user is not able to switch to any other category when using this sub-module. This feature is implemented via an XML customization.
- You can exclude clinical notes with certain statuses (such as Canceled or Unverified) from appearing in the various displays on the web and handheld platforms. This feature requires a change to the pkConfiguration file.
- If your organization uses the Direct Integration to MEDITECH® with Downtime Solution configuration, you can customize the filters used for Clinical Notes. Clinical notes are derived from these MEDITECH sources:
- Departmental Reports, also known as Medical Records reports (MEDITECH Magic systems only) Configuration options (in MEDITECH Magic systems only) let you display departmental reports as clinical notes or as test results, either by department or (in the case of test results) by specific report type. For more information, consult with your Commure Pro representative.
- RAD/ITS notes (MEDITECH client/server systems only)
- Nursing Notes
- Nursing Interventions
- The Commure Pro system can also retrieve clinical notes from these additional MEDITECH sources, if requested:
- Emergency Department Management (EDM) Notes. The filter name used for this type of clinical note is EDM-Notes.
- Emergency Department Management Interventions (Assessments and Treatments). The filter names used for these types of clinical note are
EDM-Assessments and EDM-Treatments.
Lab Results Settings
If Lab Results is enabled for your organization, the Lab Results Settings screen lets administrators configure how lab result information is displayed. For example, you can determine the maximum amount of lab result data that can be stored on an Android or Apple device, determine which lab components should mapped onto panel diagrams, and more. The Lab Results Settings screen lets you specify the following settings:Max Amount of Patient Lab Data Stored on Handheld
(Android, Apple) This setting specifies the maximum number of days’ worth of patient lab data that can be stored on handheld users’ devices. The default value is 7 days. You can change this value to any number between 1 and 180. The value for this setting determines the upper limit for Default # of Days Lab Data to Download.Default # of Days Lab Data to Download
(Android, Apple) This setting specifies the default number of days’ worth of lab data downloaded to handheld users’ devices during a sync or refresh. You can change this value to any number between 1 and the value set for Max Amount of Patient Lab Data Stored on Handheld. Users can override this default setting via their Lab Results preferences.Map Panel Normalcy Status
(Web, Android, Apple) This setting maps Commure Pro normalcy status values to values that are interfaced from your source lab results system in order to display the correct normalcy status in the various displays of lab results. See Mapping Panel Normalcy Status for more information.Map Panel Completed Status
(Web, Android, Apple) This setting maps Commure Pro completion status values to values that are interfaced from your source lab results system, in order to determine the correct completion status of panels in the various displays of lab results. See Mapping Completion Status for more information.Map Chem 7/CBC Panels
(Web, Android, Apple) This setting allows you to map lab results to Chem7 and CBC panels onto panel diagrams. If your institution comprises multiple facilities, you can map different sets of components coming across the ADT feed from each facility to different lab panels. See Mapping Chem 7/CBC Panels for more information. There are also some configuration settings that control lab results data in the Physician Portal and Mobile Clinical Results applications. Contact your Commure Pro representative to implement any of these features:- Exclude lab results with certain statuses (such as Canceled or Unverified) from appearing in the various Lab Results displays.
- Exclude specific lab components or panels from appearing in the various Lab Results displays.
- Designate certain lab components or panels to display in the Vitals module, rather than in the Lab Results module (for example, Point of Care Glucose).
- Include labs with no result and no comments and display them with a status of “Pending.”
Mapping Panel Normalcy Status
The normalcy status indicates whether the lab result values are within a normal range. In the Commure Pro system, abnormal results are highlighted in yellow, and critically abnormal results are highlighted in red. You must map the normalcy statuses from your backend Lab Results system to the Commure Pro system, so that the Commure Pro system can determine the proper highlighting to use for a lab panel or component. A panel can have one or more components, and each component within a panel has its own normalcy status associated with it. Many of the lab result displays on both the Physician Portal and on handheld devices show summarized information for the panel as a whole. In these cases, the system must determine the overall normalcy status for the panel. To do so, the system reviews each of the individual component statuses in the panel, and selects the highest criticality status as the panel’s overall normalcy status. To see which statuses are unmapped:- Click the View Notices button in the upper right corner of the Commure Pro window. See Viewing Notices.
- Scroll down to Unmapped Normalcy Status in the notification window. Level 1 users can map panel normalcy statuses to component status labels as follows:
- On the Institution tab, choose Lab Results from the Edit Settings drop-down list.
- Click Edit next to the Map Panel Normalcy Status setting.
- Map each normalcy status from your source laboratory system to the appropriate value (Unknown, Normal, Abnormal, and Critical) in the Commure Pro system by clicking the radio button in the desired column and row. For example, you might map HH (critically high) and LL (critically low) to the Critical status, and H (abnormally high) and L (abnormally low) to the Abnormal status. Any statuses that you map to the Critical column will appear with red highlighting, while those you map to the Abnormal column will appear with yellow highlighting. Any statuses mapped to the Unknown or Normal columns, and any statuses that are unmapped, are not highlighted.
- In the Quick Details box, click Save and then OK to save the new mappings. In the various displays of lab results, the label used for an individual component’s normalcy status is the same as that used in your backend system. For example, even though you mapped the backend status L to the Commure Pro status of Abnormal in the example above, the normalcy status still displays as “L” for an individual component. In cases where the overall normalcy status for a panel is derived from reviewing all of the components within the panel, the system uses the mapped normalcy status of Unknown, Normal, Abnormal, or Critical.
MEDITECH® normalcy statuses are based on a combination of an abnormal flag and the normal range defined in the MEDITECH system. Assuming that you have mapped the MEDITECH normalcy statuses correctly in this option, Commure Pro handles MEDITECH lab results as follows:
- If the MEDITECH abnormal flag contains an abnormal status, and the normal range is defined, the status in Commure Pro is the same as the MEDITECH abnormal status, and appropriate red or yellow highlighting is applied.
- If the MEDITECH abnormal flag contains an abnormal status, and the normal range is empty, the status in Commure Pro is the same as the MEDITECH abnormal status and appropriate red or yellow highlighting is applied. However, in the Component List View on the Physician Portal the result displays in the Norm/Unk column, since there is no normal range defined.
- If the MEDITECH abnormal flag is empty, and the normal range is defined, the status in Commure Pro is Normal. The status is not highlighted in red or yellow, since the Normal status is not typically highlighted.
- If the MEDITECH abnormal flag is empty, and the normal range is also empty, the status in Commure Pro is Unknown. The status is not highlighted in red or yellow, since the Unknown status is not typically highlighted.
Mapping Completion Status
The completion status of a lab result indicates whether the processing of the laboratory result is finished. The completion statuses used in the Commure Pro mapping option are Pending, Preliminary, Unknown, and Final. These statuses are listed in order from the least complete to the most complete. In the Commure Pro system, a panel can have one or more components. Each component within a panel has its own completion status associated with it. Many of the lab result displays on both the Physician Portal and on handheld devices show summarized information for the panel as a whole. In these cases, the system must determine the overall completion status for the panel. To do so, the system reviews each of the individual component statuses in the panel, and selects the “least complete” status as the panel’s overall completion status.
In this option, you can map the completion statuses from your backend Lab Results system to the four statuses in Commure Pro system, so that the priority order of your backend system’s statuses can be determined. For example, let’s say your backend system uses these statuses, in order of least to most complete: (P)ending, (I)nitial, (U)nknown, and (F)inal. You would map them to Pending, Preliminary, Unknown, and Final, respectively, in the Commure Pro system. If your backend system uses more than four completion statuses, or if you think the number of statuses may increase at some point in the future, you should leave this option unmapped, and instead use the Completed Status reference list as an alternate method for prioritizing the statuses. See Relationships for instructions. Do not map completion statuses in both options; map them in either the Completed Status reference list or in this Map Panel Completed Status option.
In rare cases, some test results (such as microbiology results) are grouped with lab results, and are included in the lab results displays. If your system is configured this way, the completion statuses for test results must also be mapped, using either this option or the Completed Status reference list. If the completion statuses for the test results and lab results use similar naming conventions, they may appear to be duplicates in this option, even though they are in fact separate statuses (those for the test results, and those for lab results).
- Click Edit next to Map Panel Completed Status.
- In the Map Completed Status form, click the radio button in the desired column and row. Map each completed status from your source laboratory system to the appropriate value (Pending, Preliminary, Unknown, or Final) in the Commure Pro system by clicking the radio button in the desired column and row. For example, you might map (I)nitial (from your backend system) to Preliminary (in the Commure Pro system). If a label is unmapped, its value is N/A.
- In the Quick Details box, click Save and then OK to save the new mappings.
Any unmapped statuses are treated as if they were mapped to Unknown.
Mapping Chem 7/CBC Panels
To map components to a Chem 7 or CBC panel:- Click Edit next to Map Chem 7/CBC Panels.
- In the Mappable Panels form, select a panel that is not yet mapped as indicated by the Not Mapped status in the Mapping column.
- Click Map in the Quick Details box.
- A dialog prompts you to select which type of panel you want to map. Click:
- Chem 7 to map components to a Chem 7 panel, or
- CBC to map components to a CBC panel.
- In the panel diagram, select the component from each drop-down list that you want to assign to each position in the diagram. Please note that all values must be mapped in order for the diagram to display correctly on handheld devices.
- When you are done mapping components, click Save.
To change the layout of a panel that is already mapped
- In the Mappable Panels form, select the panel you want to change, and click Map in the Quick Details box.
- In the panel diagram, select the desired components from the drop-down lists, and click Save.
- To make your changes immediately visible to all users, you must clear the web and session caches via the following option:Admin tab > System Management tab > Misc option > Clear Web & Session Caches button. See Clear Web & Session Caches for more information. To unmap a panel that is already mapped:
- In the Mappable Panels form, select the panel, then click Clear Mapping in the Quick Details box. To search for a particular panel or component by name:
- Click the Search button in the Quick Details box.
- In the Search for Panel dialog, type all or part of the name of the panel or component you are looking for in the text entry field, then click Search.
- If any matching panels or components are found, they appear in the Mappable Panels form.
Medications Settings
The Medications Settings form lets you set the default behavior for the amount of data stored by the Medications module for Android and Apple users. A medication list contains listings of all medications administered to the patient, and the orders given by the physician. When you select Medications from the Edit Settings menu on the Institution tab, the Medications Settings form appears. The Medications Settings form lets you configure the following settings:Default # of days for medication order history
(Android, Apple) This setting specifies the number of days’ of medication order history that is available to handheld users when they sync or refresh their handheld devices. The range is 1 through 30 days. Every order may have a Discontinued Date and an End Date:- The End Date may be set when the medication is initially ordered. For example, if a medication is to be given for 14 days, the End Date would be 14 days after the medication is started.
- If the medication is discontinued after 3 days, for example because of an adverse reaction, the Discontinued Date is set to the date the medication is discontinued but the End Date is not modified.
- A blank value for both dates means that the medication is to be continued indefinitely into the future.
Number of days for MAR history
(Android, Apple) This setting specifies the number of days’ worth of Medication Administration Record (MAR) history that is available for handheld users when they sync or refresh their handheld devices. The range is 0 through 7 days.Commure Pro supports MAR data only with MEDITECH**®** back-ends. It does not currently support MAR data with HL7 back-ends.
- You can exclude medication orders with certain statuses (such as Canceled or Unverified) from appearing in the various displays on the web and handheld applications.
- You can choose to display either trade or generic names for drugs in the various displays on the web and handheld devices. The default setting is to show generic names. If you choose to show trade names, in cases where there are no trade names available, the generic names are displayed instead.
Medication Status Sort Order
(Web) This setting is visible to only Level 0 and 1 users who are site administrators. It is used to define the sort order for medications when they are sorted by Status in the Medication Orders module. Once the sort order is set, users can click the Status heading in the Medication module to sort the medications list in the order defined by this setting.This applies to non-CPOE sites only.
- Click the [Sort] link next to Medication Status Sort Order.
- Top- Moves a status to the top of the sort order.
- Move Up- Moves a status up one position in the sort order.
- Move Down- Moves a status down one position in the sort order.
- Bottom - Moves a status to the bottom of the sort order.
- Alphabetize- Arranges the statuses in alphabetic order from A to Z.
- Click to select the status you want to move and use the Top, Move Up, Move Down, Bottom, or Alphabetize buttons to move the status into position.
- Click the Save button.
Messaging Settings
If Commure Pro Messaging is enabled for your organization, the Messaging Settings screen lets administrators configure the options that are available. Some settings described here are dependent upon other settings, so you may not see all of the settings listed below. The Messaging Settings screen lets you specify the following settings:General
Message Types
(Web, Apple, Android) This setting controls the types of messages users can receive via Commure Pro Messaging. Select the message type(s) you want to enable for the system or deselect the type(s) you want to disable.Changing this setting requires that the Mobilizer be restarted.
- General: these are messages sent between Commure Pro Messaging users. This is the default message type and will always remain selected, as all Commure Pro Messaging users can receive messages from other users.
- New Result Notification: these are system-generated messages to notify providers when the result for a test or lab they ordered has been received. These types of messages are displayed within a Notifications conversation in the Recent Conversations list. When this message type is enabled, two additional settings become available that allow you to prevent a specific result status from initiating the new result notification message. By default, these settings are blank so that the first time the result is received, regardless of its status, it initiates the new result notification message. These settings let you specify the result statuses that do not indicate a result is available, so the notification should not be sent yet. When the result status changes to one that is not listed in the setting, the new result notification message is sent to the user.
This message type must be enabled in order for the Order Group property to become available.
Include Partial Patient Name in Messaging Push Notification
(Android, Apple) This setting controls if part of a patient’s last name is visible in the push notification sent to a device when a provider receives a message related to a patient. For example, patient links sent via Commure Pro Messaging, or clinical result messages sent when “New Result Notification” Message Types are enabled.- When set to No (the default), the patient’s name is not included in the push notification. Instead, text displays stating that a new message is available and who sent the message.
Msg from Jones (Cardiology) A push notification when a lab result is received:
CBC W/ AUTO DIFF (3 crit, 2 abn)
- When set to Yes, the push notification text displays the type of message followed by the first three letters of the patient’s last name and their first initial. Additionally, for lab results, the number of abnormal and critical results are appended to the notification text in parenthesis if any exist.
Msg about Dar, M from Jones (Cardiology) A push notification when a lab result is received:
CBC W/ AUTO DIFF for Dar, M (3 crit, 2 abn)
Enable Group Messaging
(Web, Android, Apple) This setting controls if Commure Pro Messaging users can start and manage a group message.- When set to No (the default), group messages are disabled in Commure Pro Messaging.
If Group Messaging is disabled after it had been enabled, group conversations are removed from the Recent Conversation list and new group messages can no longer be created by any user.
- When set to Yes, a + New Group button is available in the Commure Pro Messaging window, on the Search screen.
If Allow Searching On-Call Schedules within Messaging is enabled, the + New Group button is available on the Name tab. Group messages are not available for on-call services nor non-Commure Pro users).
Enable Scheduled Message Delivery
(Web) This setting controls if Commure Pro Messaging users are able to schedule a message to be delivered at a later date and time.- No (the default): When set to No, Commure Pro Messaging users are unable to schedule when a message will be sent.
- Yes: All Commure Pro Messaging users are able to choose the date and time when a message will be sent.
Enable Do Not Disturb
(Web) This setting should be set to No.Configure Messaging Roles
: (Web, Android, Apple) Commure Pro Messaging can display user roles, in addition to other information about a provider, to help further identify users in search results and in conversations. This setting lets administrators map the various types of roles that exist for Commure Pro Messaging users in Commure Pro, and for non-Commure Pro Messaging users who exist in Meditech, with a defined role label that represents all of the selected roles. Once defined here, the role label is displayed in Commure Pro Messaging. For Commure Pro Messaging users, the Commure Pro Roles reference list is used as the source for list of Commure Pro Roles that are available in this Roles Mapping tool. For non-Commure Pro Messaging users in a Meditech system, nursing and provider user types are retrieved from Meditech, and then used to populate the Meditech Roles list in this tool. From left to right, the following columns are available for mapping roles:- Label: This is the role name that will display in Commure Pro Messaging. The Label is intended to represent a number of similar roles that exist in the Commure Pro Roles reference list and in Meditech.
- Commure Pro Roles: This is the list of roles that exist in the Roles reference list in Commure Pro.
- Meditech Roles: This is the list of provider and nursing user types from Meditech. Each user type is represented by a two-letter mnemonic (for example: RN, CM, etc.). An administrator familiar with the Meditech dictionaries may need to provide a description of each mnemonic, if the role is not easily identifiable.
- Priority: Some users may have more than one role associated with their user. The Priority field lets you define which label to display for a user who has more than one role associated with their user. Lower values have priority over higher values (meaning a role with a value of 1 has priority over a role with a value of 2).
- Delete: This button deletes the entire row. You cannot undo a deleted row.
- Add New Roles: This button adds a new row to the bottom of the list so you can map another role.
- Refresh Nurse Privilege Role: This button refreshes the list of Meditech Roles to make sure it is up-to-date with the Meditech system. If changes are made to the user types in Meditech, clicking the Refresh Nurse Privilege Role button updates the Meditech Roles list to include new types that have been added in Meditech, or remove types that have been deleted in Meditech. If a user role label has been mapped to a Meditech Role that is removed, the user role is deleted (unless the user role also has a Commure Pro Role mapped to it; in this case only the Commure Pro Role would remain mapped to the user role).
- In the Messaging Roles screen, type the name of the role you want to define in the Label field. This field accepts up to 100 characters.
- Select the roles you want to map to the Label.
- Click the Commure Pro Roles drop-down, and then select each of the roles that you want to map to the Label you have defined.
- For Meditech sites, click the Meditech Role drop-down, and then select each of the roles that you want to map to the Label you have defined.
Once a role has been selected, it is not available for use in another mapping row.
- Type a number to define the Priority for this mapping (must be greater than 0).
- (Optional) To map another role, click the Add New Roles button and repeat these steps.
| Mnemonic | Description | Mnemonic | Description |
|---|---|---|---|
| AUDAD | Audiology Aide | PCA | Patient Care Assistant |
| CC | Clinical Coordinator | PCC | Patient Care Coordinator |
| CDI | CDI Specialist | PCT | Patient Care Technician |
| CHAP | Chaplain | PCT1 | PT Care Tech - Level I |
| CLS | Child Life Specialist | PCT2 | PT Care Tech - Certified |
| CM | Case Manager | PCT3 | PT Care Tech - Multiskill |
| CNA | Certified Nurse Assistant | PHARM | Registered Pharmacist |
| DD | Department Director | PHATC | Pharmacy Tech/intern |
| DI | Diagnostic Imaging Tech | PT | Physical Therapist |
| DT | Dietetic Technician | QM | Quality Management |
| EEG | EEG Tech | RD | Registered Dietitian |
| EMT-P | Emergency Dept Paramedic | RD/ES | Reg Dietician/exerc.spec. |
| GN | Graduate Nurse | RHB | Rehab Services |
| IS | Information System Staff | RMT | Massage Therapist |
| LAB | Lab | RN | Registered Nurse |
| LPN | Licensed Practical Nurse | RT | Respiratory Therapy |
| MD | Provider | SL | Support Line Staff |
| MHW | Mental Health Worker | SLP | Speech Language Pathologist |
| MR | Medical Records | SN | Student Nurse |
| MR2 | Medical Records - Print | SPT | Speech Therapist |
| MT | Med Tech (Cellular Ther) | SRT | RT Student |
| NA | Nurse Aide | STRD | Student Dietician |
| NAV | Nurse Navigator | SW | Social Worker |
| NP | Nurse Practitioner | TECH | Technician |
| NURTE | Nurse Tech Level 2 | TRAN | Transporter |
| ORT | Operating Room Technician | US | Unit Secretary |
| OSR | On Site Reviewer | WC | Ward Clerk |
| OT | Occupational Therapist |
On-Call Schedule Integration
Allow Searching On-Call Schedules within Messaging
(Web, Android, Apple) This setting controls if Commure Pro Messaging users can search the hospital’s on-call schedule system to find an on-call provider as a message recipient. When enabled, users can access the on-call schedule to find the on-call provider for their facility (or facilities). Before enabling On-Call Schedule searches, contact your Commure Pro support representative to ensure you have all of the required details needed for configuring this functionality.- When set to No (the default), on-call system searches are disabled in Commure Pro Messaging.
- When set to Yes, an On Call tab is available in the Commure Pro Messaging window to search for a provider in the on-call system, and a Name tab is available to search for all users with Commure Pro Messaging enabled.
On-call schedule searches are only available to users who are associated with at least one facility.
SPOK Provider Details URL
When the setting Allow Searching On-Call Schedules within Messaging is enabled, an entry displays for each On-Call System that has been configured in the Dispatcher properties file. This is a read-only field that is automatically populated with the URL used to retrieve provider detail information for each integrated system.New Result Notification
The New Result Notification settings are available only if the New Result Notification message type has been selected under the setting Message Types. Lab Results.Statuses to Exclude from New Result Notification
This setting becomes available when the New Result Notification message type is enabled. Type a lab result status that you want to exclude from initiating result notification messages. Results that are returned with a status listed here do not trigger a result notification message when they are received in Commure Pro. To add more than one, separate each status with a comma. Test Results.Statuses to Exclude from New Result Notification
This setting becomes available when the New Result Notification message type is enabled. Type a test result status that you want to exclude from initiating result notification messages. Results that are returned with a status listed here do not trigger a result notification message when they are received in Commure Pro. To add more than one, separate each status with a comma.Consult Request Settings
Send Initial Notification
This setting is for a future release and should be disregarded.Consulting Provider Field on Order
This setting is for a future release and should be disregarded.Reason for Consult Field on Order
This setting is for a future release and should be disregarded.Consult Orders Categories
This setting is for a future release and should be disregarded.Back End Order Statuses to Exclude from Consult Notification
This setting is for a future release and should be disregarded.Federated Messaging
The Federated Messaging settings are available only if the setting Enable Federated Messaging has been enabled for the site.Load All Users into Federated Messaging Directory
(Web, Apple, Android) This is one of the components required when Enable Federated Messaging is enabled for a site. This setting lets Level 0 Administrators perform a bulk import of non-Commure Pro Messaging users from Directory Services into the Federated Directory in Commure Pro. If users have already been added to the Federated Directory, Directory Services is checked for new users that exist there, and adds them to the Federated Directory if they haven’t been added yet. A user must be assigned to at least one department to be loaded via this process.This process requires that the other Federated Messaging settings have been configured first.
Directory Services Base URL
(Web, Apple, Android) This is one of the components required when Enable Federated Messaging is enabled for a site. The Directory Services Base URL defines the location of the directory service where messaging users and their preferences are registered. The URL can be found by accessing the FHIR directory service in the API store. Contact your Commure Pro support representative to configure this setting.A warning message appears upon saving this setting if it has been entered incorrectly. To check the connection details you’ve entered before saving, click the Connection Test button. A message appears to let you know if the connection setup is correct or incorrect.
If the Directory Services URL is unavailable or inaccessible, then only the local database of Commure Pro users will be searched.
Authentication Token for Directory Services
(Web, Apple, Android) This one of the components required when Enable Federated Messaging is enabled for a site. The Authentication Token for Directory Services is generated in the API store when creating an API application. Hospital IT staff should be familiar with the details of this process at their site. In general, the steps are:- Setup an API store account or sign-in to the API store.
- Create an API application to connect with the FHIR directory service.
- Subscribe the application to the Directory service API.
A warning message appears upon saving this setting if it has been entered incorrectly. To check the connection details you’ve entered before saving, click the Connection Test button. A message appears to let you know if the connection setup is correct or incorrect.
Endpoint for Federated Messages
(Web, Apple, Android) This is one of the components required when Enable Federated Messaging is enabled for a site. The Endpoint for Federated Messages server is responsible for sending messages between the Commure Pro Messaging client and other messaging clients. Bluewave receives the message from the sender then sends the message to the recipient that was selected in the directory service. Contact your Commure Pro support representative to configure this setting.MHB Care Team Integration
Dynamic Care Team is a feature that allows Commure Pro Messaging users to view the care team for a patient’s current InFacility visit, and exchange messages with other care team providers who are also Commure Pro Messaging users. A patient’s care team is defined and maintained in an external system. The following settings are available to configure the Commure Pro application to pull specific data from the external system and display it in Commure Pro.If care team data is not displayed correctly or as expected in Commure Pro, then check the source system to ensure the data has been entered correctly.
Enable Care Team Integration
(Web, Android, Apple) This setting controls if care team data is available to users on the web portal and on handheld devices for the site.- When set to Yes, the Dynamic Care Team button is available in the following places:
- On the web portal: when patient context is active in a conversation in Commure Pro Messaging.
- On handheld devices: in the Patient Details module, Communication module, and when patient context is active in a conversation in Commure Pro Messaging.
The Dynamic Care Team is only available for patients whose current visit is an InFacility visit, and if the care team data exists in the external system.
- When set to No (the default), the Dynamic Care Team button is not available on handheld devices.
MHB Care Team Integration URL
(Web, Android, Apple) This one of the components required when Enable Care Team Integration is enabled for a site. This MHB Care Team Integration URL specifies the external system server where care team data is requested and retrieved via API. Contact your Commure Pro support representative for help with configuring this setting.MHB Care Team Integration User Name
(Web, Android, Apple) This one of the components required when Enable Care Team Integration is enabled for a site. The User Name (Client ID) is used for the API request when pulling care team data into Commure Pro from the external system. The external system provides the Username value after a successful authentication request. Contact your Commure Pro support representative for help with configuring this setting.MHB Care Team Integration Password
(Web, Android, Apple) This one of the components required when Enable Care Team Integration is enabled for a site. The Password (Client Secret) is used for the API request when pulling care team data into Commure Pro from the external system. The external system provides the Password value after a successful authentication request. Contact your Commure Pro support representative for help with configuring this setting.Orders Settings
The Order Settings screen lets you set the default behavior for the Order Status (standard) or CPOE Orders modules, depending on which is implemented at your organization. When you select Orders from the Edit Settings menu on the Institution tab, the Order Settings screen opens. The Order Settings screen lets you configure the following settings:Default # of days back for all order types
(Android, Apple) This setting determines the number of days going backward, between 1 and 30, that order status or CPOE order information is available for handheld users.Default # of days forward for all order types
(Android, Apple) This setting determines the number of days going forward, between 1 and 7, that order status or CPOE order information is available for handheld users.Regex to specify valid characters
(Web, Apple) Specifies a default list of text characters that clinicians can enter into text fields during order entry in the CPOE Orders module. This setting applies to clinicians entering orders both on the portal and on mobile devices. When clinicians enter one or more (UTF-8) characters that are not included on this list, they are warned about their use of illegal characters when they attempt to submit orders, and they are prompted to update these fields before they can proceed with submission of their order(s). This list is defined using Java regular expressions; do not make changes to this list unless you fully understand the syntax used to form regular expressions. There is also a configuration setting in the Commure Pro configuration files that lets institutions exclude orders with certain statuses (such as Canceled or Unverified) from displaying on both your web and handheld applications. Contact your Commure Pro representative for more information about implementing this feature.Patient List Settings
The following settings govern the behavior of the patient list across your entire institution.Manual Patient Registration
Auto-Create Room and Bed from Manual Patient Registration
(Web, Android, Apple) This setting determines whether the user is able to manually create a Room and Bed when manually creating a patient. The default setting is No. On the web, the user must first select a Facility and Nursing Unit. The feature then works as follows:- When this preference is set to Yes, a Create new room and bed link appears on the web manual registration screen. The user clicks it and enters a room and bed in the resulting dialog box.
- If there is a match for the room under the chosen facility/nursing unit, but not the bed, the room is set to match the entered room, and a record for the bed field is created based on what the user entered.
- If there is no match for room under the chosen facility/nursing unit, records for the room and bed fields are created in the system, based on what the user entered.
- The user is not allowed to create a bed without a room, as this does not fit the room/bed hierarchy.
- When this preference is set to No, the Create new room and bed link does not appear, and the user must select from the Room and Bed drop-down lists.
- When this preference is set to Yes, the Room and Bed drop-down lists allow the user to either select an existing room and bed under the chosen facility/nursing unit, or to manually enter new ones.
- If the user selects an existing room, but enters a new bed, the room is set to match the entered room, and a record for the bed field is created based on what the user entered.
- If the user enters a new room and bed, records for the room and bed fields are created in the system, based on what the user entered.
- The user is not allowed to create a bed without a room, as this does not fit the room/bed hierarchy.
- When this preference is set to No, the user must select an existing room and bed from the Room and Bed drop-down lists.
On Android devices only, if the device does not have connectivity, the application cannot perform a search in order to display the existing rooms and beds. In this case, if Room or Bed are required fields, the user will not be able to complete the manual registration process. If they are not required, the user can complete the registration without them, and when the connection is restored, the registration is submitted.
Allow Auto Verification
This setting has no function should be set to No.Non-Verified Patient Visibility
(Web, Android, Apple) This setting determines where non-verified patients are displayed. Non-verified patients are those that have been manually registered (on any platform), but whose demographic data is considered incomplete. Depending on which option is selected here, the patient might appear only on the patient list of the person who created the patient (User Only), or can range all the way to All Users, where anyone in the institution can see the non-verified patient. Non-verified patients who are not visible to other users cannot be sent to other users, and do not appear in search results. However, any charges for the patient will go to the holding bin.- If this is set to User Only, the manually registered, non-verified patients are only displayed on the patient list of the person who created them.
- If this is set to User’s Department, anyone in the same department as the person who manually registered the patient can see the non-verified patient.
- If this is set to User’s Facilities, anyone in the same facility as the person who manually registered the patient can see the non-verified patient.
- If this is set to All Users (the default setting), anyone in this institution can see the non-verified patient, regardless of who manually registered the patient.
Visit Merging
(Web) This setting determines whether web users can merge two visits for the same patient into one visit.- Choose Not Allowed if visits cannot be merged.
- Choose Non-Verified Visits Only if only visits for manually created, non-verified patients can be merged.
- Choose Any Visits (the default setting) if there is no restriction on which visits can be merged. For example, if an authenticated patient had two visits entered (one interfaced from the ADT/Registration system, and one accidentally manually entered in the Commure Pro web application), then the two visits could be merged. The result is that information for the two visits, such as charges, are combined into one visit.
Handheld
Patient List Field Labels
(Android, Apple) This setting provides a scrollable list of text fields that let you customize how patient information field labels appear in the Patient Details module on handheld devices. For example, you could choose to display the label SSN instead of Social Security Number to save space on the handheld screen. It is important to note that the Facility MRN field label determines the label displayed for the facility medical record number. Facility MRN can be displayed in the Patient Details module if it is selected as a display field in the Patient Details Fields setting.Patient Registration Fields
(Android, Apple) This setting determines the fields that are displayed for handheld users when they manually register a patient on their device. Click [ Edit ] to view the available fields on the Handheld Patient Registration Fields screen. A list of fields are displayed; each field has a set of three checkbox options that may be selected (Editable, Required, and Required for Verification). Certain basic fields are required for all patients that are manually created on a handheld device and are therefore have all three checkboxes selected by default. The checkboxes for these fields cannot be changed:- First Name
- Last Name
- ADT Visit Type
- Appt/Admit Date with Time
- Location: On Apple and Android devices, this is two separate fields for Facility and Unit; only Facility is required by default. If you wish the Unit field to also be required, you must include the Room field on the manual registration screen and make it a required field (check the boxes for both the Editable and Required options).
- Check the Editable box for each field that you want to include on the manual registration screen. The field will be present, but not required.
- Check the Required box if you want to make the field a required field on the manual registration screen. The user will not be able to save the registration data unless they complete this field.
- The Required for Auto Verification box has no function, and should be left unchecked.
Set Defaults button
As an optional configuration, you can click the Set Defaults button to configure default values for the basic fields that are always required during manual registration on handheld devices (First Name, Last Name, ADT Visit Type, Appt/Admit Date with Time, and Location (Facility and Unit)). You can also override any of these institution-level default values at the user level, in order to customize them for a specific user, via the setting below: Admin - User - Patient List - Default Values for Manual Registration When you click the Set Defaults button, the Set Defaults window displays, with the options below:- Patient Name: Use the First Nam e and Last Name fields to populate the first and last names with a generic entry for those instances where the patient name is unknown, or where you do not want the provider to be required to manually enter it. For each field, you may select any of the values below. This feature behaves differently on Android versus Apple devices:
- Android devices:
- Specific Text Value: When you select this option, a text field is displayed where you can enter a specific text value as the desired default value. For example, you might enter “Temporary” as the First Name and “Patient” as the Last Name for an end result of “Patient, Temporary.” Note that you should not enter any actual patient names for this field. If you select Specific Text Value but leave the text field blank, then nothing is defaulted into the field.
- Username: Select this option to default the username of the person who created the manual registration. For example, if you select this option for both the First Name and Last Name fields, and the user CJONES registered a patient, then the end result would be: “CJONES, CJONES.”
- Unique ID (available only for the Last Name field): Select this option to default a unique number into the Last Name field, in the format of: nnnnnn.
- Apple devices: For regular manual registration, the defaults work as described above for Android devices. However, for photo registration a unique number (in the format of nnnnnn) is always appended to the defaulted value. For example, if Last Name is configured with a Specific Text Value of “Temporary” or blank, then the end result would be “Temporary nnnnnn” or “nnnnnn” respectively. Please note that for both Android and Apple, you can mix and match. For example, you could enter a text value of “Temporary Patient” as the First Name, and the provider’s username as the Last Name, for an end result of, for example: “CJONES, Temporary Patient.” - – ADT Visit Type: You can configure a default ADT Visit type if all of your manual registrations are for primarily one visit type, such as Outpatient.
- Appt/Admit Date/Time: You can specify a default appointment date and time of “now.”
- Facility: You can configure a default facility if all of your manual registrations occur in primarily one location.
- Unit: You can configure a default unit, if all of your manual registrations occur in primarily one unit.
Patient Details Fields
(Android, Apple) This setting provides a scrollable list of account and patient fields available for display in the Patient Details module on handheld devices. You can control which of the available fields are displayed by checking the box for each item. You can also determine the order in which these fields are displayed in the handheld module by clicking Sort.Patient Header (for Handheld)
(Android, Apple) This setting enables administrators to choose an additional patient identifier to display in the patient banner area at the top of the screen on mobile devices.- On Android devices, the standard patient banner contains the patient’s name, age in years, gender, visit location, and code status. Select one of these additional identifiers to add to the patient banner:DOB (date of birth), MRN (medical record number), or Account Number (also known as the Visit Number).
- On Apple devices, this setting does not affect Apple devices running Commure Pro version 9 or later. In this case, the standard patient banner contains the patient’s name, age in years, gender, MRN, visit location, and code status. The banner does not change no matter how this setting is configured.
Jump to Module after Adding Patient
This setting has no function.Jump to Module Button Label
This setting has no function.Other
Clinical Rounding Report Form Selection
(Web) This setting determines what forms are enabled to print as a Clinical Rounding Report. Click [Edit] to edit the available forms on the Clinical Rounding Report Form selection screen. Check the Editable box for each form that you want to display as an available Clinical Rounding Report to print.Problem List Settings
The Problem List Settings screen lets you add custom codes to the dictionary of diagnoses. When you select Problem List from the Edit Settings drop-down list on the Institution tab, the Problem List Settings screen appears. The Problem List Settings screen lets you configure the following setting:High-Risk Diagnoses
(Web, Android, Apple) This setting is used to classify a diagnosis as high-risk so that providers are required to enter Assessment and Plan information when selecting the diagnosis on the A/P tab in a History and Physical template. This helps promote accuracy and consistency in clinical documentation for high-risk problems. To classify a diagnosis as high-risk, define a High-Risk Diagnosis Group with keywords that can be matched to words or phrases that appear in a diagnosis descriptions. When a provider selects a diagnosis that includes one of the matching keywords defined in the Group, the diagnosis is considered high-risk and will require Assessment and Plan input. Once a High-Risk Diagnosis Group is defined here, a Quick Text group with entries can be created and linked to the High-Risk Diagnosis Group so that providers are prompted with relevant quick text when selecting a high-risk diagnosis in NoteWriter. For more information about Quick Text groups, see Defining Quick Text Entries for Your Departments and Users.Data is not auto-saved while entering High-Risk Diagnoses. If you navigate away from this screen without saving, changes will be lost; you must click Save to complete your entry.
For the Assessment and Plan field to be required in a note template created in NoteWriter Template Editor (NWTE), the setting High Risk Dx must be enabled for the template in NWTE.
- Click the Add Group button. A new group is added to the High-Risk Diagnoses list.
- Enter a name for the group that describes the high-risk diagnosis group you are identifying. For example, “Sepsis” could be used to describe a group created to identify diagnoses related to sepsis. Click outside the text field to add the add the name.
- Next to Matches, add the keywords and phrases that will be used to search diagnosis descriptions to identify a high-risk diagnosis. The group name is automatically added as a keyword. You can edit this as needed. For example, Sepsis could be created as a High-Risk Diagnosis Group, with matching keywords such as “sepsis,” “septic,” and “septic shock.”
- Next to Exclusions, add any keywords and phrases that should be used to exclude a diagnosis from being considered high-risk. For example, an exclusion could be, “family history of.” When a provider selects a diagnosis that includes that phrase, it will not be considered a high-risk diagnosis.
- Click Save at the bottom of the screen.
To edit a High-Risk Diagnoses Group
- Select the Group name, Matches keyword, or Exclusions keyword, then type the updated text you want in the field, and then click outside of the text field.
- Click the Save button at the bottom of the screen to save any changes.
To delete a Group and all of its keywords
- Click the Delete button next to the Group name you want to delete. The entire group is removed.
- Click the Save button at the bottom of the screen to save any changes.
To delete a keyword from a Group
- Select the keyword you want to remove and press the Delete button on your keyboard.
- Click the Save button at the bottom of the screen to save any changes.
Nomenclature Vocabularies
(Web, Android, Apple) The Problem List Nomenclature stores the ICD-9 and ICD-10 diagnosis codes that are used by the following modules: Problem List, Charge Capture, NoteWriter, and CPOE. This master list of diagnosis codes is loaded by your Commure Pro representative at initial implementation, and also each year when it is updated. With the assistance of your Commure Pro representative, you can make the following modifications to the master list of codes:- You can modify the effective or expiration dates associated with any ICD-9 or ICD-10 code.
- You can exclude certain ICD-10 codes from the search results when users search for a diagnosis. Please note that this change affects all desktop and mobile applications that use diagnosis searching, including Charge Capture, CPOE, NoteWriter, and the Problem List module.
- You can change the priority order in which diagnosis codes are displayed in the search results when a user searches for a diagnosis. When a user types a complete ICD-10 code directly into the search box, the system will default the description of the first search result in the list. Normally, the system moves diagnoses that prompt for more specificity to the top of the results so that users can leverage the coding guidance (this guidance only appears if the Admin > User > Problem List > Allow non-specific diagnoses setting is set to No). As a result, typing a complete code will sometimes result in one of the more obscure descriptions (that have the specificity prompts) being selected.
- There are users in your organization who often type ICD-10 codes directly into the search field and are sometimes confused by the descriptions that get assigned to those codes.
- You are comfortable not prompting for more specificity when a user types a complete ICD-10 code into the search field (even if that code could be made more specific).
- the diagnosis Code number
- a Description of the code
- Keywords that the application uses when a user searches for diagnoses
- an Active indicator
- an indication of the code’s Exclude status (see below)
- an Effective Date that defines when the code is available for use
- an Expiration Date that defines when the code is no longer available for use
To add a new custom diagnosis code
- Click the New Code button.
- Enter text for the required Code, Keyword, and Description fields in the Add Nomenclature Item: Custom Diagnoses box.
- Check the Exclude Flag if you want to exclude this diagnosis from some Charge Capture operations. You might decide to do this if your institution uses “dummy” codes that should be exempt from one or both of these Charge Capture operations:
- Copying the diagnosis when a user copies an existing charge transaction (with this diagnosis) to a new charge transaction.
- Showing an excluded diagnosis code on the patients’ Existing lists.
A diagnosis’ active status overrides its exclusion status. For example, if a diagnosis code is inactive (because either the Active flag is unchecked, or the charge transaction’s service date is not within the diagnosis code’s effective date range), then it will not copy forward, regardless of its exclusion status.
- Enter an Effective Date and an Expiration Date, if necessary.
- Click Save. The following table shows the maximum field lengths of these required diagnosis fields:
| Diagnosis Field Name | Field Length |
|---|---|
| Diagnosis Code | 64 |
| Diagnosis description | 500 characters |
| Diagnosis keywords | 4000 characters |
For information on CPT Code field lengths, see Field Length.
To search the list of custom diagnosis codes for a specific diagnosis
- Click the Search Codes button.
- Choose Search for Code or Search for Description from the Search Type drop-down list.
- Enter a search string into the Enter code or description field.
- Click Search to perform the search and display the results. If no results are found, consider reducing the number of search terms to expand the available results, or click on the View Entire List link.
Enable Problem Submission
(Web, Apple, Android) This setting enables the ability to send patient problem data that was entered directly in a Commure Pro application to your source system via an HL7 interface. This includes problems that were entered on charges, orders, and notes, as well as those entered directly in the Problem List module, for both the web and handheld platforms. (Problems entered on draft charges, draft notes, or as the “rule out” reason on an order are not sent via the interface.) The interface supports sending ICD-9, ICD-10, SNOMED, and IMO terms to the recipient system. Once enabled here, additional work is required by the Commure Pro integrations team in order for the problem data to flow to that system; contact your Commure Pro representative for more information.Select Facilities for Problem Submissions
(Web, Apple, Android) This setting is enabled only if Enable Problem Submission is set to Yes. Use this setting to specify one or more facilities for which problems should be sent. Problems will be submitted to your source system only for patients in those facilities. You must select at least one facility here, in order for problem data to be sent to the source system.Display alert on problems flagged as NOS
(Web) This setting determines whether all users will see the NOS Alert icon- Yes: The NOS Alert icon is displayed next to diagnoses that have the NOS designation when searching for a diagnosis to add to a patient’s problem list, a charge transaction, or a NoteWriter note. The user is still allowed to select the diagnosis; it is simply a visual cue to remind the provider that they should select a more specific diagnosis, if possible.
- No: The NOS Alert icon is not displayed next to any diagnoses.
This icon is not displayed when adding a diagnosis to a CPOE order, nor does it appear when adding diagnoses on handheld devices.
Display Common Terms in Diagnosis Searching
(Web, Android, Apple) This setting enables or disables the ability to filter diagnosis search results by common terms.- Yes: When searching for a diagnosis to add to a patient’s problem list, a charge transaction, a NoteWriter note, or a CPOE order, all users are able to filter the results by commonly used terms that are found in the search results. The filter is named Common Terms on the web and Android platform, and Filter Terms on the Apple platform.
- No: User are not able to filter diagnosis search results using the Common Terms/Filter Terms filter.
Display Specialty Filters in Diagnosis Searching
(Web, Android, Apple) This setting enables or disables the ability to filter diagnosis search results by specialty.- Yes: When searching for a diagnosis to add to a patient’s problem list, a charge transaction, a NoteWriter note, or a CPOE order, all users are able to filter the results by specialty. The filter is named Clinical Areas on the weband Android platform, and Specialty on the Apple platform.
- No: User are not able to filter diagnosis search results using the Clinical Areas/Specialty filter.
Test Results Settings
The Test Results Settings screen lets you set the default behavior for the Test Results module for Android and Apple users. When you select Test Results from the Edit Settings menu on the Institution tab, the Test Results Settings screen opens. The Test Results Settings screen lets you configure the following settings:Default # of instances for all test types
(Android, Apple) This setting determines how many instances of each type of test result for each patient are available to handheld users when they sync or refresh their handheld devices.Maximum # of Days’ Worth of Test Data to Keep Per Patient on the Handheld
(Android, Apple) This setting specifies the maximum number of days, between 1 and 180, that test results data will be stored for each patient on handheld devices.Link Information Type
(Apple) The test result information sent from your backend system to Commure Pro may indicate that one or more image viewers can be used to view the images associated with certain tests such as EKGs, echocardiograms, or radiologic tests. Although more than one image viewer may be specified in the database, only one viewer can be used on handheld devices. If more than one viewer is available, this setting must be used to specify which of the available viewers will be used on handheld devices. Your Commure Pro representative will work wit h the Commure Pro Integrations team to determine the proper value for this setting. Once specified here, along with the implementation of corresponding integrations work and XML customizations, a Cloud icon is displayed on the handheld Test Results Summary screen next to any test result that has images associated with it. The user selects the icon to launch the images in the image viewer. If desired, XML customizations can also be implemented to use different icons for different types of images, such as an X-ray icon for x-rays or an EKG icon for EKGs. The Physician Portal, in contrast, can be configured to use more than one image viewer, and as such, is not affected by this setting. On the Physician Portal, one or more hypertext links can be configured to display for a test result that has associated images. Again, integrations work and XML customizations are necessary to implement this feature. There are also some customizations that you can make to the Test Results option. Contact your Commure Pro representative if you would like to implement these features:- You can create a custom display option for the center column of the Patient List tab on the Physician Portal (this is also the left column of the standard Patient Data Display) that shows only the test results that belong to a specific category. For example, you might create a display option called “Radiology” that shows only test results of that type. Additionally, the drop-down filter in the custom display option can be hidden so the user is not able to switch to any other category when using this sub-module. This feature is implemented via an XML customization.
- You can exclude test results with certain statuses (such as Canceled or Unverified) from appearing in the various displays on the web and handheld applications. This feature requires a change to the pkConfiguration file. Configuration options (in MEDITECH Magic systems only) let you display departmental reports as test results or as clinical notes, either by department or (in the case of test results) by specific report type.
Vitals and I/Os Settings
The Vitals and I/Os Settings screen lets you set the default behavior for the Vitals and I/Os module for Android and Apple users. When you select Vitals & I/Os from the Edit Settings menu on the Institution tab, the Vitals and I/Os Settings screen appears. The Vitals and I/Os Settings screen lets you configure the following settings:Default # of days for all vital types
(Android, Apple) This setting determines the number of days worth of vital sign data that is available to handheld users when they sync or refresh their devices.Default # of days for all I/O types
(Android, Apple) This setting determines the number of days worth of I/O data that is available to handheld users when they sync or refresh their devices.First Shift Start Time
(Web, Android, Apple) This setting specifies the start time of the first shift of a 24-hour period. The Vitals Table view on the web, and the I/Os display on both the handheld and the web, all use the First Shift Start Time to calculate the correct time blocks to display in each column. For sites with NoteWriter enabled, Vitals and I/Os data over a 24-hour period is automatically pulled into the Exam tab. I/Os over a 24-hour period are auto-pulled starting with the Shift Start Time from the last completed shift range. (Vitals from last 24-hours are auto-pulled based on the note start time.) In addition, the I/Os section of the Clinical Rounding Report shows the I/O data for the last complete set of three shifts, from the first shift to the last shift, encompassing a 24-hour period. The table below illustrates some examples.| First Shift Start Time | Date/Time When Report Printed | Time Range Included on Report | Notes |
|---|---|---|---|
| 7:00 am | February 24, 8:00 am | February 23 7:00 am through February 24 7:00 am | I/O data after 7:00 am on February 24 is not shown. |
| 7:00 am | February 24, 5:00 am | February 22 7:00 am through February 23 7:00 am | The report must go back two days to find a complete 3-shift set. I/O data after 7:00 am on February 23 is not shown. |
| 11:00 pm | February 24, 8:00 am | February 22 11:00 pm through February 23 11:00 pm | The report must go back two days to find a complete 3-shift set. I/O data after 11:00 pm on February 23 is not shown. |
Shift Date to Display
(Web) This setting determines which shift day is displayed in the Date column for those shifts that cross days. The options are Start Date or End Date (the default is Start Date). For example, an institution that chooses “Start Date” will see the date as 10/14 for the shift running from 23:00 on 10/14/07 to 03:00 on 10/15/07. This setting affects the Vitals Table view on the web. In addition to the settings above, there are also some system configuration settings that can be used to control vital signs and intake/output data in the web and handheld applications. Contact your Commure Pro representative if you would like to implement any of these features:- You can specify a custom sort order for vital signs and intake/output readings. If no sort order is set, the default is alphabetical. If new vital sign or I/O components have been added after a custom sort order has already been applied, the new items are listed at the end in alphabetical order until they are placed into the sort order with the existing components.
- For clients with MEDITECH systems, the Commure Pro application typically retrieves vital sign and intake/output data from the laboratory module, pharmacy module, nursing interventions, and order entry.
- You can designate certain lab components to display in the Commure Pro Vitals module, rather than in the Lab Results module (for example, Point of Care Glucose).
- You can retrieve vital sign and intake/output data from the Emergency Department Management (EDM) Notes and Interventions module, in addition to the modules previously mentioned.