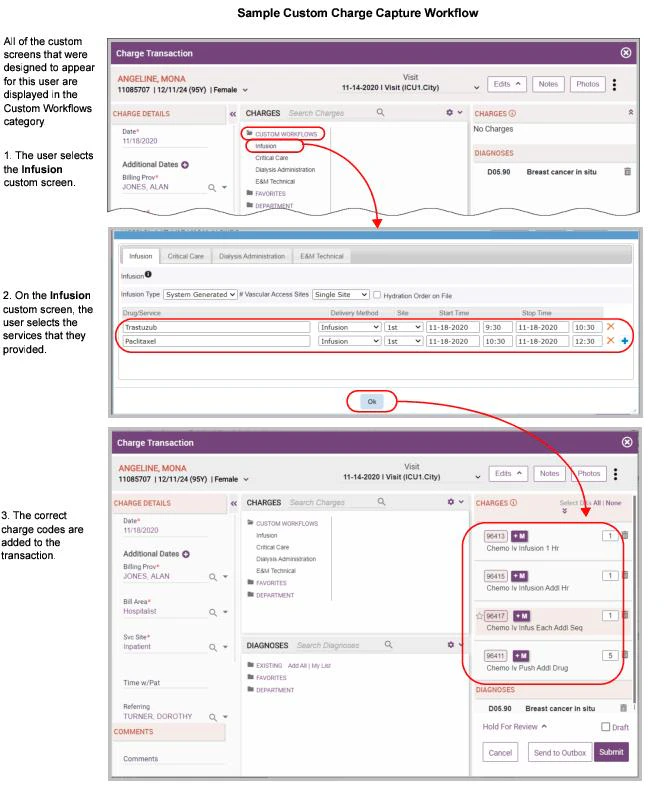
Build guided charge capture screens that walk users through E&M, infusion, and critical care billing without requiring coding expertise.
Custom Charge Capture Screens allow you to create custom charge capture screens that help users who are not familiar with coding rules to select the correct charge code. These screens contain a series of descriptive, user-friendly fields, or questions, that help the user to identify the procedures or tasks that they performed. Based on their answers, the correct charge codes are then automatically selected for them. Custom Charge Capture Screens can be helpful in the following scenarios:
Evaluation and Management Billing (E & M Screens): Nurses or physicians might need assistance in selecting the correct level of technical or professional E & M codes, respectively. For example, technical E & M codes have three levels (99211, 99213, and 99215), while professional E & M codes have five (99211, 99212, 99213, 99214, and 99215). By responding to a series of user-friendly fields, the nurse or physician can identify the amount of work that they performed, as well as any contributory factors. Based on their answers, the correct level of technical or professional E&M code is automatically selected.
General Billing (List screens): A nurse might need assistance in selecting the correct codes for ancillary services, such as room preparation, nurse exams, wound care, or immunizations. Or a physician might need assistance in selecting the proper charges for a complex workflow. By responding to a series of user-friendly fields, they can identify the exact services (and quantities) that were performed. Based on their answers, the correct CPT codes, modifiers, and quantities are automatically selected.
Critical Care Billing (Critical Care screens): Physicians might need assistance in selecting the correct charge codes for critical care billing. Typically, several physicians are involved in critical care incidents, and the complexity and total time spent by all of them must be evaluated in order to select the correct charge codes. Each physician, one after another, simply enters the amount of time that they personally spent with the patient for a particular critical care incident. As each physician enters their information, the cumulative information entered by all of the physicians is totaled and re-evaluated, and the correct CPT codes, modifiers, and quantities are automatically selected.
Infusion Billing (Infusion screens): A nurse or physician might need assistance in selecting the correct charge codes for chemotherapy infusion services. The user enters information such as the particular drugs that were provided, the method used to provide them, and how long they were provided. Based on this information, the correct CPT codes, modifiers, and quantities are automatically selected.
The custom screens containing the fields can be tailored to user roles (for example, Provider, Nurse, Medical Assistant) and to patient visit location and financial class. This means that the user is only able to select charges that are appropriate for them and for the visit location and financial class. In addition, you can use the Supervising MD Present charge header to indicate whether or not a supervising physician was present during a particular service. And last, you can use a Rendering Physician charge header to indicate the specific person who provided each service on the charge transaction (the name of the physician, nurse, or medical assistant).
Availability of Custom Charge Capture Screens on Web versus Handheld Platforms
Once configured, Custom Charge Capture Screens are available as follows:
On the web platform, all of the screens types described above are available during charge entry.
On the Apple platform, all of the screen types described above except Infusion are available during charge entry. These screens are available on Apple devices only if enabled via a configuration setting (contact your Commure Pro representative to enable this feature). Regardless of whether custom screens are enabled or disabled, mobile users can still enter charges (professional or technical) that contain the Supervising MD Present and Rendering Physician charge headers.
On the Android platform, custom screens are not available. Mobile users can still enter charges (professional or technical) that contain the Supervising MD Present and Rendering Physician charge headers.
Using a Custom Charge Capture Screens with Other Charge Capture Features
Custom Charge Capture Screens can be used in conjunction with the following features:
Charge Data Master (CDM). Custom Charge Capture Screens are typically used in conjunction with a CDM, but can also be used independently without one. If a charge is generated by a Custom Charge Capture Workflow screen, and that charge is mapped in the CDM, and the transaction meets all of the criteria for applying CDM codes, then the appropriate CDM codes are retrieved. See Implementing a Charge Data Master (CDM).
PQRS. When the PQRS feature is implemented, each time a provider submits a charge transaction, it is evaluated to determine if it fits the quality reporting criteria, and if so, the provider is then prompted to answer a series of clinical metrics questions. The usage of a Custom Charge Capture Screen to generate the charge codes does not interfere with this process in any way; the transaction is still evaluated to see if it meets the reporting criteria, and if so, the appropriate quality measure questions are presented to the provider. See Configuring PQRS/MIPS.
RVU Management. If a Custom Charge Capture Workflow screen automatically generates a charge code that has an RVU associated with it, then that charge code, once it is added to the Selected Codes section on the Charge Transaction screen, will show the RVU (if the user is configured to view it), and that RVU will be saved with the charge code on the transaction. In addition, if appropriate, the charge codes are auto-sorted based on RVU, the RVU values are multiplied, and a modifier is added. See Configuring RVU Management.
Selection of NDC Codes. If a Custom Charge Capture Screen automatically generates a charge code that has NDC codes mapped to it, then that charge code, once it is added to the Selected Codes section on the Charge Transaction screen, will show the additional fields for NDC and Quantity. The user may then select the appropriate NDC code before submitting the transaction. See Configuring the Selection of NDC Codes During Charge Capture.
Custom Charge Capture Screens cannot be used in conjunction with the following features:
Automated Code Entry. Please note that the Custom Charge Capture Screens feature differs from the Automated Code Entry feature. Automated Code Entry automatically adds CPT codes, modifiers, and/or diagnoses to charge transactions every time that a user enters a transaction that contains a specific combination of a CPT code, Service Site, and Billing Area. There is no user intervention and the user may not even be aware that additional codes are being added, since they are added behind the scenes after they submit the transaction. With Custom Charge Capture Screens, CPT codes are added to the transaction only when the user chooses to respond to one or more fields (or in some cases, the responses are pre-selected for the user). The user can see the CPT codes that were added, and can modify them prior to submitting the charge transaction. Commure Pro recommends that you use only one of these features; do not implement both at the same time. See Configuring Automated Code Entry.
Batch Charge Entry. Any custom screens you have designed via the Custom Charge Capture Screens feature are not available for use in the Batch Charge Entry option. See Configuring Batch Charge Entry.
Steps for Configuring Custom Charge Capture Screens
The steps for configuring Custom Charge Capture Screens are listed in the table below. Each of these steps requires changes to configuration settings that are found on the Admin tab. The basic steps are outlined below:
Step
Where Documented
1. (Optional) In the Commure Pro system, create new charge codes to be used specifically as technical E & M charges, if necessary.
3. Configure user settings that can impact the Custom Charge Capture Workflow screens (such as whether users should be able to clear data quickly from custom screens, or view and edit other user’s charges).
5. For Infusion billing only: Import a Service Catalog that contains all the drugs or services necessary for billing Infusion services. (Skip this step if you are not doing Infusion billing.)
8. Define Custom Charge Capture Workflow screens by placing the fields on the screens, and defining the CPT codes that should be selected when the user responds to the fields with a particular value. Some custom screens also require you to define rules that specify how the CPT codes are generated.
(Optional) Implement a CDM so that disparate charge codes used in different facilities can be displayed to end-users, and also routed to different billing systems.
Any charge code that is defined in the Commure Pro master list of charge codes can be used with Custom Charge Capture Screens. When billing for technical components, some organizations prefer to use “special” or “dummy” charge codes that are unique to their organization and its billing process. If necessary, you can add these charge codes to the master list of charge codes so that they can be utilized with Custom Charge Capture Screens. Keep in mind that both professional and technical evaluation and management charges use the same CPT codes. If you use the same E & M code twice on the same visit (once for the professional component, and once for the technical), Commure Pro’s code edit engine will consider these to be duplicate charges and will present a code edit error message to the user when they attempt to save the transaction. To avoid this, you may wish to create separate and different codes for the technical E & M’s. For example, the professional codes could be the standard 99211 through 99215 codes, while the technical E & M codes could be 99211T, 99213T, and 99215T.You can add codes to the master list of charge codes via the setting below:Admin - Institution - Charge Capture - Update Charges/Modifiers
The screens that you design for Custom Charge Capture Screens are displayed to various users based on their Role in the Commure Pro system. The system is pre-loaded with the roles of Provider and User, but you may want to create additional roles. The number of roles you add depends on the types of users that you want to enter charges, and which ones you think will need custom screens to assist them in doing so. For example, if you think nurses and medical assistants will need help, you might create new roles for “Nurse” and “Medical Assistant.” If you are using a CDM, keep in mind that the CDM also uses roles to determine when CDM charges should be retrieved (see Implementing a Charge Data Master (CDM)).To create a new Role in the system:
Select Admin > System Management > Reference Lists.
There are several user settings that can impact your implementation of Custom Charge Capture Screens. These settings determine whether users can edit each other’s charge data. Depending on your organization’s workflow, you may want both physicians and non-physicians to enter charges for their services on the same charge transaction. For example, if a physician organization is leasing space at your facility, a physician may be entering charges for professional services, while a nurse may be entering the facility’s technical charges for services such as room preparation/clean-up, the nurse’s assistance to the physician, the nurse’s administration of medications, and so on. In this example, the nurse might create the transaction to enter the facility’s charges, and the physician might later edit the transaction to enter his professional fees. Or, the sequence might be reversed, with the physician entering charges first, and the nurse entering second. The workflow can be variable and a given user may need the ability to edit the charge transactions that were created by another. The settings below can be used to accommodate your organization’s workflow:
This setting determines whether a user can edit another user’s charges (as long as it the transaction is still editable based on its charge status and date). If enabled, the user can edit any charge transactions that they can view.
Admin - User - User Permissions - Level 2 / 3: Can Edit Other Users’ Charges
These settings determine which charge transactions a Desktop Charge Capture user can view (none, just their own, those in their department, or all):
Admin - User - Charge Capture - Set Charge Desktop View Access
This setting determines whether the user will see a warning message when they attempt to create a new charge transaction for a visit date that already has an existing charge transaction. This can be helpful in preventing users from creating multiple transaction for the same service date, in instances where you would like them all to enter their charges on the same transaction.
Admin - User - Charge Capture - Prompt to Edit Transaction if Visit/Date is Coded)- Although this next setting is not a user setting, it is used in conjunction with the setting above. It determines for which types of visits the user will be warned when they attempt to create a new charge transaction for a visit date that already has an existing charge transaction.
Admin - System Management - Commure Pro Visit Types - Charge Capture: Notify on Add Charge if Existing Transaction for Visit Date (see Commure Pro Visit Types)
If your organization is going to be capturing charges for different types of users, such as attending physicians, residents, nurses, or medical assistants, you may want to implement the Supervising MD Present and/or Rendering Provider charge headers. Charge Headers are created at the institution level, and can then be modified at the user level for a specific user, if necessary, using the following options:Admin - Institution - Charge Capture - Add/Edit Charge HeadersAdmin - User - Charge Capture - Add/Edit Charge Headers
The Rendering Provider charge header is a standard header that is present in every Commure Pro system. It is associated with the individual charge codes on the transaction (rather than with the entire transaction as a whole). This allows you to have a single charge transaction that contains charges for several different persons, and also to clearly identify which person provided which services. In the example of nurses and residents working with an attending physician, the services provided by the attending would list the attending’s name as the Rendering Provider, the services provided by the nurse (immunization, room prep) would list the nurse’s name, and those provided by the resident would list the resident’s name. If the attending physicians, nurses, and residents are each entering their own charges, you can set the Initial Default Value and Subsequent Default Value to User’s Name, so that their own names default automatically into the field as they enter their charges.The Supervising MD Present header is another standard header that is present in every Commure Pro system. This header is also associated with the individual charge codes, instead of the entire charge transaction. This allows the header to have a different value for each charge on the transaction. If your organization users a Charge Data Master, this header is important in determining which CDM codes are sent to billing (see Implementing a Charge Data Master (CDM)). The Supervising MD Present header has a simple Yes/No response. You can set up the header so that it will default the appropriate value when each user enters their portion of the charges on the Charge Transaction screen. For example, you might set it up like this:
At the institution level, set the header to visible and required.
At the user level, for nurses or medical assistants, set the initial default value to No.
At the user level, for an attending physicians who typically oversee residents, set the initial default value to Yes.
At the user level, for resident physicians, set the initial default value to blank. Since the header is required, the resident must select the appropriate Yes or No response before submitting the charge transaction.
Importing/Exporting a Service Catalog for Infusion Billing
If your organization is using Custom Charge Capture Screens for Infusion billing, you must import a Service Catalog that contains all of the possible infusion services for which you might bill. The Service Catalog can contain both drugs (such as Doxorubicin) and services (such as Hydration Services).
You can skip this step if your organization is not using Custom Charge Capture Screens for Infusion billing.
Once you have a set of services loaded into your system, you can then later export them to a Microsoft Excel® spreadsheet. The most likely usage of this feature is that you might import an initial set of services so that you can test them or use them for a while, export the services to a spreadsheet, possibly make some modifications, and then import them back into the same Commure Pro system, or to a different Commure Pro system (such as a test or production environment). See Steps for Importing a Service Catalog.When exporting the service catalog, the system creates a Microsoft Excel spreadsheet that contains one tab labeled “SERVICECATALOG.” The content and format of the SERVICECATALOG tab in the spreadsheet is described in Format for Importing/Exporting a Service Catalog. When importing, your source spreadsheet must use this same format.
To import or export a spreadsheet containing your Service Catalog, follow the instructions below. Please note that if you import into a system that already has drugs or services defined (from a prior import), the system first deletes all of the existing drugs and services, and then imports a fresh set from the spreadsheet.When importing a Service Catalog, some of the individual elements that are defined for each drug/service must already exist in the Commure Pro system. These include the locations (facility and nursing unit) and roles for which each service is available.As part of the import process, you can also enable an optional SOLR search feature for the Drug/Service field on custom Infusion screens. When SOLR searching is enabled, a user can enter a generic or trade name and also a drug class (such as “chemo” or “hydration”), separated by a space. For example, if the user types “chemo abs” or “abs chemo,” the system finds any items with a drug class of “chemo” that have “abs” in the generic or trade name (each drug and service in the Service Catalog is mapped to a drug class). When SOLR searching is not enabled, the system searches only on the generic or trade names. The instructions for enabling this feature are included in the import instructions below.To import a file containing your Service Catalog:
Select the Admin > Institution > Charge Capture > Custom Charge Capture Screens > Manage Infusion option.
The Infusion Settings screen is displayed.
In Service Catalog Upload section on the right side of the screen, click the Browse button, search for the spreadsheet that contains the information, and then select the file.
The spreadsheet must use the “Excel 97-2003 Workbook” format (with an .xls extension). The standard “Excel Workbook” format (with an .xlsx extension) will not work with the import process.
Click the Import button.
The drugs and services are imported from the spreadsheet into the Commure Pro system.
If you want to enable SOLR searching, contact your Commure Pro representative, who must now make some configuration changes prior to the next step. The Commure Pro mobilizer service will have to be restarted as part of this process, which may need to be scheduled with your organization. In the meantime, you can continue with any remaining steps for implementing Custom Charge Capture Workflow screens. Users will be able to perform basic searches by generic and trade names on any custom Infusion screens that you design.
After your Commure Pro representative has made the configuration changes for SOLR searching, click the Index Catalog button, located in the Data Indexing section at the bottom right of this screen.
The drugs and services are indexed, allowing for SOLR searching by drug class (in addition to basic searching by generic or trade name) on custom Infusion screens.
In the spreadsheet, the SERVICECATALOG tab contains the list of drugs or services that are used at your organization for Infusion billing. Each drug or service in the spreadsheet must have a unique name. For each drug/service, there are multiple rows in the spreadsheet, including information about the locations and roles for which the drug/service is available, the generic and trade names for each, and the drug class to which it belongs.
The spreadsheet must use the “Excel 97-2003 Workbook” format (with an .xls extension). The standard “Excel Workbook” format (with an .xlsx extension) will not work with the import process.
Column
Heading
Description
Acceptable Values
1
SERVICE
The word “SERVICE” indicates the start of a new drug/service definition.
SERVICE
2
FACILITY
The static label “FACILITY.”
FACILITY
3
TRADE_NAME
The trade name of the drug/service. This can be left blank; a trade name is not required for a drug/service.
Example: Plenaxis
4
FACILITY_NAME
The facilities in which this drug/service can be used. Each facility must exist in Commure Pro system. If you want this drug/service to be available for all facilities, leave this blank.
Example: General Hospital
5
NURSING_UNIT
The static label “NURSING_UNIT.”
NURSING_UNIT
6
ROLE
The static label “ROLE.”
ROLE
5
TYPE
The type of entry that this item is in the catalog (there are only two choices: Drug and Service).
Drug, Service
8
ROLE_TYPE
The roles for which this drug/service should be available for use. Each role must exist in the Commure Pro system. If you want this drug/service to be available for all roles, leave this blank.
You can skip this step if your organization is not using Custom Charge Capture Screens for Infusion billing.
The Primary Service Hierarchy is used to determine which service, out of all those entered by the user, should be listed as the “initial” or “primary” service. When billing for the infusion services that were provided to a patient during a given infusion session, there is usually only one primary (“initial”) service; all other drugs/services are considered secondary (“subsequent”) for billing purposes. The only exception to this rule is the case where two drugs are delivered concurrently through different sites. In this case, they may both be considered as primary services. For a more in-depth explanation of how the Primary Service Hierarchy is used to calculate the primary service for an infusion session, see How the Primary Service is Calculated.
To define your Primary Service Hierarchy, you must rank the drug classes and delivery methods that are used at your organization in numeric order, with “1” being the highest rank. This information is then used to select the primary service for each infusion session. The rules used to calculate the primary service are complex, but in general, one could say that those services with the highest ranked Drug Class and Delivery Method are selected as the primary services. For a more thorough description of the calculation process, see How the Primary Service is Calculated.To define your Primary Service Hierarchy:
Select the Admin > Institution > Charge Capture > Custom Charge Capture Screens > Manage Infusion option.
The Infusion Settings screen is displayed. The left side of the screen, labeled Primary Service Hierarchy, contains a list of Drug Classes and Delivery Methods.
The Drug Classes are derived from your imported Service Catalog. If you do not see any Drug Classes listed, this means that you did not import a Service Catalog. You must import the Service Catalog before you can define your Primary Service Hierarchy (see Importing/Exporting a Service Catalog for Infusion Billing). The Delivery Methods are derived from the values defined on the Delivery Method field. You can add more values if necessary (see Editing a Field).
Select a numeric rank for each Drug Class and Delivery Method.
You may leave the rank blank for an item. Services with no rank will not be considered for primary service.
Do not assign the same rank to two different items within the same Drug Class or Delivery Method—each rank should be unique.
Do not skip ranks. For example, if there are 5 drug classes, and one of them is left blank, assign ranks 1 to 4 to the remaining drug classes. Don’t assign ranks of 1, 2, 4, and 5 (skipping rank 3).
Click the Save button.
The drug classes and delivery methods are now ranked.
If you are using Custom Charge Capture Screens for E & M Billing or General Billing, you must create a master list of the possible fields that you want to present to your users. Later in the configuration process, you will place these fields on E & M or List sections, respectively. These fields should be descriptive in nature, and use terminology that is familiar to the user. The fields can be phrased as complete or partial sentences or questions. The idea is to make it easy for the user to identify the type and/or quantity of services that they performed.You can create the types of fields listed below. Each field can be used on one or more custom screens.
Type
Field Format
Sample Field Text
Sample Response
1. Boolean: Checkbox fields that indicate a simple Yes/No or Done/Not Done.
Checkbox
Additional time spent due to altered mental status or impaired mobility
User checks the field (or leaves it unchecked).
1. Boolean (continued)
Checkbox
Administration of medications
User checks the field (or leaves it unchecked).
2. Variable Quantity: Fields that require the user to enter a numeric quantity.
Numeric entry
Vital signs recorded (enter number of times)
User checks the field and enters a number.
3. List: Fields that require the user to select an answer from a predefined list of responses.
Selection list
Catheter care (select number of times)
User checks the field and selects a value from a list: 1 2 3 or more
4. Range: Fields that require the user to select a quantity from a defined list of ranges.
Range selection
Skin tags removed (select quantity in range)
User checks the field and selects a value from a list of ranges: 1 to 6 7 or above
4. Range (continued)
Range selection
Face time with patient (select a 15 minute increment)
User checks the field and selects a value from a list of ranges: 1 to 15 16 to 30 31 and above
5. Age Range: Fields that have a series of age ranges as the list of possible responses. The application compares the patient’s age to the service date and automatically selects the correct age range. The user need only select the field itself (not the age range).
Age range
New patient preventive visit, based on age range
User checks the field and the system automatically selects an age range value: 1 day to 12 months 1 year to 4 years 5 years to 11 years 12 years to 17 years 18 years to 39 years 40 years to 64 years 65 years to above
For instructions on how to create, edit, or delete fields, see these topics:
In the Text field, enter the text of the field that you want to present to the user when they are entering charges.
(Optional) Select a category for this field. For example, you might categorize your fields as “nurse” and “provider” fields, or you might categorize them as “evaluation,” “procedure,” “immunization,” etc. You can create and use as many categories as you like for your fields, and each field can have more than one category. When adding a new field, you can search for an existing category by typing a few characters of the category name. If a match exists, it is displayed and you can select it. If a match does not exist, you can create a new category on the fly by simply continuing to type the full category name and then pressing Enter, Tab, Space, or Comma (category names must be at least two characters in length and have no spaces). Later, when placing fields on sections, the categories can be helpful tool for finding the fields that you want. For example, when designing a technical E & M section, you could search or fields that have a category of “nurse.”
Select the format of the field:
If you want the field format to be Boolean (a simple checkbox, format 1 in Creating Fields for E & M or List Sections), select the Save button now and you are done with this field.
If you want a format other than Boolean, select one of the options below:
Variable Quantity: Check this box if you want to the user to answer the field by entering a numeric quantity (format 2 in Creating Fields for E & M or List Sections). Select the Save button now and you are done with this field.
Advanced Options: Check this box if you want to create a field using formats 3, 4, or 5 (in Creating Fields for E & M or List Sections). Three new buttons appear when you check this box:
List: Click the List button to create a predefined list of values for the user to choose from (format 3). Enter a text or numeric value for the first answer in the Value field.
Range: Click the Range button to create a predefined list ranges for the user to choose from (format 4). Enter the start and end values for the first range in the From and To fields.
Age Range: Click the Age Range button to create a predefined list of age ranges for the user to choose from (format 5). Enter the start and end values for the first age range in the From and To fields. You can select days, months, or years as the Unit for the age range.
After you enter the value or range for the field’s first answer, you can then take any of these actions:- t Click the Add icon to add a row for another value or range.
Click the Delete icon to delete a value or range that was added in error.
If you want one of the values or ranges to be selected by default, check the Default box for that row.
Select the Save button when you are done adding values or ranges, and this field is saved.
You can edit a field’s text, or the values/ranges that are defined for a field. However, you cannot change the overall format of the field itself (such as changing it from a List type to a Range type).
Find the field you want to edit. All of the fields are displayed in a table that shows you the Field Description, the Categories assigned to the field, who last updated the field, and the date they did so. The fields are listed alphabetically by the Field Description. To help you find the field you want, you can enter a phrase in the Search field. Any fields with that phrase in the Field Description or Category are displayed.
Click the Edit icon for the field that you want to modify. The icon is located at the right side of the field’s row.
Change the field’s text.
Add or remove the categories that are associated with the field.
Change a value or range by modifying its text.
Click the Add icon to add a row for a new value or range.
Click the Delete icon to delete a value or range.
Change the value or range that is select as the default by checking the Default box for that row.
Find the field you want to delete. All of the fields are displayed in a table that shows you the Field Description, the Categories assigned to the field, who last updated the field, and the date they did so. The fields are listed alphabetically by the Field Description. To help you find the field you want, you can enter a phrase in the Search field. Any fields containing that phrase in the Field Description or the Category are displayed.
Click the Delete icon for the field that you want to delete. The icon is located at the right side of the field’s row.
If you are using Custom Charge Capture Screens for Critical Care billing, a complete set of the necessary fields is pre-loaded in the system for you. As a result, you do not have to create any fields for Critical Care billing. You cannot delete the pre-loaded Critical Care fields. You can modify a Critical Care field’s text (label), but you cannot make any other changes to it (see Editing a Field). If you are using Custom Charge Capture Screens only for Critical Care, and you are happy with the default text that is used for the fields, you can skip this step entirely.The pre-loaded Critical Care fields that are visible to end-users on custom Critical Care screens are listed in the table below. When a user enters data for a Critical Care session, these fields are presented/asked once for each segment of time that a provider spends with the patient during a Critical Care incident.
Pre-Loaded Fields: For Use on Critical Care Screens
Field Text
Type
Acceptable Values
Time Spent with Patient
Variable Quantity
nn
Complexity
List
Low, Moderate, High, N/A
In addition to the fields above, a second set of Critical Care fields is also pre-loaded in the system. However, these fields are not seen by end-users on the custom Critical Care screens. They are used strictly by administrators to define the rules that control the automated selection of CPT codes on those screens.
Pre-Loaded Fields: For Defining Critical Care Rules
If you are using Custom Charge Capture Screens for Infusion billing, a complete set of the necessary fields is pre-loaded in the system for you. As a result, you do not have to create any fields for Infusion billing. You cannot delete the pre-loaded Infusion fields. You can modify an Infusion field’s text (label), and for certain fields, you can also modify the list of acceptable values associated with the field (see Editing a Field). If you are using Custom Charge Capture Screens only for Infusion, and you are happy with the default text and values that are used for the fields, you can skip this step entirely.The pre-loaded infusion fields that are visible to end-users on custom Infusion screens are listed in the table below. When a user enters data for an infusion session, some fields are presented/asked only once for the entire infusion session, while other fields are presented/asked once for each service that was provided during the session.
Pre-Loaded Fields: For Use on Infusion Screens
Field Text
Type
Asked Once per Session or Once per Service
Acceptable Values
Can Modify the List of Values?
Infusion Type
List
Once per session
Single, Sequential, Concurrent, System Generated
No
Access Type
List
Once per session
Single Site, Multiple Sites
No
Separate Hydration Order on File
Boolean
Once per session
checked, unchecked
Not applicable
Drug/Service
List
Once per service
All unique generic Service Name values come from the imported Service Catalog.
You cannot make edits to the values via the field definition, but you can import a new Service Catalog that contains more or different services.
Delivery Method
List
Once per service
Infusion, IA Infusion, Push, IA Push, Injection, IA Injection, Oral
Yes
Site
List
Once per service
1st, 2nd, 3rd, 4th, 5th
Yes
Start Time
Time (military)
Once per service
hh:mm in 24 hour military time
Not applicable
Stop Time
Time (military)
Once per service
hh:mm in 24 hour military time
Not applicable
In addition to the fields above, a second set of Infusion fields is also pre-loaded in the system. However, these fields are not seen by end-users on the custom Infusion screens. They are used strictly by administrators to define the rules that control the automated selection of CPT codes on those screens.
Pre-Loaded Fields: For Defining Infusion Rules
Field Text
Type
Acceptable Values
Can Modify the LIst of Values?
Drug Class
List
All unique Drug Class values come from the imported Service Catalog.
You cannot make edits to the values via the field definition, but you can import a new Service Catalog that contains more or different drug classes.
The next step in configuring Custom Charge Capture Screens is to create a set of custom charge sections (screens) that contain the fields you created in Creating Fields to Assist Users. In the case of Critical Care and Infusion billing, the fields are created automatically for you, so now all you need do is create a custom charge section that contains those fields.You can create as many sections as you like. The first steps for creating a new section are the same, regardless of the type of section that you are creating. You name the section, enter help text for it, and identify the user roles, patient locations, and patient financial classes for which it will appear. The steps for this are described here:
Creating a New Section: First Steps for All Section Types
The first several steps for creating new section are the same for all types of sections: E & M, List, Critical Care, and Infusion. Follow the steps below to start the process.
Select the Add Section button, and choose the type of section that you want to create from the drop-down list: E & M, List, Critical Care, or Infusion.
Enter a Display Label. This is the name that appears to the user during charge entry, as the name of the tab for the custom screen and at the top of the custom screen itself.
Enter a Description. This is for informational purposes only; only administrators will see this when creating/modifying sections.
Determine whether this section should be Active (available to end users during charge entry). Leave this box unchecked while you are designing the section, and check it once you are certain that it is ready for use.
(Optional) Click the Add/Edit Help link to add help to this section for your end-users. Your help can describe the purpose of the section, or give tips regarding how best to respond to the fields on the section. Please note that this is a single blurb of help text for the entire screen as a whole; it is not field by field help. When entering the help text, several formatting tools are available, such as bolding, underlining, bullets, or numbers. When entering data on this section during charge entry, the end-user can click the Info icon to view this help.
Determine the financial classes, locations, and roles for which this section should appear.
Click the Select Financial Class button to select the financial classes for this section. If you select one or more financial classes, this section will only be available to the user when they enter a charge for a patient who has one of those financial classes on their visit.
Click the Select Locations button to select the locations for this section. If you select one or more locations, this section will only be available to the user when they enter a charge for a patient in one of those locations.
Some clients have facilities with sub-facilities. This causes a problem with the Location field, since the sub-facilities appear as nursing units, and the nursing units are then not visible.
Click the Select Roles button to choose the user roles for this section. If you select one or more roles, this section will only be available to users who have at least one of those roles defined in their user profile.
If you enter one or more items for each of the criteria above, all of the criteria must be met in order for the screen to appear (the patient must have one of the financial classes, the patient must be in one of the locations, and the user must have one of the roles). If you leave any of the criteria blank (for example, if you do not select any financial classes, locations, or roles), then this section will be available for all financial classes, locations, or roles, respectively.
Finish creating the section by following the steps in the appropriate topic below:
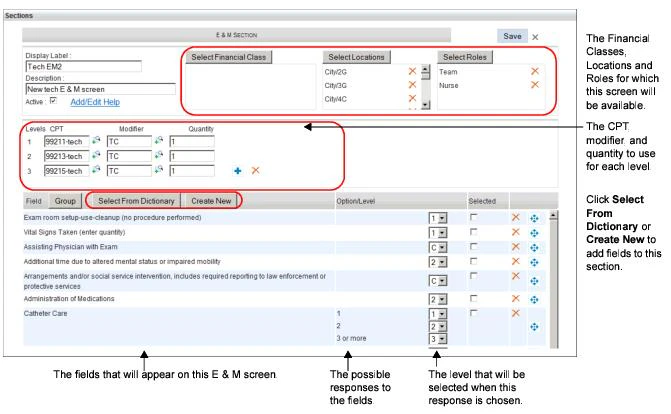
Creating a New Section: Final Steps for E & M Sections
The final steps for creating a new Evaluation & Management section are as follows: define the various levels of E & M codes, and then place fields on the section. The fields help the user to identify the services that they provided, which in turn are used to calculate the level of CPT code that should be entered. Only one E & M CPT code is generated as a result of the user responding to one or more fields.
Enter a CPT code, Modifier, and/or Quantity for each level of evaluation and management. Only one of these codes will be selected and entered on the charge transaction. For example, you might create a screen called “Tech E & M New.” For CPT codes, you would enter 99211T, 99213T, and 99215T, since these codes represent all the possible levels of technical evaluation and management CPT codes for a new patient (see Creating New Charge Codes for an explanation of technical E & M CPT codes). List the lowest level (99211T) on line 1, the next level (99213T) on line 2, and so on.
Enter a complete code, or enter a partial code or description and then click the Search icon to find the code you want.
If you need more than three levels, click the Add icon to add more.
If you entered a code in error, click the Delete icon to remove it.
Add fields to the section. This can be done using either of the methods below:
Click the Select From Dictionary button to add one or more fields from the Field Dictionary to this section. A list of all possible fields is displayed in alphabetical order. You can type a word or two in the Search field to help you find the field that you want. Select one or more fields from the list. You can select several at once — just click on all those that you want, and then select the Ok button.
Click the Create New button to create a new field on the fly. The field is added to this section immediately, and is also added to the Field Dictionary for future use on other sections. See Creating Fields to Assist Users for information on the different types of fields that can be created, or Adding a New Field starting at Step 3 for specific instructions for creating each type of field.
Do not place Variable Quantity fields on an E & M screen, since a variable quantity entered by an end-user cannot be used as criteria for selecting the level of E & M charge code.
Each field that you select or create is then displayed at the bottom of the screen. You can see the field text in the Field column, the and the possible responses to the field in the Option/Level column. If the field format is Plain, no responses are listed in the Options column. If the field format is List, Range, or Age Range, all the possible responses are listed as Options.
For each field, indicate the level of E & M code that should be selected when the user answers that field. Your choices depend on the number of E & M codes that you listed at the top of the screen (in Step 2). If you listed three levels as in our example (99211T, 99213T, and 99215T), then you will see choices for three levels (1, 2, 3), plus an additional choice (C) for a contributory factor.
Level
Result
1
If the user checks this box (for simple checkboxes), or selects this response (for predefined lists or ranges), the CPT code listed on Line 1 (99211T in our example) will be selected.
2
If the user checks this box (for simple checkboxes), or selects this response (for predefined lists or ranges), the CPT code listed on Line 2 (99213T in our example) will be selected.
3
If the user checks this box (for simple checkboxes), or selects this response (for predefined lists or ranges), the CPT code listed on Line 3 (99215T in our example) will be selected.
C
If the user checks this box (for simple checkboxes), or selects this response (for predefined lists or ranges), it will be considered a contributory factor, and will increase the highest selected E & M level by 1. If multiple contributory factors are selected, the highest level is still increased by only 1. If only contributory factors are selected, no E & M code is selected.
Depending on which fields the user answers, and the specific responses that they choose for each, the highest level of E & M code is automatically selected. In the example below, the level 3 E & M code (99215T) was chosen because the highest level to which the answers corresponded was a level 2 E &M, plus the addition of a contributory factor increased it to a level 3.
Field
Possible Responses
Level Assigned to this Response
Sample User Responses
Resulting Level Selected
Patient registration, exam room set-up, use and clean-up
checkbox
1
checked
Level 1
Administration of Medications
checkbox
2
checked
Level 2
Non-debridement wound care management per 25 sq. cm. – for multiple wounds, add total size of all wounds
0-25 sq cm 26-50 sq cm 51-above
1 2 3
25-50 sq cm
Level 2
Additional time due to altered mental status or impaired mobility
checkbox
C
checked
Increase 1 level
Add more fields, delete fields, rearrange fields, or pre-select responses for the user:
To pre-select one or more responses for the user, check the boxes for those responses in the Selected column. If this custom screen is available to the user when they create a charge transaction (based on their role and the patient’s location), those responses will be pre-selected for them. The application will evaluate all pre-selected responses, choose the appropriate level of E &M code, and automatically enter that E & M code on the Charge Transaction screen for the user, as soon as it opens. The user can always change the responses to any of the fields, or remove the generated E & M code, as appropriate.
When done, click the Save button to save this section.
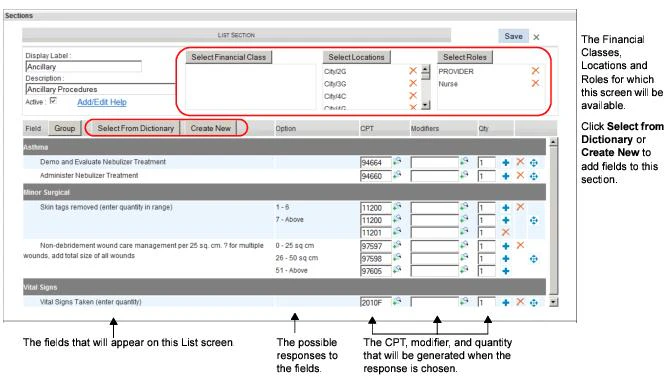
Creating a New Section: Final Steps for List Sections
The final step for creating a new List section is to place fields on the section. The fields help the user to identify the types of services that they performed. One or more CPT codes may be generated as a result of the user responding to one or more fields.
Add fields to the section. This can be done using either of the methods below:
Click the Select From Dictionary button to add one or more fields from the Field Dictionary to this section. A list of all possible fields is displayed in alphabetical order. You can type a word or two in the Search field to help you find the field that you want. Select one or more fields from the list. You can select several at once — just click on all those that you want, and then select the Ok button.
Click the Create New button to create a new field on the fly. The field is added to this section immediately, and is also added to the Field Dictionary for future use on other sections. See Creating Fields to Assist Users for information on the different types of fields that can be created, or Adding a New Field starting at Step 3 for specific instructions for creating each type of field.
Each field that you select or create is then listed at the bottom of the screen. You can see the field text in the Field column, the and the possible responses to the field in the Option column. If the field format is Plain or Variable Quantity, no responses are listed in the Options column. If the field format is List, Range, or Age Range, all the possible responses are listed as Options.
For each field, indicate the CPT code, Modifiers, and Qty (quantity) that should be selected when the user answers that field. Depending on which fields the user answers, and the specific responses that they choose for each, the appropriate charge codes are automatically selected. Some examples are listed below:
Field
Field Type
Option (Possible Responses)
CPT/Modifier/Qty Defined for this Response
Sample User Responses
Resulting CPT Codes Entered
Demo and Evaluate Nebulizer Treatment
Plain
checkbox
94664/none/1
checked
94664/none/1
Vital Signs recorded (enter number of times)
Variable Quantity
user enters number
2010F/none/1 (The quantity you enter here is multiplied by the quantity the user enters.)
3
2010F/none/3
Skin tags removed (select quantity in range)
Range
1-6
11200/none/1
Add more fields, delete fields, or rearrange fields:
To add more CPT codes for a particular field (so that multiple CPT codes are selected when the user answers this field), click the Add icon on that field’s row, and then enter the additional CPT, Modifier, and Qty.
To move a field up or down, click and hold on the Move icon next to a field, drag the field up or down to a new location on the section, and drop it.
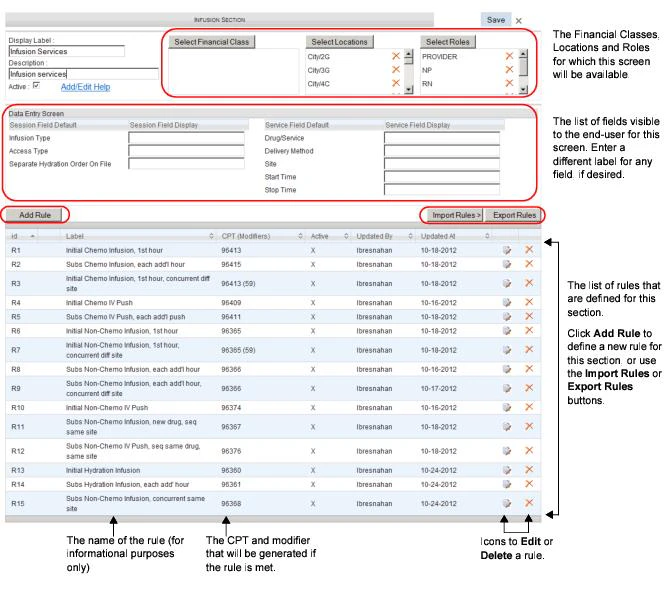
Creating a New Section: Final Steps for Critical Care or Infusion Sections
The fields used on a Critical Care or Infusion section are pre-loaded in your system, and are already placed on any new Critical Care or Infusion section that you create. Critical Care fields help the user to identify the complexity and amount of time spent with a patient during a critical care incident. Infusion fields help the user to identify the types of chemotherapy services that were performed, such as the particular drugs/services that were provided, the method used to provide them, and how long they were provided. See Pre-Loaded Fields for Critical Care Billing and Pre-Loaded Fields for Infusion Billing for a complete list of fields.The final step for creating a new Critical Care or Infusion section is to define a series of rules that determine which CPT codes should be entered in response to the data that the user enters in these fields.
Critical Care: As each provider enters information into the Critical Care section’s fields about the complexity and length of time spent they with the patient, the cumulative information entered by all providers is evaluated against the rules that you define for the section. In addition, the patient’s age on the date of service is taken into account when the rules are applied. Then one or more CPT codes are automatically entered on the charge transaction screen.
Infusion: When a user enters information into the Infusion section’s fields about the services that were performed, those services are evaluated against the rules that you define for the section. *In addition, several other factors are calculated or taken into account, such as the primary service hierarchy, the system generation of an infusion type, and whether or not any hydration services are billable. *Then one or more CPT codes are automatically entered on the charge transaction screen for the user. For a full explanation of all the factors that are involved in the process of generating CPT codes for an Infusion section, see How CPT Codes are Calculated for Infusion Sections.
To create a new Critical Care or Infusion section, follow these steps:
In the Data Entry Screen section, all of the fields that will be visible to the end user for this custom Critical Care or Infusion screen are already listed for you. You can change the text (label) that is used for any of these fields by typing a new label into the associated text field. This modified label appears on this custom section only.
If you want to modify the default label for a field, so that it becomes the default label on all custom Critical Care or Infusion sections, change the label for the field in the field dictionary. That way, you won’t have to type a new label for the field on every custom Critical Care or Infusion section that you define. See Editing a Field.
Add rules to the section. Each rule defines the circumstances under which a particular CPT code will be automatically entered. For example, on an Infusion section you might define a rule for CPT code 96413, Chemo IV Infusion, 1 hour. The rule might state that the Drug Class must be “Chemo,” the Delivery Method must be “Infusion,” the Access Type must be “Single Site or Multiple Sites,” the Infusion Type must be “Single, Sequential, or Concurrent,” and so on. See Sample Critical Care Rules and Sample Infusion Rules for some samples of common rules that an organization might implement.
There is also an import file available that contains a sample set of rules. We recommend you import this set a starting point for new critical care and infusion sections, and then modify any of these rules as necessary. Contact your Commure Pro representative to obtain this sample set of rules.
You can add as many rules as you want, using either of these methods:
Click the Add Rule button to enter a rule manually, by choosing from a variety of criteria fields. See Manually Adding Rules to a Critical Care or Infusion Section for instructions on how to manually add a rule, as well as a definition of each of the criteria fields available for use with rules.
Click the Import Rules button to import one or more rules from a Microsoft Excel spreadsheet. This spreadsheet would have been created by exporting a set of rules from a different section, either in this Commure Pro system, or a different one (such as a test environment). Or, it could be the sample set of rules provided by your Commure Pro representative. See Importing/Exporting Rules for a Critical Care or Infusion Section.
You can also click the Export Rules button, to export the currently defined set of rules for this section to a Microsoft Excel spreadsheet (so that you can later import them into another section in this Commure Pro system, or a different one, such as a test or production environment).
When done, click the Save button to save this section.
Click the Add Rule button.
The Add Rule dialog opens.
Enter the CPT code and Modifier (if any) that should be generated when the criteria defined in his rule are met. You can enter a complete code, or enter a partial code or description and then click the Search icon to find the code that you want.
Using the fields below, define the criteria for that should be met for the CPT code you entered in Step 3. When completing the fields for this custom screen on a charge transaction, if the user enters services that match the criteria that you define here, then that CPT code will be generated for the charge transaction. The criteria fields for both Critical Care and Infusion screens are listed below.
For any criteria field that has a list of values, you can select more than one value by simply clicking on more than one item (you do not have to press the Control key).
Criteria fields for Critical Care rules:
Charge Type: Indicate whether the CPT code defined in Step 3 is a charge for an Initial or Subsequent service. In Critical Care billing, Initial codes are used for the first n minutes (typically 30-74, or however you define it in the rule), and will always have a quantity of 1. Subsequent, or add-on, codes are used for additional time, and the quantity increases by 1 every n minutes (typically 30, or however you define it in the rule).
Complexity: Enter the complexity that must be chosen by at least one user, in order to qualify for the CPT code. If you want Complexity to be an optional field for users, select N/A here.
Age Range: Enter the start and end values for the age range in the Start and End fields. You can select days, months, or years as the unit for the age range. If the rule applies to all age ranges, you can either leave these fields blank, or enter an all-inclusive age range (such as 0 Y to 999 Y).
Min Time for 1 Unit (minutes): Enter the minimum amount of time that must be entered by all users as a cumulative total, in order to qualify for the CPT code.
Max Time for 1 Unit (minutes): Enter the maximum amount of time that must be entered by all users as a cumulative total, in order to qualify for the CPT code.
Criteria fields for Infusion rules:
Drug Class: Select the drug class that must be indirectly chosen by the user (the service chosen by the user is mapped to a drug class in the Service Catalog), in order for the service to qualify for the CPT code.
Charge Type: Indicate whether the CPT code defined in Step 3 is a charge for an Initial or Subsequent service.
Delivery Method: Select the delivery method that must be chosen by the user, in order for the service to qualify for the CPT code.
In order to save a rule with a value in this field, the following must also be true:
Drug Class must have at least one value selected that maps to a row of type “Drug” in the uploaded Service Catalog (every entry in the Service Catalog is mapped to a type of either “Drug” or “Service”), unless the Drug Class is “Hydration” (“Hydration” maps to a type of “Service”).
Access Type: Select the access type that must be chosen by the user, in order for the service to qualify for the CPT code. The Access Type field indicates whether the drugs in an infusion session were administered through a single site or multiple sites.
Site: Select the site number that must be entered by the user, in order for the service to qualify for the CPT code. The Site field indicates whether a drug was administered in a different site than other drugs in the session.
Infusion Type: Select the type of infusion that must be chosen by the user, or calculated by the system, in order for the service to qualify for the CPT code.
Single: Only one service was given.
Sequential: Two or more services were provided, one after the other.
Concurrent: Two or more services were provided at the same time.
System Generated: Instead of the user specifying that the services were given singly, sequentially, or concurrently, they can choose System Generated. The system will then assess the start and stop times of the services, and determine how they were provided.
Min Time for 1 Unit (minutes): Enter the minimum amount of time that the service must be provided, in order for the service to qualify for the CPT code.
In order to save a rule with a value in this field, at least one of the following must also be true:
Delivery Method must be Infusion or Push, or
Drug Class must be Hydration.
Max Time for 1 Unit (minutes): Enter the maximum amount of time that the service must be provided, in order for the service to qualify for the CPT code.
In order to save a rule with a value in this field, at least one of the following must also be true:
Delivery Method must be Infusion or Push, or
Drug Class must be Hydration.
Min Time since last Admin of same drug (minutes): Enter the minimum amount of time that must elapse since the last time the same drug was administered, in order to qualify for the CPT code. (This criteria is used when the CPT code defined in Step 3 is for an additional sequential service of the same drug administered via Push, that you want to be listed separately in addition to the CPT code for the primary service.) Note that this field is used in conjunction with the Same Drug Previously Administered in Session field, which indicates that the same drug is being administered again.
In order to save a rule with a value in this field, the following must also be true:
Same Drug Previously Administered in Session is selected, and
First Hour of Administration is not selected, and
Charge Type is Subsequent, and
Delivery Method is Push
Same Drug Previously Administered in Session: Check this box if the CPT code defined in Step 3 is for an additional sequential service of the same drug administered via Push, that you want to be listed separately in addition to the CPT code for the primary service. Note that this field is used in conjunction with the Min Time since last Admin of same drug (minutes) field, which determines the minimum amount of time that must elapse between the two administrations.
In order to save a rule with this field checked, the following must also be true:
Min Time since last Admin of same drug (minutes) must contain a value, and
First Hour of Administration is not selected, and
Charge Type is Subsequent, and
Delivery Method is Push
First hr of Administration: Check this box if the CPT code defined in Step 3 is for the addition of a *new *drug delivered via infusion, that you want to be listed separately as a subsequent service in addition to the CPT code for the primary service.
In order to save a rule with this field checked, the following must also be true:
Same Drug Previously Administered in Session is not selected, and
Min Time since last Admin of same drug (minutes) does not contain a value, and
Delivery Method is Infusion, and
Charge Type is Subsequent
Concurrent infusion, same site: Check this box if the CPT code defined in Step 3 is for an additional concurrent service of a new drug (that is not Chemo or Hydration), in the same site as the primary service, that you want to be listed separately as a subsequent service, in addition to the CPT code for the primary services.
In order to save a rule with this field checked, the following must also be true:
Infusion Type is Concurrent, and
Charge Type is Subsequent, and
Delivery Method is Infusion, and
Drug Class is not Chemo or Hydration, and
First hour of administration is not selected
Save the rule by clicking one of these buttons:
Add & Create Next: Save this new rule, and open a new Add Rule dialog so that you can add another one.
Add & Close: Save this new rule, and close the Add Rule dialog. The Infusion Section screen is displayed, with the new rule listed in the bottom half of the screen.
Cancel: Close the Add Rule dialog without saving this rule. The Infusion Section screen is displayed.
Importing/Exporting Rules for a Critical Care or Infusion Section
You can export the rules that you have defined for a Critical Care or Infusion section in Commure Pro to a Microsoft Excel® spreadsheet, or you can import the rules from a spreadsheet into Commure Pro. The most likely usage of this feature is that you might define a series of rules in a Commure Pro system (such as a test environment), export them to a spreadsheet, and then import them into a Critical Care or Infusion section in a different instance of a Commure Pro system (such as a production environment).
You can also export an entire Critical Care or Infusion section (see Importing/Exporting Fields or Sections). When doing so, the section’s rules are also exported as part of the section definition. So you can either export the entire section definition (with the rules included), or you can export just the rules associated with a section.
Commure Pro strongly recommends that you do not make changes to the exported spreadsheet, prior to importing it into a new system/environment. All edits should be made in the application itself. See Steps for Importing/Exporting Rules.When exporting, the system creates a spreadsheet that contains a tab called “RULES.” Each rule in the spreadsheet has a unique name. If you import into a system that already has rules with those same names, those entries will be overwritten.
The steps for both importing and exporting Critical Care or Infusion rules are included below.To export the rules from a Critical Care or Infusion section to a spreadsheet:
Click the Export Rules button, located in the lower right portion of the screen.
The rules for this section are exported to a spreadsheet.
The exported spreadsheet uses the “Excel 97-2003 Workbook” format (with an .xls extension), which should not be changed. The standard “Excel Workbook” format (with an .xlsx extension) will not work with the import process.
Click the Save to save the file, or Open to open the file.
Click the Import Rules button, located in the lower right portion of the screen.
Click the Browse button to search for the spreadsheet that contains the information, and then select the file.
The spreadsheet must use the “Excel 97-2003 Workbook” format (with an .xls extension). The standard “Excel Workbook” format (with an .xlsx extension) will not work with the import process.
Click the Import button.
The rules are imported into the Critical Care or Infusion section in the Commure Pro system.
Listed below are some sample rules that might be defined at an organization that provides critical care services. The samples below are by no means a definitive or complete list of rules; they are provided simply as a means of illustrating of how the various criteria can be used to define rules.Typically, critical care charges are based on the age of the patient, which are broken into four age groups: under 29 days, 29 days to 24 months, 25 months to 5 years, and over 5 years. If you treat all four of these age groups, you can create a single Critical Care section, with different CPT codes and rules for each age group.
Sample Rules for Critical Care
Field
Value for this Rule
Value for this Rule
Value for this Rule
Value for this Rule
Value for this Rule
Explanation
Standard E&M code is used when critical care is less than 30 minutes, for all patient ages.
Standard E&M code is used when critical care is less than 30 minutes, for all patient ages.
Standard E&M code is used when critical care is less than 30 minutes, for all patient ages.
Critical care charge for patients under 29 days, when critical care is over 30 minutes, but less than 75.
Critical care charge for patients under 29 days, for each additional 30 minutes over 75.
NOTE: Since the appropriate E&M code can vary depending on several factors (other than just time spent and complexity), your organization may choose not to create these three rules for time less than 30 minutes. If these rules are not set up, physicians can still enter their critical care time on the custom screens, and the appropriate critical care CPT code will be generated only once the total is at least 30 minutes.
CPT
99221Initial hospital care-Level 1
99222Initial hospital care-Level 2
99223Initial hospital care-Level 3
99468Critical Care, first hour, under 29 days
99469Critical Care, additional 30 minutes, under 29 days
Modifier
Charge Type
Initial
Initial
Initial
Initial
Subsequent
Complexity
Low, N/A (If the user does not specify the complexity, a level 1 code is assumed.)
Moderate
High
Low, Moderate, High, N/A
Low, Moderate, High, N/A
Age Range
Min Time for 1 unit (minutes)
0
0
0
30
1
Max Time for 1 unit (minutes)
29
29
29
74
30
Sample Rules for Critical Care, continued
Field
Value for this Rule
Value for this Rule
Value for this Rule
Value for this Rule
Explanation
Critical care charge for patients from 29 days to 24 months, when critical care is over 30 minutes, but less than 75 minutes.
Critical care charge for patients from 29 days to 24 months, for each additional 30 minutes over 75.
Critical care charge for patients from 25 months to 5 years, when critical care is over 30 minutes, but less than 75 minutes.
Critical care charge for patients from 25 months to 5 years, for each additional 30 minutes over 75.
CPT
99471Critical Care, first hour, 29 days to 24 months
99472Critical Care, additional 30 minutes, 29 days to 24 months
99475Critical Care, first hour, 25 months to 5 years
99476Critical Care, additional 30 minutes, 25 months to 5 years
Modifier
Charge Type
Initial
Subsequent
Initial
Initial
Complexity
Low, Moderate, High, N/A
Low, Moderate, High, N/A
High
Low, Moderate, High, N/A
Age Range
Start: 29 D End: 24 M
Start: 29 D End: 24 M
Start: 25 M End 5 Y
Start: 25 M End 5 Y
Min Time for 1 unit (minutes)
30
1
30
1
Max Time for 1 unit (minutes)
74
30
74
30
Sample Rules for Critical Care, continued
Field
Value for this Rule
Value for this Rule
Explanation
Critical care charge for patients over 5 years, when critical care is over 30 minutes, but less than 75 minutes.
Critical care charge for patients over 5 years, for each additional 30 minutes over 75.
CPT
99291Critical Care, first hour, over 5 years
99292Critical Care, additional 30 minutes, over 5 years
Listed below are some sample infusion rules that might be defined at an organization that provides infusion services. The samples below are by no means a definitive or complete list of rules; they are provided simply as a means of illustrating of how the various criteria can be used to define rules.
Sample Rules for Chemo Infusion
Field
Values for this Rule
Values for this Rule
Values for this Rule
Explanation
Initial chemo Infusion, 1st hour
Initial chemo Infusion, 1st hour, concurrently, second site
Subsequent chemo Infusion, each additional hour
CPT
96413Chemotherapy administration, intravenous infusion technique; up to 1 hour, single or initial substance/drug
96413Chemotherapy administration, intravenous infusion technique; up to 1 hour, single or initial substance/drug.
96415Chemotherapy administration, intravenous infusion technique; each additional hour (List separately in addition to code for primary procedure)
Modifier
59Distinct procedural service.
Drug Class
Chemo
Chemo
Chemo
Charge Type
Initial
Initial
Subsequent
Delivery Method
Infusion
Infusion
Infusion
Access Type
Single Site Multiple Sites
Multiple Sites
Single Site Multiple Sites
Site
1st
2nd
1st 2nd
Infusion Type
Single Sequential Concurrent
Sequential Concurrent
Single Sequential Concurrent
Min Time for 1 Unit (minutes)
16
16
31
Max Time for 1 Unit (minutes
60
60
60
Min Time Since last Admin of same drug (minutes)
Same Drug Previously Administered in Session
First hr of Administration
Concurrent Infusion, Same Site
Sample Rules for Non-Chemo Infusion
Field
Values for this Rule
Values for this Rule
Values for this Rule
Values for this Rule
Explanation
Initial Non-Chemo Infusion, 1st hour
Subsequent Non-Chemo Infusion, each add’l hour
Subsequent Non-Chemo Infusion, each add’l hour, concurrently, different site
Subsequent Non-Chemo Infusion, concurrently, same site
CPT
96365Intravenous infusion, for therapy, prophylaxis, or diagnosis (specify substance or drug); initial, up to 1 hour
96366Intravenous infusion, for therapy, prophylaxis, or diagnosis (specify substance or drug); each additional hour (List separately in addition to code for primary procedure)
96366Intravenous infusion, for therapy, prophylaxis, or diagnosis (specify substance or drug); each additional hour (List separately in addition to code for primary)
96368Intravenous infusion, for therapy, prophylaxis, or diagnosis (specify substance or drug); concurrent infusion (List separately in addition to code for primary procedure)
Modifier
Drug Class
Non-Chemo
Non-Chemo
Non-Chemo
Non-Chemo
Charge Type
Initial
Subsequent
Subsequent
Subsequent
Delivery Method
Infusion
Infusion
Infusion
Infusion
Access Type
Single Site Multiple Sites
Single Site
Single Site Multiple Sites
Single Site Multiple Sites
Site
1st
1st
1st 2nd
1st
Infusion Type
Single Sequential Concurrent
Single Sequential
Concurrent
Concurrent
Min Time for 1 Unit (minutes)
16
31
31
16
Max Time for 1 Unit (minutes
60
60
60
9999999
Min Time Since last Admin of same drug (minutes)
Same Drug Previously Administered in Session
First hr of Administration
Concurrent Infusion, Same Site
Sample Rules for Chemo and Non-Chemo Push
Field
Value
Value
Value
Explanation
Initial Non-Chemo Push
Initial Chemo Push
Subs Chemo Push, each add’l push
CPT
96374Therapeutic, prophylactic, or diagnostic injection (specify substance or drug); intravenous push, single or initial substance/drug
96409Chemotherapy administration; intravenous, push technique, single or initial substance/drug
96411Chemotherapy administration; intravenous, push technique, each additional substance/drug (List separately in addition to code for primary procedure)
Modifier
Drug Class
Non-Chemo
Chemo
Chemo
Charge Type
Initial
Initial
Subsequent
Delivery Method
Push
Push
Push
Access Type
Single Site Multiple Sites
Single Site Multiple Sites
Single Site Multiple Sites
Site
1st 2nd
1st 2nd
1st 2nd 3rd 4th 5th
Infusion Type
Single Sequential Concurrent
Single Sequential Concurrent
Sequential Concurrent
Min Time for 1 Unit (minutes)
0
0
0
Max Time for 1 Unit (minutes
15
15
15
Min Time Since last Admin of same drug (minutes)
30
Same Drug Previously Administered in Session
checked
First hr of Administration
Concurrent Infusion, Same Site
Sample Rules for Hydration
Field
Value
Value
Explanation
Initial Hydration Infusion
Subsequent Hydration Infusion, each add’l hour
CPT
96360Intravenous infusion, hydration; initial, 31 minutes to 1 hour
96361Intravenous infusion, hydration; each additional hour (List separately in addition to code for primary procedure)
Next, if the user selected System Generated for the Infusion Type field, an Infusion Type (of Single, Sequential, or Concurrent) is calculated by the system for the infusion session. See How a System Generated Infusion Type is Calculated.
Next, any hydration services entered by the user are evaluated to determine if they are billable. Those that are not deemed billable are disregarded. See How Hydration Services Are Evaluated for Billing.
And finally, the billable services are evaluated to see if they fulfill the criteria for one or more of the rules that you defined for the Infusion section. One CPT code is automatically generated on the charge transaction for each Rule whose criteria is met. See How Infusion Rules are Applied to Generate CPT Codes.
When you define your Primary Service Hierarchy for Infusion billing (see Steps for Defining your Primary Service Hierarchy), you rank the Drug Classes and Delivery Methods that are used at your organization in numeric order, with “1” being the highest rank. This information is then used to select the primary service for each infusion session. For example, you might rank your Drug Classes and Delivery Methods as follows:
Field
Value
Rank
Drug Class
Chemo
1
Non-Chemo
2
Hydration
3
Delivery Method
Infusion
1
IA Infusion
2
Push
3
IA Push
4
Injection
IA Injection
Oral
Please note that a drug/service must have a defined rank for both its Drug Class and its Delivery Method in order to be selected as a primary service. If either of these is undefined (blank) in the Primary Service Hierarchy, then the drug/service is removed from consideration, and will not be selected as the primary service. Using our sample hierarchy above, a Chemo drug administered Orally could not be selected as a primary service, because the Delivery Method (Oral) does not have a rank.The rules used for calculating the primary service are described below.
If all of the drugs/services that were provided during a given session are administered through the same site (Access Type is Single Site, and the value for Site is the same on each service), there is only one primary service. It is selected is as follows:
First, the Drug Class is evaluated for each of the services that were provided. The service that belongs to the highest ranked Drug Class is selected as the primary service.
If there is a tie (two services were provided, and both have the same Drug Class rank), then the Delivery Method is evaluated for each of those services. The service that has the highest ranked Delivery Method is selected as the primary service.
If there is a tie yet again (all services have the same Drug Class rank, and also the same Delivery Method rank), a tie-breaker rule is applied.
If all the drugs/services have a Delivery Method of Infusion, the application analyzes the administration times to maximize the billing potential:
If the individual administration times of the tied drugs are than less than 60 minutes, the services are combined, and one “initial” CPT code is used for the total administration time of all of the drugs.
Example: Two chemo IV drugs (same Drug Class rank, same Delivery Method of Infusion) are administered in an infusion session. Both are administered through Site 1st (same Site), one for 45 minutes, and the other for 50 minutes. Based on the maximum value rule for this Drug Class, Delivery Method, and Charge Type combination, the initial CPT code for Chemo IV is added once, for the total administration time of 60 minutes. The subsequent CPT code for Chemo IV is added for the remaining 35 minutes.- t If the administration time of the first tied drug is greater than 60 minutes (and it does not overlap with the other tied drugs), an “initial” CPT code is used for that drug, and “subsequent” CPT codes are applied to any remaining time for that drug or for any additional drugs.
Example: Two non-chemo IV drugs (same Drug Class rank, same Delivery Method of Infusion) are administered in an infusion session. Both are administered through Site 1st (same Site), Drug 1 is administered from 08:00-09:30 and Drug 2 is administered from 09:30-10:30. Based on the maximum value rule for this Drug Class, Delivery Method, and Charge Type combination, the initial CPT code for Non-Chemo IV is added once for Drug 1 for the first 60 minutes, along with a subsequent CPT code for the remaining 30 minutes. Drug 2 then qualifies for subsequent CPT code.- t If the administration time of the tied drugs overlaps, the “initial” CPT code is applied to the drug with the longer administration time, and “subsequent” CPT codes are applied to any remaining time for that drug. Any additional drugs are considered for a concurrent infusion charge.
Example: Two non-chemo IV drugs (same Drug Class rank, same Delivery Method of Infusion) are administered in an infusion session. Both are administered through Site 1st (same Site), Drug 1 is administered from 08:00-09:00 and Drug 2 is administered from 08:00-09:45. Based on the maximum value rule for this Drug Class, Delivery Method, and Charge Type combination, the initial CPT code for Non-Chemo IV is added once for Drug 2 (the longer running administration) for the first 60 minutes, along with a subsequent CPT code for the remaining 45 minutes. Drug 1 then qualifies for subsequent CPT for a concurrent infusion of a drug in the same site.
If the drugs/services were delivered using a Delivery Method other than Infusion, one drug is arbitrarily selected as the primary service, and the other becomes the “secondary” or “subsequent” service.
Example: Two chemo Push drugs (same Drug Class rank, Delivery Method is not Infusion, but Delivery Methods have the same rank) are administered in an infusion session. Both are administered through Site 1st (same Site), one for 15 minutes, and the other for 15 minutes. One of the drugs is arbitrarily selected for the initial CPT code for Chemo Push, for the first instance, and the other drug is selected for the subsequent CPT code for Chemo Push, for the second instance.
If the drugs/services that were provided during a given session are administered through different sites (Access Type is multiple sites, and the value for Site is different on each service), and two or more have a Delivery Method of Infusion or Push, there will be more than one primary service.
First, the Drug Class is evaluated for each of the services that were provided. The service that belongs to the highest ranked Drug Class becomes one of the primary services, and the service that belongs to the lower ranked Drug Class (but still has a Delivery Method of Infusion or Push, via a different Site), becomes another primary service.
Example: One chemo IV drug and one hydration service (different Drug Class ranks, Delivery Method for both is infusion) are administered in an infusion session. Chemo (the higher ranked Drug Class) is administered through Site 1st for 45 minutes, and hydration (the lower ranked Drug Class) is administered through Site 2nd for 180 minutes (different Sites). The initial CPT code for chemo IV is added once. The initial CPT code for hydration is added once for the first 60 minutes, and the subsequent CPT code for hydration is added for the remaining 120 minutes.- b. If there is a tie (both of the services belong to the same Drug Class, and have the same Delivery method of either Infusion or Push, via different Sites), both of them become primary services.
Example: Two chemo IV drugs (same Drug Class rank, Delivery Method for both is Infusion) are administered in an infusion session. One is administered through Site 1st for 45 minutes, and the other through Site 2nd for 50 minutes (different Sites).The initial CPT code for chemo IV is added twice, once for each service. Modifier 59 is added to one of the codes (as specified in the Infusion rules).
How a System Generated Infusion Type is Calculated
When entering infusion service information for a patient on an Infusion section, if the user selects “System Generated” for the Infusion Type field, an infusion type (of Single, Sequential, or Concurrent) is calculated by the system for the infusion session. This information is then used when calculating which CPT codes to generate on the charge transaction screen (see How CPT Codes are Calculated for Infusion Sections for information about other factors that also affect the CPT code generation).
If there is only one service entered for the infusion session, then the Infusion Type is Single.
If there is more than one service, go to Step 2.
If there are no services that have a Delivery Method of Infusion or Push, then the Infusion Type is Single.
If there is at least one service with a Delivery Method of Infusion or Push, go to Step 3.
Determine whether any hydration services should be considered as an “infusion type” service, when calculating the Infusion Type of Single, Sequential, or Concurrent. If there are no hydration services at all, skip this step.
Hydration services (which always have a Delivery Method of Infusion) are only considered if they are administered immediately following another service that has a Delivery Method of Infusion. Therefore, if there are no services, other than hydration, that have a Delivery Method of Infusion, then the hydration service does not qualify as an “infusion type” service. In this case, go to Step 4.
If there are other services that have a Delivery Method of Infusion, in addition to the hydration service, then compare the start and stop times of the hydration service with those other services. There are three possible results:
The hydration Start Time is earlier than the Stop Time value of the last chronologically administered non-hydration service administered via Infusion. In this case, the hydration service does not qualify as an “infusion type” service.
The hydration Start Time is equal to the Stop Time value of the last chronologically administered non-hydration service administered via Infusion. In this case, the hydration service does qualify as an “infusion type” service.
The hydration Start Time is later than the Stop Time of the last chronologically administered non-hydration service administered via Infusion. In this case, the hydration service does not qualify as an “infusion type” service.
Review the Delivery Method for the remaining non-hydration services. Any that have a Delivery Method of Infusion do qualify as “infusion type” services.
At this point, we have the following:
Possibly one hydration service (from Step 3) that qualifies as an “infusion type” service.
Possibly one or more non-hydration services (from this Step) that qualify as “infusion type” services.
Review all of the qualifying “infusion type” services and determine if they were given singly, sequentially, or concurrently.
If there is only one qualifying service, the Infusion Type is Single.
If there is more than one qualifying service, look at Start Time and Stop Time for each one to determine if they were given sequentially or concurrently:
If there is no overlap in the Start Date/ Time to Stop Date / Time for any of the services, the Infusion Type is Sequential.
If there is overlap in the Start Date/ Time to Stop Date / Time for any of the services, and the services are being administered in different sites, the Infusion Type is Sequential.
If there is overlap in the Start Date/ Time to Stop Date / Time for any of the services, and the services are being administered in the same site, the Infusion Type is Concurrent.
Infusion services with a Drug Class of hydration are not considered billable unless a) they have a Delivery Method of infusion, and b) the user checks the Separate Hydration Order on File checkbox on the Infusion section (when they are entering the infusion services for the patient). If these two conditions are not met, then all hydration services entered by the user are ignored when the rules for the Infusion section are applied.If the conditions above are met, then some or all of the hydration services may be billable.
If the hydration service is delivered through the same site as another non-hydration drug that has also has a Delivery Method of infusion, then only the portion of time that does not overlap with the other drug can be billed. For example:
Hydration is administered through site 1 from 10:00 to 15:00
Chemo infusion is administered through site 1 from 11:00 to 15:00 PM
Billable hydration time is 10:00 to 11:00 (the non-overlapping time only)
If the hydration service is delivered through a different site from another non-hydration drug that has also has a Delivery Method of infusion, then it may be billed in its entirety. For example:
Hydration is administered through site 1 from 10:00 to 15:00
Chemo infusion is administered through site 2 from 11:00 to 15:00
Billable hydration time is 10:00 to 15:00 (both the overlapping and non-overlapping time)
Hydration services that overlap with other hydration services are not billable; these are considered bundled services and cannot be billed separately.
Normal Saline is administered through site 1 from 9:43 to 14:15
Hydration is administered through site 1 from 9:44 to 14:10
Heparin IV (via IV Push) is administered through site 1 from 14:44 to 14:46
Billable hydration time is from 9:43 to 14:15 (for the first Normal Saline administration only)
How Infusion Rules are Applied to Generate CPT Codes
An Infusion section contains one or more rules, and these rules are used to generate CPT codes on the charge transaction screen. Each rule defines the circumstances that must be met (the data that must be entered by the user or calculated by the system), in order for one specific CPT code to be generated on the charge transaction. If the data that was entered by the user (or that was calculated by the system) satisfies more than one rule, then more than one CPT code is generated. The CPT codes are generated as follows:
Determine Whether to Apply an “Initial” CPT Code for the Primary Services (based on administration time).
For each of the services that qualify as a primary service for the session, determine if the administration time for that service was long enough to apply an “initial” CPT code. For example, look at all the rules that have a Charge Type of Initial, and find the one that matches the service’s Drug Class, Delivery Method, etc. Check to see if this primary service was administered at least as long as the Min Time For 1 Unit (minutes) setting for that Rule. If it does, then generate the CPT code defined on the Rule, with a Quantity of 1.
In some case, there might be a primary service that does not have an administration time (such as an injection). In this case, the system finds the Rule that has a Charge Type of Initial, and also matches the service’s Drug Class, Delivery Method, etc., and generates the CPT code defined on that Rule, with an appropriate Quantity.
If there is more than one primary service, this can result in one or more “initial” CPT codes that have a Quantity of 1.
Determine whether to Apply a “Subsequent” CPT code for the Primary and Secondary Services (based on administration time).
For each of the services that qualified as a primary service for the session, determine if the administration time for that service was long enough to apply a “subsequent” CPT code, for any time over and above the initial service. For example, using the same the “initial” Rule that was already applied in Step 1, check to see if the primary service was also administered longer than the Max Time For 1 Unit (minutes) setting. If it was, then look at all the rules that have a Charge Type of Subsequent, and find the one that matches the service’s Drug Class, Delivery Method, etc. Check to see if the additional time that this primary service was administered is at least as long as the Min Time For 1 Unit (minutes) setting for the “subsequent” Rule. If it does, then apply the CPT code defined on the Rule, with an appropriate Quantity based on the additional amount of time the service was administered. If the primary service was stopped and then started one or more times, take the additional time from the initial administration of the primary service (the additional time beyond the maximum time used for the initial CPT code), and add it to the total time for the second/subsequent administrations; use this grand total when determining a Quantity for the “subsequent” CPT code.
If there is more than one primary service, this can result in one or more “subsequent” CPT codes that have a Quantity of 1 or more.
For each of the secondary services (those that do not qualify as a primary service for the session), determine if the administration time for that service was long enough to apply a “subsequent” CPT code. For example, look at all the rules that have a Charge Type of Subsequent, and find the one that matches the service’s Drug Class, Delivery Method, etc. Check to see if this secondary service was administered at least as long as the Min Time For 1 Unit (minutes) setting for that Rule. If it does, then apply the CPT code defined on the Rule, with an appropriate Quantity based on the total amount of time the service was administered.
In some case, there might be a secondary service that does not have an administration time (such as an injection). In this case, the system finds the Rule that has a Charge Type of Subsequent, and also matches the service’s Drug Class, Delivery Method, etc., and generates the CPT code defined on that Rule, with a Quantity of 1 for each service.
If there is more than one secondary service, this can result in one or more “subsequent” CPT codes that have a Quantity of 1 or more.
There are three special cases that are also considered when determining which CPT codes to apply:
A. Determine Whether to Apply a “Subsequent” CPT for the Same Drug being Administered a Subsequent Time in the Session.
For any secondary services that have a Delivery Method of Push (or a Delivery Method of Infusion and a total administration time of less than 15 minutes), first determine if the same drug was previously administered using a Delivery Method of either Infusion or Push in the session. If this is true, then for the second administration, find the Rule that has the same Drug Class, a Delivery Method of Push, and also the Charge Type set to Subsequent, the Min time since last admin of same drug (minutes) set to [n] minutes, and the Same Drug Previously Administered in Session box checked. Then check to see if the Start Time of the second administration is [n] minutes or more after the Stop Time of the first administration. If this is true, then apply the CPT code defined in the Rule to the second service.
This will result in a “subsequent” CPT for infusion of the same drug, with a Quantity of 1 or more. No additional CPT codes are added for this drug.
Example: One chemo drug is delivered via infusion (Drug A) for one hour. A non-chemo drug is delivered via Push (Drug B), two separate times during the same session, 45 minutes apart.
96413, Quantity of 1, is applied for the initial chemo infusion service (one hour for Drug A)
96375 Quantity of 1, is applied for the first subsequent non-chemo push (first push for Drug B)
96376 Quantity of 1, is applied for the second subsequent non-chemo push (second push for Drug B). The Rule for 96376 has the Same Drug Previously Administered in Session box checked and the Min time since last admin of same drug (minutes) set to 30 minutes.
B. Determine Whether to Apply a CPT for a Sequential Infusion of a New Chemo or Non-Chemo Drug.
For any secondary services, first determine if two different drugs in the same Drug Class (other than hydration) have been administered in the same session, both using a Delivery Method of Infusion. If these conditions are true, find the Rule that has the same Drug Class, Delivery Method, Infusion Type, etc, and also the Charge Type set to Subsequent and the First Hour of Administration box checked. If the total administration time of both drugs is greater than or equal to the Min Time For 1 Unit (minutes) setting in that Rule, then apply the CPT code defined in the Rule to the second service.
This will result in a “subsequent” CPT for the infusion of a new drug, with a Quantity of 1. If there is any remaining time after the first hour, then Step 2 above is applied, which could result in another “subsequent” CPT code for the additional time. This is the only “special” case where there might be additional processing on the same service.
Example: Two different non-chemo drugs (Drug A and Drug B) are administered via infusion, sequentially in the same site, one for 2 hours and the other for 3 hours.
96365, Quantity of 1, is applied for the initial non-chemo service (first hour for Drug A)
96367, Quantity of 1, is applied for the first hour of a sequential infusion of a new drug (first hour for Drug B). The Rule for 96367 has the First Hour of Administration box checked.
96366, Quantity of 3, is applied for the remaining billable time for both drugs (one remaining hour for Drug A, two remaining hours for Drug B).
C. Determine Whether to Apply a “Subsequent” CPT for a Concurrent Infusion of a Drug in the Same Site.
First, determine if a secondary service with a Drug Class that is not Chemo or Hydration, and a Delivery Method of Infusion, is delivered concurrently (Infusion Type is Concurrent) through the same Site as another service (that is not Hydration). Next, determine if the total administration time of the secondary service is greater than 15 minutes, and if the majority of its administration time overlaps with one or more other infusions. If these two conditions are true, find the Rule that has the same Drug Class, Delivery Method, Infusion Type, etc as the secondary service, and also the Charge Type set to Subsequent and the Concurrent Infusion, Same Site box checked. Apply the CPT code defined in that Rule for the secondary service, with a Quantity of 1.
If there is more than one drug that qualifies for this rule (Rule C) for a concurrent charge, the drug with the longest total administration time is selected. Once this rule for a concurrent charge has been applied to a drug in an infusion session, no charge will be applied for any other drug that qualifies for this same rule. This is because Rule C can only be used once for an infusion session, and there is no other applicable charge if another drug qualifies for the rule.
If the amount of time that the secondary service overlaps the other infusion(s) is not a majority of its administration time, or if this rule (Rule C) for a concurrent charge has already been applied to a drug in an infusion session, then bill only the non-overlapping time for that infusion, using Rule B (infusion of a new drug) or Rule 2 (subsequent infusion) above instead, based on the logic for those rules. However, if the non-overlapping time is less than or equal to 15 minutes, increase the non-overlapping time to 16 minutes so that an infusion code (96367 or 96366) is applied instead of a push code (96375).
If the total administration time of the secondary service (both overlapping and non-overlapping) is less than or equal to 15 minutes, apply a push CPT code (96375) for the total administration time, regardless of whether the majority of time is overlapping with the other infusion.
This will result in a “subsequent” CPT for concurrent infusion of a drug, with a Quantity of 1. No additional CPT codes are added for this drug.
Example: Two non-chemo drugs (Drug A and B) are delivered via infusion through the same site concurrently. Drug A is administered from 10:00-14:00 and Drug B is administered from 11:00-14:00. Drug B is then administered again via infusion from 14:30 to 15:30. Note that the total administration time of Drug B is greater than 15 minutes (4 hours) and the majority of Drug B’s administration (3 of the 4 hours) overlaps with Drug A.
96365, Quantity of 1, is applied for the initial non-chemo service (first hour for Drug A)
96368, Quantity of 1, is applied for the concurrent infusion in the same site (first hour for Drug B). The Rule for 96368 has the Concurrent Infusion, Same Site box checked. When 96368 is used, no other charges are applied for Drug B, neither for additional hours (12:00-14:00), nor for additional administrations through the same site via infusion (14:30-15:30). (Note: If the second administration of Drug B had been via a different Delivery Method (for example, Push), then another charge code could be applied.)
96366, Quantity of 3, is applied for the remaining billable time for the first service (remaining three hours for Drug A).
You can make a variety of changes to a section, such as changing a section’s name or description, adding or removing fields, and so on. However, you cannot change the overall format of the section itself (such as changing it from List section to an E & M section).
Find the section you want to edit. Sections are arranged alphabetically by the section Label. To help you find the section, you can change the sort order by clicking on a column heading, or you can enter a phrase in the Search field.
Click the Edit icon for that section. It is located at the right side of the section’s row.
The section contents are displayed.
Make your changes:
For all types of sections:
Change the section’s Display Label, Description, or Active status.
Add or remove Locations or Roles.
For E & M sections only:
Add or remove levels in the Levels portion of the screen.
Modify the CPT, Modifier, or Quantity in the Levels portion of the screen.
Click the Add button to add new field to the section.
Use the Move icon to move a field. Click and hold on the Move icon, drag the field up or down to a new location on the section, and drop it.
You can copy a section in order to create a new section. This is useful when you want to create a new section that has similar fields or rules to an existing section, with only slight differences. When copying, you create a new section with a different name. Then you edit the section to make any changes that are necessary for the new section.
Find the section you want to copy. Sections are arranged alphabetically by the section Label. To help you find the section, you can change the sort order by clicking on a column heading, or you can enter a phrase in the Search field.
Click the Copy icon for that section. It is located at the right side of the section’s row.
A new section of the same type is created. It has the same CPT codes, modifiers, and fields or rules as the original section. Note that the Display Label, Description, Financial Classes, Locations, and Roles are not copied forward.
Enter a name for this new section in the Display Label field, and a description in the Description field.
Make any modifications as necessary for the new section’s definition. See Editing a Section for information on the changes you can make.
Check the Active box, if you want to start using the section right away.
When you are done, click the Save button to save the new section.
Find the section you want to delete. Sections are arranged alphabetically by the section Label. To help you find the section, you can change the sort order by clicking on a column heading, or you can enter a phrase in the Search field.
Click the Delete icon for that section. It is located at the right side of the section’s row.
On E & M and List sections only, you can group fields together and give each group a heading name. This grouping feature is for visual layout only, to help the end-user quickly locate the fields they want to answer. The grouping does not affect the logic or generation of CPT codes in any way.
Find the section you want to modify. Sections are arranged alphabetically by the section Label. To help you find the section, you can change the sort order by clicking on a column heading, or you can enter a phrase in the Search field.
Before starting to create groups, you may find it easier to first re-order all of the fields so that the corresponding fields for each group are listed together, in the order that you want them within each group. Use the Move icon to move the fields up or down into position.
4. Identify a set of fields that you want to include in a group, and select all of those rows. Click on the first row in the group, and then Control-Click on any additional rows. Once they are all selected, click the Group button.
The rows are all indented slightly to indicate that they are part of the group, and a default name of “New Group” is assigned to the group.
Double-click on defaulted name of “New Group.”
The field changes to a text box, so that you can change the default name. Enter a new name for the group and click OK.
Repeat Step 4 and Step 5 to create additional groups.
Make any necessary changes:
To add a field to an existing group, grab the Move icon for that field and drag it into the group.
To remove a field from an existing group, grab the Move icon for that field and drag it out of the group.
To remove a group entirely, grab the Move icon for each field in the group, and drag them one by one out of the group, until there are none left. When you save the section, the group will be deleted.
Click the Save button when you are finished creating/managing groups.
You can export the fields and sections that you have defined in Commure Pro to a Microsoft Excel® spreadsheet, or you can import fields and sections from a spreadsheet into Commure Pro. The most likely usage of this feature is that you might define a series of fields and sections in a Commure Pro system (such as a test environment), export them to a spreadsheet, and then import into a different instance of a Commure Pro system (such as a production environment). Commure Pro strongly recommends that you do not make changes to the exported spreadsheet, prior to importing it into a new system/environment. All edits should be made in the application itself. See Steps for Importing/Exporting Fields or Sections.When exporting, the system creates a spreadsheet that contains two tabs called “Fields” and “Sections.” Each field and section in the spreadsheet has a unique external ID. If you import into a system that already has fields and sections with those same external IDs, those entries will be overwritten.
The Import and Export buttons are present on both the Manage Field Dictionary and Manage Sections options, and work the same way in both options. You can import or export both fields and sections at the same time, to or from a single spreadsheet that contains tabs for each.When exporting sections, all of the elements involved are exported. This includes all of the section definitions, all of the fields used on the all of the sections, and all of the rules used on any Critical Care or Infusion sections. The only items that are not included in the export are the fields used for Critical Care and Infusion billing. Since these fields are pre-loaded in every system, they never need to be exported or imported.When importing sections, some of the individual elements that are used on the sections must already exist in the Commure Pro system. These include the locations (facility and nursing unit), roles, financial classes, CPT codes and modifiers (in the master lists of charges and modifiers), and fields. When you import both fields and sections from a single spreadsheet, the system will correctly import the fields first, and then import the sections.To export your field and section information to a spreadsheet:
Select the Admin > Institution > Charge Capture > Custom Charge Capture Screens > Manage Field Dictionary or Manage Sections option.
In the Manage Field Dictionary or Manage Sections option, click the Export button.
The fields and/or sections are exported to a spreadsheet.
The exported spreadsheet uses the “Excel 97-2003 Workbook” format (with an .xls extension), which should not be changed. The standard “Excel Workbook” format (with an .xlsx extension) will not work with the import process.
Click the Save to save the file, or Open to open the file.