- System-level configuration changes that affect all users. See System-Level Customizations.
- XML customizations that affect a variety of functions and displays within the Commure Pro application. These can be applied to all users, to users in certain departments or facilities, or to specific individual users. See XML Customizations.
- Links from the Commure Pro application to external systems. These links can be made available to all users, to users in certain departments or facilities, or to specific individual users. In addition, authentication for the external system is supported. See Links from Commure Pro to External Systems.
System-Level Customizations
Contact your Commure Pro representative to assist you in making the changes below. System-level configuration changes affect all users of the Commure Pro system.- Change the amount of time before the system automatically logs out a user and/or change the time-out warning message (see Changing the System Time-Out and/or the Time-Out Warning Message)
- Change the system title and/or logo that appear on the login screen and other areas of the Physician Portal or Desktop Charge Capture application (see Customizing the Logo and/or Branding Title)
- Change the messages and system information displayed on the login page of the Physician Portal or Desktop Charge Capture application (see Customizing the Information Displayed on the Web Login Screen)
- Create a desktop shortcut to provide your users with easy access to your organization’s Commure Pro URL (see Creating a Desktop Shortcut to the Commure Pro Desktop Application).
- Allow users to log into Commure Pro’s desktop application from a different software application (see Implementing Single Sign-On or Custom Links to the Commure Pro Desktop Application from Other Applications).
- Change the required format for passwords (see Customizing Password Formats)
- Change the format of dates and addresses (see Customizing Date and Address Formats)
Changing the System Time-Out and/or the Time-Out Warning Message
The Commure Pro system logs a user out of the web application automatically after a certain period of inactivity. This is known as the system time-out, and the default setting is ten minutes. “Inactivity” is any time that the user is not actively working in the Commure Pro web application. This can include time spent using an external application that was accessed via a link from Commure Pro, or time spent using any type of standard desktop software. Before automatically logging out the user, the following warning message is displayed: “Your [BrandingTitle] session will be timed out if there is no activity within [TimeBeforeTimeout]. If you would like to extend your session simply click “Continue.""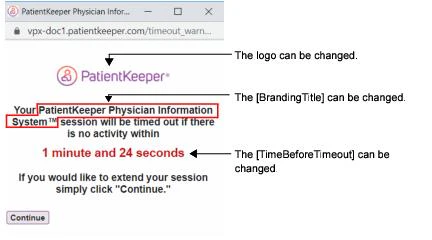
- Change the amount of time for the system time-out.
- Change any aspect of the time-out warning message, such as the logo, the text of the message, the [BrandingTitle], and/or the [TimeBeforeTimeout] (see also Customizing the Logo and/or Branding Title).
- Disable the time-out warning message entirely.
Customizing the Logo and/or Branding Title
A branding title of “Commure Pro Physician Information System™” is displayed on the login page and the time-out warning message. The Commure Pro logo is displayed in both of these locations, as well as on the main application browser page. You can replace the branding title and/or the logos with your own organization’s name and logo. You can use one small logo for all three locations, or you can use a large logo for the login page, and a small one for the two other locations.- Small logo for all three locations: The small logo cannot be larger than 163 pixels wide by 32 pixels high. http://CLIENTURL/mobilizer/sitewebintegration/mylogo.jpg
- Large logo for the login page only: The large logo is treated as a banner—it is centered on the login page and extends to the right and left as far as necessary. It cannot be more than 150 pixels high. http://CLIENTURL/mobilizer/sitewebintegration/mybanner.jpg
Customizing the Logo that Displays in the Header of Clinical Notes
The Commure Pro logo also displays in the header of all printed clinical notes by default, as demonstrated by the sample clinical note document that is provided below.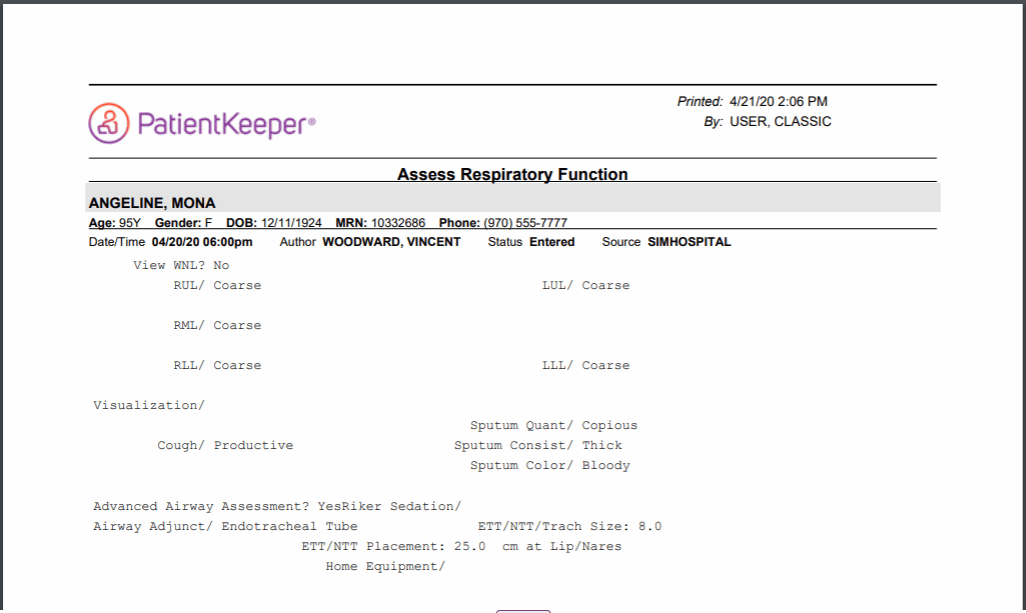
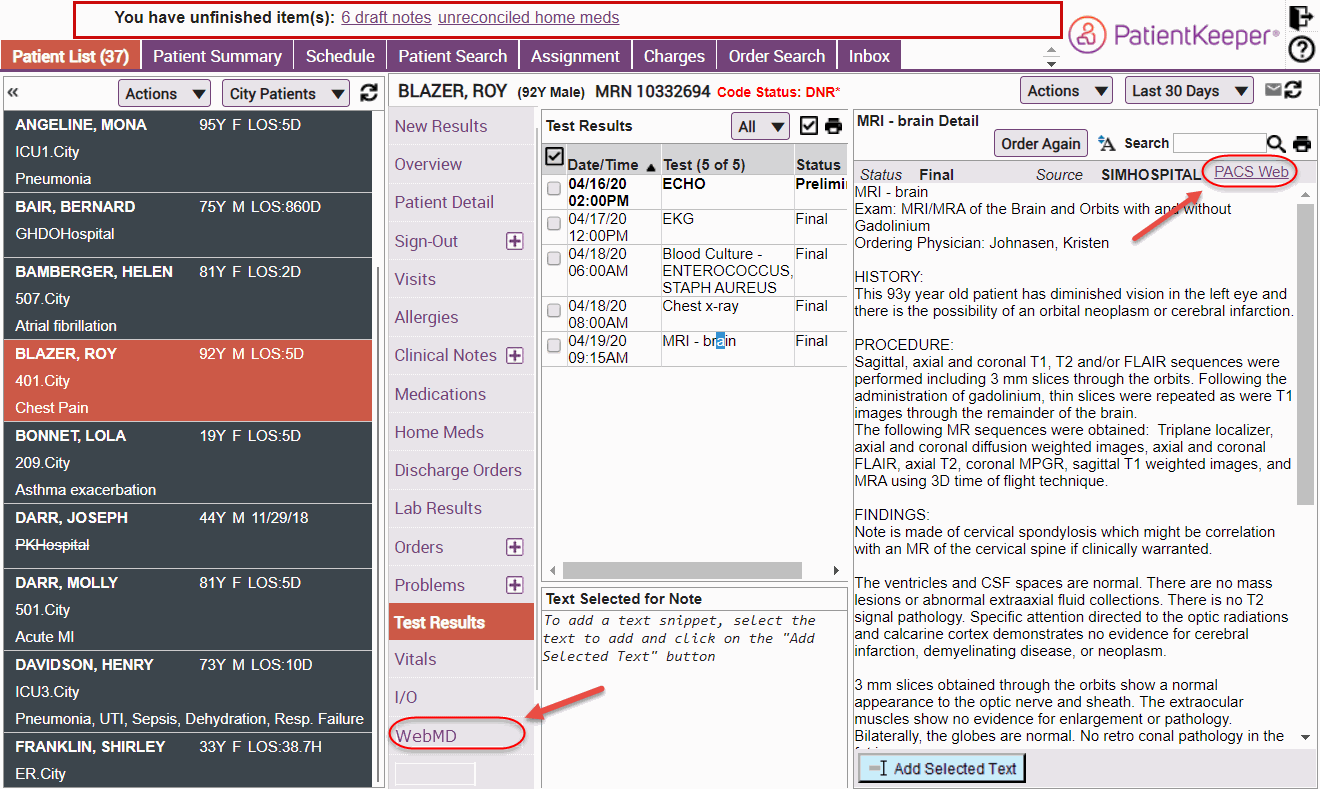
Customizing the Patient Header in the Portal to Include Code Status
You can customize your site to display each patient’s code status prominently in the patient header that displays on the portal. When customized to be included, this information displays to the right of the standard information that is always included as part of the patient header.Customizing the Information Displayed on the Web Login Screen
The system/environment name that is displayed on the Physician Portal or Desktop Charge Capture login screen can be changed to suit your organization’s needs. The system/environment name is located just below the login area. For example, you might want to display a combination of your organization’s name and the system environment, such as General Hospital - Production System, or General Hospital - Training System. You can also create one or two messages for the login screen, such as a message about scheduled downtimes, who to contact for support, or general information about your organization. These messages are displayed above and below the login area.Creating a Desktop Shortcut to the Commure Pro Desktop Application
By creating a desktop shortcut to the Commure Pro desktop application, users can just double-click the shortcut to go to the Commure Pro login page. Commure Pro provides an icon named Commure ProHelp.ico for the desktop shortcut. The icon is included with the on-line help system and is usually found on the Commure Pro application server in this location:
C:\Commure Pro\ENVIRONMENT\mobilizer\help\Commure ProHelp.ico
In this example, the drive letter (C:) may be different. ENVIRONMENT represents the environment (TEST, LIVE, or other.). If you do not have access to the Commure Pro application server, or do not know how to access it, request this icon from your Commure Pro representative.
You must create the shortcut on each computer workstation individually. To create a shortcut, follow these steps:
Commure Pro provides an icon named Commure ProHelp.ico for the desktop shortcut. The icon is included with the on-line help system and is usually found on the Commure Pro application server in this location:
C:\Commure Pro\ENVIRONMENT\mobilizer\help\Commure ProHelp.ico
In this example, the drive letter (C:) may be different. ENVIRONMENT represents the environment (TEST, LIVE, or other.). If you do not have access to the Commure Pro application server, or do not know how to access it, request this icon from your Commure Pro representative.
You must create the shortcut on each computer workstation individually. To create a shortcut, follow these steps:
- Copy the Commure ProHelp.ico file to a location on the computer hard drive. We suggest you copy it to the Program Files directory: C:\Program Files\Commure ProHelp.ico
- From the desktop, right-click on a blank area of the desktop, point to New, and then click Shortcut. The Create Shortcut Wizard appears.
- In the Type the location of the item field, type the path and name of your organization’s Commure Pro URL, and then click Next. This should be exactly the same URL that you would type in the address line of an internet browser. For example, you might type: https://www.generalhospital.com/mobilizer/index.jsp
- In the Type a name for this shortcut field, enter the name that you want to appear under the icon, and then click Finish. For example, you might type “Commure Pro,” or “Physician Portal.”
- Find the new shortcut on the desktop, right-click on it, and then click Properties. The New Internet Shortcut Properties dialog appears.
- Click the Web Document tab (if it is not automatically displayed) and then click the Change Icon button.
- Browse to the location where you saved the Commure ProHelp.ico file, and select it.
- Click OK twice to save your work and close the New Internet Shortcut Properties dialog box. The desktop shortcut is now created. Any user can double-click it to quickly access the login page of the Commure Pro application.
Implementing Single Sign-On or Custom Links to the Commure Pro Desktop Application from Other Applications
To facilitate the login process, you can create a custom login to the Commure Pro desktop application. Here are some examples of when you might customize:- If you require remote users to first authenticate via an SSL VPN device (e.g., Juniper®), you could implement a custom login. This login would provide immediate access to Commure Pro after the SSL VPN device authenticates them, without requiring them to enter a second username/password for Commure Pro. This, in effect, implements a single sign-on process for these users.
- If some of your users want to access the Commure Pro application directly from a third-party software application, implement a custom link that automatically logs them into Commure Pro without requiring them to enter a Commure Pro username/password. For example, radiologists whose workflow is built around a PACS system might like a quick link from the PACS system directly to Commure Pro to view other information about patients.
- If your organization is affiliated with another organization that also uses Commure Pro software, you can implement a link from one instance of Commure Pro to another, without requiring the user to enter a second Commure Pro username/password. In this case, the user’s credentials for the second system are stored in the Commure Pro Wallet. The user can select a patient in the first instance and then click a link in the center column of the Patient List tab to open a separate window to the second instance. Patient context information can be passed to the second instance of Commure Pro, so that the current patient is automatically selected (or at a minimum, the search criteria on the Patient Search tab can be populated automatically). Once the second instance of Commure Pro is open, all normal functionality is available. How does it work? The source application (SSL VPN device, third party application, or Commure Pro application) posts a form with the person’s username/password to an interim URL provided by Commure Pro. This URL first stores the username/password in the web session, and then redirects to the normal Commure Pro login page and automatically performs a login using the stored username/password. During the Commure Pro login, the stored username/password is authenticated using the authentication protocol that is currently implemented for the Commure Pro system (which could be either basic authentication or multi-authentication). Please contact your Commure Pro representative if you would like to implement this feature.
Customizing Password Formats
By default, a Commure Pro password must be at least three characters long, with no other formatting requirements. However, you can also add these password requirements:- Password must be a certain minimum length (between 3 and 20 characters with maximum length being 20 characters)
- Password must have at least one number and one letter
- Password must be mixed case These requirements affect both the web and handheld applications. Notify your Commure Pro representative if you want to establish any of these password rules, and they will update them via the following setting:
Customizing Date and Address Formats
At the time of installation, your Commure Pro representative can configure the system to display date and address information in either US format (the default) or non-US format. The selected format is used for both the handheld and web applications.| Item | US Format | Non-US Format |
|---|---|---|
| Date formats | mm/dd/yyyy or mm/dd/yy | dd/mm/yyyy or dd/mm/yy |
| Label for State/Province fields | State | Province |
| Label for Zip/Postal Code fields | Zip or Zip Code | Postal Code |
XML Customizations
Authorized administrators can view a list of custom changes to the software application that Commure Pro has implemented specifically for your organization. Customizations can be applied system-wide, or can be applied to only certain facilities, departments, users (by access level), or individual users. For example, you might see customizations such as the following:- Changes to the layout and field choices on the Patient Search tab
- Changes to the order of the display items in the center of the Patient List tab
- Changes to the layout and the fields choices on the Patient Details and Visits display windows
- Changes to the layout, lookups, and other display items on the Schedule tab
- Changes to reports accessed under the Tracking / Reporting tab
- Feedback option that allows providers to send feedback about an application directly to Commure Pro Support
- Hide the Print icons on Patient List, Patient Details, Patient Charge Status, Worklist, Charge Search, and Schedule tabs
- Links to external systems such as other hospital information systems or on-line reference tools (see Links from Commure Pro to External Systems for more information) The XML Customizations screen also has options to add, edit, or delete customizations. However, none of these actions should be attempted without first consulting your Commure Pro representative.
- Click the Admin tab, then click the System Management tab.
- Click the XML Customizations option. A list of your organization’s customizations displays.
- Click on a customization item to view further details about it.
Links from Commure Pro to External Systems
The Commure Pro system supports links to other web-based applications, such as reference tools or imaging systems. In order to create a link from the Physician Portal or Desktop Charge Capture application to an external system, there are three basic requirements:- Commure Pro personnel must implement an XML customization that is specific to the type of external system to which you want to create a link. The XML determines where in the user interface the link will appear. For example, a link to a medical reference such as WebMD® might appear in the center column of the Patient List tab. A link to an imaging tool might appear in the title bar of the Test Results detail pane.
- If the external system requires user authentication, or if you want to limit access to the external system by user, then a Level 1 administrator must use the External Systems option on the System Management tab. This option is used to define user access and the authentication requirements for the external system. This section of the manual describes how to use the External Systems option. If the external system is an open internet reference tool such as WebMD, and all users will be given access to it, then you do not need to create a definition for the external system.
- Depending on the access requirements of the external system, a Commure Pro Wallet entry may need to be created for each user who accesses the external system. The wallet entry stores the person’s username and/or password for the external system. Wallet entries can be created in three ways:
- Wallet entries can be created manually by a Level 0 or 1 administrator via the following setting: Admin - User - General - Wallet Entries - – Wallet entries can be created by a Level 0 or 1 administrator via Bulk User Edit option. However, this option only adds a wallet entry for a specific external system to all of the selected users. It cannot set the usernames and passwords for those users, as they would be different for each person. For more information, see Notes About Bulk Editing, and Adding Wallet Entries.
- In some cases, the Commure Pro system can create wallet entries automatically. This is based on the external system’s definition. See Adding an External System Definition. To access the External Systems screen, on the System Management tab click External Systems.
Adding an External System Definition
To define a new link to an external system, follow the steps below:- Click the Add External System button. The Add External System dialogue appears.
- Enter information in each of the fields: Name:Enter a descriptive name for the external system.External System Id:Enter the system ID for the external system. The ID must be unique within the Commure Pro system and it must match the ID that is used by the WebIntegrations.xml file to refer to the external system. Contact your Commure Pro representative for the correct ID.Shared:This field indicates whether the username and password are shared across all users, or whether each user must have their own.
- Check the Shared box to indicate that all users will share the same username and password. When you check this box, two additional fields appear:
- Shared Username: enter the username that is shared by all users.
- Shared Password: enter the password that is shared by all users.
- Leave the Shared box unchecked if each person must have their own username and password to access the external system. When this box is not checked, the Username Mapping Type and Password Mapping Type fields appear. Use them to indicate the parameters for the non-shared usernames and passwords.
- Username Mapping Type: this field determines the requirements for username.
- None: No username is required when connecting to the external system.
- Use Commure Pro UserID: Select this option if every person’s username is the same in both the Commure Pro system and the external system. The username the user enters when logging into Commure Pro is cached for the session and passed to the external system when linking.
- Use User Entered UserID: Select this option if some or all of the users have different usernames in the Commure Pro system and the external system. An administrator can enter and store each individual’s username in the user’s Commure Pro Wallet, or the system can prompt the user to enter it the first time they attempt to access the external system. If the username is valid at the time of the attempt, an entry is automatically created in the Commure Pro Wallet to store this information, and the user is not prompted for it on subsequent attempts.
- Password Mapping Type: this field determines the requirements for password.
- None: No password is required when connecting to the external system.
- Use Commure Pro Cached Password: Select this option if every user’s password is the same in both the Commure Pro system and the external system. The password the user enters when logging into Commure Pro is cached for the session and passed to the external system when linking.
- Use User Entered Cached Password: Select this option if some or all of the users have different passwords in the Commure Pro system and the external system, and you want the ability to store the user’s password. An administrator can enter and store each individual’s password in the user’s Commure Pro Wallet, or the system can prompt the user to enter it the first time they attempt to link to the external system. If the password is valid at the time of the attempt, an entry is automatically created in the Commure Pro Wallet to store this information, and the user is not prompted for it on subsequent attempts.
- Use Not Cached Password: Select this option if some or all of the users have different passwords in the Commure Pro system and the external system, and you want the user to enter their external system password every time they attempt to access it. The password is not cached in Commure Pro, which forces the user to re-enter the password on every attempt to access the external system. Enabled:This setting determines whether or not access to the external system is currently enabled or disabled for all users. Check this box to enable access, or leave it unchecked to disable access. This field is useful when first implementing an external system. You can define the link to the external system and leave it disabled while you set up any associated Commure Pro Wallet entries, or while you work out your implementation strategy. Once all the necessary items are in place, you can then enable access to all of your users.Globally Available:This setting determines whether or not access to the external system is available to all users.
- When the Globally Available box is checked, all users have access to the external system. Furthermore, if an administrator does not manually create wallet entries for each user on the General Settings page of the User tab, the Commure Pro system will automatically create wallet entries for the external system. Wallet entries are automatically created when the following conditions are met:
- If the Shared box is not checked, and a Username Mapping Type of Use User Entered UserID is selected, a wallet entry is created automatically the first time the user attempts to link to the external system and enters their username, or
- If the Shared box is not checked, and a Password Mapping Type of Use User Entered Cached Password is selected, a wallet entry is created automatically the first time the user attempts to link to the external system and enters their password.
- When the Globally Available box is not checked, a user can only access the external system if a level 0 or level 1 administrator creates a wallet entry for them.
- Click the Save button to save this external system definition. Or, click Cancel to exit without saving your work.
Editing or Deleting External System Definitions
To edit the definition for an external system, follow these steps:-
Select an external system definition on the left side of the screen by clicking on it.
The details of that external system definition appear on the right side of the screen.
- Click the Edit button to edit the definition. See Adding an External System Definition for a description of the fields found on this screen. When you are finished making your changes, click the Save button.
- Or, click the Delete button to delete the definition, and click Yes when prompted to confirm the deletion.