Accessing User Settings
Configuration of settings at the user level enables Level 1 or 2 administrators to control the settings of individual users. To access the user-level CPOE settings:- Click the Admin tab and then the User tab.
- Select the specific user whose settings you want to change and click Edit.
- Select CPOE from the Edit Settings drop-down list. The Personal Preferences screen provides access to all available settings used to configure the selected user. For more information about these settings, see User Order Entry Access Settings and User Favorites Settings.
Controlling a User’s Access to Order Entry
Administrators (with level 2 access or higher) can restrict access to Order Entry at the individual user level. The configuration settings used to control access are provided on the User tab, which (access permitting) displays among the tabs included under the Admin tab. These settings determine whether each user has access to enter both regular orders and free text orders. To grant a user permission to enter orders or create free text orders:- Click the Admin tab, followed by the User tab. The list of available users displays.
- Select the user for which you want to grant access, and click the Edit button.
- On the Personal Preferences screen, select CPOE from the Edit Settings drop-down menu.
- To grant the user permission to enter orders, locate the Can Enter Orders setting, and click Yes. To grant the user permission to enter free text orders, locate the Allow Free Text Orders setting, and click Yes.
- Click Save. The selected user is now able to access Order Entry from the user interface, either by choosing the Enter Orders option from the Actions drop-down menu, or by clicking the + icon that displays to the right of the Orders link on the modules list (when users select patients from CPOE-enabled facilities. Note that when users select patients from a facility in which CPOE is disabled, the Order Status link displays the order data in a more restricted view.)
User Order Entry Access Settings
The user-level preferences control the behavior of individual users in your facility or institution. In conjunction with department-level settings, the settings available at the user level sometimes provide administrators with more granularity to override department-level or Facility Group settings for one or more users in a department or Facility Group. When conflicts arise between settings configured at both the department and user level, the user-level settings take precedence. The following settings are used to configure the CPOE application at the user level. The two settings below are available to level 1 and level 2 administrators only. For information on accessing these settings, see Controlling a User’s Access to Order Entry. Allow Free Text Orders (Web, Android, Apple) Determines whether specific users are granted permission to create Free Text Orders. A Free Text Order is an order requiring users to enter some amount of detail (in a Free Text Field) as part of the order entry process. Can Enter Orders (Web, Android, Apple) Determines whether specific users are granted permission to sign and submit orders from the CPOE user interface. When this setting is disabled for a particular user, the icon providing access to the CPOE application is removed from the user interface. Removing the icon entirely ensures that unauthorized users do not enter orders from the Patient List, Patient Details, Patient Search or from the Sign-Out summary. An additional configuration option On Behalf of Provider is available so that sites can grant permission to individual nurses (or clinicians other than providers) to enter orders on behalf of an authorized provider. For more information, see Authorizing Users for Nursing Order Entry.Controlling a User’s Administrative Access to CPOE
Administrators (with level 1 access or higher) can restrict or grant access to a level 2 user’s administrative access in the CPOE application. The configuration setting used to control this access is provided on the User tab, which (access permitting) displays among the tabs included under the Admin tab. This setting determines whether each level 2 user has access to the Facility Group tab, which enables users to configure Facility Group preferences and all elements belonging to the Order Catalog, including Order Definitions, Order Sets, and Route Actions. To grant a level 2 user administrative access to the CPOE application:- Click the Admin tab, followed by the User tab. The list of available users displays.
- Select the level 2 user for whom you want to grant administrative access, and click the Edit button.
- On the Personal Preferences screen, select CPOE from the Edit Settings drop-down menu.
- To grant the selected user administrative access, locate the CPOE Administrator setting and click Yes.
- Click Save. The selected user is now granted access to the Facility Group tab, which displays within the physician portal. From this tab, authorized users can configure Facility Group preferences, CPOE utilities, and all elements belonging to the Order Catalog.
Per-User Administrative Access Settings
The following setting is used to grant or deny administrative access at the user level. The setting below is available to level 0 and level 1 administrators only. For information on accessing these settings, see Controlling a User’s Administrative Access to CPOE. CPOE Administrator: (web only) Determines whether specific level 2 users are granted permission to access the administrative access settings in the user interface. When granted access to this interface, users can configure Facility Group preferences, CPOE utilities, and all elements belonging to the Order Catalog.Controlling a User’s Access to Medication Reconciliation
Administrators (with level 2 access or higher) can restrict access to the Medication Reconciliation feature at the individual user level. The configuration setting used to control access is provided on the User tab, which (access permitting) displays among the tabs included under the Admin tab. This setting determines whether each user is granted permission to use the Medication Reconciliation user interface. Users access this interface by clicking the Medication Reconciliation icon from the Physician Portal. To grant a user permission to access the Medication Reconciliation feature:- Click the Admin tab, followed by the User tab. The list of available users displays.
- Select the user for whom you want to grant access, and click the Edit button.
- On the Personal Preferences screen, select CPOE from the Edit Settings drop-down menu.
-
To grant the user permission to access the Medication Reconciliation user interface, locate the appropriate setting(s) below, and click Yes for each option that you want to enable for the user.
- Enable Admission Med Rec
- Enable Transfer Med Rec
- Enable Discharge Med Rec
- Click Save. The selected user is now able to access the Medication Reconciliation user interface.
Controlling a User’s Ability to Enter Home Medications
Administrators (with level 2 access or higher) can restrict access to a user’s ability to enter home medication orders at the individual user level. The configuration setting used to control access is provided on the User tab, which (access permitting) displays among the tabs included under the Admin tab. This setting determines whether a user is able to enter home medication orders from the Orders pane that displays within the physician portal. To grant a user permission to enter home medications from the Orders pane:- Click the Admin tab, followed by the User tab. The list of available users displays.
- Select the user for whom you want to enable home medication entry, and click the Edit button.
- On the Personal Preferences screen, select CPOE from the Edit Settings drop-down menu.
- To grant the selected user the ability to enter home medications, locate the Add Home Medications setting and click Yes.
- Click Save. The selected user is now able to enter home medication orders from the Orders pane that displays within the physician portal. The Order Home Meds button displays enabling users to enter these types of orders.
Per-User Medication Reconciliation Access Settings
The following settings are used to configure the Medication Reconciliation user interface at the user level. The setting below is available to level 1 and level 2 administrators only. For information on accessing these settings, see Controlling a User’s Access to Medication Reconciliation and Controlling a User’s Ability to Enter Home Medications. Enable Admission Med Rec: (web only) Determines whether specific users are granted permission to access the Admission Medication Reconciliation user interface. When granted access to this interface, providers can perform medication reconciliation on a patient’s home medications during the patient admission process. Enable Transfer Med Rec: (web only) Determines whether specific users are granted permission to access the Transfer Medication Reconciliation user interface. When granted access to this interface, providers can perform medication reconciliation during the patient transfer process. Enable Discharge Med Rec: (web only) Determines whether specific users are granted permission to access the Discharge Medication Reconciliation user interface. When granted access to this interface, providers can perform medication reconciliation during the patient discharge process. Add Home Medications (web only) Determines whether specific users are granted permission to enter home medications outside of the formal medication reconciliation process. Continue Home Meds? Determines whether selected clinicians can access the Continue Home Medications screen. This screen is primarily used by clinicians in the ER to add selected medication orders without the need to perform a full medication reconciliation. As an alternative, clinicians can now perform partial reconciliation during patient admission, transfer, or discharge. For more information, see Enabling Partial Reconciliation of Medications in AMR, Enabling Partial Reconciliation of Medications in DMR, and Allowing Partial Reconciliation of Orders During Patient Transfer. View Unreconciled Home Meds Alert Upon Entering Orders Determines whether the system checks for unreconciled home medications whenever the selected user attempts to submit an order session, If there are one or more unreconciled medications, this user is prompted with the option to reconcile these medications. For more information, see Prompting Clinicians to Address Unreconciled Home Medications During Order Entry.Requiring Users to Obtain Co-Signature for CPOE Orders
Configuring co-signature functionality is essentially a two-step process. Prior to configuring an individual user’s co-signature rules (described below) administrators should consider that marking specific orders for co-signature is a prerequisite for some user configurations. Specifically, this additional step is required any time that an administrator plans to require users to get co-signature on a defined subset of orders (unless this subset is the entire medication Order Group). For more information, see Marking Order Definitions to Require Provider Co-Signature and Configuring the Display of Radiology Orders. Administrators (level 2 and above) can configure providers at the individual user level to require co-signature on one or more of their orders. The setting that determines the scope of each provider’s co-signature rules is provided on the User tab, which (access permitting) displays among the tabs included under the Admin tab. Note that you must configure co-signature independently for providers when submitting orders specifically as part of the Discharge Medication Reconciliation (DMR) workflow. For more information, see Requiring Users to Obtain Co-Signature When Submitting DMR Orders. To require a user to obtain co-signature before they can enter one or more orders:- Click the Admin tab, followed by the User tab. The list of available users displays.
- Select the user who you want to require to obtain co-signature on one or more orders and click the Edit button.
- On the Personal Preferences screen, select CPOE from the Edit Settings drop-down menu.
- Locate and configure the setting CPOE Co-Signature Required to define the scope of co-signature rules as they apply to Order Definitions.
- If choosing to require co-signature of scheduled medications, configure the related setting CPOE Scheduled Meds Requiring Co-Signature.
- To restrict co-signature rules for your defined scope of orders to one or more providers or departments, click Edit for either the Restrict Co-Signature to Providers or Restrict Co-Signature to Department setting and define the group of users to be subject to these co-signature rules.
- Search for and select the individual providers or departments to define a restricted list of providers who are authorized to provide co-signature, and click Save in the Quick Details box.
- Click Save at the bottom of the screen to save your co-signature configuration. The selected user is now required to obtain co-signature for the specified orders.
Requiring Co-Signature for Admission Orders
(MEDITECH only) You can create a list of specific Order Definitions requiring co-signature from clinicians without admit privileges. When clinicians without the proper authority enter one or more of these orders during order entry, they are required to obtain co-signature from a list of authorized providers (those with a MEDITECH role of ADMIT_PRIVILEGE). Note that co-signature rules for admission orders are defined institution-wide, and the group of users for whom these restrictions are enforced are defined by their MEDITECH role (specifically, ADMIT_PRIVILEGE=no) instead of by a specific user or department configuration in Commure Pro CPOE. Also note that when a user meets both the Commure Pro CPOE and MEDITECH criteria for required co-signature, the list of providers available to them is restricted to the narrower definition (only those providers with a MEDITECH role of ADMIT_PRIVILEGE). To configure CPOE to require co-signature for a defined list of admission orders:- Click the Admin tab and then the Facility Group or CPOE tab.
In deployments where Facility Groups are not enabled, the Facility Group tab is replaced by the CPOE tab.
- If your institution uses multiple Facility Groups, select the Facility Group you want to configure from the Facility Group drop-down list.
- Click the Edit button.
- Locate the setting Require Co-Signature for Admission Orders and click the associated Search Order Definitions link to search for and select one or more Order Definitions to define your list.
- Upon completion of this list, click Save. When clinicians without admit privileges click Sign/Submit for an order session that includes one or more orders from this list, they are required to select a provider with co-signature authorization. After clinicians select a co-signer and submit their order(s), the order session is routed to the co-signers Inbox for approval, and the process from this point forward is identical to the typical CPOE co-signature workflow.
CPOE Co-Signature Settings
The following settings are used to configure co-signature rules that can apply to departments or individual users. These settings are available to level 1 and level 2 administrators only. CPOE Co-Signature Required Defines the scope of the co-signature rules. You can configure the scope of these rules to apply to any of the following:- All: To require the selected user to obtain co-signature on all orders belonging to all Order Types.
- Marked Order Defs: To require the selected user to obtain co-signature on all orders that have been specifically marked to require co-signature. For more information, see Marking Order Definitions to Require Provider Co-Signature.
- All Medications: To require the selected user to obtain co-signature on all medication orders.
-
Scheduled Medications: Enable this setting to require co-signature on scheduled medications and then configure the following related preference to restrict co-signature to a specific schedule.
CPOE Scheduled Meds Requiring Co-Signature
When you restrict co-signature rules to scheduled medications, this setting lets you further define which controlled substances require co-signature. You can apply these co-signature rules to a defined group of providers or departments using the configuration preferences Restrict Co-signature to Providers and Restrict Co-Signature to Department, both described below.
- C-II only
- C-II, C-III
- C-II, C-III, C-IV
- C-II, C-III, C-IV, C-V
- C-II, C-III, C-IV, C-V, C-VI (enforced upon setting CPOE Co-Signature Required to All Orders). Restrict Co-Signature to Providers To select one or more individual providers by name. When users are prompted to obtain a co-signature for the specified orders, the providers that they can select are restricted to this list.
Authorizing Users for Nursing Order Entry
In some clinical settings, you might need to authorize individual nurses (or clinicians other than providers) to enter orders on behalf of an authorized provider. Extending order entry to others selectively can provide some flexibility for clinical work settings in which it might be impractical for providers to directly enter orders by hand. When nurses or other clinicians are authorized for order entry, they can enter orders just as providers do, but their view of the order entry screen is enhanced to include two additional (mandatory) fields “Ordering Provider” and “Source”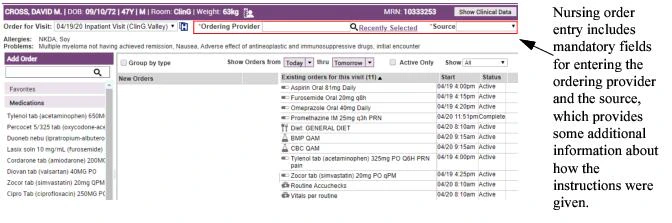
- Click the Admin tab, followed by the User tab. The list of available users displays.
- Select an individual user from the list and click Edit.
- On the Personal Preferences screen, select CPOE from the Edit Settings drop-down menu.
- Locate the preference Can Enter Orders and set the value to On Behalf of Provider.
- Click Save. The selected user is authorized for order entry but is required to choose an Ordering Provider and Source during order entry.
Regulating the Scope of Provider Order Searches
Administrators (with level 2 access or higher) can regulate the scope of each provider’s order search activity. You can restrict order searches to a provider’s departments or facilities. In addition, you can disable order search functionality entirely for individual users, or provide unrestricted access so that users can search for orders across all facilities belonging to your institution. To regulate a provider’s order search scope:- Click the Admin tab, followed by the User tab. The list of available users displays.
- Select the user for whom you want to define search scope, and click the Edit button.
- On the Personal Preferences screen, select CPOE from the Edit Settings drop-down menu.
-
Locate the User Can Search for Orders setting, and select one of the following options:
- None
- Within User’s Departments
- Within User’s Facilities
- All For more information about these options, see the setting User Can Search for Orders.
- Click Save. The scope of the user’s search is modified according to the selected filter.
User Search Scope Settings
The following setting is used to regulate the scope of provider search. The setting below is available to level 1 and level 2 administrators only. For information on accessing these settings, see Controlling a User’s Access to Order Entry. User Can Search for Orders (web only) Defines the scope of a provider’s order search activity on the Order Search tab. Select one of the following options to regulate the scope an individual user’s search operations when conducted from the Order Search tab.- None: To hide the Order Search tab from the selected user entirely.
- Within User’s Departments: To restrict order search scope on the Order Search tab to within the selected user’s departments.
- Within User’s Facilities: To restrict order search scope on the Order Search tab to within the selected user’s facilities.
- All: To allow the selected user to conduct unrestricted order searches from the Order Search tab.
Creating a Favorites List for Individual Users
Favorites are orders that users can access directly from the Add Order screen. Using a Favorites list, users can quickly access the orders that they enter most frequently. The orders on a Favorites list can be organized into custom categories. Typically, administrators (both level 1 and 2) create Favorites lists at the department level, which contain the Order Strings most-frequently entered by all users belonging to a particular department. Administrators and level 3 users can then further define Favorites at the individual user level. These user-level Favorites exist in addition to (or as an alternative to) the Favorites that are defined at the department level. This flexibility enables both administrators and end-users to refine the Favorites list by adding or removing any specific Favorites that differ from the Favorites list defined for this user at the department level. In addition to any Favorites that are created by department or user preference settings, note that providers can also add orders to their own individual Favorites list from the Order Details screen during the order entry process.Adding Orders to the Favorites List
You can add any Order String to a user’s individual Favorites list. When you add these elements as entries, they belong either to the top-level directory (named My Pickers) or to any custom category that you create. For more information on creating categories, see Adding Categories to the Favorites List.Note that level 3 users can also create and modify their own Favorites through the configuration of user preference settings. When level 3 users access their own Favorites setting (Admin > Preferences > Edit [CPOE] Settings > Favorites [click Edit]), they are given access to a simplified user interface that enables them to easily modify and add their own Favorite orders. In addition, end-users are also enable to manage their individual Favorites list during the order entry process. For more information about level 3 self-provisioning of Favorite orders, see the Commure Pro CPOE User’s Guide.
- Click the Admin tab, followed by the User tab. The User Settings screen displays the list of users.
- Select the user for whom you want to add the favorite order and click Edit.
- On the Personal Preferences screen, select CPOE from the Edit Settings drop-down menu.
- Click the Edit link associated with the Favorites setting. The Favorites screen displays for the specified user.
- If the selected user is associated with multiple Facility Groups, select the Facility Group to which you want the user’s favorite order(s) to belong.
- On the right-hand side of the screen, click the Edit button associated with the category to which you are adding the favorite order. The Edit My Pickers screen displays.
- (optional) If you want Order Details to display when the selected user clicks this Order String on his or her Favorites list, enable the setting Automatically launch Order Detail.
- Click OK after you enter all of the Order Details.
- Click Save, and then Close. The Order Prototype or Order Set is saved to the selected user’s Favorites list.
The selection of Favorite orders made available to providers is also determined by the selected patient visit type. Favorite orders do not display to providers during order entry if they belong to Order Sets that have been restricted to other visit types through the Usage setting. For more information, see Restricting Order Sets by Usage Type.
Adding Categories to the Favorites List
You can create categories to organize all Order Strings that belong to an individual user’s Favorites list. When you add categories to the top-level directory, these categories exist as sub-categories of the top-level category named My Pickers. You can create categories under the top-level (My Pickers) category or under any custom category that you create. Categories that you create under My Pickers are represented as top-level categories on the Add Orders screen. Categories that you create within any of your custom categories are represented as sub-categories, which are consolidated under their parent directories on the Add Orders screen. When you encounter any elements named Pickers in the administration interface, remember that the term Picker is simply used to represent either the Favorites or the categories that contain these Favorites on the Add Order page. To add a category to a specific user’s Favorites list:- Click the Admin tab, followed by the User tab. The User Settings screen displays the list of users.
- Select the user for whom you want to add the Favorites category and click Edit.
- On the Personal Preferences screen, select CPOE from the Edit Settings drop-down menu.
- Click the Edit link associated with the Favorites setting. The Favorites screen displays for the specified user.
- If the selected user is associated with multiple Facility Groups, select the Facility Group to which you want the user’s favorite order category to belong.
- On the right-hand side of the screen, click the Edit button associated with the category that exists one level above the category that you want to create. The Edit My Pickers screen displays.
- Click the Add Category button and enter the name of the category into the Add Category dialog box.
- Click OK. The new category is added to the Favorites list. It displays as an entry in the Children table on the Edit My Pickers screen. This table displays all entries (both categories and Favorites) that exist under the top-level entry named My Pickers. Note that your new category is identified as type subcat, meaning that your new category exists as a sub-category (child) of another category. If you are creating your first category, this category exists as a child of the top-level My Pickers category.
- Click Save. The new category displays under the My Pickers entry on the Favorites screen, among all Favorites and categories that apply to the specified user at both the department and user levels.
Hiding Department Favorites from a User
Administrators can further refine the list of Favorites made available at the user level by hiding one or more of the categories or Favorites that were created and assigned through the user’s department. This functionality allows administrators to model assignment of Favorites in a more granular way, so that it matches the actual organization of a facility’s departments. Assigning Favorites by department is efficient and convenient, but there may be some users belonging to your individual departments who should be exempt from accessing certain Favorites or categories that are available to most members of the user’s department. To Hide a Favorite or category from a Particular User:- Click the Admin tab, followed by the User tab. The User Settings screen displays the list of users.
- Select the user from whom you want to hide the Favorite(s) and click Edit.
- On the Personal Preferences screen, select CPOE from the Edit Settings drop-down menu.
- Click the Edit link associated with the Favorites setting. The Favorites screen displays for the specified user.
- If the selected user is associated with multiple Facility Groups, select the Facility Group associated with the favorite or category that you want to hide from a particular user.
- On the right-hand side of the screen, click the Edit button associated with the category containing the category of Favorite you want to hide.
-
Under the Hidden column, select the check box(es) associated with each category or Favorite that you want to hide.
You can only hide department-level categories or Favorites from a user. You are prevented from hiding any Favorites or categories that were created at the user level.
- Click Save. You are returned to the Favorites screen for this user.
- Click Close. You are returned to the Personal Preferences screen for the selected user. When this user navigates to the CPOE Add Order screen, he or she will not see these Favorites or categories among the Order Strings listed on their department Favorites list.
User Favorites Settings
In the configuration of Favorites, user-level settings supplement the department-level settings instead of overriding them. When you configure a Favorites list at the user level, the user has access to both these Favorites and any Favorites belonging to the department(s) to which the user belongs. The following setting is available to Level 1, 2, and 3 users: Favorites (web only) This setting provides access to the Pickers interface. In the CPOE application, pickers are used to create Favorites and the categories used to organize them. Administrators can create Favorites at the department level. Here at the user level, an administrator or user can either add items to the Favorites list, or hide items that are not helpful to a particular user. The Favorites list displays on the Add Orders screen, and provides users with direct access to their most-frequently used Order Strings.Auto-Creation of Favorites
As an alternative to defining a user’s favorite orders manually through configuration of pickers, administrators can create all of a user’s favorite orders automatically. The Auto-Create Favorites feature works by generating a list of favorites that is derived from the order entry patterns of one or more providers. This feature lets you create favorite orders naturally and efficiently, and greatly reduces the chance of creating favorites that are not useful to the providers in your institution. The administrative interface for auto-creation of favorites provides flexibility in how you generate favorites, enabling you to create favorite orders using one or more of the following criteria:- The Order Type of the favorites you are creating (you can auto-create favorites for all orders except medication orders)
- The duration (in weeks) of order entry data to use to obtain the list of favorites
- The minimum number of orders that must be entered for an Order Definition to be considered a favorite (when Order Type selected is All)
- The maximum number of favorites to create for a particular Order Definition
When you create favorite orders automatically, note that these favorites are only created for the selected Facility Group. To generate favorites for facilities belonging to a different Facility Group, you must specifically select this Facility Group and re-run the auto-create favorites process.
Creating Favorite Orders Automatically
Typically, auto-creation of favorites occurs as part of the initial configuration phase, during deployment of the CPOE application in your institution, although you can run it at any time. In some cases, you might choose to run the Auto-Create feature to replace all manual favorites that you previously created for one or more of your providers. When you initiate this process for one or more users belonging to your institution, the process is run on all recent order data (except medication orders) entered by your provider(s) within a configurable period of time. To create favorite orders automatically:- Click the Admin tab and then the Facility Group or CPOE tab.
In deployments where Facility Groups are not enabled, the Facility Group tab is replaced by the CPOE tab.
- If your institution uses multiple Facility Groups, select the Facility Group you want to configure from the Facility Group drop-down list.
- Click the CPOE Utilities link, followed by the Auto-Create Favorites button.
-
From the Auto-Create Favorites window, locate the User Search pane and use the following search filters to define search scope and locate all user(s) for whom to create the favorites:
- User Name/ID: Specify one or more letters to narrow your search scope to match a particular pattern.
- Access Level: You can restrict your search scope to providers or administrators of a particular level.
- Department: You can restrict your search scope to providers belonging to a single department.
- Max # of Search Results: You can restrict how many results to return from your search query. Note that you can define this search scope to be wider than the actual users that you intend to use for the Auto-Create process.
- Click the Search button.
- From the search results returned, select the user(s) you want and click the Add Selected Users button.
- The list of selected users is added to the Users to Edit pane in the lower-left part of the window. Unless you make further edits to this list by removing selected users, this group of users is the group for which favorites will be created automatically.
-
Locate the Auto-Create Favorites Settings pane and use the following settings to configure the behavior of the Auto-Create process:
- Order Type: You can choose one or more Order Types, but note that auto-creation of favorites is not available to medication orders. Use Ctrl + click functionality to select multiple types from the available list.
- Favorite Config DXML Template: Selects the DXML template you want from the drop-down list. This template is used to define behavior for the auto-favorites creation process.
- Delete All Favorites: Determines whether to replace or supplement existing favorites when creating the new favorites automatically.
- # of Weeks: Specifies the duration (weeks) of data to use as source data for generating favorites. The auto-create process is run on all orders entered by all of the selected providers over this time period.
- Max Favorites Per Def (Med Only): Specifies an upper-limit on the number of favorites to create from a single Order Definition. This limitation is used to prevent the auto-create process from creating an excess of duplicate or near-duplicate favorites, such as might occur when a provider enters a large number of Order Strings for a single Order Definition. For more information about these settings, see Auto-Create Favorites Settings.
- Click the Run button in the Status pane, located in the upper-right pane of the Auto-Create Favorites window. The auto-create process is run on the selected order data.
- Click Close to exit the Auto-Create Favorites window.
Auto-Create Favorites Settings
The following settings are used to configure the Auto-Create Favorites feature. These settings are typically only available to level 0 and level 1 administrators. You can also selectively make these settings available to some level 2 administrators, if your institution permits this access. For information on accessing these settings, see Creating Favorite Orders Automatically. Order Type: You can use this setting to restrict auto-creation of favorites to one or more Order Types (excluding the medication Order Type). Note that the setting Minimum Orders Per Definition only displays when you select the Medication Order Type (or the setting All). Favorite Config DXML Template Specifies the template to use for configuring the display and behavior of the favorites output. For more information about using DXML to configure aspects of automatic favorites creation, consult a Commure Pro representative. Delete All Favorites Determines whether the Auto-Create Favorites process overwrites all (user) favorites of the selected provider(s). When set to:- Yes: The auto-create favorites process overwrites all of the favorites belonging to the selected provider(s), including both manually-created favorites and all previously-created favorites that were generated automatically. Note that all favorites created for the selected provider(s) at the department level remain intact.
- No: The auto-create favorites process appends all auto-created favorites to the existing favorites of the selected provider(s).