You cannot add Fields or Field Sets to existing Order Definitions that were created on a back-end system, unless these Order Definitions belong to the Medication Order Type. In these cases, you can build Field Sets manually or you can use an existing Field Set, such as from a MEDITECH® system.
Working With Field Sets
You create a Field Set after you create one or more Fields that you want to add to an Order Definition or Order Group. Typically, creation of Fields and Field Sets occurs as part of the process of creating Order Definitions or Order Groups directly in the CPOE application. Note that many Fields are typically hidden from providers, since they exist for administrative reasons and should not display to the provider during order entry. Also note that these hidden Fields are included on the printed order sheet when the Field specifies a default value. Note that you cannot use the CPOE application to modify the Fields or Field Sets of Order Definitions or Groups that were created by a back-end system, unless these Definitions or Groups belong to the Medication Order Type. To modify the Fields or Fields Sets of all other back-end Order Types, you must edit these from your back-end system.Restricting Field Sets to One or More Facilities
As with orders, you can restrict Field Sets to one or more specific facilities. Restriction of Field Sets provides additional flexibility, allowing you to assign Field Sets that only apply to one or more specific facilities within to your institution. Typically, any facility-specific Field Sets that you create will serve as an alternative to the default Field Set, which is expected to remain as the most commonly used Field Set for most facilities. Note that you can define (at most) one additional Field Set per facility. Restricted Field Sets override the general Field Set, but only for the specified facility or facilities. Access for restricting data in this way is determined by configuration, and is configurable per Facility Group. For more information about enabling this functionality, see Restricting Order Data to One or More Facilities. To restrict a Field Set to one or more specific facilities:- Click the Admin tab and then the Facility Group or CPOE tab.
In deployments where Facility Groups are not enabled, the Facility Group tab is replaced by the CPOE tab.
- If your institution uses multiple Facility Groups, select the Facility Group you want to configure from the Facility Group drop-down list.
- Click the Order Definitions or Order Groups link. The CPOE Order Definition/Group Maintenance page is displayed.
- Enter your search criteria and click the Search button. Use the search filter settings to refine your search criteria so that only the Order Definition(s) or Order Group(s) you want are returned.
- Select the Order Definition or Order Group that has the Field Set you want to restrict, and click Edit in the lower-right portion of the screen.
- Locate the Field Set setting and click the associated Add Facility Specific Field Sets link.
- Click the lookup button (”…”) to search for and select the Field Set that you want to restrict.
- Use the drop-down menu to select the facility to which you are restricting the selected Field Set. You can repeat steps 6, 7, and 8 if your restriction involves multiple facilities.
- Click Save.
Creating and Editing Field Sets
You can only create and edit Field Sets in the following cases:- When you create an Order Group or Order Definition directly in the CPOE application
- When you need to add one or more Fields to an Order Group or Order Definition that belongs to the Medication Order Type. In these cases, whenever you need to add one or more Fields, creation of a Field Set enables you to add these Fields to a particular Order Group or Order Definition.
Creating Field Sets
Creation of a Field Set occurs as part of the larger process of creating a new Order Group or Order Definition. After you create one or more Fields, you must create a Field Set to add these new Fields to a particular Order Group or Definition. In addition to serving as a “container” for Fields, Field Sets enable you to configure several properties of Fields at one time. If you are looking to work with Fields that belong to Order Definitions created on a back-end system, your options are limited to adding one or more Fields to an existing Field Set. For more information, see Editing Field Sets. To create a field set:- Click the Admin tab and then the Facility Group or CPOE tab.
In deployments where Facility Groups are not enabled, the Facility Group tab is replaced by the CPOE tab.
- If your institution uses multiple Facility Groups, select the Facility Group you want to configure from the Facility Group drop-down list.
- Click the Field Sets link on the left-hand side of the screen.
- From the CPOE Field Set Maintenance pane, click the Add Field Set button.
-
In the Add CPOE Field Set window, enter the following Field Set information:
- Abbreviation
- Name
- Description
- Status For more information about these settings, see Field Set Settings.
- Click the Add Fields link.
- From the CPOE Fields screen, enter your search criteria and click the Search button. Use the search filter settings to refine your search criteria until you locate the Field(s) you want to add to the set.
- Select the Field(s) you want and click OK to add them to the Field Set.
- Click the Save button. The selected Fields are added to the Field Set.
Editing Field Sets
The degree to which you can edit a Field Set is determined by how the Field Set was originally created. Editing of Field Sets created on a back-end system is more limited than the editing options available to you when editing Field Sets created using the CPOE application. In the case of edits to back-end Field Set data (except medication orders), you are restricted to cosmetic edits that largely involve configuration of label-related properties such as abbreviation, description, and name. In the case of Field Sets that you create directly in CPOE, you are given unrestricted access to modify this data. In addition, the user interface for editing Field Sets provides access to several Field-related properties, such as Field default values and required status. For more information, see Assigning Default Values to Fields, Configuring Display Properties of Fields, and Configuring Display Properties of Fields. To edit a field set:- Click the Admin tab and then the Facility Group or CPOE tab.
In deployments where Facility Groups are not enabled, the Facility Group tab is replaced by the CPOE tab.
- If your institution uses multiple Facility Groups, select the Facility Group you want to configure from the Facility Group drop-down list.
- Click the Field Sets link on the left-hand side of the screen.
- From the CPOE Field Set Maintenance pane, enter your search criteria and click the Search button. Use the search filter settings to refine your search criteria until you locate the Field Set that you want to edit.
- Select the Field Set you want and click the Edit button that displays in the lower-right portion of the screen.
-
In the Edit CPOE Field Set window, you have access to the following settings:
- Abbreviation
- Name
- Description
- Status One or more of these settings may display as read-only if the selected Field Set is associated with an Order Group or Order Definition that was created on a back-end system. For more information about these settings, see Field Set Settings.
- When you complete your edits, click Save. The changes you made are applied to the selected Field Set.
Associating Fields With a Field Set
Associating Fields with a particular Field Set happens as part of the Field Set creation process. For more information, see Creating Field Sets.Field Set Settings
The following settings are provided for level 1 administration of Field Sets. Commure Pro Key Specifies a unique value that the CPOE application uses to identify Field Sets and link them to their associated Fields, Order Group and/or Order Definition. Abbreviation Specifies a unique short name identifier or mnemonic that the back-end system uses to identify a Field Set. This setting typically displays as a read-only value. Description Enables you to provide a more elaborate description of the Field Set, such as indication of how the Field Set is to be used or explanation of why some or all of the specified Fields have been added to a particular Field Set. Default Value Specifies the default value to be assigned to the field. Display at Top of screen Determines whether to give precedence in displaying this field above all other fields on the order detail screen during order entry. Exclude from discharge Determines whether or not to include this field on the order detail when providers are reconciling medications during the discharge medication reconciliation process. Hide Rule Hide rules can be defined to prevent fields that are not applicable from displaying under certain conditions. For example, customers can prevent the “Is patient pregnant?” field from displaying when the patient is male. Last Updated By Displays the most recent date and time that edits were made to this data, as well as the user name of the person responsible for this change. Name Specifies the full name of the Field Set. This name is used to identify the Field Set and associate it with a particular Order Group or Order Definition. This setting typically displays as a read-only value. Status Indicates or determines whether a Field Set is active or inactive. If the selected Field Set is associated with an Order Definition or Order Group that was interfaced from a back-end system, this setting displays whether the selected Field Set is active or inactive on the back-end. If the selected Field Set is associated with an Order Definition or Order Group that was created in the CPOE application, you can set this option to determine whether a Field Set is active or inactive in the CPOE application. Type Specifies the type of each Field that belongs to the selected Field Set. Default Value Enables you to set the default value for each Field belonging to the selected Field Set. The method for setting the default value is specific to the Field Type. For more information, see Assigning Default Values to Fields. Number of Columns Determines how many columns to use to display Fields on both the Order Detail and Order String windows. When this setting is configured to display Fields in multiple columns, Fields are distributed across each column before additional rows are used to display more Fields. For example, if you configure this setting to specify 3 columns, the Fields are distributed as follows:| Field 1 | Field 2 | Field 3 |
|---|---|---|
| Field 4 | Field 5 | Field 6 |
| Field 7 | Field 8 | Field 9 |
Working With Fields
In CPOE, Fields are used to obtain additional data from users as they enter orders into the Order Detail screen. The Fields that display under the Order Details associated with a particular Order Group or Order Definition exist as part of a Field Set. When data in your Order Catalog comes from your back-end system, you cannot modify the Fields or Field Sets associated with these Order Definitions and Groups in most cases. However, you can add Fields and Field Sets to Order Definitions and Order Groups that belong to the medication Order Type. When working with medication Order Definitions or Groups from your back-end, you might need to add a Field Set containing one or more Fields to obtain additional information about a medication order. In this scenario, you can build Field Sets manually or you can use an existing Field Set, such as from a MEDITECH® system. The other scenario involving creation of Fields and Field Sets occurs when you create a custom Order Definition or Order Group directly from within the CPOE application. In this scenario, Field creation is usually performed as the first step in this larger process, the steps of which are:- Create one or more Fields.
- Create a Field Set.
- Add Fields to define the new Field Set.
- Create a new Order Definition or Order Group.
- Associate the new Field Set with the new Order Definition or Order Group. When creating Fields or Field Sets to add to Order Definitions or Order Groups that you create directly in the CPOE application, you are not restricted to the medication Order Type; you can add Fields and Field Sets to any Definitions or Groups that do not come from your back-end system.
Creating and Editing Fields
The activity of creating and editing Fields should be restricted to the following scenarios:- During creation of new Order Groups or Definitions
- When adding one or more Fields to an existing medication Order Definition As you add new Fields, you can define them through configuration of several properties, such as Field name and Field type. You can select from many types of Fields, including date/time fields, radio buttons, and text fields that allow for free text entry. For the complete list of configuration settings, see Field Settings.
Creating Fields
Normally, you create Fields with the aim of associating them with a Field Set. When you aim to create a Field Set that contains multiple Fields (which is the typical scenario), you normally begin the process by creating these Fields individually, although you can also add Fields “on the fly”, or directly from within the Field Set user interface. To create a Field:- Click the Admin tab and then the Facility Group or CPOE tab.
In deployments where Facility Groups are not enabled, the Facility Group tab is replaced by the CPOE tab.
- If your institution uses multiple Facility Groups, select the Facility Group you want to configure from the Facility Group drop-down list.
- Click the Fields link on the left-hand side of the screen.
- Click the Add Field button.
-
In the Add CPOE Field window, enter the following information about the new Field:
- Abbreviation
- Name
- Status
- Field Type
- (any other fields that are unique to a specific Field Type) For more information about these settings, see Field Settings.
- Click Save. The new Field is added to the list of available Fields. You can make additional edits to Field properties from the Field Set user interface. For more information, see Working With Field Sets.
Editing Fields
When you create Order Definitions and Order Groups directly in the CPOE application, you can edit any of the Fields and Field Sets belonging to these Definitions and Groups. When working with Order Definitions or Order Groups that were created in your back-end system, you can only make edits to Fields and Field Sets that you added to these Definitions and Groups from within Commure Pro CPOE. This option is only available to Order Definitions and Order Groups that belong to the medication Order Type. Note that when you modify Fields and Field Sets of interfaced medication orders from within Commure Pro CPOE, these edits are retained as data is updated from the back-end system. Also, after adding any additional Field Sets to order strings that were interfaced from the back-end system, you can continue to make edits to the Fields belonging to these (‘manually-added’) Field Sets. Any such changes to interfaced order strings are also retained during data updates from the back-end system. Many of the Fields that are accessible through the CPOE user interface are provided on a read-only basis. If you want to edit Fields or Field Sets associated with back-end Order Definitions or Groups other than those belonging to the medication Order Type, you must edit these in your back-end system. To edit a field:- Click the Admin tab and then the Facility Group or CPOE tab.
In deployments where Facility Groups are not enabled, the Facility Group tab is replaced by the CPOE tab.
- If your institution uses multiple Facility Groups, select the Facility Group you want to configure from the Facility Group drop-down list.
- Click the Fields link on the left-hand side of the screen.
- From the CPOE Field Maintenance pane, enter your search criteria and click the Search button. Use the search filter settings to refine your search criteria so that only the Field(s) you want are returned.
- Select the Field you want and click the Edit button that displays in the lower-right portion of the screen.
-
From the Edit CPOE Field window, you can modify any of the following settings that are provided as modifiable options:
- Abbreviation
- Name
- Status
- Field Type
- (any other fields that are unique to a specific Field Type)
- For more information about these settings, see Field Settings.
Assigning Default Values to Fields
After you add one or more Fields to an Order Group or Order Definition, you can configure these Fields to be populated with default values so that users do not need to complete these Fields when they enter orders that use them. Assignment of default values is accomplished through the Edit Field Set screen, so before you can assign default values to Fields, you must create a Field Set and add any new Fields that you create to the new Field Set. For more information, see Associating Fields With a Field Set. Note that when you make changes to the default values of Fields that are used in one or more order strings, the Fields belonging to these order strings are only updated with the new default values when these Fields remain unspecified (set to a blank value). When Fields belonging to these order strings have been configured to specify a value, these Fields retain their values within the order strings; precedence is given to configured Field values over updates that you make to Field default values within the associated Field Set. To assign a default value to a field:- Click the Admin tab and then the Facility Group or CPOE tab.
In deployments where Facility Groups are not enabled, the Facility Group tab is replaced by the CPOE tab.
- If your institution uses multiple Facility Groups, select the Facility Group you want to configure from the Facility Group drop-down list.
- Click the Field Sets link on the left-hand side of the screen.
- From the CPOE Field Set Maintenance pane, enter your search criteria and click the Search button. Use the search filter settings to refine your search criteria until you locate the Field Set that contains the Field(s) you want to edit.
- Select the Field Set you want and click the Edit button that displays in the lower-right portion of the screen. The lower portion of the Edit CPOE Field Set window displays a table containing information about the individual fields comprising the selected Field Set.
- Locate the Default Value column in the table and enter the default value(s) in each row that corresponds to a Field for which you want to specify a default value. Note that the method for setting a Field’s default value differs according to Field Type. For example, when a Check box displays, you can set the value to be enabled or disabled by default. When a text box is provided, you can specify the default value to be displayed to users in the Field when they select the Order Definition or Order Group associated with the Field Set containing this Field.
- Click Save. You are returned to the CPOE Field Set Maintenance pane. The default value(s) that you set will display to users the next time that they select the Order Group or Order Definition associated with this Field Set.
Configuring Display Properties of Fields
Level 1 administrators have some degree of control over how the individual Fields of a Field Set display on the Add Order screen for a particular Order Definition or Order Group. As with default values and required status, configuration of a Field’s display properties is accomplished through the Field Set user interface.Hiding Fields From Providers’ Add Order Screen
Your Order Definitions or Order Groups might contain one or more Fields that have no relevance for providers. For example, there may be Fields pertaining to the transport of a patient that providers do not need to complete, but which still belong with a particular Order Definition or Group. In such cases, you can configure individual Fields to be hidden from providers when they enter an order belonging to a particular definition or group.When Order Catalog data is interfaced from your back-end system, all of the Fields belonging to back-end Order Groups and Order Definitions are hidden by default. You can choose whether to hide or display these Fields by default. Note that when they specify a default value, these Fields are included on the printed order sheet. For more information about configuring interfaced Fields to be hidden or displayed by default, contact your Commure Pro representative.
- Click the Admin tab and then the Facility Group or CPOE tab.
In deployments where Facility Groups are not enabled, the Facility Group tab is replaced by the CPOE tab.
- If your institution uses multiple Facility Groups, select the Facility Group you want to configure from the Facility Group drop-down list.
- Click the Field Sets link on the left-hand side of the screen.
- From the CPOE Field Set Maintenance pane, enter your search criteria and click the Search button. Use the search filter settings to refine your search criteria until you locate the Field Set that contains the Field(s) you want to edit.
- Select the Field Set containing the Field you want to hide from providers and click the Edit button that displays in the lower-right portion of the screen.
- Locate the Hidden From Provider column and enable the check box in the row associated with the Field that you want to hide from providers when they enter orders. Note that you are prevented from saving your configuration changes if the field is also configured to be required for providers.
- Click Save. You are returned to the CPOE Field Set Maintenance pane. When providers enter orders that use this Field Set, the Field(s) you selected will not display on the Add Orders screen.
Positioning Fields at the Top of the Add Order Screen
You will often want to position the various Fields belonging to a Field Set so that these Fields display at the top of a provider’s Add Order screen, giving prominence to these Fields during order entry. When you configure the various Fields in a Field Set to be positioned at the top of the screen, these Fields then display above the standard Fields (such as When, Dose, Rate, Frequency) that providers often use during order entry.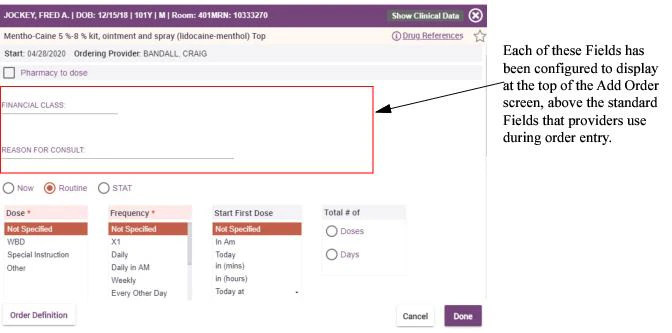
- Click the Admin tab and then the Facility Group or CPOE tab.
In deployments where Facility Groups are not enabled, the Facility Group tab is replaced by the CPOE tab.
- If your institution uses multiple Facility Groups, select the Facility Group you want to configure from the Facility Group drop-down list.
- Click the Field Sets link on the left-hand side of the screen.
- From the CPOE Field Set Maintenance pane, enter your search criteria and click the Search button. Use the search filter settings to refine your search criteria until you locate the Field Set containing the Fields you want to display more prominently.
- Select the Field Set containing the Fields you want to move to the top of the Add Order screen and click the Edit button in the lower-right portion of the screen.
- Locate the Display at Top of screen column and enable the check boxes in each row corresponding with each of the Fields belonging to the Field Set.
- Click Save. You are returned to the CPOE Field Set Maintenance pane. When providers enter orders that use this Field Set, the Field(s) you selected will display at the top of the Add Order screen, before the standard order entry Fields.
Hiding Fields During Discharge Medication Reconciliation
Sometimes, Order Definitions or Groups might contain Fields that are only relevant in an inpatient setting and do not need to be displayed in Discharge Medication Reconciliation. You can configure the individual Fields within a Field Set so that certain Fields display only when orders are used during order entry or Admission Medication Reconciliation activity. These Fields are then hidden in any Discharge Med Rec work flow (both on the portal and on supported mobile devices), including when providers use DMR to add or continue these orders. To hide one or more Fields from displaying in the DMR work flow:- Click the Admin tab and then the Facility Group or CPOE tab.
In deployments where Facility Groups are not enabled, the Facility Group tab is replaced by the CPOE tab.
- If your institution uses multiple Facility Groups, select the Facility Group you want to configure from the Facility Group drop-down list.
- Click the Field Sets link on the left-hand side of the screen.
- From the CPOE Field Set Maintenance pane, enter your search criteria and click the Search button. Use the search filter settings to refine your search criteria until you locate the Field Set that contains the Field(s) you want to edit.
- Select the Field Set that has the Fields you want to configure and click the Edit button that displays in the lower-right portion of the screen.
- Locate the Exclude from discharge column and enable the check box in the row associated with the Field(s) to be hidden during any DMR activity.
- Click Save. You are returned to the CPOE Field Set Maintenance pane. The fields you selected no longer display when providers use DMR to continue or add orders that make use of this Field Set, including DMR activity that users perform on the portal and on supported mobile devices.
Hiding Fields From Printed Order Sheets
One or more Fields belonging to an Order Definition may be important during order entry, but you might want to exempt these Fields from all printed order sheets that would normally include these Fields among a Field Set. To hide a field from printed orders:- Click the Admin tab and then the Facility Group or CPOE tab.
In deployments where Facility Groups are not enabled, the Facility Group tab is replaced by the CPOE tab.
- If your institution uses multiple Facility Groups, select the Facility Group you want to configure from the Facility Group drop-down list.
- Click the Field Sets link on the left-hand side of the screen.
- From the CPOE Field Set Maintenance pane, enter your search criteria and click the Search button. Use the search filter settings to refine your search criteria until you locate the Field Set containing the Fields you want to exempt from your printed orders.
- Select this Field Set and click the Edit button in the lower-right portion of the screen.
- Locate the Hide name on print-out column and enable the check box in the row associated with the Field(s) that you want to hide.
- Click Save. You are returned to the CPOE Field Set Maintenance pane. When providers print orders that use this Field Set, the Field(s) you selected will not be included in these print-outs.
Defining a Suffix to Display Custom Text After a Field
You can define custom text to display after a Field in the user interface. For example, you can define custom text to display measurement data at the end of a data entry field, to prevent providers from errors during data entry. Note that you must also modify your form template in order to see this suffix display on your printed order sheet. To define a suffix to display text after a Field:- Click the Admin tab and then the Facility Group or CPOE tab.
In deployments where Facility Groups are not enabled, the Facility Group tab is replaced by the CPOE tab.
- If your institution uses multiple Facility Groups, select the Facility Group you want to configure from the Facility Group drop-down list.
- Click the Fields link on the left-hand side of the screen.
- From the CPOE Field Maintenance pane, locate the Field you want to modify. Use the search filter settings to refine your search criteria until you locate the Field. Note that you can define suffixes only for the following Field types:List Choose One, Number, and Text.
- Select this Field and click the Edit button in the lower-right portion of the screen.
- Locate the Field Suffix setting and enter the custom text into the associated text field.
- Click Save. You are returned to the CPOE Field Maintenance pane. Your custom text will display with this Field in the View and Edit Order Details screens, and in Order Definitions that are configured to include this Field.
Configuring a Default Option to Pre-Select in the “When” Field
You can configure some of the Order Types so that a specific option for the “When” field is selected by default when providers enter orders belonging to this particular type. Through configuration of display overrides, administrators can set the default “When” value that displays to providers during entry of orders belonging to the following Order Types:- Nursing orders
- Radiology orders
- Other orders Note that this value is the default selection (as opposed to fixed default value). Providers always have the option to modify the value of the “When” field during order entry. This configuration option is simply provided so that administrators can define the “When” value that is most likely to be sought by providers as they enter orders. Defining a default “When” field is accomplished through configuration of display overrides. For more information, see Changing Default Field Properties of an Order Type.
- Click the Admin tab and then the Facility Group or CPOE tab.
In deployments where Facility Groups are not enabled, the Facility Group tab is replaced by the CPOE tab.
- If your institution uses multiple Facility Groups, select the Facility Group you want to configure from the Facility Group drop-down list.
- Click the Display Overrides link and use the search criteria to locate one of the three overrides that correspond with the Order Types (nursing, radiology, and other) that support this feature. These overrides are:
- Generic Nursing (PK.HC.Nursing)
- Generic Other (PK.HC.Other)
- Generic Radiology (PK.HC.Radiology)
Note that each of these three Order Types is identified using the PK.HC. prefix. These entries display in the search results only when the Override Order Type drop-down filter is set to All.
- Select the display override corresponding with one of the three Order Types you want to modify and click the Edit button.
- From the Edit CPOE Order Display Override window, locate the Fields table and, in the row corresponding with the “When” field (under “Name” column), set the default value to one of the following options:
- Not Specified: When providers enter orders of this type, the “When” field is set to “Not Specified” by default. Note that if providers change this value to “Today”, the word “Today” is then appended to the Order Description during order submission.
- Today (hide in order description): When providers enter orders of this type, the “When” field is set to “Today” by default. If providers retain this default value during order submission, the word “Today” is not appended to the Order Description.
- Today (show in order description): When providers enter orders of this type, the “When” field is set to “Today” by default. If providers retain this default value during order submission, the word “Today” is appended to the Order Description.
- Click Save. Your configuration changes are saved. Before these changes become visible on the portal or on handheld devices, you must run both the search indexer and the Order String Description Generator. Both of these operations can be run from the Search Index tab (Admin > Facility Group > CPOE Utilities > Search Index tab). For more information, see Level 0 administrators can edit the OHA Config DXML template directly from the Edit Facility Group Utility Settings window. An edit icon is provided to the right of the template drop-down menu enabling level 0 administrators to navigate directly to the Edit Form Template window, where they can modify the OHA Config DXML template. (JIRA-30557).
Restricting Dose Values for Premix and Titratable Drip Medications
In cases where they are ordering premix or titratable drip medications, providers should be restricted from changing the medication Dose value and the value shown should display as the only available choice. Administrators can configure orders to abide by such display limitations through configuration of the Medication Dose Display Override. To restrict dose values for Premix and Titratable Drip Medications:- Click the Admin tab and then the Facility Group or CPOE tab.
In deployments where Facility Groups are not enabled, the Facility Group tab is replaced by the CPOE tab.
- If your institution uses multiple Facility Groups, select the Facility Group you want to configure from the Facility Group drop-down list.
- Click the Display Overrides link and locate the Dose Field (PK.HC.Medication. Dose).
- Under the Default Value column, enable the Show selected dose only property and make sure that the field is set as a required field and save your changes.
- Apply this Display Override to qualifying Order Groups and Order Definitions that involve all premix and titratable drip medications. For more information about applying overrides, see Applying Display Overrides to an Order Group and Applying Display Overrides to an Order Definition.
Configuring Medication Orders to Display a Default Refill Count
You can configure the medication Order Type to display a default “Refills” value. Through configuration of display overrides, administrators can configure medication orders to automatically populate this field with the value that is most likely to be used by most medication orders.Sites using ePrescribing with CPOE should note that some controlled medications have refill restrictions that pertain to the medication’s specific schedule. Schedule III and IV medications have an upper limit of 5 refills allowed. Schedule II medications are not available for refill and are assigned a refill count of 0 automatically.
- Click the Admin tab, click the Location tab.
- Select the location you want to configure, then click Edit.
- From the Edit Location Prefs window, locate the Outpatient Med Hard Coded Fields Display setting and click the associated Add / Edit Override button.
- From the CPOE Hard Coded Fields Display Override window, search for and select the display override used to define outpatient orders for the selected location.
- Click the Edit button.
- From the Edit CPOE Order Display Override window, locate the following fields and configure them to specify these settings:
- Dispense (PK.HC.Medication.Quantity): Set this field to be Required.
- Refills (PK.HC.Medication. Refills): Set this field to be Required and set its default value to 0.
- Rx Needed (PK.HC.Medication.RxNeeded): Make sure this field is neither Required nor Hidden. The Rx Needed field is available for providers to select when they are entering orders during DMR that require a prescription. Upon submission of an order with the Rx Needed selection enabled, a prescription is routed to the designated prescription printer at the patient’s location. When clinicians select Rx Needed while continuing medications in DMR, note that they are required to complete both the Dose and Frequency fields before submitting the order. These fields are always mandatory in this specific work flow (even if not configured to be required by a Display Override).For customers using ePrescribing, interfaced home medications with Rx Needed selected display in the MEDITECH discharge plan (under the New Prescriptions header), except for free-text medications (which are not allowed as prescriptions and are therefore failed as submissions).For more information about configuring a pharmacy printer that meets more restrictive criteria to comply with certain state laws, consult with your Commure Pro representative.
- Click Save. Your configuration changes are saved. Before these changes become visible on the portal or on handheld devices, you must run both the search indexer and the Order String Description Generator. Both of these operations can be run from the Search Index tab (Admin > Facility Group > CPOE Utilities > Search Index tab). For more information, see Level 0 administrators can edit the OHA Config DXML template directly from the Edit Facility Group Utility Settings window. An edit icon is provided to the right of the template drop-down menu enabling level 0 administrators to navigate directly to the Edit Form Template window, where they can modify the OHA Config DXML template. (JIRA-30557).
Making One or More Fields Required by Providers
The Field Sets that you create might contain one or more Fields that you want providers to complete before they can submit an order. You can configure one or more individual Fields to be required to ensure that providers do not submit an order until the order data is complete. Configuration of a Field’s required status is accomplished from the Field Set user interface. To configure a Field to be required by providers:- Click the Admin tab and then the Facility Group or CPOE tab.
In deployments where Facility Groups are not enabled, the Facility Group tab is replaced by the CPOE tab.
- If your institution uses multiple Facility Groups, select the Facility Group you want to configure from the Facility Group drop-down list.
- Click the Field Sets link on the left-hand side of the screen.
- From the CPOE Field Set Maintenance pane, enter your search criteria and click the Search button. Use the search filter settings to refine your search criteria until you locate the Field Set that contains the Field(s) you want to edit.
- Select the Field Set containing the Field you want to set as a required Field and click the Edit button that displays in the lower-right portion of the screen.
- Locate the Required for Ordering Provider column and enable the check box in the row associated with the Field that you want to require providers to complete. Note that you are prevented from saving your configuration changes if the field is also configured to be hidden from providers.
- Click Save. You are returned to the CPOE Field Set Maintenance pane. When providers attempt to save or submit orders without specifying a value for the required Field(s), they will be prompted to complete the required Field(s) before proceeding.
Making One or More Fields Required for Processing
The Field Sets that you create might contain one or more Fields that you want all users to complete before the order can be processed by your back-end system. You can configure one or more individual Fields to be required to ensure that users do not submit an order until the order data is complete. Configuration of a Field’s required status is accomplished from the Field Set user interface. To configure a Field to be required for back-end processing:- Click the Admin tab and then the Facility Group or CPOE tab.
In deployments where Facility Groups are not enabled, the Facility Group tab is replaced by the CPOE tab.
- If your institution uses multiple Facility Groups, select the Facility Group you want to configure from the Facility Group drop-down list.
- Click the Field Sets link on the left-hand side of the screen.
- From the CPOE Field Set Maintenance pane, enter your search criteria and click the Search button. Use the search filter settings to refine your search criteria until you locate the Field Set that contains the Field(s) you want to edit.
- Select the Field Set containing the Field you want to set as a required Field and click the Edit button that displays in the lower-right portion of the screen.
- Locate the Required for Processing column and enable the check box in the row associated with the Field that you want to require users to complete.
- Click Save. You are returned to the CPOE Field Set Maintenance pane.
Hiding Fields From Printed Order Sheets
One or more Fields belonging to an Order Definition may be important during order entry, but you might want to exempt these Fields from all printed order sheets that would normally include these Fields among a Field Set. To hide a field from printed orders:- Click the Admin tab and then the Facility Group or CPOE tab.
In deployments where Facility Groups are not enabled, the Facility Group tab is replaced by the CPOE tab.
- If your institution uses multiple Facility Groups, select the Facility Group you want to configure from the Facility Group drop-down list.
- Click the Field Sets link on the left-hand side of the screen.
- From the CPOE Field Set Maintenance pane, enter your search criteria and click the Search button.
- Use the search filter settings to refine your search criteria until you locate the Field Set containing the Fields you want to exempt from your printed orders.
- Select this Field Set and click the Edit button in the lower-right portion of the screen.
- Locate the Hide name on print-out column and enable the check box in the row associated with the Field(s) that you want to hide.
- Click Save. You are returned to the CPOE Field Set Maintenance pane. When providers print orders that use this Field Set, the Field(s) you selected will not be included in these print-outs.
How Fields are Used to Display Microbiology Orders
Microbiology orders that are pulled over from a back-end system typically display in Commure Pro CPOE with two additional fields: a Source field and a Description field. Both of these fields display as drop-down menus that limit users to making a single selection (both use the List Choose One field type). Typically, the microbiology descriptions dynamically change based on the source, so when users first choose a Source (such as ankle), the Description choices change to reflect the source (in the case of ankle source, users can choose either left or right for the description). Note that Source values are not always relevant for microbiology orders, such as cerebrospinal fluid (CSF) cultures. In such cases, the Description field provides the list of relevant options that are pulled from the back end (in the case of CSF Culture orders, the description might include options such as shunt, subdural, tap, and ventricular). When there is data to justify displaying these fields, note that the fields are required (regardless of how they might be configured within their field set).Changing Default Field Properties in the Order Catalog
Administrators can selectively configure some Order Type, Order Group and Order Definition Field properties on an individual basis. You can configure selected default Fields to be hidden, so that they do not display for one or more Order Types, Groups or Definitions. You can also configure these default Fields to be required, so that providers must complete these Fields before they can enter an order belonging to a particular Order Type, Group or Definition.Some of the Fields belonging to Order Types are provided as read-only Fields. The required or hidden properties of some Fields are not configurable.
Changing Default Field Properties of an Order Type
The approach for configuring the Order Type Default Fields differs from the approach used to configure Order Group and Order Definition default Fields. Rather than using Display Overrides, which you use to configure the default Fields of Order Groups and Order Definitions, the process for configuring Order Types is more direct. Also note that, unlike configuring the Order Group and Order Definition default Fields, you are restricted to a single configuration of default Fields per Order Type. Though administrators can require and hide many of the Fields belonging to each of the six Order Types, note that you cannot make changes to some of these Fields. This restriction is designed to ensure that all orders belonging to each Order Type follow certain rules and retain their core definition. To configure the default Fields of an Order Type:- Click the Admin tab and then the Facility Group or CPOE tab.
In deployments where Facility Groups are not enabled, the Facility Group tab is replaced by the CPOE tab.
- If your institution uses multiple Facility Groups, select the Facility Group you want to configure from the Facility Group drop-down list.
-
Click the Display Overrides link and use the search criteria to locate the Order Type that has the default Fields you want to configure.
Each of the Order Types is identified using the PK.HC. prefix. These entries display in the search results only when the Override Order Type drop-down filter is set to All.
- Select the display override corresponding with the Order Type you want to modify and click the Edit button.
- From the Edit CPOE Order Display Override window, locate the Fields table and, in the rows corresponding with each Fields that you want to edit, set each configurable Field to be hidden or required. Note that some core Fields cannot be modified for the selected Order Type.
- Click Save. The default Field settings are applied to the selected Order Type. The next time that providers select an order belonging to this Order Type, the selected order hides and requires its Fields according to this definition.
Changing Default Field Properties of Order Groups and Definitions
There are times that you might need to override the Field or Field Set settings that an Order Group inherits from its parent Order Type or that an Order Definition inherits from its Order Group. You can create Display Overrides and apply these overrides to hide or require specific fields of Order Groups and Definitions. It is helpful to think of Display Overrides as a kind of “template” for defining hidden and required Fields. Display Overrides can be useful in several clinical scenarios, such as:- Requiring the entry of a frequency value for certain types of nursing orders
- Hiding fields that are of no concern to clinicians, such as the ‘method of transport’ field of radiology orders
- Hiding all fields to create an order that solely consists of free-text fields
- In general, hiding any fields inherited by an Order Type or Order Group that are not applicable to an order You create Display Overrides at the Order Type level, and then you apply these overrides to one or more Order Groups or Definitions within the selected Order Type. Once you create a Display Override, you can apply this override by assigning it to all Order Groups or Definitions that share the same hidden and required Field properties. Procedural information for creating and applying Display Overrides is provided below. Typically, these two procedures are performed sequentially, although after initially creating and applying one or more Display Overrides you might decide to apply these overrides to other Order Groups or Order Definitions at a later time.
Creating Display Overrides
Display Overrides serve as a kind of template to define Field properties for a particular Order Type. As you create Display Overrides, you should consider how you plan to apply these overrides to one or more Order Groups or Order Definitions. Some advance planning can help you to use Display Overrides efficiently by preventing you from creating unnecessary or duplicate overrides. To create a Display Override:- Click the Admin tab and then the Facility Group or CPOE tab.
In deployments where Facility Groups are not enabled, the Facility Group tab is replaced by the CPOE tab.
- If your institution uses multiple Facility Groups, select the Facility Group you want to configure from the Facility Group drop-down list.
- Click the Display Overrides link.
- From the CPOE Order Display Override Maintenance window, click the Add Display Override button.
- Select the Order Type of the Order Group(s) or Definition(s) whose Fields you want to hide or require. The Add CPOE Order Display Override window displays.
-
Enter the following information about the Display Override that you are creating:
- Abbreviation and name of the override (required)
- Description of the override (optional)
- Status, indicating whether the override can be found in search (active) or not (inactive)
-
From the list of Fields displayed in the table:
- Select the check box under the Required column for each Field that you want to be mandatory.
- Select the check box under the Hidden column for each Field that you do not want to display.
- Click Save. The Display Override is created.
Applying Display Overrides to an Order Group
Once you create a Display Override, you can apply this override to one or more Order Groups, provided these groups are of the same Order Type. To apply a Display Override to an Order Group:- Click the Admin tab and then the Facility Group or CPOE tab.
In deployments where Facility Groups are not enabled, the Facility Group tab is replaced by the CPOE tab.
- If your institution uses multiple Facility Groups, select the Facility Group you want to configure from the Facility Group drop-down list.
- Click the Order Groups link, use the search criteria to locate and select the Order Group to which you are applying the override, and click the Edit button.
- From the Edit CPOE Order Group window, locate the Hard Coded Fields Display setting and click the associated Add / Edit Override button.
-
Use the search criteria filters and click Search to locate the Display Override that you want to apply to the selected Order Group.
Display Override search queries return Display Overrides that are relevant to the Order Type of the selected Order Group only. For example, if you search for Display Overrides to apply to the Blood Bank Order Group, only the Display Overrides associated with the Lab Order Type show in your search results, since the Blood Bank Order Group belongs to the Lab Order Type.
- Select the Display Override from the list of available overrides, and click OK. The Display Override that you applied displays next to the Hard Coded Fields Display setting.
- Click Save. The Display Override is applied to the selected Order Group. The next time that providers select an order belonging to this Order Group, the order will hide and require Fields according to this Display Override definition.
Applying Display Overrides to an Order Definition
Just as with Order Groups, you can apply Display Overrides to one or more Order Definitions, provided these Definitions are of the same Order Type as the override. Typically, you apply Display Overrides to Order Definitions for the following reasons:- One or more Order Definitions has Field properties that differ from its Order Type. Just as with Order Group overrides, you might decide to hide or require some of the default Fields that this Order Definition inherits from its Order Type.
- One or more Order Definitions has Field properties that differ from its Order Group. In this case, you could configure the default Fields of an Order Definition so that a particular definition is exempt from Field properties that are defined at the Order Group level.
- Click the Admin tab and then the Facility Group or CPOE tab.
In deployments where Facility Groups are not enabled, the Facility Group tab is replaced by the CPOE tab.
- If your institution uses multiple Facility Groups, select the Facility Group you want to configure from the Facility Group drop-down list.
- Click the Order Definitions link, use the search criteria to locate and select the Order Definition to which you are applying the override, and click the Edit button.
- From the Edit CPOE Order Definition window, locate the Hard Coded Fields Display setting and click the associated Add / Edit Override button.
-
Use the search criteria filters and click Search to locate the Display Override that you want to apply to the selected Order Definition.
Display Override search queries return Display Overrides that are relevant to the Order Type of the selected Order Definition only. For example, if you search for Display Overrides to apply to the Antibody Titer Order Definition (belonging to the Blood Bank Order Group), only the Display Overrides associated with the Lab Order Type show in your search results, since the Blood Bank Order Group belongs to the Lab Order Type.
- Select the Display Override from the list of available overrides, and click OK.
- The Display Override that you applied displays next to the Hard Coded Fields Display setting.
- Click Save. The Display Override is applied to the selected Order Definition. The next time that providers select an order belonging to this Order Definition, the Fields associated with this order will be hidden or required, according to the Display Override configuration.
Example: Adding a Unit of Hours Field to Medication Order Definitions
For example, you might configure the Generic Medication Display Override to display a ”# of Hours” field, which providers can use as an additional unit of measurement during medication entry. Because it is not used as often as the other medication unit fields (# of Bags, # of Doses, and # of Days), this field is typically configured to be hidden by default. To display this field, simply disable the Hidden property for the Number of Hours field on the Edit CPOE Order Display Override window After you de-select the Hidden setting associated with the Number of hours field and then click save, the # of Hours field displays as an additional option for specifying units of measurement during medication order entry. Note that enabling this Display Override field also displays the # of Hours field on handheld devices. This field accepts any numeric value in the range 0 through 9999. Also note that providers are restricted to entering data for only one of these fields for a given medication order. When they attempt to enter data into a second field, they are prompted with a message informing them of this restriction.Example #2: Adding Units of Bags or Doses to Medication Order Definitions
Alternatively, you might decide to configure the Generic Medication Display Override to display a ”# of Bags” or ”# of Doses” field to include these units of measurement in the order description. In MEDITECH environments, this value is obtained from the MEDITECH pharmacy module and you can configure your display overrides to show dosage units in either of these fields by displaying one field and hiding the other field. For example, to show a units as “X n doses” (such as “X 10 doses), simply disable the Hidden property for the Total # of Doses field and enable the Hidden property for the Number of Bags field on the Edit CPOE Order Display Override window Note that legal requirements sometimes apply that require the display of a specific field in a particular scenario. For example, the # of Days field is required when providers order and prescribe schedule II medications. (In this specific scenario, note that this field is not only required but an upper limit of 90 is enforced when providers enter a value into this field.) For more information, see Configuring ePrescribing for Controlled Medications.Example #3: Adding a Stop Date Field to Medication Order Definitions
Instead of administering a medication by number of units (such as bags or doses, as in the previous example), providers might instead choose to specify a stop date and time as a way of defining the completion of a medication administration schedule. To include a Stop Date/Time field during order entry, configure the Generic Medication Display Override to show and (optionally) require this field. Note that providers are restricted to using either the Stop Date/Time or Total # of Doses / Days field during order entry; these two fields are typically mutually exclusive (even when both are set to be required in the Generic Medication Display Override). An exception allowing providers to use both of these fields together is when they select a PRN reason during order entry. In this case, providers are allowed to set a Stop Date/Time and also specify a Total # of Doses for the order. However, they are still prevented from specifying a # of Days in such cases, and entering data in one field automatically clears any data from the other field (even when both fields are set to be required in the Generic Medication Display Override).Hiding Field Names for Orders with Admin Criteria
In some customer environments (such as customers using MedHost as their back-end system), defining Admin Criteria in Commure Pro CPOE sometimes requires the placement of two Fields together to mimic how certain Admin Criteria is defined on the back-end system. For example, customers may decide to place the two Field types “Number” and “List - choose one” side-by-side in order to create a titration template in Commure Pro CPOE. In such cases, administrators can configure the new property Hide field name on the CPOE Field Maintenance pane (Admin > Facility Group > Fields) so that the label(s) of specific Fields are hidden and only the field responses display, allowing for defining Fields that can be combined and used with more flexibility.Field Settings
The following settings are provided for level 1 administration of Fields. Commure Pro Key Specifies a unique value that the CPOE application uses to identify Fields and link them to their associated Field Set, Order Group and/or Order Definition. Abbreviation Specifies a unique short name identifier or mnemonic that the back-end system uses to identify each Field. This setting typically displays as a read-only value. Alternate Name Specifies a substitute name to use in CPOE instead of the Field name used by the back-end system. Note that alternate names are only used to display Fields as part of Field Sets in Commure Pro CPOE; these names are not sent over the bridge to be updated in the back-end system. (This setting is for (MEDITECH) customer deployments that include use of the bridge only.) Hide Field Name Lets administrators hide the labels of specific Fields so that Fields can be combined together with more flexibility, such as when placing Fields together to define titration templates as part of manually creating Admin Criteria to mimic how such templates are defined in a back-end system. Name Specifies the full name of the Field. This name is used to label the Field used to obtain information associated with a particular Order Group or Order Definition. This setting typically displays as a read-only value. Status Indicates whether a Field is active or inactive. If the selected Field belongs to an Order Definition or Order Group that was interfaced from a back-end system, this setting displays whether the Field is active or inactive on the back-end. If the selected Field belongs to a Field Set that is associated with an Order Definition or Order Group that was created in the CPOE application, you can configure this setting to determine whether a Field is active or inactive in the CPOE application. Field Suffix Enables you to specify custom text, such as units, to display at the end of a Field. Defining a Field suffix can be useful in guiding providers to enter the correct data into a Field. For example, if you define the suffix “#ml” to associate with a Number Field used to prompt for a volume of fluids, providers will know to restrict their text entry to include the numeric value only. Once you define a custom Field suffix, it displays with the Field in the Order Detail screen when providers view and edit the order. The suffix also displays with Fields that are configured to be included with an Order Description. Default from Visit Determines whether a specific field can be pre-populated based on a specific patient property (such as a patient’s weight). Setting this to populate a field with a specific property also requires that you configure the property as a “Commure Pro visit” property. For more information, consult with your Commure Pro representative. When you configure a field to pre-populate with a property, note that this value is not inherited by any orders derived from the original order (such orders strings, Order Sets, or favorites). The field is only populated with the appropriate patient-specific value at the time of order entry. Last Updated By Displays the most recent date and time that edits were made to this data, as well as the user name of the person responsible for this change. Field Type This setting enables you to select the type of Field you want to add to an Order Definition or Order Group. You can select from the following Field types:- Checkbox Group: Adds multiple check boxes enabling users to select multiple values for a Field. Use of a check box group requires creation of a reference list to define the various check box selections. For example:

- Date: Adds a date Field to the selected Order Definition or Order Group, enabling you to prompt users to enter a date associated with the order. A widget for selecting a date is provided so that your users do not have to type the date in a particular format. For example:

- Date Time: Adds both a date and a time Field to the selected Order Definition or Order Group, enabling you to prompt users to enter a date and time (24-hour clock format) associated with the order. For example:

- Display: Enables you to display a read-only field, such as to print a block of text that displays to providers as a read-only description.
- List Choose Multiple: Adds a list box to the selected Order Definition or Order Group, enabling users to select any number of options (using control-click) from a list box of choices. Use of a drop-down list requires creation of a reference list to define the various list choices. For example:

-
List Choose One: Adds a drop-down list to the selected Order Definition or Order Group, enabling users to select any single option from a drop-down list of choices. Use of drop-down list requires creation of a reference list to define the various list choices, except in cases where drop-down lists support specific clinical data that gets pulled from the back-end system (such as with microbiology orders). For more information, see How Fields are Used to Display Microbiology Orders.
For example:

-
Number: Adds a Field enabling users to specify a numeric value. You can define properties of the numeric value, such as the length and number of decimals. For example:
 (The following two options are available to the Number Field Type only:)
- Total Length: Specifies the maximum number of characters that users can enter into a Field of type number.
- Number of decimals: Specifies the maximum number of decimal points that users can enter into a Field of type Number. (In environments interfacing to a MEDITECH back-end, note that a value of 0 is enforced for this option when pulling data from MEDITECH fields of type “number” since MT limits such fields to whole numbers.)
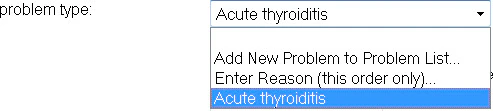
- Problem List: Adds a question the response for which is based on a problem that is included on the patient’s existing problem list. For example:
- Provider Lookup: Adds a search box from which users can select providers. Note that this lookup is conducted among all provider data that is available within a user’s selected Facility. When a provider practices at multiple facilities belonging to more than one Facility Group, the search results of provider lookups are determined by the Facility Group that is associated with the current Facility.
An example is provided below of a Provider Lookup Field as it displays to users.:

-
Radio Buttons: Adds multiple radio buttons enabling users to select one option among a group of multiple options. Use of radio buttons requires creation of a reference list to define the various radio button options.
For example:

-
Text: Adds a Field of configurable length that enables users to provide limited descriptive text for the selected Order Definition or Order Group. For example:
 (The following option is available to the Text Field Type only:)
- Number of Characters: Specifies the maximum number of characters that users can enter into a Field of type Text. If you want to provide a way for users to enter text data that is unrestricted, use the Text Area Field Type.
-
Text Area: Adds a scrollable text Field that enables users to provide unlimited descriptive text for the selected Order Definition or Order Group. For example:

-
Time: Adds a time Field to the selected Order Definition or Order Group, enabling you to prompt users to enter a time associated with the order. For example:

-
Yes No: Adds radio buttons to the selected Order Definition or Order Group, enabling you to prompt users to make a Yes / No or N/A selection. For example:
 Append frequency when interfacing
Determines whether to include the frequency along with the response data entered for a particular Field. When this value is set to Yes, the frequency value is pre-pended to the selected Field each time that orders specify a Frequency value. If this setting is configured for a Field belong to both Order Group and Order Definition Field Sets, the Field belonging to the Order Group Field Set is used. If this setting is configured for multiple Fields belonging to a single Field Set, the frequency is pre-pended to the first Field in the set.
Append frequency when interfacing
Determines whether to include the frequency along with the response data entered for a particular Field. When this value is set to Yes, the frequency value is pre-pended to the selected Field each time that orders specify a Frequency value. If this setting is configured for a Field belong to both Order Group and Order Definition Field Sets, the Field belonging to the Order Group Field Set is used. If this setting is configured for multiple Fields belonging to a single Field Set, the frequency is pre-pended to the first Field in the set.
- Include Other Choices: Determines whether to add “Other” as a choice among the available selections. You can provide “Other” as a choice when using any Field Type that enables providers to select from a list of choices (Checkbox Group, List Choose Multiple, List Choose One, Radio Buttons). When data associated with this setting has been interfaced from the back-end system, an administrator’s ability to edit the setting is controlled by the preference Edit Interfaced Order Catalog (Admin > CPOE > CPOE Preferences > Edit) (the scope of which is normally restricted to Order Groups and Definitions within the Commure Pro CPOE application). When Edit Interfaced Order Catalog is set to No, the Include Other Choices setting displays as a read-only setting.
- Hide Other Choices: In customer environments where suppressing the display of “Other” is not an option, enabling this choice ensures that the “Other” choice remains unavailable to clinicians during order entry. (Enabling this setting can be useful in environments where configuration updates are pulled from a back-end system, to ensure that the “Other” choice remains hidden even if “Include Other Choices” is set to yes.) (This option is available to customers with MEDITECH back-end systems only.)
- Reference List: Provides a drop-down list of all available reference lists. You must create a reference list to supply the choices available to providers when you use any of the Field Types that enable them to select from a list of choices (Checkbox Group, List Choose Multiple, List Choose One, Radio Buttons).
- Display at Top of screen: Enables you to distinguish some Fields in a Field Set by moving them to the top of the Add Order screen. For more information, see Positioning Fields at the Top of the Add Order Screen. The following option applies to the List Choose One, Number, and Text Field Types only.
- Yes - response only Order string descriptions will include the response that users provided in response to this field. This data is appended to the end of the order description.
- Yes - label and response Order string descriptions will include both the field label as well as the data that users provided in response to the field.
- No Order string descriptions will exclude both the field label as well as the data that users provided in response to the field.