> ## Documentation Index
> Fetch the complete documentation index at: https://docs.pro.commure.com/llms.txt
> Use this file to discover all available pages before exploring further.
# Entering Orders
> Order entry workflows and features in the Commure Pro Android app.
## Understanding Order Alerts
When entering orders for patients, the application may display one or more alerts to notify you of possible issues with the order, or to recommend additional action by you. These alerts could occur during any workflow where you are entering orders, such as:
* When entering orders from the **Orders** module
* When re-ordering from either of the following modules:
* Lab Results
* Test Results
* When entering orders while writing a note in the **Clinical Notes** module
Alerts can be broken into two broad categories:
* **Clinical Decision Support (CDS) Alerts**: These alerts are based on a combination of the patient’s demographic data (such as age or smoking status) and/or clinical data (such as lab results or vital signs), in conjunction with the orders you are placing. The alert could be any of these types: it might be purely informational, it might suggest alternative or additional orders, it might require you to enter an override reason before proceeding with a specific new order, or it might prevent you entirely from entering a specific new order. These alerts are displayed *before* you click **Sign/Submit**.
See *[Reviewing Clinical Decision Support (CDS) Alerts](#reviewing-clinical-decision-support-cds-alerts)*.
* **Interaction and Duplicate Alerts**: These alerts compare the new orders you are about to enter with the patient’s allergies and all other new and existing orders for the patient. If a new order would cause a drug-drug interaction, a drug-allergy interaction, a drug-disease interaction, or if it is a duplicate of an existing order, you will receive an alert. Depending on the severity of the alert, you might be presented with a variety of options to resolve the alert. These alerts are displayed *after* you click **Sign/Submit**.
See *[Reviewing Interaction and Duplicate Order Alerts](../enter_patient_data/enter-orders#reviewing-interaction-and-duplicate-order-alerts)*.
### Reviewing Clinical Decision Support (CDS) Alerts
Clinical Decision Support alerts use clinical data and other patient information to evaluate orders and generate an alert. CDS alerts can display during any of the following workflows:
* When entering orders from the **Orders** module
* When re-ordering from either of the following modules:
* Lab Results
* Test Results
* When entering orders while writing a note in the **Clinical Notes** module.
Your administrator has configured CDS alerts for your facility based on rules that define the type of alert to be shown, and when to show them. The alert you see might be informational for your reference, or it might require you to take specific actions so that you can continue the workflow. A CDS rule might also prevent you from submitting an order based on criteria used by that rule.
CDS alerts display with text and buttons contained in a yellow banner at the top of the Order Details screen and/or at the top of the Orders Summary. When an alert is first displayed, the box containing the alert is fully expanded to ensure that you read it. Once you read it, you can collapse it. If you exit and return to the same screen, the alert may be presented again, in the same state that you left it (expanded or collapsed).
The topics above describe the different types of CDS alerts and provide an example of each. Many of the alert types can also include a **View Source** link (also described above), which when tapped, displays additional reference information related to the alert.
## Message Alerts
CDS message alerts are simple informational alerts, as in this example:
 These alerts display on the Order Details screen and remain visible each time you access the Order Details screen for the order, up until you sign and submit the order.
Some dose range checking alerts also display as message alerts. However, these alerts behave somewhat differently than described above. See *[Dose Range Checking Alerts](../enter_patient_data/enter-orders#dose-range-checking-alerts)*.
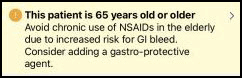
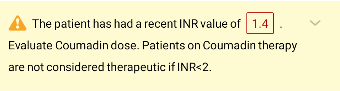
## Alerts with Clinical Data
Some CDS alerts contain clinical data about the patient. The clinical data might be incorporated into the text of a message, as in this example where the patient’s INR value is part of the message:
These alerts display on the Order Details screen and remain visible each time you access the Order Details screen for the order, up until you sign and submit the order.
Some dose range checking alerts also display as message alerts. However, these alerts behave somewhat differently than described above. See *[Dose Range Checking Alerts](../enter_patient_data/enter-orders#dose-range-checking-alerts)*.
## Alerts with Clinical Data
Some CDS alerts contain clinical data about the patient. The clinical data might be incorporated into the text of a message, as in this example where the patient’s INR value is part of the message:
 In other cases, the patient’s clinical data (for example, lab results, test results, or active medications) might be displayed as a list of clinical data items, without any message. Depending on configuration settings for your facility, you might see several instances of clinical data for a specific time period.
These alerts display on the Order Details screen and remain visible each time you access the Order Details screen for the order, up until you sign and submit the order.
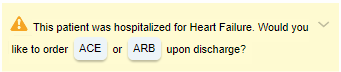
## Alerts with Suggestions for Additional Orders
CDS alerts might sometimes suggest that you enter additional orders for the patient. These alerts include buttons so that you can easily add those orders.
* In some cases, there are the button(s) to enter an individual order or an order set. After reading the message, you can click the button to add the order or order set to the New Orders list.
In other cases, the patient’s clinical data (for example, lab results, test results, or active medications) might be displayed as a list of clinical data items, without any message. Depending on configuration settings for your facility, you might see several instances of clinical data for a specific time period.
These alerts display on the Order Details screen and remain visible each time you access the Order Details screen for the order, up until you sign and submit the order.
## Alerts with Suggestions for Additional Orders
CDS alerts might sometimes suggest that you enter additional orders for the patient. These alerts include buttons so that you can easily add those orders.
* In some cases, there are the button(s) to enter an individual order or an order set. After reading the message, you can click the button to add the order or order set to the New Orders list.
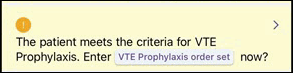 * In other cases, there are button(s) that launch an Order Search window. The button in the message displays keywords that are used to generate a list of search results in the Order Search window, from which you can select a new order.
 These alerts display on the Orders Summary and disappear if you enter the recommended item. Otherwise they remain visible for the entire order session. You may proceed with placing other orders even if you do not enter the suggested order(s).
## Alerts Requiring an Override Reason
These CDS alerts display a warning message and also contain a field to select an **Override Reason**, as in this example:
These alerts display on the Orders Summary and disappear if you enter the recommended item. Otherwise they remain visible for the entire order session. You may proceed with placing other orders even if you do not enter the suggested order(s).
## Alerts Requiring an Override Reason
These CDS alerts display a warning message and also contain a field to select an **Override Reason**, as in this example:
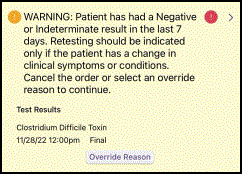 This type of alert displays on the Order Details screen and remains visible each time you access the Order Details screen for the order, up until you sign and submit the order. You cannot place the order unless you select an **Override Reason**. Once you do so, that reason is shown as selected.
Some dose range checking alerts also display as alerts requiring an override reason. However, these alerts behave somewhat differently than described above. See *[Dose Range Checking Alerts](../enter_patient_data/enter-orders#dose-range-checking-alerts)*.
## Alerts Requiring Mandatory Discard
These CDS alerts display a warning message indicating that you cannot continue and that you *must* discard the new order. Your only option is to tap the **Discard Order** button.
This type of alert displays on the Order Details screen and remains visible each time you access the Order Details screen for the order, up until you sign and submit the order. You cannot place the order unless you select an **Override Reason**. Once you do so, that reason is shown as selected.
Some dose range checking alerts also display as alerts requiring an override reason. However, these alerts behave somewhat differently than described above. See *[Dose Range Checking Alerts](../enter_patient_data/enter-orders#dose-range-checking-alerts)*.
## Alerts Requiring Mandatory Discard
These CDS alerts display a warning message indicating that you cannot continue and that you *must* discard the new order. Your only option is to tap the **Discard Order** button.
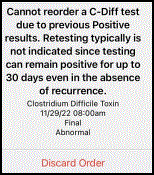 This alert displays on the Order Details screen. However, once you discard the order, it is no longer displayed.
## Dose Range Checking Alerts
Dose range checking alerts display information pertaining to the dosing of the medication, such as information about the maximum single or daily dosage, or whether renal function should be considered. Factors such as the patient’s age or weight are taken into consideration when appropriate.
For parent/child medications such as IV medications with additives or diluents, dose range checking is performed only on the parent medication.
Dose range checking alerts might be presented as either a message, or as a message requiring an override reason.
* **Message Alerts for Dose Range Checking**: These alerts display a warning message pertaining to the dosing of the medication and/or might indicate that renal function should be considered.
This alert displays on the Order Details screen. However, once you discard the order, it is no longer displayed.
## Dose Range Checking Alerts
Dose range checking alerts display information pertaining to the dosing of the medication, such as information about the maximum single or daily dosage, or whether renal function should be considered. Factors such as the patient’s age or weight are taken into consideration when appropriate.
For parent/child medications such as IV medications with additives or diluents, dose range checking is performed only on the parent medication.
Dose range checking alerts might be presented as either a message, or as a message requiring an override reason.
* **Message Alerts for Dose Range Checking**: These alerts display a warning message pertaining to the dosing of the medication and/or might indicate that renal function should be considered.
 These alerts display on the Order Details screen. You can take one of the following actions:
* **Leave the order unchanged**: If you simply close the Order Details screen without making any changes, you can then sign and submit the order. Note that the alert will remain visible each time you access the Order Details screen for that order, up until the point that you sign and submit it.
* **Choose a different dose, frequency, or route**: If you enter a different dose, frequency, or route, the alert is immediately removed from the Order Details screen. However, when you go back to the Orders Summary, the order is checked again for issues, and if the new dose/route/frequency would still trigger an alert, then the order will show a red icon next to it and the **Sign/Submit** button will be disabled. Tap the order to view the Order Details again, which will include an updated alert. Review the new alert and then either modify the order again, or close the Order Details and submit the order in its current state.
* **Message Alerts Requiring an Override Reason for Dose Range Checking**: These alerts display a warning message pertaining to the dosing of the medication or renal function, and include a field to select an **Override Reason**.
These alerts display on the Order Details screen. You can take one of the following actions:
* **Leave the order unchanged**: If you simply close the Order Details screen without making any changes, you can then sign and submit the order. Note that the alert will remain visible each time you access the Order Details screen for that order, up until the point that you sign and submit it.
* **Choose a different dose, frequency, or route**: If you enter a different dose, frequency, or route, the alert is immediately removed from the Order Details screen. However, when you go back to the Orders Summary, the order is checked again for issues, and if the new dose/route/frequency would still trigger an alert, then the order will show a red icon next to it and the **Sign/Submit** button will be disabled. Tap the order to view the Order Details again, which will include an updated alert. Review the new alert and then either modify the order again, or close the Order Details and submit the order in its current state.
* **Message Alerts Requiring an Override Reason for Dose Range Checking**: These alerts display a warning message pertaining to the dosing of the medication or renal function, and include a field to select an **Override Reason**.
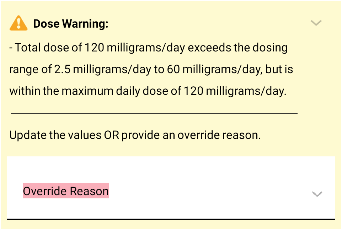 These alerts display on the Order Details screen. You must take one of the following actions to proceed with the order:
* **Select an override reason to submit the order as is**: If you want to leave the order unchanged and submit it despite the warning message, then you must first select an **Override Reason**. After selecting a reason, you can then close the Order Details and sign and submit the order. Note that the alert will remain visible each time you access the Order Details screen for that order, up until the point that you sign and submit it.
* **Choose a different dose, frequency, or route**: If you enter a different dose, frequency, or route, the alert is immediately removed from the Order Details screen (without requiring you to enter an **Override Reason**). However, when you go back to the Orders Summary, the order is checked again for issues, and if the new dose/route/frequency would still trigger an alert, then the order will show a red icon next to it and the **Sign/Submit** button will be disabled. Tap the order to view the Order Details again, which will include an updated alert. Review the new alert and then either modify the order again, or select an **Override Reason** to submit the order in its current state.
## Viewing Source Information from a CDS Alert
Your organization may include a **View Source** link in some CDS alerts to provide additional information about the alert.
These alerts display on the Order Details screen. You must take one of the following actions to proceed with the order:
* **Select an override reason to submit the order as is**: If you want to leave the order unchanged and submit it despite the warning message, then you must first select an **Override Reason**. After selecting a reason, you can then close the Order Details and sign and submit the order. Note that the alert will remain visible each time you access the Order Details screen for that order, up until the point that you sign and submit it.
* **Choose a different dose, frequency, or route**: If you enter a different dose, frequency, or route, the alert is immediately removed from the Order Details screen (without requiring you to enter an **Override Reason**). However, when you go back to the Orders Summary, the order is checked again for issues, and if the new dose/route/frequency would still trigger an alert, then the order will show a red icon next to it and the **Sign/Submit** button will be disabled. Tap the order to view the Order Details again, which will include an updated alert. Review the new alert and then either modify the order again, or select an **Override Reason** to submit the order in its current state.
## Viewing Source Information from a CDS Alert
Your organization may include a **View Source** link in some CDS alerts to provide additional information about the alert.
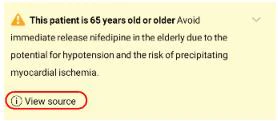 Tapping the **View Source** link opens a pop-up screen that can include reference text added by your administrator and/or links to web pages that provide additional reference information. There may be more than one web page link included on the View Source screen.
1. Review the CDS alert information and then tap the **View Source** link, located at the bottom of the alert.
Tapping the **View Source** link opens a pop-up screen that can include reference text added by your administrator and/or links to web pages that provide additional reference information. There may be more than one web page link included on the View Source screen.
1. Review the CDS alert information and then tap the **View Source** link, located at the bottom of the alert.
 The View Source screen opens and displays reference text and/or links to web pages.
* If the screen includes reference text, review the text.
* If the screen includes web page links, tap each link to review its content.
When you tap a link, a web page opens in a browser window, using whatever is your default browser. Review the content, and then tap the device’s **Back** button to return to the View Source screen in the Commure Pro application. Or if you have navigated within the web site, it may be easier to swipe up from the bottom right corner to view the list of recent apps and then select the Commure Pro application to return to it (on older devices, tap the **Recent Apps** button).
2. When you are done reviewing the information on the View Source screen, tap **Done** at the bottom right to close it and return to the order or Orders Summary.
### Reviewing Interaction and Duplicate Order Alerts
Mobile CPOE checks for the following types of issues after you tap the **Sign/Submit** button to submit your new order(s):
* **Drug-drug interactions**: Whether a new medication order interacts with another new or existing medication order for the patient.
* **Drug-allergy interactions**: Whether a new medication order interacts with an allergy that the patient has on record in the Allergies module.
* **Drug-disease interactions**: Whether a new medication order interacts with an active disease on the patient’s Problem List.
* **Duplicate orders**: Whether a new order is a duplicate of another new or existing order.
If an order would cause an interaction or would represent a duplicate order, a warning or alert is displayed after you attempt to sign and submit the order. Typically, the warning or alert describes the problem and indicates whether further action is necessary. Your administrator determines the level of alert (critical or non-critical) that should be displayed, depending on the severity or type of the interaction or duplication. You must resolve any critical alerts when they occur, while non-critical alerts should be reviewed for possible further action. The types of orders that are considered to be duplicates, as well as the options are available to you when a duplicate or interaction is found, depend upon your system configuration. See *[Resolving Critical and Non-Critical Warnings or Alerts](../enter_patient_data/enter-orders#resolving-critical-and-non-critical-warnings-or-alerts)* for more information and instructions.
## Resolving Critical and Non-Critical Warnings or Alerts
After you tap the **Sign & Submit** button, any new orders that would cause an interaction or duplication are displayed on the Alerts screen. Each new medication order is listed with a critical or non-critical alert icon, or in some cases, both icons. None of your new orders will be submitted until after you resolve or review these alerts and tap the **Resubmit** button.
* Critical alerts, indicated by a red icon , *require* you to take some action before you are allowed to resubmit the new order.
* Non-critical alerts, indicated by a yellow icon , do *not* require you to take any action. You can review the details of the alert if desired, or you can just resubmit the new order.
To resolve or review interaction or duplicate alerts displayed on the Alerts screen:
1. Review the alerts for each new medication order and take appropriate action on each of them.
* You can immediately delete/discard a new order that is causing an alert. Select the **Delete** button to the right of the new order’s name. The new order is removed from the Alerts screen.
* You can tap on the alert listed under a specific new order to review the details of that alert, and possibly take an action to resolve it, as described in [Step 2](../enter_patient_data/enter-orders#resolving-critical-and-non-critical-warnings-or-alerts) .
* If *only* non-critical alerts are displayed, you can choose to immediately resubmit the new order(s) without taking any further action. Select the **Resubmit** button at the top right of the screen and you are done (skip the remaining steps below). However, it is best practice to review the details of all alerts first, as described in [Step 2](../enter_patient_data/enter-orders#resolving-critical-and-non-critical-warnings-or-alerts) .
2. When you tap on an alert for a specific new order, the Alert Details screen is displayed. The new order is listed at the top, followed by all the items that are causing an interaction or duplication with that order. This can include items such as other new orders (from the current order session), existing orders, patient allergies, or patient problems. After reviewing the details, you can take any of the actions below:
* Delete/discard the current new order (the one listed at the top of the screen). Select the **Delete** button to the right of the new order’s name.
* For any type of interaction, you might see an option to enter an override reason to explain why the order should be processed despite the alert. Select the **Override** button and then choose a reason. **Note:** The option to provide an override reason is available if configured by your organization.
* For drug-drug interactions, you can also:
* Delete the other new order (from the current order session) that is causing an interaction or duplication. Select the **Delete** button next to the new order that you wan to delete.
* Discontinue the existing order that is causing an interaction or duplication. Select the **DC** button next to the existing order that you want to discontinue.
* For drug-disease interactions, you can also:
* Resolve the patient’s disease/problem that is causing the interaction. Marking a problem as resolved indicates that the patient had the problem in the past, but it is no longer an active problem today. Select the **Resolve** button just below the disease’s name, and tap Yes when asked to confirm. The problem is immediately marked as resolved with a **Resolved Date** equal to today’s date.
* Delete the patient’s disease/problem that is causing the interaction. You should only delete a problem if the patient never had the problem, either now or in the past. Select the **Delete** button to the right of the disease’s name. The problem is immediately deleted from the patient’s Problem List.
* When viewing the details of a non-critical alert, if you determine that none of the actions described in the bullets above are necessary, you can simply tap **Back** to return to the main Alerts screen.
After you review or resolve all of the alerts for a given new medication order, you are returned to the main Alerts screen. On this screen, you will note that the new medication order is either removed entirely from the screen (if you deleted the new order), or it is shown with a green checkmark (to indicate that you resolved the order’s alert in some other manner), or it remains unchanged (if you did not take any action on a non-critical alert).
3. Continue reviewing alerts until you have addressed all of them.
If, during the process of reviewing alerts, you delete all of the new orders from the current session, you are returned to the Orders Summary screen.
4. Tap **Resubmit** at the top right of the main Alerts screen.
All of the remaining new orders from your order session (including those that did not cause any interactions or duplication), as well as any existing orders that you discontinued, are now submitted.
## Basic Steps: Entering a New Order
Providers can enter orders for their patients from anywhere in their workflow; making order entry easy, convenient, and flexible. They need only follow these simple steps to quickly add orders:
1. Choose an option for adding a new order. You can select orders from various lists, search for an order, select orders from a predefined order set, repeat a patient’s existing (previous) order, or repeat a patient’s completed lab result or test result.
See *[Adding an Order](../enter_patient_data/enter-orders#adding-an-order)* for more information.
2. Review Clinical Decision Support (CDS) Alerts, if any are displayed.
See *[Reviewing Clinical Decision Support (CDS) Alerts](#reviewing-clinical-decision-support-cds-alerts)*.
3. (Optional) Request a notification when results are available for the patient’s lab or test order(s).
See *[Requesting Notifications when Results are Available](../enter_patient_data/enter-orders#requesting-notifications-when-results-are-available)*.
4. (Optional) Specify that the first dose for a medication order be given "now."
See *[Specifying "Now" as the First Dose Time for a Medication Order](../enter_patient_data/enter-orders#specifying-"now"-as-the-first-dose-time-for-a-medication-order)*.
5. Sign and submit the order.
See *[Signing and Submitting an Order](../enter_patient_data/enter-orders#signing-and-submitting-an-order)*.
6. Review warnings or alerts for interactions or duplicate orders, if any are displayed.
See *[Reviewing Interaction and Duplicate Order Alerts](../enter_patient_data/enter-orders#reviewing-interaction-and-duplicate-order-alerts)*.
## Adding an Order
The order entry process can be started from the Orders, Lab Results, or Test Results module, although most of the most common workflow is to start from the Orders module.
When starting from the Lab Results or Test Results modules, you are typically viewing a completed lab result or test result, and then choosing to re-order that same item again. See *[Repeating a Completed Lab Result or Test Result](../enter_patient_data/enter-orders#repeating-a-completed-lab-result-or-test-result)* for instructions on this workflow.
When starting from the Orders module, follow these steps:
1. From the **Patient List** module, select a patient.
2. When the **Home** screen is displayed, select the **Orders** module.
The Orders Summary of the Orders module is displayed.
3. Select the **Add** button to enter a new order.
The Add New Orders screen is displayed.
Whether you are working from the Orders module, or from the Lab Results or Test Results module, each method accommodates the typical workflows encountered by providers. The various workflows are summarized in the table below.
* Add a new order from your **Favorites** list.
**When to use**: After reviewing the patient’s orders, you decide to enter a new one. The item you want to order is something that you order frequently, so most likely it will be on your **Favorites** list. Your Favorites list contains the orders that are commonly used within your department(s), the orders that you have used frequently in the past, and any orders that you have personally added to your Favorites list.
**Basic steps**: Orders module > **Add** button > select from the **Favorites** list.
**For more info**: *[Adding an Order from the Favorites List](../enter_patient_data/enter-orders#adding-an-order-from-the-favorites-list)*
* Search for an order to add.
**When to use**: After reviewing the patient’s orders, you decide to enter a new one. The item you want to order is not something that you order frequently, so you know it will not be on your Favorites list. Instead, you can search for it from the master order list.
**Basic steps**: Orders module > **Add** button > search for the order.
**For more info**: *[Searching for an Order to Add](../enter_patient_data/enter-orders#searching-for-an-order-to-add)*
* Add a free-text order.
**When to use**: After reviewing the patient’s orders, you decide to enter a new one. The item you want is not something that you order frequently, so you cannot find it on your **Favorites** list, nor can you find it when you search for it. As a last resort, you can enter a free-text order.
**Basic steps**: Orders module > **Add** button > search for the order > if the order cannot be found, select the free text item.
**For more info**: *[Adding a Free-Text Order](../enter_patient_data/enter-orders#adding-a-free-text-order)*
* Add orders from an order set.
**When to use**: Based on the patient’s diagnosis or needed procedures, you decide to review a predefined "order set" so that you can select some or all of the orders from it.
**Basic steps**: Orders module > **Add** button > select the order set from the **Favorites** list or search for the order set.
**For more info**: *[Adding Orders from an Order Set](../enter_patient_data/enter-orders#adding-orders-from-an-order-set)*
* Repeat an existing (previous) order.
**When to use**: After reviewing the patient’s existing orders, you decide that you want to reorder (repeat) one of the items on that list. You can just select the item and order it again.
**Basic steps**: Orders module > Existing Orders section > select an order to view Details screen > **Order Again** button
**For more info**: *[Repeating an Existing Order](../enter_patient_data/enter-orders#repeating-an-existing-order)*
* Repeat a completed lab result or test result.
**When to use**: After reviewing the patient’s completed lab results or test results (in the Lab Results or Test Results module), you decide that you want to reorder (repeat) an item from one of those lists. You can just select the item and order it again.
**Basic steps**: Test Results or Lab Results module > select a lab result or test result to view the Details screen > select the **More** button > **Order Again**.
**For more info**: *[Repeating a Completed Lab Result or Test Result](../enter_patient_data/enter-orders#repeating-a-completed-lab-result-or-test-result)*
### Adding an Order from the Favorites List
The **Favorites** list is a list of those items that you or members of your department order frequently. Favorites allow you to quickly find commonly used orders for your patients. The favorite orders are typically grouped into categories, although there may be a few orders at the top or bottom of the Favorites list that are not included in any category.
You can add or remove items to/from your **Favorites** list at any time. See *[Managing Orders in Your Favorites List](../enter_patient_data/enter-orders#managing-orders-in-your-favorites-list)*.
During the order entry process, you might see clinical decision support (CDS) alerts (see *[Reviewing Clinical Decision Support (CDS) Alerts](#reviewing-clinical-decision-support-cds-alerts)*). After tapping **Sign/Submit**, you might see alerts about drug, disease, or allergy interactions or duplicate orders (see *[Reviewing Interaction and Duplicate Order Alerts](../enter_patient_data/enter-orders#reviewing-interaction-and-duplicate-order-alerts)*). Alerts can provide clinical data or inform you of issues related to an order.
1. From the Orders Summary screen, select the **Add** button .
The Add New Orders screen is displayed.
2. Select the order that you want. You can either:
* Select an order from the list of uncategorized favorites, or
* Select an order from one of the favorites categories (below the uncategorized favorites). You may have to scroll down to see the categories. Select a category name or the **Expand** icon to expand a category and view the orders within it, and then select an item from the list.
3. If necessary, review CDS alerts or complete any additional fields needed to place the order:
* If the new order has CDS alerts or required fields that need to be completed, or if your administrator has configured the order to always display the Order Details screen for review purposes, the Order Details screen is now automatically displayed. CDS alerts are listed at the top in yellow, and required fields are highlighted in pink with the text "This field is required." Review the order’s details or CDS alerts, make any necessary adjustments, complete any required fields, and then select **Back** .
* If the Order Details screen has a **Reason** or **Problem** field, see *[Adding a Reason (Diagnosis) to a New Order](#adding-a-reason-diagnosis-to-a-new-order)* for instructions on how to complete it.
* For lab or test orders, see *[Requesting Notifications when Results are Available](../enter_patient_data/enter-orders#requesting-notifications-when-results-are-available)*.
* For medication orders, see *[Specifying "Now" as the First Dose Time for a Medication Order](../enter_patient_data/enter-orders#specifying-"now"-as-the-first-dose-time-for-a-medication-order)*.
* If the new order does *not* have CDS alerts or required fields, and your administrator has not configured it to always display for review, the Order Details screen is not displayed. However, if you want to modify the order by changing some of the detail fields, you can still do so before you sign and submit it. See *[Modifying the Details of a New Order](../enter_patient_data/enter-orders#modifying-the-details-of-a-new-order)*.
After you finish reviewing any CDS alerts and filling out the Order Details screen, or if there were no details to fill out, the Add New Orders screen with the **Favorites** list is redisplayed. The order you just selected has a checkmark next to it to indicate that it is selected.
4. Take any of the actions below.
* Select another order from the **Favorites** list.
* Select the **Back** button if you are finished selecting orders.
The Orders Summary is displayed with the new order(s) listed in the New Orders section.
### Searching for an Order to Add
If you cannot find the order you want on your **Favorites** list, you can use the **Search** option to search the **Favorites** list and also the entire master list of orders.
During the order entry process, you might see clinical decision support (CDS) alerts (see *[Reviewing Clinical Decision Support (CDS) Alerts](#reviewing-clinical-decision-support-cds-alerts)*). After tapping **Sign/Submit**, you might see alerts about drug, disease, or allergy interactions or duplicate orders (see *[Reviewing Interaction and Duplicate Order Alerts](../enter_patient_data/enter-orders#reviewing-interaction-and-duplicate-order-alerts)*). Alerts can provide clinical data or inform you of issues related to an order.
1. From the Orders Summary screen, select the **Add** button .
The Add New Orders screen is displayed.
2. Tap the **Search** button at the top of the screen to expand the **Search** field.
3. Type a word or phrase in the **Search** field and then select **Search** from the virtual keyboard.
The View Source screen opens and displays reference text and/or links to web pages.
* If the screen includes reference text, review the text.
* If the screen includes web page links, tap each link to review its content.
When you tap a link, a web page opens in a browser window, using whatever is your default browser. Review the content, and then tap the device’s **Back** button to return to the View Source screen in the Commure Pro application. Or if you have navigated within the web site, it may be easier to swipe up from the bottom right corner to view the list of recent apps and then select the Commure Pro application to return to it (on older devices, tap the **Recent Apps** button).
2. When you are done reviewing the information on the View Source screen, tap **Done** at the bottom right to close it and return to the order or Orders Summary.
### Reviewing Interaction and Duplicate Order Alerts
Mobile CPOE checks for the following types of issues after you tap the **Sign/Submit** button to submit your new order(s):
* **Drug-drug interactions**: Whether a new medication order interacts with another new or existing medication order for the patient.
* **Drug-allergy interactions**: Whether a new medication order interacts with an allergy that the patient has on record in the Allergies module.
* **Drug-disease interactions**: Whether a new medication order interacts with an active disease on the patient’s Problem List.
* **Duplicate orders**: Whether a new order is a duplicate of another new or existing order.
If an order would cause an interaction or would represent a duplicate order, a warning or alert is displayed after you attempt to sign and submit the order. Typically, the warning or alert describes the problem and indicates whether further action is necessary. Your administrator determines the level of alert (critical or non-critical) that should be displayed, depending on the severity or type of the interaction or duplication. You must resolve any critical alerts when they occur, while non-critical alerts should be reviewed for possible further action. The types of orders that are considered to be duplicates, as well as the options are available to you when a duplicate or interaction is found, depend upon your system configuration. See *[Resolving Critical and Non-Critical Warnings or Alerts](../enter_patient_data/enter-orders#resolving-critical-and-non-critical-warnings-or-alerts)* for more information and instructions.
## Resolving Critical and Non-Critical Warnings or Alerts
After you tap the **Sign & Submit** button, any new orders that would cause an interaction or duplication are displayed on the Alerts screen. Each new medication order is listed with a critical or non-critical alert icon, or in some cases, both icons. None of your new orders will be submitted until after you resolve or review these alerts and tap the **Resubmit** button.
* Critical alerts, indicated by a red icon , *require* you to take some action before you are allowed to resubmit the new order.
* Non-critical alerts, indicated by a yellow icon , do *not* require you to take any action. You can review the details of the alert if desired, or you can just resubmit the new order.
To resolve or review interaction or duplicate alerts displayed on the Alerts screen:
1. Review the alerts for each new medication order and take appropriate action on each of them.
* You can immediately delete/discard a new order that is causing an alert. Select the **Delete** button to the right of the new order’s name. The new order is removed from the Alerts screen.
* You can tap on the alert listed under a specific new order to review the details of that alert, and possibly take an action to resolve it, as described in [Step 2](../enter_patient_data/enter-orders#resolving-critical-and-non-critical-warnings-or-alerts) .
* If *only* non-critical alerts are displayed, you can choose to immediately resubmit the new order(s) without taking any further action. Select the **Resubmit** button at the top right of the screen and you are done (skip the remaining steps below). However, it is best practice to review the details of all alerts first, as described in [Step 2](../enter_patient_data/enter-orders#resolving-critical-and-non-critical-warnings-or-alerts) .
2. When you tap on an alert for a specific new order, the Alert Details screen is displayed. The new order is listed at the top, followed by all the items that are causing an interaction or duplication with that order. This can include items such as other new orders (from the current order session), existing orders, patient allergies, or patient problems. After reviewing the details, you can take any of the actions below:
* Delete/discard the current new order (the one listed at the top of the screen). Select the **Delete** button to the right of the new order’s name.
* For any type of interaction, you might see an option to enter an override reason to explain why the order should be processed despite the alert. Select the **Override** button and then choose a reason. **Note:** The option to provide an override reason is available if configured by your organization.
* For drug-drug interactions, you can also:
* Delete the other new order (from the current order session) that is causing an interaction or duplication. Select the **Delete** button next to the new order that you wan to delete.
* Discontinue the existing order that is causing an interaction or duplication. Select the **DC** button next to the existing order that you want to discontinue.
* For drug-disease interactions, you can also:
* Resolve the patient’s disease/problem that is causing the interaction. Marking a problem as resolved indicates that the patient had the problem in the past, but it is no longer an active problem today. Select the **Resolve** button just below the disease’s name, and tap Yes when asked to confirm. The problem is immediately marked as resolved with a **Resolved Date** equal to today’s date.
* Delete the patient’s disease/problem that is causing the interaction. You should only delete a problem if the patient never had the problem, either now or in the past. Select the **Delete** button to the right of the disease’s name. The problem is immediately deleted from the patient’s Problem List.
* When viewing the details of a non-critical alert, if you determine that none of the actions described in the bullets above are necessary, you can simply tap **Back** to return to the main Alerts screen.
After you review or resolve all of the alerts for a given new medication order, you are returned to the main Alerts screen. On this screen, you will note that the new medication order is either removed entirely from the screen (if you deleted the new order), or it is shown with a green checkmark (to indicate that you resolved the order’s alert in some other manner), or it remains unchanged (if you did not take any action on a non-critical alert).
3. Continue reviewing alerts until you have addressed all of them.
If, during the process of reviewing alerts, you delete all of the new orders from the current session, you are returned to the Orders Summary screen.
4. Tap **Resubmit** at the top right of the main Alerts screen.
All of the remaining new orders from your order session (including those that did not cause any interactions or duplication), as well as any existing orders that you discontinued, are now submitted.
## Basic Steps: Entering a New Order
Providers can enter orders for their patients from anywhere in their workflow; making order entry easy, convenient, and flexible. They need only follow these simple steps to quickly add orders:
1. Choose an option for adding a new order. You can select orders from various lists, search for an order, select orders from a predefined order set, repeat a patient’s existing (previous) order, or repeat a patient’s completed lab result or test result.
See *[Adding an Order](../enter_patient_data/enter-orders#adding-an-order)* for more information.
2. Review Clinical Decision Support (CDS) Alerts, if any are displayed.
See *[Reviewing Clinical Decision Support (CDS) Alerts](#reviewing-clinical-decision-support-cds-alerts)*.
3. (Optional) Request a notification when results are available for the patient’s lab or test order(s).
See *[Requesting Notifications when Results are Available](../enter_patient_data/enter-orders#requesting-notifications-when-results-are-available)*.
4. (Optional) Specify that the first dose for a medication order be given "now."
See *[Specifying "Now" as the First Dose Time for a Medication Order](../enter_patient_data/enter-orders#specifying-"now"-as-the-first-dose-time-for-a-medication-order)*.
5. Sign and submit the order.
See *[Signing and Submitting an Order](../enter_patient_data/enter-orders#signing-and-submitting-an-order)*.
6. Review warnings or alerts for interactions or duplicate orders, if any are displayed.
See *[Reviewing Interaction and Duplicate Order Alerts](../enter_patient_data/enter-orders#reviewing-interaction-and-duplicate-order-alerts)*.
## Adding an Order
The order entry process can be started from the Orders, Lab Results, or Test Results module, although most of the most common workflow is to start from the Orders module.
When starting from the Lab Results or Test Results modules, you are typically viewing a completed lab result or test result, and then choosing to re-order that same item again. See *[Repeating a Completed Lab Result or Test Result](../enter_patient_data/enter-orders#repeating-a-completed-lab-result-or-test-result)* for instructions on this workflow.
When starting from the Orders module, follow these steps:
1. From the **Patient List** module, select a patient.
2. When the **Home** screen is displayed, select the **Orders** module.
The Orders Summary of the Orders module is displayed.
3. Select the **Add** button to enter a new order.
The Add New Orders screen is displayed.
Whether you are working from the Orders module, or from the Lab Results or Test Results module, each method accommodates the typical workflows encountered by providers. The various workflows are summarized in the table below.
* Add a new order from your **Favorites** list.
**When to use**: After reviewing the patient’s orders, you decide to enter a new one. The item you want to order is something that you order frequently, so most likely it will be on your **Favorites** list. Your Favorites list contains the orders that are commonly used within your department(s), the orders that you have used frequently in the past, and any orders that you have personally added to your Favorites list.
**Basic steps**: Orders module > **Add** button > select from the **Favorites** list.
**For more info**: *[Adding an Order from the Favorites List](../enter_patient_data/enter-orders#adding-an-order-from-the-favorites-list)*
* Search for an order to add.
**When to use**: After reviewing the patient’s orders, you decide to enter a new one. The item you want to order is not something that you order frequently, so you know it will not be on your Favorites list. Instead, you can search for it from the master order list.
**Basic steps**: Orders module > **Add** button > search for the order.
**For more info**: *[Searching for an Order to Add](../enter_patient_data/enter-orders#searching-for-an-order-to-add)*
* Add a free-text order.
**When to use**: After reviewing the patient’s orders, you decide to enter a new one. The item you want is not something that you order frequently, so you cannot find it on your **Favorites** list, nor can you find it when you search for it. As a last resort, you can enter a free-text order.
**Basic steps**: Orders module > **Add** button > search for the order > if the order cannot be found, select the free text item.
**For more info**: *[Adding a Free-Text Order](../enter_patient_data/enter-orders#adding-a-free-text-order)*
* Add orders from an order set.
**When to use**: Based on the patient’s diagnosis or needed procedures, you decide to review a predefined "order set" so that you can select some or all of the orders from it.
**Basic steps**: Orders module > **Add** button > select the order set from the **Favorites** list or search for the order set.
**For more info**: *[Adding Orders from an Order Set](../enter_patient_data/enter-orders#adding-orders-from-an-order-set)*
* Repeat an existing (previous) order.
**When to use**: After reviewing the patient’s existing orders, you decide that you want to reorder (repeat) one of the items on that list. You can just select the item and order it again.
**Basic steps**: Orders module > Existing Orders section > select an order to view Details screen > **Order Again** button
**For more info**: *[Repeating an Existing Order](../enter_patient_data/enter-orders#repeating-an-existing-order)*
* Repeat a completed lab result or test result.
**When to use**: After reviewing the patient’s completed lab results or test results (in the Lab Results or Test Results module), you decide that you want to reorder (repeat) an item from one of those lists. You can just select the item and order it again.
**Basic steps**: Test Results or Lab Results module > select a lab result or test result to view the Details screen > select the **More** button > **Order Again**.
**For more info**: *[Repeating a Completed Lab Result or Test Result](../enter_patient_data/enter-orders#repeating-a-completed-lab-result-or-test-result)*
### Adding an Order from the Favorites List
The **Favorites** list is a list of those items that you or members of your department order frequently. Favorites allow you to quickly find commonly used orders for your patients. The favorite orders are typically grouped into categories, although there may be a few orders at the top or bottom of the Favorites list that are not included in any category.
You can add or remove items to/from your **Favorites** list at any time. See *[Managing Orders in Your Favorites List](../enter_patient_data/enter-orders#managing-orders-in-your-favorites-list)*.
During the order entry process, you might see clinical decision support (CDS) alerts (see *[Reviewing Clinical Decision Support (CDS) Alerts](#reviewing-clinical-decision-support-cds-alerts)*). After tapping **Sign/Submit**, you might see alerts about drug, disease, or allergy interactions or duplicate orders (see *[Reviewing Interaction and Duplicate Order Alerts](../enter_patient_data/enter-orders#reviewing-interaction-and-duplicate-order-alerts)*). Alerts can provide clinical data or inform you of issues related to an order.
1. From the Orders Summary screen, select the **Add** button .
The Add New Orders screen is displayed.
2. Select the order that you want. You can either:
* Select an order from the list of uncategorized favorites, or
* Select an order from one of the favorites categories (below the uncategorized favorites). You may have to scroll down to see the categories. Select a category name or the **Expand** icon to expand a category and view the orders within it, and then select an item from the list.
3. If necessary, review CDS alerts or complete any additional fields needed to place the order:
* If the new order has CDS alerts or required fields that need to be completed, or if your administrator has configured the order to always display the Order Details screen for review purposes, the Order Details screen is now automatically displayed. CDS alerts are listed at the top in yellow, and required fields are highlighted in pink with the text "This field is required." Review the order’s details or CDS alerts, make any necessary adjustments, complete any required fields, and then select **Back** .
* If the Order Details screen has a **Reason** or **Problem** field, see *[Adding a Reason (Diagnosis) to a New Order](#adding-a-reason-diagnosis-to-a-new-order)* for instructions on how to complete it.
* For lab or test orders, see *[Requesting Notifications when Results are Available](../enter_patient_data/enter-orders#requesting-notifications-when-results-are-available)*.
* For medication orders, see *[Specifying "Now" as the First Dose Time for a Medication Order](../enter_patient_data/enter-orders#specifying-"now"-as-the-first-dose-time-for-a-medication-order)*.
* If the new order does *not* have CDS alerts or required fields, and your administrator has not configured it to always display for review, the Order Details screen is not displayed. However, if you want to modify the order by changing some of the detail fields, you can still do so before you sign and submit it. See *[Modifying the Details of a New Order](../enter_patient_data/enter-orders#modifying-the-details-of-a-new-order)*.
After you finish reviewing any CDS alerts and filling out the Order Details screen, or if there were no details to fill out, the Add New Orders screen with the **Favorites** list is redisplayed. The order you just selected has a checkmark next to it to indicate that it is selected.
4. Take any of the actions below.
* Select another order from the **Favorites** list.
* Select the **Back** button if you are finished selecting orders.
The Orders Summary is displayed with the new order(s) listed in the New Orders section.
### Searching for an Order to Add
If you cannot find the order you want on your **Favorites** list, you can use the **Search** option to search the **Favorites** list and also the entire master list of orders.
During the order entry process, you might see clinical decision support (CDS) alerts (see *[Reviewing Clinical Decision Support (CDS) Alerts](#reviewing-clinical-decision-support-cds-alerts)*). After tapping **Sign/Submit**, you might see alerts about drug, disease, or allergy interactions or duplicate orders (see *[Reviewing Interaction and Duplicate Order Alerts](../enter_patient_data/enter-orders#reviewing-interaction-and-duplicate-order-alerts)*). Alerts can provide clinical data or inform you of issues related to an order.
1. From the Orders Summary screen, select the **Add** button .
The Add New Orders screen is displayed.
2. Tap the **Search** button at the top of the screen to expand the **Search** field.
3. Type a word or phrase in the **Search** field and then select **Search** from the virtual keyboard.
 All orders that are a potential match, excluding non-formulary medications, are displayed.
4. If there are too many matches to look through, or if you want to see non-formulary medications, tap the filter heading ("**Show: All**").
A list of categories is displayed, each indicating the number of matching orders in that category. You can select a category to view only the matches in that category, and then select an order from the shorter list.
5. Select an order from the list of matches.
6. If necessary, review CDS alerts or complete any additional fields needed to place the order:
* If the new order has CDS alerts or required fields that need to be completed, or if your administrator has configured the order to always display the Order Details screen for review purposes, the Order Details screen is now automatically displayed. CDS alerts are listed at the top in yellow, and required fields are highlighted in pink with the text "This field is required." Review the order’s details or CDS alerts, make any necessary adjustments, complete any required fields, and then select **Back** .
* If the Order Details screen has a **Reason** or **Problem** field, see *[Adding a Reason (Diagnosis) to a New Order](#adding-a-reason-diagnosis-to-a-new-order)* for instructions on how to complete it.
* For lab or test orders, see *[Requesting Notifications when Results are Available](../enter_patient_data/enter-orders#requesting-notifications-when-results-are-available)*.
* For medication orders, see *[Specifying "Now" as the First Dose Time for a Medication Order](../enter_patient_data/enter-orders#specifying-"now"-as-the-first-dose-time-for-a-medication-order)*.
* If the new order does *not* have CDS alerts or required fields, and your administrator has not configured it to always display for review, the Order Details screen is not displayed. However, if you want to modify the order by changing some of the detail fields, you can still do so before you sign and submit it. See *[Modifying the Details of a New Order](../enter_patient_data/enter-orders#modifying-the-details-of-a-new-order)*.
After you finish reviewing any CDS alerts and filling out the Order Details screen, or if there were no details to fill out, the Add New Orders screen with the **Favorites** list is redisplayed. The order you just selected has a checkmark next to it to indicate that it is selected.
7. Take any of the actions below:
* Select another order from the list of matches.
* Search for a different order by selecting the "**X**" in the **Search** field and then repeating steps 3-5.
* Select an order from the **Favorites** list. First, clear your search term by selecting the "**X**" in the **Search** field, and then tap the device’s **Close Keyboard** button. The **Favorites** list is now redisplayed so that you can select orders from it.
* Select the **Back** button if you are finished selecting orders.
The Orders Summary is displayed with the new order(s) listed in the New Orders section.
### Adding a Free-Text Order
If you cannot find the order you want on your **Favorites** list, and you cannot find it using the **Search** option either, then you may be able to enter it as a free-text order. Depending on your system’s configuration, free text orders may be allowed for only certain types of orders. In addition, you can enter free-text orders only if your administrator has enabled this feature for you. Even if enabled, you should use free text orders only as a last resort, in those cases where you cannot find the order you need using the **Favorites** or **Search** option.
During the order entry process, you might see clinical decision support (CDS) alerts (see *[Reviewing Clinical Decision Support (CDS) Alerts](#reviewing-clinical-decision-support-cds-alerts)*). Alerts can provide clinical data or inform you of issues related to an order.
1. From the Orders Summary screen, select the **Add** button .
The Add New Orders screen is displayed.
2. Tap the **Search** button at the top of the screen to expand the **Search** field.
3. Type a word or phrase in the **Search** field and then select **Search** from the virtual keyboard.
All orders that are a potential match, excluding non-formulary medications, are displayed first. At the very bottom of the results list there is a free text entry called: "Free Text Order \[Your Search Phrase]."
* If you do not see the item you want in the results, you can scroll down and select the "Free Text Order \[Your Search Phrase]" entry now. Please note that the search phrase you entered will be used as the description of the order. Therefore, if it is not descriptive enough to be used as the free text order, you can re-type a more complete order description in the **Search** field, and then select the new resulting free text entry from the results (see also [Step 6](../enter_patient_data/enter-orders#adding-a-free-text-order) ). Once you select your free text entry, you are then required to select the type of order that you are entering, such as Lab, Medication, or Radiology (only order types that allow free text orders are shown as a choice). An order of the type that you selected is then created.
* If there are too many matches to look through, or if you want to see non-formulary medications, tap the filter heading ("**Show: All**"), and then select an order type to view only the results of that type.
For those order types that allow free text orders, an entry called "Free Text Order \[Your Search Phrase]" is included at the bottom of the list. If you do not see the item you want in the shorter results list, select the free text entry, and then select the type of order that you want to enter, such as Lab, Medication, or Radiology.
4. If necessary, complete any additional fields needed to place the order:
* If the order type for your free text entry contains specific fields that need to be completed, the Order Details screen is automatically displayed. Required fields are highlighted in pink with the text "This field is required." Complete any required fields and select **Back** .
* If the Order Details screen has a **Reason** or **Problem** field, see *[Adding a Reason (Diagnosis) to a New Order](#adding-a-reason-diagnosis-to-a-new-order)* for instructions on how to complete it.
* For lab or test orders, see also *[Requesting Notifications when Results are Available](../enter_patient_data/enter-orders#requesting-notifications-when-results-are-available)*.
* For medication orders, see also *[Specifying "Now" as the First Dose Time for a Medication Order](../enter_patient_data/enter-orders#specifying-"now"-as-the-first-dose-time-for-a-medication-order)*.
* If the order type for your free text entry does *not* contain specific fields that need to be completed, the Order Details screen is not displayed. However, if you want to modify the free text order by changing some of the detail fields or by entering a more descriptive name, you can still do so before you sign and submit it. See *[Modifying the Details of a New Order](../enter_patient_data/enter-orders#modifying-the-details-of-a-new-order)*.
After you finish filling out the Order Details screen, or if there were no details to fill out, the Add Orders search screen with the list of potential matches is redisplayed. The free text order you just created has a checkmark next to it to indicate that it is selected.
5. Take any of the actions below:
* Select another order from the list of matches.
* Search for a different order by selecting the "**X**" in the search field and then repeating steps 3-4.
* Select an order from the **Favorites** list. First, clear your search term by selecting the "**X**" in the **Search** field, and then tap the device’s **Close Keyboard** button. The **Favorites** list is now redisplayed so that you can select orders from it.
* Select the **Back** button if you are finished selecting orders.
The Orders Summary is displayed with the new order(s) listed in the New Orders section.
6. (Optional) If the name of the free text order is not descriptive enough, select the order to open the Order Details screen. Most free text orders contain text fields for a **Description** and/or **Instructions** that you can use to enter more information. Enter the necessary information and then select the **Back** button .
The Orders Summary is displayed with the modified free text order listed in the New Orders section.
### Adding Orders from an Order Set
Your organization may have created order sets for your use. An order set is a list of suggested orders for a particular procedure or diagnosis. You can quickly select some or all of the orders from the order set and enter them all at once. Only those order sets that your administrator has designated for use on handheld devices can be viewed on your mobile device.
There are two types of order sets:
* **Full Order Sets (or just "Order Sets")**: These are large order sets that contain many orders. Full order sets are commonly used when an entire suite of suggested lab, radiology, medication, nursing, or other orders is necessary for a particular procedure or diagnosis. Some of the orders may be selected by default, but you can also review and select additional orders from the order set.
* **Mini Order Sets**: These are small order sets that contain a limited number of orders (usually less than 10). Mini order sets are commonly used when there are multiple orders that make up a single treatment and the organization wants all of the orders within the order set to be automatically selected by default when the user chooses the order set. When a user chooses the mini order set, the order set screen is not displayed; instead, all of the orders within the mini order set are automatically selected for the user.
Mini order sets can be selected in several ways:
* Mini order sets can be selected from the **Favorites** list, or after performing an **Order Search** for one. When selected in this manner, all of the orders from the mini order set are automatically added to the **New Orders** list on the Orders Summary.
* Mini order sets can also be selected from within a full order set. If the full order set contains an Order Search item, the user can select that item and then perform a search for a mini order set. When selected in this manner, all of the orders from the mini order set are automatically added to the larger order set.
During the order entry process, you might see clinical decision support (CDS) alerts (see *[Reviewing Clinical Decision Support (CDS) Alerts](#reviewing-clinical-decision-support-cds-alerts)*). After tapping **Sign/Submit**, you might see alerts about drug, disease, or allergy interactions, or duplicate orders (see *[Reviewing Interaction and Duplicate Order Alerts](../enter_patient_data/enter-orders#reviewing-interaction-and-duplicate-order-alerts)*). Alerts can provide clinical data or inform you of issues related to an order.
To use a full or mini order set:
1. From the Orders Summary screen, select the **Add** button .
The Add New Orders screen is displayed.
2. Select the order set using either method below:
* Select it from the Favorites list (see *[Adding an Order from the Favorites List](../enter_patient_data/enter-orders#adding-an-order-from-the-favorites-list)*)
* Search for it (see *[Searching for an Order to Add](../enter_patient_data/enter-orders#searching-for-an-order-to-add)*)
Your next steps depend on whether you selected a full or mini order set:
* If you selected a mini order set, you are done. The individual orders in that set are added to the **New Orders** section of the Order Summary. Select the **Back** button to view them and select **SIGN/SUBMIT**.
* If you selected a full order set, the Order Set screen displays. This screen lists all of the orders in the set, with a checkbox next to each. Proceed to Step 2 below.
3. Select some or all the orders listed in the order set.
* Scroll up or down to see all of the orders in the order set.
* Select the *checkbox* to the left of the order name to quickly select an order in the order set. The Order Details screen for that order displays automatically\* only if\* the order has CDS alerts or required fields that need to be completed, or if your administrator has configured the order to always display the Order Details screen for review purposes. Review any CDS alerts, fill in the required information, and then select **Back** to return to the order set screen.
* Select the order \*name \*to select an order and also view the Order Details screen, so that you can modify the details of the order. When the Order Details screen is displayed, make your changes and then select **Back** to return to the order set screen.
* One or more orders may already be pre-selected for you. Do not remove these orders as they are required to complete the order set. If any of the pre-selected orders have a red exclamation mark on the far right side of the order , it means that the order has CDS alerts or required fields that you need to complete. Select the order name to open the Order Details screen, review the alerts and/or fill in the required information, and then select **Back** to return to the order set screen.
* In some cases, when you select a particular order in the order set, one or more *additional* orders in the set are then also automatically selected for you. For example, there might be two or three items are always ordered together at your organization. If so, your administrator might set them up so that when you order one of the items (known as the "parent" order), the orders for the additional items (known as the "child" orders) are automatically selected for you. If you unselect a parent order, all of the child orders are unselected as well. Regardless of this automated selection/unselection feature, you can always select or unselect any child order individually.
* Some orders are *repeating* orders (repeating orders display the **Repeating** icon on the far right). Each time you select a repeating order, another new row for the same order is added to the order set screen, allowing you to enter the same type of order multiple times. For example, if a Physician Consult were set up as a repeating order, it would be listed once on the order set screen. As soon as you select it and enter an order for a consult with a particular physician, another (unselected) order for a Physician Consult is added to the order set screen. Now you can enter a second order for a Physician Consult with a different physician. In fact, you can enter as many Physician Consult orders as you need.
* Some items in the order set allow you to search for an order (search items display a **Search** icon to the left of the order name). For example, you might see an item called "Other Orders" or "Other Labs." When you select the item, a **Search** field is displayed. The field might be empty, allowing you to enter your own search term, or a search term might be automatically entered for you. Just search for the desired order (or mini order set) and select it. The Order Set screen is then redisplayed with the new order(s) listed.
* Use the **Expand** and **Collapse** icons next to any heading to expand or collapse sections of the order set. Some order sets are made up of combinations of other smaller order sets. For example, many admission order sets might contain a smaller "nested" order set for standard admission lab tests. If you select items from a nested order set, and then you collapse it, you are asked whether you want to keep or discard those items.
4. After you complete your selections, select the **Back** button at the top left corner of the order set screen.
The Orders Summary is displayed. All of the orders you selected from the order set are listed in the New Orders section. Each order is listed individually and now behaves as an individual order.
Any orders have a red exclamation mark on the far right side are pre-selected orders from the order set that have CDS alerts that you did not view or required fields that you did not complete. You cannot submit these until you review the alerts or complete the required fields. To do so, select each order to open the Order Details screen, review the alerts and/or complete the required fields, and then select the **Back** button to return to the Orders summary.
### Repeating an Existing Order
While reviewing a patient’s list of Existing Orders in the Orders module, you may decide that you want to repeat an order from that list. The easiest way to do this is to use the Order Again function.
Your system administrator determines which types of existing orders can be reordered. In most cases, all types of orders can be reordered, but your administrator may disallow reordering for some types (such as diet). If reordering is allowed for medication orders, then it also includes medications with additives/diluents.
During the order entry process, you might see clinical decision support (CDS) alerts (see *[Reviewing Clinical Decision Support (CDS) Alerts](#reviewing-clinical-decision-support-cds-alerts)*). After tapping **Sign/Submit**, you might see alerts about drug, disease, or allergy interactions or duplicate orders (see *[Reviewing Interaction and Duplicate Order Alerts](../enter_patient_data/enter-orders#reviewing-interaction-and-duplicate-order-alerts)*). Alerts can provide clinical data or inform you of issues related to an order.
1. From the Orders Summary screen, under the Existing Orders section, identify the order that you want to repeat, and then take either of the actions below:
* Select the order to open the Order Details screen, and then select the **Order Again** button at the top of the screen (if the **Order Again** button is not visible, select the **More** button and then choose **Order Again**).
* Tap *and hold* on the existing order’s row. When the action buttons appear at the top of the screen, select the **Order Again** button (if the **Order Again** button is not visible, select the **More** button and then choose **Order Again**).
2. If necessary, review CDS alerts or complete any additional fields needed to place the order:
* If the new order has CDS alerts or required fields that need to be completed, or if your administrator has configured the order to always display the Order Details screen for review purposes, the Order Details screen is now automatically displayed. CDS alerts are listed at the top in yellow, and required fields are highlighted in pink with the text "This field is required." Review the order’s details or CDS alerts, make any necessary adjustments, complete any required fields, and then select **Back** .
* If the Order Details screen has a **Reason** or **Problem** field, see *[Adding a Reason (Diagnosis) to a New Order](#adding-a-reason-diagnosis-to-a-new-order)* for instructions on how to complete it.
* For lab or test orders, see *[Requesting Notifications when Results are Available](../enter_patient_data/enter-orders#requesting-notifications-when-results-are-available)*.
* For medication orders, see *[Specifying "Now" as the First Dose Time for a Medication Order](../enter_patient_data/enter-orders#specifying-"now"-as-the-first-dose-time-for-a-medication-order)*.
* If the new order does *not* have CDS alerts or required fields, and your administrator has not configured it to always display for review, the Order Details screen is not displayed. However, if you want to modify the order by changing some of the detail fields, you can still do so before you sign and submit it. See *[Modifying the Details of a New Order](../enter_patient_data/enter-orders#modifying-the-details-of-a-new-order)*.
After you finish reviewing any CDS alerts and filling out the Order Details screen, or if there were no details to fill out, the Orders Summary is displayed with the new (repeated) order listed in the New Orders section.
### Repeating a Completed Lab Result or Test Result
While reviewing a patient’s clinical results in the Lab Results or Test Results module, you may decide that you want to repeat an item. You can easily place an order directly from the Lab Results or Test Results module.
Your system administrator determines which types of labs or tests can be ordered again. In most cases, all types can be reordered, but your administrator may disallow reordering for some types.
During the order entry process, you might see clinical decision support (CDS) alerts (see *[Reviewing Clinical Decision Support (CDS) Alerts](#reviewing-clinical-decision-support-cds-alerts)*). After tapping **Sign/Submit**, you might see alerts about drug, disease, or allergy interactions or duplicate orders (see *[Reviewing Interaction and Duplicate Order Alerts](../enter_patient_data/enter-orders#reviewing-interaction-and-duplicate-order-alerts)*). Alerts can provide clinical data or inform you of issues related to an order.
1. From the Summary screen of the Lab Results or Test Results module, select the lab result or test result that you want to repeat.
The Details screen for that item is displayed.
In the Lab Results module, you can repeat an entire panel, or just an individual component from a panel. To repeat an entire panel, perform Step 2 while viewing the Panel Details screen. To repeat a single component from a panel, perform Step 2 while you are viewing that component’s Details or Graph screen.
2. Select the **More** button and then choose **Order Again**.
The following message is displayed: "*Loading Order*."
* If an exact match is found for the item, it is automatically selected and the following message is displayed: "*The order has been added to the new orders list in CPOE. Please go to CPOE to sign and submit the order.*" Proceed to the next step.
* If an exact match is not found, the following message is displayed: "*Attention: The order could not be added to the new orders list. Please go to CPOE to add it.*" In this case, you must go to the Orders module to search for and add the order yourself. See *[Adding an Order](../enter_patient_data/enter-orders#adding-an-order)*.
3. Go to the Orders module (select **Back** , then the **Home Menu** , and then the **Orders** module).
The lab or test that you just reordered is listed in the New Orders section. Please note that if the new (repeated) order contains CDS alerts or required fields that need to be completed, it will show a with red exclamation mark on the New Orders list. Select the order to open the Order Details, review any alerts and complete any required fields, and then select **Back** to return to the Orders Summary.
* See also *[Requesting Notifications when Results are Available](../enter_patient_data/enter-orders#requesting-notifications-when-results-are-available)*.
4. Select **SIGN/SUBMIT** to submit the new order.
### Adding a Reason (Diagnosis) to a New Order
On the Order Details screen for some orders (such as radiology orders), you may be required to indicate the reason, or diagnosis, that supports why the patient needs the order. Depending on how the order has been defined by your administrator, as well as on the settings in your user profile, you may be able to do any of the following:
* Select one of the patient’s existing problems from their problem list, to use for this order
* Search for and select a new problem, that will be used for a) this order only, or b) this order and also added to the patient’s problem list
* Enter a free text problem, that will be used for a) this order only, or b) this order and also added to the patient’s problem list
To add a reason (diagnosis) to a new order:
1. While in the process of entering a new order, select the **Exam Diagnosis**, **Reason**, or **Problem** field (the label for the field may vary).
A diagnosis selection screen is displayed. If the patient has any existing problems, they are listed here.
2. Select the problem that you want to use for the order:
* **Use an existing problem**: Select a diagnosis from the patient’s list of Existing Problems.
* **Search for new problem**: Search for a new problem by typing in the **Search** field and then selecting the **Search** button. The **Search** field uses a medical vocabulary called Intelligent Medical Objects (IMO®) to provide an alternate set of diagnosis descriptions in the search results. IMO is a patient-centric terminology database that is licensed through Commure Pro and it provides extensive mappings of disease states to ICD-9 or ICD-10 codes and any applicable HCC codes. Search queries involving IMO terms show the most relevant 100 results based on their IMO ranking.
You can type a complete or partial ICD-9 code, ICD-10 code, SNOMED CT® code, or diagnosis description in the **Search** field. A list of all diagnoses that match your results is shown. Select the diagnosis that you want from the search results. You may now be presented with one or both of the pop-up options below:- ◊**Rule Out**: Select this option if the problem should be used for this order only. The words "Rule Out" will precede the problem description in all displays and print-outs for this order.
* **Add to Problem List**: Select this option if the problem should be used for this order, and also automatically added to the patient’s problem list.
* **Select the Free Text item**: Select the **Free Text** option. When you do so, you may be presented with one or both of the pop-up options below:
* **Rule Out**: Select this option to enter a free text problem that will be used for this order only. The words "Rule Out" are automatically entered in the diagnosis field for you; now just tap into the diagnosis field and type your free text problem after the words "Rule Out." Once you submit the order, "Rule Out" will precede the problem description in all displays and print-outs for this order.
* **Add to Problem List**: Select this option to enter a free text problem that will be used for this order, and also automatically added to the patient’s problem list. Next, tap into the diagnosis field and type the free text problem into the text field.
The problem is added to the **Order Details** window.
3. Select **Back** to save your order, and then select **SIGN/SUBMIT**.
The problem is saved for the order, and is also added to the patient’s problem list, if appropriate.
### Specifying "Now" as the First Dose Time for a Medication Order
Medication orders have several fields that determine the schedule for a patient’s medication:
* **Priority** (for example: Routine, STAT, Now)
* **Frequency** (for example: Daily, QAM, QPM, Q4H, etc.)
* **Start First Dose** (for example: In AM, Today, In (mins), etc.)
The values you select for these fields determine the medication start time, based on the organization’s scheduled administration times for the selected **Frequency**. In some cases, if the number of hours to the patient’s first scheduled dose is more than half the total number of hours between doses for the selected **Frequency**, you may see a warning message in red, as in this example: "*Next scheduled dose in 18 hours 15 mins (04/12 09:00 AM).*" For example, if medications with a **Frequency** of "Daily" are administered at 9:00 AM (24 hours between doses, 12 hours is half), and the current time is 3:00 PM, then it will be 18 hours until the patient’s first scheduled dose. Since 18 is more than 12, you would see the warning message.
In this case, if you prefer that the first dose be given *now*, then you can easily change the **Priority** to "Now," either on the Order Details screen, or right on the Orders Summary screen.
During the order entry process, you might see clinical decision support (CDS) alerts (see *[Reviewing Clinical Decision Support (CDS) Alerts](#reviewing-clinical-decision-support-cds-alerts)*). After tapping **Sign/Submit**, you might see alerts about drug, disease, or allergy interactions or duplicate orders (see *[Reviewing Interaction and Duplicate Order Alerts](../enter_patient_data/enter-orders#reviewing-interaction-and-duplicate-order-alerts)*). Alerts can provide clinical data or inform you of issues related to an order.
1. Enter a new order for the patient using any of the standard methods:
* *[Adding an Order from the Favorites List](../enter_patient_data/enter-orders#adding-an-order-from-the-favorites-list)*
* *[Searching for an Order to Add](../enter_patient_data/enter-orders#searching-for-an-order-to-add)*
* *[Adding a Free-Text Order](../enter_patient_data/enter-orders#adding-a-free-text-order)*
* *[Adding Orders from an Order Set](../enter_patient_data/enter-orders#adding-orders-from-an-order-set)*
* *[Repeating an Existing Order](../enter_patient_data/enter-orders#repeating-an-existing-order)*
2. After selecting the order using any of the above methods, the Order Details screen may be displayed:
* If the Order Details screen is displayed after you select the order:
1. Review any CDS alerts that are displayed.
2. Review the **Priority**, **Start First Dose**, and **Frequency** fields, and make any changes as necessary.
3. If the number of hours to the patient’s first scheduled dose is more than half the total number of hours between doses (based on the **Frequency** that you selected), you may see the following message is displayed in the **Priority** field: "*Next scheduled dose in nn hours nn mins (mm/dd hh:mm AM/PM).*"
4. If you want the first dose to be given now, tap the **Priority** field and select "Now."
5. Select the **Back** button twice to close the Order Details and return to the Orders Summary screen.
6. Sign and submit the order as normal (see *[Signing and Submitting an Order](../enter_patient_data/enter-orders#signing-and-submitting-an-order)*).
* If the Order Details screen is *not* displayed after you select the order:
3. On the Orders Summary screen, locate the order on the New Orders list. If the number of hours to the patient’s first scheduled dose is more than half the total number of hours between doses (based on the **Frequency** that you selected), you may see the following message displayed below the order name: "*Next scheduled dose in nn hours nn mins (mm/dd hh:mm AM/PM). Give First Dose Now?*" A **NOW** button is also shown to the right of the red message.
All orders that are a potential match, excluding non-formulary medications, are displayed.
4. If there are too many matches to look through, or if you want to see non-formulary medications, tap the filter heading ("**Show: All**").
A list of categories is displayed, each indicating the number of matching orders in that category. You can select a category to view only the matches in that category, and then select an order from the shorter list.
5. Select an order from the list of matches.
6. If necessary, review CDS alerts or complete any additional fields needed to place the order:
* If the new order has CDS alerts or required fields that need to be completed, or if your administrator has configured the order to always display the Order Details screen for review purposes, the Order Details screen is now automatically displayed. CDS alerts are listed at the top in yellow, and required fields are highlighted in pink with the text "This field is required." Review the order’s details or CDS alerts, make any necessary adjustments, complete any required fields, and then select **Back** .
* If the Order Details screen has a **Reason** or **Problem** field, see *[Adding a Reason (Diagnosis) to a New Order](#adding-a-reason-diagnosis-to-a-new-order)* for instructions on how to complete it.
* For lab or test orders, see *[Requesting Notifications when Results are Available](../enter_patient_data/enter-orders#requesting-notifications-when-results-are-available)*.
* For medication orders, see *[Specifying "Now" as the First Dose Time for a Medication Order](../enter_patient_data/enter-orders#specifying-"now"-as-the-first-dose-time-for-a-medication-order)*.
* If the new order does *not* have CDS alerts or required fields, and your administrator has not configured it to always display for review, the Order Details screen is not displayed. However, if you want to modify the order by changing some of the detail fields, you can still do so before you sign and submit it. See *[Modifying the Details of a New Order](../enter_patient_data/enter-orders#modifying-the-details-of-a-new-order)*.
After you finish reviewing any CDS alerts and filling out the Order Details screen, or if there were no details to fill out, the Add New Orders screen with the **Favorites** list is redisplayed. The order you just selected has a checkmark next to it to indicate that it is selected.
7. Take any of the actions below:
* Select another order from the list of matches.
* Search for a different order by selecting the "**X**" in the **Search** field and then repeating steps 3-5.
* Select an order from the **Favorites** list. First, clear your search term by selecting the "**X**" in the **Search** field, and then tap the device’s **Close Keyboard** button. The **Favorites** list is now redisplayed so that you can select orders from it.
* Select the **Back** button if you are finished selecting orders.
The Orders Summary is displayed with the new order(s) listed in the New Orders section.
### Adding a Free-Text Order
If you cannot find the order you want on your **Favorites** list, and you cannot find it using the **Search** option either, then you may be able to enter it as a free-text order. Depending on your system’s configuration, free text orders may be allowed for only certain types of orders. In addition, you can enter free-text orders only if your administrator has enabled this feature for you. Even if enabled, you should use free text orders only as a last resort, in those cases where you cannot find the order you need using the **Favorites** or **Search** option.
During the order entry process, you might see clinical decision support (CDS) alerts (see *[Reviewing Clinical Decision Support (CDS) Alerts](#reviewing-clinical-decision-support-cds-alerts)*). Alerts can provide clinical data or inform you of issues related to an order.
1. From the Orders Summary screen, select the **Add** button .
The Add New Orders screen is displayed.
2. Tap the **Search** button at the top of the screen to expand the **Search** field.
3. Type a word or phrase in the **Search** field and then select **Search** from the virtual keyboard.
All orders that are a potential match, excluding non-formulary medications, are displayed first. At the very bottom of the results list there is a free text entry called: "Free Text Order \[Your Search Phrase]."
* If you do not see the item you want in the results, you can scroll down and select the "Free Text Order \[Your Search Phrase]" entry now. Please note that the search phrase you entered will be used as the description of the order. Therefore, if it is not descriptive enough to be used as the free text order, you can re-type a more complete order description in the **Search** field, and then select the new resulting free text entry from the results (see also [Step 6](../enter_patient_data/enter-orders#adding-a-free-text-order) ). Once you select your free text entry, you are then required to select the type of order that you are entering, such as Lab, Medication, or Radiology (only order types that allow free text orders are shown as a choice). An order of the type that you selected is then created.
* If there are too many matches to look through, or if you want to see non-formulary medications, tap the filter heading ("**Show: All**"), and then select an order type to view only the results of that type.
For those order types that allow free text orders, an entry called "Free Text Order \[Your Search Phrase]" is included at the bottom of the list. If you do not see the item you want in the shorter results list, select the free text entry, and then select the type of order that you want to enter, such as Lab, Medication, or Radiology.
4. If necessary, complete any additional fields needed to place the order:
* If the order type for your free text entry contains specific fields that need to be completed, the Order Details screen is automatically displayed. Required fields are highlighted in pink with the text "This field is required." Complete any required fields and select **Back** .
* If the Order Details screen has a **Reason** or **Problem** field, see *[Adding a Reason (Diagnosis) to a New Order](#adding-a-reason-diagnosis-to-a-new-order)* for instructions on how to complete it.
* For lab or test orders, see also *[Requesting Notifications when Results are Available](../enter_patient_data/enter-orders#requesting-notifications-when-results-are-available)*.
* For medication orders, see also *[Specifying "Now" as the First Dose Time for a Medication Order](../enter_patient_data/enter-orders#specifying-"now"-as-the-first-dose-time-for-a-medication-order)*.
* If the order type for your free text entry does *not* contain specific fields that need to be completed, the Order Details screen is not displayed. However, if you want to modify the free text order by changing some of the detail fields or by entering a more descriptive name, you can still do so before you sign and submit it. See *[Modifying the Details of a New Order](../enter_patient_data/enter-orders#modifying-the-details-of-a-new-order)*.
After you finish filling out the Order Details screen, or if there were no details to fill out, the Add Orders search screen with the list of potential matches is redisplayed. The free text order you just created has a checkmark next to it to indicate that it is selected.
5. Take any of the actions below:
* Select another order from the list of matches.
* Search for a different order by selecting the "**X**" in the search field and then repeating steps 3-4.
* Select an order from the **Favorites** list. First, clear your search term by selecting the "**X**" in the **Search** field, and then tap the device’s **Close Keyboard** button. The **Favorites** list is now redisplayed so that you can select orders from it.
* Select the **Back** button if you are finished selecting orders.
The Orders Summary is displayed with the new order(s) listed in the New Orders section.
6. (Optional) If the name of the free text order is not descriptive enough, select the order to open the Order Details screen. Most free text orders contain text fields for a **Description** and/or **Instructions** that you can use to enter more information. Enter the necessary information and then select the **Back** button .
The Orders Summary is displayed with the modified free text order listed in the New Orders section.
### Adding Orders from an Order Set
Your organization may have created order sets for your use. An order set is a list of suggested orders for a particular procedure or diagnosis. You can quickly select some or all of the orders from the order set and enter them all at once. Only those order sets that your administrator has designated for use on handheld devices can be viewed on your mobile device.
There are two types of order sets:
* **Full Order Sets (or just "Order Sets")**: These are large order sets that contain many orders. Full order sets are commonly used when an entire suite of suggested lab, radiology, medication, nursing, or other orders is necessary for a particular procedure or diagnosis. Some of the orders may be selected by default, but you can also review and select additional orders from the order set.
* **Mini Order Sets**: These are small order sets that contain a limited number of orders (usually less than 10). Mini order sets are commonly used when there are multiple orders that make up a single treatment and the organization wants all of the orders within the order set to be automatically selected by default when the user chooses the order set. When a user chooses the mini order set, the order set screen is not displayed; instead, all of the orders within the mini order set are automatically selected for the user.
Mini order sets can be selected in several ways:
* Mini order sets can be selected from the **Favorites** list, or after performing an **Order Search** for one. When selected in this manner, all of the orders from the mini order set are automatically added to the **New Orders** list on the Orders Summary.
* Mini order sets can also be selected from within a full order set. If the full order set contains an Order Search item, the user can select that item and then perform a search for a mini order set. When selected in this manner, all of the orders from the mini order set are automatically added to the larger order set.
During the order entry process, you might see clinical decision support (CDS) alerts (see *[Reviewing Clinical Decision Support (CDS) Alerts](#reviewing-clinical-decision-support-cds-alerts)*). After tapping **Sign/Submit**, you might see alerts about drug, disease, or allergy interactions, or duplicate orders (see *[Reviewing Interaction and Duplicate Order Alerts](../enter_patient_data/enter-orders#reviewing-interaction-and-duplicate-order-alerts)*). Alerts can provide clinical data or inform you of issues related to an order.
To use a full or mini order set:
1. From the Orders Summary screen, select the **Add** button .
The Add New Orders screen is displayed.
2. Select the order set using either method below:
* Select it from the Favorites list (see *[Adding an Order from the Favorites List](../enter_patient_data/enter-orders#adding-an-order-from-the-favorites-list)*)
* Search for it (see *[Searching for an Order to Add](../enter_patient_data/enter-orders#searching-for-an-order-to-add)*)
Your next steps depend on whether you selected a full or mini order set:
* If you selected a mini order set, you are done. The individual orders in that set are added to the **New Orders** section of the Order Summary. Select the **Back** button to view them and select **SIGN/SUBMIT**.
* If you selected a full order set, the Order Set screen displays. This screen lists all of the orders in the set, with a checkbox next to each. Proceed to Step 2 below.
3. Select some or all the orders listed in the order set.
* Scroll up or down to see all of the orders in the order set.
* Select the *checkbox* to the left of the order name to quickly select an order in the order set. The Order Details screen for that order displays automatically\* only if\* the order has CDS alerts or required fields that need to be completed, or if your administrator has configured the order to always display the Order Details screen for review purposes. Review any CDS alerts, fill in the required information, and then select **Back** to return to the order set screen.
* Select the order \*name \*to select an order and also view the Order Details screen, so that you can modify the details of the order. When the Order Details screen is displayed, make your changes and then select **Back** to return to the order set screen.
* One or more orders may already be pre-selected for you. Do not remove these orders as they are required to complete the order set. If any of the pre-selected orders have a red exclamation mark on the far right side of the order , it means that the order has CDS alerts or required fields that you need to complete. Select the order name to open the Order Details screen, review the alerts and/or fill in the required information, and then select **Back** to return to the order set screen.
* In some cases, when you select a particular order in the order set, one or more *additional* orders in the set are then also automatically selected for you. For example, there might be two or three items are always ordered together at your organization. If so, your administrator might set them up so that when you order one of the items (known as the "parent" order), the orders for the additional items (known as the "child" orders) are automatically selected for you. If you unselect a parent order, all of the child orders are unselected as well. Regardless of this automated selection/unselection feature, you can always select or unselect any child order individually.
* Some orders are *repeating* orders (repeating orders display the **Repeating** icon on the far right). Each time you select a repeating order, another new row for the same order is added to the order set screen, allowing you to enter the same type of order multiple times. For example, if a Physician Consult were set up as a repeating order, it would be listed once on the order set screen. As soon as you select it and enter an order for a consult with a particular physician, another (unselected) order for a Physician Consult is added to the order set screen. Now you can enter a second order for a Physician Consult with a different physician. In fact, you can enter as many Physician Consult orders as you need.
* Some items in the order set allow you to search for an order (search items display a **Search** icon to the left of the order name). For example, you might see an item called "Other Orders" or "Other Labs." When you select the item, a **Search** field is displayed. The field might be empty, allowing you to enter your own search term, or a search term might be automatically entered for you. Just search for the desired order (or mini order set) and select it. The Order Set screen is then redisplayed with the new order(s) listed.
* Use the **Expand** and **Collapse** icons next to any heading to expand or collapse sections of the order set. Some order sets are made up of combinations of other smaller order sets. For example, many admission order sets might contain a smaller "nested" order set for standard admission lab tests. If you select items from a nested order set, and then you collapse it, you are asked whether you want to keep or discard those items.
4. After you complete your selections, select the **Back** button at the top left corner of the order set screen.
The Orders Summary is displayed. All of the orders you selected from the order set are listed in the New Orders section. Each order is listed individually and now behaves as an individual order.
Any orders have a red exclamation mark on the far right side are pre-selected orders from the order set that have CDS alerts that you did not view or required fields that you did not complete. You cannot submit these until you review the alerts or complete the required fields. To do so, select each order to open the Order Details screen, review the alerts and/or complete the required fields, and then select the **Back** button to return to the Orders summary.
### Repeating an Existing Order
While reviewing a patient’s list of Existing Orders in the Orders module, you may decide that you want to repeat an order from that list. The easiest way to do this is to use the Order Again function.
Your system administrator determines which types of existing orders can be reordered. In most cases, all types of orders can be reordered, but your administrator may disallow reordering for some types (such as diet). If reordering is allowed for medication orders, then it also includes medications with additives/diluents.
During the order entry process, you might see clinical decision support (CDS) alerts (see *[Reviewing Clinical Decision Support (CDS) Alerts](#reviewing-clinical-decision-support-cds-alerts)*). After tapping **Sign/Submit**, you might see alerts about drug, disease, or allergy interactions or duplicate orders (see *[Reviewing Interaction and Duplicate Order Alerts](../enter_patient_data/enter-orders#reviewing-interaction-and-duplicate-order-alerts)*). Alerts can provide clinical data or inform you of issues related to an order.
1. From the Orders Summary screen, under the Existing Orders section, identify the order that you want to repeat, and then take either of the actions below:
* Select the order to open the Order Details screen, and then select the **Order Again** button at the top of the screen (if the **Order Again** button is not visible, select the **More** button and then choose **Order Again**).
* Tap *and hold* on the existing order’s row. When the action buttons appear at the top of the screen, select the **Order Again** button (if the **Order Again** button is not visible, select the **More** button and then choose **Order Again**).
2. If necessary, review CDS alerts or complete any additional fields needed to place the order:
* If the new order has CDS alerts or required fields that need to be completed, or if your administrator has configured the order to always display the Order Details screen for review purposes, the Order Details screen is now automatically displayed. CDS alerts are listed at the top in yellow, and required fields are highlighted in pink with the text "This field is required." Review the order’s details or CDS alerts, make any necessary adjustments, complete any required fields, and then select **Back** .
* If the Order Details screen has a **Reason** or **Problem** field, see *[Adding a Reason (Diagnosis) to a New Order](#adding-a-reason-diagnosis-to-a-new-order)* for instructions on how to complete it.
* For lab or test orders, see *[Requesting Notifications when Results are Available](../enter_patient_data/enter-orders#requesting-notifications-when-results-are-available)*.
* For medication orders, see *[Specifying "Now" as the First Dose Time for a Medication Order](../enter_patient_data/enter-orders#specifying-"now"-as-the-first-dose-time-for-a-medication-order)*.
* If the new order does *not* have CDS alerts or required fields, and your administrator has not configured it to always display for review, the Order Details screen is not displayed. However, if you want to modify the order by changing some of the detail fields, you can still do so before you sign and submit it. See *[Modifying the Details of a New Order](../enter_patient_data/enter-orders#modifying-the-details-of-a-new-order)*.
After you finish reviewing any CDS alerts and filling out the Order Details screen, or if there were no details to fill out, the Orders Summary is displayed with the new (repeated) order listed in the New Orders section.
### Repeating a Completed Lab Result or Test Result
While reviewing a patient’s clinical results in the Lab Results or Test Results module, you may decide that you want to repeat an item. You can easily place an order directly from the Lab Results or Test Results module.
Your system administrator determines which types of labs or tests can be ordered again. In most cases, all types can be reordered, but your administrator may disallow reordering for some types.
During the order entry process, you might see clinical decision support (CDS) alerts (see *[Reviewing Clinical Decision Support (CDS) Alerts](#reviewing-clinical-decision-support-cds-alerts)*). After tapping **Sign/Submit**, you might see alerts about drug, disease, or allergy interactions or duplicate orders (see *[Reviewing Interaction and Duplicate Order Alerts](../enter_patient_data/enter-orders#reviewing-interaction-and-duplicate-order-alerts)*). Alerts can provide clinical data or inform you of issues related to an order.
1. From the Summary screen of the Lab Results or Test Results module, select the lab result or test result that you want to repeat.
The Details screen for that item is displayed.
In the Lab Results module, you can repeat an entire panel, or just an individual component from a panel. To repeat an entire panel, perform Step 2 while viewing the Panel Details screen. To repeat a single component from a panel, perform Step 2 while you are viewing that component’s Details or Graph screen.
2. Select the **More** button and then choose **Order Again**.
The following message is displayed: "*Loading Order*."
* If an exact match is found for the item, it is automatically selected and the following message is displayed: "*The order has been added to the new orders list in CPOE. Please go to CPOE to sign and submit the order.*" Proceed to the next step.
* If an exact match is not found, the following message is displayed: "*Attention: The order could not be added to the new orders list. Please go to CPOE to add it.*" In this case, you must go to the Orders module to search for and add the order yourself. See *[Adding an Order](../enter_patient_data/enter-orders#adding-an-order)*.
3. Go to the Orders module (select **Back** , then the **Home Menu** , and then the **Orders** module).
The lab or test that you just reordered is listed in the New Orders section. Please note that if the new (repeated) order contains CDS alerts or required fields that need to be completed, it will show a with red exclamation mark on the New Orders list. Select the order to open the Order Details, review any alerts and complete any required fields, and then select **Back** to return to the Orders Summary.
* See also *[Requesting Notifications when Results are Available](../enter_patient_data/enter-orders#requesting-notifications-when-results-are-available)*.
4. Select **SIGN/SUBMIT** to submit the new order.
### Adding a Reason (Diagnosis) to a New Order
On the Order Details screen for some orders (such as radiology orders), you may be required to indicate the reason, or diagnosis, that supports why the patient needs the order. Depending on how the order has been defined by your administrator, as well as on the settings in your user profile, you may be able to do any of the following:
* Select one of the patient’s existing problems from their problem list, to use for this order
* Search for and select a new problem, that will be used for a) this order only, or b) this order and also added to the patient’s problem list
* Enter a free text problem, that will be used for a) this order only, or b) this order and also added to the patient’s problem list
To add a reason (diagnosis) to a new order:
1. While in the process of entering a new order, select the **Exam Diagnosis**, **Reason**, or **Problem** field (the label for the field may vary).
A diagnosis selection screen is displayed. If the patient has any existing problems, they are listed here.
2. Select the problem that you want to use for the order:
* **Use an existing problem**: Select a diagnosis from the patient’s list of Existing Problems.
* **Search for new problem**: Search for a new problem by typing in the **Search** field and then selecting the **Search** button. The **Search** field uses a medical vocabulary called Intelligent Medical Objects (IMO®) to provide an alternate set of diagnosis descriptions in the search results. IMO is a patient-centric terminology database that is licensed through Commure Pro and it provides extensive mappings of disease states to ICD-9 or ICD-10 codes and any applicable HCC codes. Search queries involving IMO terms show the most relevant 100 results based on their IMO ranking.
You can type a complete or partial ICD-9 code, ICD-10 code, SNOMED CT® code, or diagnosis description in the **Search** field. A list of all diagnoses that match your results is shown. Select the diagnosis that you want from the search results. You may now be presented with one or both of the pop-up options below:- ◊**Rule Out**: Select this option if the problem should be used for this order only. The words "Rule Out" will precede the problem description in all displays and print-outs for this order.
* **Add to Problem List**: Select this option if the problem should be used for this order, and also automatically added to the patient’s problem list.
* **Select the Free Text item**: Select the **Free Text** option. When you do so, you may be presented with one or both of the pop-up options below:
* **Rule Out**: Select this option to enter a free text problem that will be used for this order only. The words "Rule Out" are automatically entered in the diagnosis field for you; now just tap into the diagnosis field and type your free text problem after the words "Rule Out." Once you submit the order, "Rule Out" will precede the problem description in all displays and print-outs for this order.
* **Add to Problem List**: Select this option to enter a free text problem that will be used for this order, and also automatically added to the patient’s problem list. Next, tap into the diagnosis field and type the free text problem into the text field.
The problem is added to the **Order Details** window.
3. Select **Back** to save your order, and then select **SIGN/SUBMIT**.
The problem is saved for the order, and is also added to the patient’s problem list, if appropriate.
### Specifying "Now" as the First Dose Time for a Medication Order
Medication orders have several fields that determine the schedule for a patient’s medication:
* **Priority** (for example: Routine, STAT, Now)
* **Frequency** (for example: Daily, QAM, QPM, Q4H, etc.)
* **Start First Dose** (for example: In AM, Today, In (mins), etc.)
The values you select for these fields determine the medication start time, based on the organization’s scheduled administration times for the selected **Frequency**. In some cases, if the number of hours to the patient’s first scheduled dose is more than half the total number of hours between doses for the selected **Frequency**, you may see a warning message in red, as in this example: "*Next scheduled dose in 18 hours 15 mins (04/12 09:00 AM).*" For example, if medications with a **Frequency** of "Daily" are administered at 9:00 AM (24 hours between doses, 12 hours is half), and the current time is 3:00 PM, then it will be 18 hours until the patient’s first scheduled dose. Since 18 is more than 12, you would see the warning message.
In this case, if you prefer that the first dose be given *now*, then you can easily change the **Priority** to "Now," either on the Order Details screen, or right on the Orders Summary screen.
During the order entry process, you might see clinical decision support (CDS) alerts (see *[Reviewing Clinical Decision Support (CDS) Alerts](#reviewing-clinical-decision-support-cds-alerts)*). After tapping **Sign/Submit**, you might see alerts about drug, disease, or allergy interactions or duplicate orders (see *[Reviewing Interaction and Duplicate Order Alerts](../enter_patient_data/enter-orders#reviewing-interaction-and-duplicate-order-alerts)*). Alerts can provide clinical data or inform you of issues related to an order.
1. Enter a new order for the patient using any of the standard methods:
* *[Adding an Order from the Favorites List](../enter_patient_data/enter-orders#adding-an-order-from-the-favorites-list)*
* *[Searching for an Order to Add](../enter_patient_data/enter-orders#searching-for-an-order-to-add)*
* *[Adding a Free-Text Order](../enter_patient_data/enter-orders#adding-a-free-text-order)*
* *[Adding Orders from an Order Set](../enter_patient_data/enter-orders#adding-orders-from-an-order-set)*
* *[Repeating an Existing Order](../enter_patient_data/enter-orders#repeating-an-existing-order)*
2. After selecting the order using any of the above methods, the Order Details screen may be displayed:
* If the Order Details screen is displayed after you select the order:
1. Review any CDS alerts that are displayed.
2. Review the **Priority**, **Start First Dose**, and **Frequency** fields, and make any changes as necessary.
3. If the number of hours to the patient’s first scheduled dose is more than half the total number of hours between doses (based on the **Frequency** that you selected), you may see the following message is displayed in the **Priority** field: "*Next scheduled dose in nn hours nn mins (mm/dd hh:mm AM/PM).*"
4. If you want the first dose to be given now, tap the **Priority** field and select "Now."
5. Select the **Back** button twice to close the Order Details and return to the Orders Summary screen.
6. Sign and submit the order as normal (see *[Signing and Submitting an Order](../enter_patient_data/enter-orders#signing-and-submitting-an-order)*).
* If the Order Details screen is *not* displayed after you select the order:
3. On the Orders Summary screen, locate the order on the New Orders list. If the number of hours to the patient’s first scheduled dose is more than half the total number of hours between doses (based on the **Frequency** that you selected), you may see the following message displayed below the order name: "*Next scheduled dose in nn hours nn mins (mm/dd hh:mm AM/PM). Give First Dose Now?*" A **NOW** button is also shown to the right of the red message.
 2\. If you want the first dose to be given now, select the **NOW** button.
3\. Sign and submit the order as normal (see *[Signing and Submitting an Order](../enter_patient_data/enter-orders#signing-and-submitting-an-order)*).
The order is submitted with a **Priority** of "Now."
### Requesting Notifications when Results are Available
You can request a notification when the results are available for a specific lab or test that you ordered for a specific patient. This feature is available only if implemented by your organization, and only for certain types of orders, as configured by your system administrator. When you place the patient’s order, simply indicate that you want to be notified when the results are available.
During the order entry process, you might see clinical decision support (CDS) alerts (see *[Reviewing Clinical Decision Support (CDS) Alerts](#reviewing-clinical-decision-support-cds-alerts)*). After tapping **Sign/Submit**, you might see alerts about drug, disease, or allergy interactions or duplicate orders (see *[Reviewing Interaction and Duplicate Order Alerts](../enter_patient_data/enter-orders#reviewing-interaction-and-duplicate-order-alerts)*). Alerts can provide clinical data or inform you of issues related to an order.
1. Enter a new order for the patient using any of the standard methods:
* *[Adding an Order from the Favorites List](../enter_patient_data/enter-orders#adding-an-order-from-the-favorites-list)*
* *[Searching for an Order to Add](../enter_patient_data/enter-orders#searching-for-an-order-to-add)*
* *[Adding a Free-Text Order](../enter_patient_data/enter-orders#adding-a-free-text-order)*
* *[Adding Orders from an Order Set](../enter_patient_data/enter-orders#adding-orders-from-an-order-set)*
* *[Repeating an Existing Order](../enter_patient_data/enter-orders#repeating-an-existing-order)*
* *[Repeating a Completed Lab Result or Test Result](../enter_patient_data/enter-orders#repeating-a-completed-lab-result-or-test-result)*
2. After selecting the order using any of the above methods, the Order Details screen may be displayed:
* If the Order Details screen is displayed after you select the order:
1. Review any CDS alerts that are displayed.
2. Select the **Notify when order resulted** checkbox at the bottom of the Order Details screen.
3. Select the **Back** button twice to close the Order Details and return to the Orders Summary screen.
4. Sign and submit the order as normal (see *[Signing and Submitting an Order](../enter_patient_data/enter-orders#signing-and-submitting-an-order)*).
* If the Order Details screen is *not* displayed after you select the order:
1. On the Orders Summary screen, select the order from the New Orders list to open the Order Details screen.
2. Review any CDS alerts that are displayed.
3. Select the **Notify when order resulted** checkbox at the bottom of the Order Details screen.
4. Select the **Back** button to return to the Orders Summary screen.
5. Sign and submit the order as normal (see *[Signing and Submitting an Order](../enter_patient_data/enter-orders#signing-and-submitting-an-order)*).
When the lab or test results are ready, a New Results notification is sent to your device. You can tap the notification to open the Commure Pro Messaging module and view the result. See *[Viewing and Responding to Unread Messages or New Result Notifications](../communicate/commure-pro-messaging#viewing-and-responding-to-unread-messages-or-new-result-notifications)* for more information.
## Signing and Submitting an Order
As you select new orders or make other changes (such as renewing, holding, resuming, ordering again, or discontinuing), they are added to the patient’s list of new orders, which are displayed at the top of the Orders Summary screen, in the New Orders section. The patient’s new orders continue to accumulate on this list and are not submitted to the server until you select the **SIGN/SUBMIT** button.
The **SIGN/SUBMIT** button is disabled if there are any orders in the New Orders section that have a red exclamation mark . This icon indicates that the new order either has required fields that are not completed, or clinical decision support (CDS) alerts that are not yet viewed. Tap on the new order to open the Order Details screen and complete the required fields or view the alerts. When you return to the Orders summary, the red exclamation icon is removed and the **SIGN/SUBMIT** button becomes enabled again. See *[Reviewing Clinical Decision Support (CDS) Alerts](#reviewing-clinical-decision-support-cds-alerts)* for more information.
After you select the **SIGN/SUBMIT** button, you may be required to enter your Commure Pro password or a numeric PIN (Personal Identification Number). Or, if Fingerprint Authentication has been set up on your device (see *[Establishing Fingerprint Authentication for Logging In or Signing Orders](../get_started/logging-in-and-out#establishing-fingerprint-authentication-for-logging-in-or-signing-orders)*), and has also been enabled by your administrator, you can use your fingerprint to sign your orders instead of a manually entering a password or PIN.
Depending on how your administrator has configured the system, any one of the following scenarios may apply:
* You are *never* required to enter a password or PIN (or to use Fingerprint Authentication) after you select the **SIGN/SUBMIT** button .
* You *are* required to enter a password or PIN the first and every time that you select the **SIGN/SUBMIT** button. If the Fingerprint Authentication feature is enabled on your device, after you enter your password or PIN the first time, you are then prompted to use the fingerprint feature (instead of password or PIN) each time you select the **SIGN/SUBMIT** button.
* You *are* required to enter a password or PIN the first time you select the **SIGN/SUBMIT** button, and then the application "remembers" your this information for subsequent submissions in the same session. You are not required to enter it again unless you have a period of inactivity (no new order submissions) that is longer than a specific period of time defined by your administrator. Again, if the Fingerprint Authentication feature is enabled on your device, after you enter your password or PIN the first time, you are then prompted to use the fingerprint feature (instead of password or PIN) whenever you have a period of inactivity that is longer than the defined time.
You are not required to re-enter your password or PIN (or to use Fingerprint Authentication) when resubmitting after viewing or resolving an alert about an interaction or duplicate order.
* In addition, your administrator may require you to enter the name of a provider who can co-sign the orders for you. This feature can be enabled for all orders, or just certain types.
To sign and submit all your new orders for a given patient, follow the steps below.
1. On the Orders Summary screen, if any orders in the New Orders list have a red exclamation mark , tap on the new order to open the Order Details screen, and then complete any required fields or review any CDS alerts. Then tap **Back** to return to the Orders Summary.
The red exclamation icon is removed and the **SIGN/SUBMIT** button becomes enabled.
2. Select the **SIGN/SUBMIT** button , located at the bottom of the New Orders section.
3. If an additional password, PIN, or co-signing provider are required, one or more of the screens below is displayed. Complete each screen as follows, depending on what it requires:
* **Manual Entry of Password or PIN**: Manually enter your password or PIN.
* **Manual Entry of Password or PIN, plus Co-Signing Provider**: Manually enter your password or PIN, and then enter the name of the co-signing provider (select their name from the **Recently Used** list or use the SEARCH ON SERVER... option). If only one provider can co-sign for you, that name is defaulted into the field for you.
* **Fingerprint Authentication in place of Password or PIN**: When the "*Confirm fingerprint to continue (touch sensor)*" message is displayed, just press your finger lightly on the fingerprint sensor to register your fingerprint and immediately sign your orders. (To enable Fingerprint Authentication, see *[Establishing Fingerprint Authentication for Logging In or Signing Orders](../get_started/logging-in-and-out#establishing-fingerprint-authentication-for-logging-in-or-signing-orders)*.)
If you prefer to use your password or PIN instead of your fingerprint, or if your fingerprint is not accepted (as might happen if your finger is damp or dirty), you can select **USE PASSWORD** or **USE PIN** and then sign using your password or PIN instead.
If you change your password or PIN, the next time you attempt to submit an order, you are prompted to manually enter your new password or PIN on the Signature screen one time. After that, Fingerprint Authentication can be used successfully again.
* **Co-Signing Provider**: If a password or PIN are not required, or if you used Fingerprint Authentication in place of manually entering the password or PIN, you may next see a dialog asking for the name of the co-signing provider. Select their name from the **Recently Used** list or use the SEARCH ON SERVER... option. If only one provider can co-sign for you, that name is defaulted into the field for you.
Each of the patient’s new orders are now checked for interactions or duplicates.
* If none are found, the order is submitted to the server and moves to the Existing Orders section. If you were required to enter a co-signing provider, the orders are then routed to the co-signing provider for signature, and they are also added to the patient’s Existing Orders list.
When orders are routed to a co-signing provider, they are routed as either a printed order sheet or made available in whatever system your facility uses for managing order deficiencies, depending on how your system is configured. In some cases, the order deficiency system may then route the order to Commure Pro’s eSignature application for the co-signing provider. Contact your Commure Pro representative to implement the eSignature workflow, as this requires work by the Commure Pro Integrations team.
* If the order would cause an interaction or is a duplicate, an alert describing the issue is displayed. You can correct the issue and submit again, or you can discard the order. See *[Reviewing Interaction and Duplicate Order Alerts](../enter_patient_data/enter-orders#reviewing-interaction-and-duplicate-order-alerts)*.
If your device does not have connectivity at the time you select the **SIGN/SUBMIT** button , the orders are not submitted and remain on your device in the New Orders section. See *[Understanding Unsubmitted Orders](../enter_patient_data/enter-orders#understanding-unsubmitted-orders)*.
### Understanding Unsubmitted Orders
A patient’s new and changed orders accumulate in the New Orders section until you sign and submit them. If your device is not connected to the server at the time that you select the **SIGN/SUBMIT** button, or if you exit the Orders module without selecting the **SIGN/SUBMIT** button, the new orders are not submitted. The orders remain on your device as long as you do not discard them. There are multiple safeguards in place to ensure that you do not forget to submit these orders. Please note that in all cases below, the application notifies you about only those new unsubmitted orders that you created on *this* mobile device. Unsubmitted orders that you created on a different mobile device or on the desktop CPOE application are not included.
* **Yellow Caution Symbol**: When one or more patients on your patient list have an unsubmitted order, a yellow exclamation mark overlays the **Patient List** button. To highlight the *specific* patients that have unsubmitted orders, a yellow exclamation mark is also displayed next to the patient’s name on the Patient List. Or when viewing the **Home** screen for that patient, the same yellow exclamation mark overlays the **Orders** icon. You can submit the orders when you are ready, by going to the Orders module for that patient and selecting the **SIGN/SUBMIT** button . Or, if you decide you do not want to submit the orders after all, you can select the **More** button and then choose **Discard All** to discard all the new unsubmitted orders.
2\. If you want the first dose to be given now, select the **NOW** button.
3\. Sign and submit the order as normal (see *[Signing and Submitting an Order](../enter_patient_data/enter-orders#signing-and-submitting-an-order)*).
The order is submitted with a **Priority** of "Now."
### Requesting Notifications when Results are Available
You can request a notification when the results are available for a specific lab or test that you ordered for a specific patient. This feature is available only if implemented by your organization, and only for certain types of orders, as configured by your system administrator. When you place the patient’s order, simply indicate that you want to be notified when the results are available.
During the order entry process, you might see clinical decision support (CDS) alerts (see *[Reviewing Clinical Decision Support (CDS) Alerts](#reviewing-clinical-decision-support-cds-alerts)*). After tapping **Sign/Submit**, you might see alerts about drug, disease, or allergy interactions or duplicate orders (see *[Reviewing Interaction and Duplicate Order Alerts](../enter_patient_data/enter-orders#reviewing-interaction-and-duplicate-order-alerts)*). Alerts can provide clinical data or inform you of issues related to an order.
1. Enter a new order for the patient using any of the standard methods:
* *[Adding an Order from the Favorites List](../enter_patient_data/enter-orders#adding-an-order-from-the-favorites-list)*
* *[Searching for an Order to Add](../enter_patient_data/enter-orders#searching-for-an-order-to-add)*
* *[Adding a Free-Text Order](../enter_patient_data/enter-orders#adding-a-free-text-order)*
* *[Adding Orders from an Order Set](../enter_patient_data/enter-orders#adding-orders-from-an-order-set)*
* *[Repeating an Existing Order](../enter_patient_data/enter-orders#repeating-an-existing-order)*
* *[Repeating a Completed Lab Result or Test Result](../enter_patient_data/enter-orders#repeating-a-completed-lab-result-or-test-result)*
2. After selecting the order using any of the above methods, the Order Details screen may be displayed:
* If the Order Details screen is displayed after you select the order:
1. Review any CDS alerts that are displayed.
2. Select the **Notify when order resulted** checkbox at the bottom of the Order Details screen.
3. Select the **Back** button twice to close the Order Details and return to the Orders Summary screen.
4. Sign and submit the order as normal (see *[Signing and Submitting an Order](../enter_patient_data/enter-orders#signing-and-submitting-an-order)*).
* If the Order Details screen is *not* displayed after you select the order:
1. On the Orders Summary screen, select the order from the New Orders list to open the Order Details screen.
2. Review any CDS alerts that are displayed.
3. Select the **Notify when order resulted** checkbox at the bottom of the Order Details screen.
4. Select the **Back** button to return to the Orders Summary screen.
5. Sign and submit the order as normal (see *[Signing and Submitting an Order](../enter_patient_data/enter-orders#signing-and-submitting-an-order)*).
When the lab or test results are ready, a New Results notification is sent to your device. You can tap the notification to open the Commure Pro Messaging module and view the result. See *[Viewing and Responding to Unread Messages or New Result Notifications](../communicate/commure-pro-messaging#viewing-and-responding-to-unread-messages-or-new-result-notifications)* for more information.
## Signing and Submitting an Order
As you select new orders or make other changes (such as renewing, holding, resuming, ordering again, or discontinuing), they are added to the patient’s list of new orders, which are displayed at the top of the Orders Summary screen, in the New Orders section. The patient’s new orders continue to accumulate on this list and are not submitted to the server until you select the **SIGN/SUBMIT** button.
The **SIGN/SUBMIT** button is disabled if there are any orders in the New Orders section that have a red exclamation mark . This icon indicates that the new order either has required fields that are not completed, or clinical decision support (CDS) alerts that are not yet viewed. Tap on the new order to open the Order Details screen and complete the required fields or view the alerts. When you return to the Orders summary, the red exclamation icon is removed and the **SIGN/SUBMIT** button becomes enabled again. See *[Reviewing Clinical Decision Support (CDS) Alerts](#reviewing-clinical-decision-support-cds-alerts)* for more information.
After you select the **SIGN/SUBMIT** button, you may be required to enter your Commure Pro password or a numeric PIN (Personal Identification Number). Or, if Fingerprint Authentication has been set up on your device (see *[Establishing Fingerprint Authentication for Logging In or Signing Orders](../get_started/logging-in-and-out#establishing-fingerprint-authentication-for-logging-in-or-signing-orders)*), and has also been enabled by your administrator, you can use your fingerprint to sign your orders instead of a manually entering a password or PIN.
Depending on how your administrator has configured the system, any one of the following scenarios may apply:
* You are *never* required to enter a password or PIN (or to use Fingerprint Authentication) after you select the **SIGN/SUBMIT** button .
* You *are* required to enter a password or PIN the first and every time that you select the **SIGN/SUBMIT** button. If the Fingerprint Authentication feature is enabled on your device, after you enter your password or PIN the first time, you are then prompted to use the fingerprint feature (instead of password or PIN) each time you select the **SIGN/SUBMIT** button.
* You *are* required to enter a password or PIN the first time you select the **SIGN/SUBMIT** button, and then the application "remembers" your this information for subsequent submissions in the same session. You are not required to enter it again unless you have a period of inactivity (no new order submissions) that is longer than a specific period of time defined by your administrator. Again, if the Fingerprint Authentication feature is enabled on your device, after you enter your password or PIN the first time, you are then prompted to use the fingerprint feature (instead of password or PIN) whenever you have a period of inactivity that is longer than the defined time.
You are not required to re-enter your password or PIN (or to use Fingerprint Authentication) when resubmitting after viewing or resolving an alert about an interaction or duplicate order.
* In addition, your administrator may require you to enter the name of a provider who can co-sign the orders for you. This feature can be enabled for all orders, or just certain types.
To sign and submit all your new orders for a given patient, follow the steps below.
1. On the Orders Summary screen, if any orders in the New Orders list have a red exclamation mark , tap on the new order to open the Order Details screen, and then complete any required fields or review any CDS alerts. Then tap **Back** to return to the Orders Summary.
The red exclamation icon is removed and the **SIGN/SUBMIT** button becomes enabled.
2. Select the **SIGN/SUBMIT** button , located at the bottom of the New Orders section.
3. If an additional password, PIN, or co-signing provider are required, one or more of the screens below is displayed. Complete each screen as follows, depending on what it requires:
* **Manual Entry of Password or PIN**: Manually enter your password or PIN.
* **Manual Entry of Password or PIN, plus Co-Signing Provider**: Manually enter your password or PIN, and then enter the name of the co-signing provider (select their name from the **Recently Used** list or use the SEARCH ON SERVER... option). If only one provider can co-sign for you, that name is defaulted into the field for you.
* **Fingerprint Authentication in place of Password or PIN**: When the "*Confirm fingerprint to continue (touch sensor)*" message is displayed, just press your finger lightly on the fingerprint sensor to register your fingerprint and immediately sign your orders. (To enable Fingerprint Authentication, see *[Establishing Fingerprint Authentication for Logging In or Signing Orders](../get_started/logging-in-and-out#establishing-fingerprint-authentication-for-logging-in-or-signing-orders)*.)
If you prefer to use your password or PIN instead of your fingerprint, or if your fingerprint is not accepted (as might happen if your finger is damp or dirty), you can select **USE PASSWORD** or **USE PIN** and then sign using your password or PIN instead.
If you change your password or PIN, the next time you attempt to submit an order, you are prompted to manually enter your new password or PIN on the Signature screen one time. After that, Fingerprint Authentication can be used successfully again.
* **Co-Signing Provider**: If a password or PIN are not required, or if you used Fingerprint Authentication in place of manually entering the password or PIN, you may next see a dialog asking for the name of the co-signing provider. Select their name from the **Recently Used** list or use the SEARCH ON SERVER... option. If only one provider can co-sign for you, that name is defaulted into the field for you.
Each of the patient’s new orders are now checked for interactions or duplicates.
* If none are found, the order is submitted to the server and moves to the Existing Orders section. If you were required to enter a co-signing provider, the orders are then routed to the co-signing provider for signature, and they are also added to the patient’s Existing Orders list.
When orders are routed to a co-signing provider, they are routed as either a printed order sheet or made available in whatever system your facility uses for managing order deficiencies, depending on how your system is configured. In some cases, the order deficiency system may then route the order to Commure Pro’s eSignature application for the co-signing provider. Contact your Commure Pro representative to implement the eSignature workflow, as this requires work by the Commure Pro Integrations team.
* If the order would cause an interaction or is a duplicate, an alert describing the issue is displayed. You can correct the issue and submit again, or you can discard the order. See *[Reviewing Interaction and Duplicate Order Alerts](../enter_patient_data/enter-orders#reviewing-interaction-and-duplicate-order-alerts)*.
If your device does not have connectivity at the time you select the **SIGN/SUBMIT** button , the orders are not submitted and remain on your device in the New Orders section. See *[Understanding Unsubmitted Orders](../enter_patient_data/enter-orders#understanding-unsubmitted-orders)*.
### Understanding Unsubmitted Orders
A patient’s new and changed orders accumulate in the New Orders section until you sign and submit them. If your device is not connected to the server at the time that you select the **SIGN/SUBMIT** button, or if you exit the Orders module without selecting the **SIGN/SUBMIT** button, the new orders are not submitted. The orders remain on your device as long as you do not discard them. There are multiple safeguards in place to ensure that you do not forget to submit these orders. Please note that in all cases below, the application notifies you about only those new unsubmitted orders that you created on *this* mobile device. Unsubmitted orders that you created on a different mobile device or on the desktop CPOE application are not included.
* **Yellow Caution Symbol**: When one or more patients on your patient list have an unsubmitted order, a yellow exclamation mark overlays the **Patient List** button. To highlight the *specific* patients that have unsubmitted orders, a yellow exclamation mark is also displayed next to the patient’s name on the Patient List. Or when viewing the **Home** screen for that patient, the same yellow exclamation mark overlays the **Orders** icon. You can submit the orders when you are ready, by going to the Orders module for that patient and selecting the **SIGN/SUBMIT** button . Or, if you decide you do not want to submit the orders after all, you can select the **More** button and then choose **Discard All** to discard all the new unsubmitted orders.
 * **System Notification**: A notification stating "*Commure Pro: You have n unsubmitted order(s)*" is displayed in the system notifications list if any of the following occur while you have unsubmitted orders on the device: if the Commure Pro application times out, if you press the device’s **Home** button to switch to a different application, if you log out and keep the orders (as described in the previous bullet), or if you shut down the Commure Pro application entirely. In all cases, you can tap the notification to launch the Commure Pro application, and as described above, the patients with unsubmitted orders will be flagged with the yellow icon so that you can quickly identify them and address their orders. Or you can ignore the notification; the notification and the unsubmitted orders will remain on the device (flagged with the yellow icon until you log back in again and either submit or discard them.
* **Badge on Commure Pro App Icon**: If you log out of Commure Pro while you still have unsubmitted orders, a badge displays on the **Commure Pro** application icon, as in this example: . Depending on your device, the badge may appear as a solid dot, or as a dot with a number in the middle.
Badge display is supported with Android OS version 8 and higher.
## Managing New and Existing Orders
From the Orders Summary screen, you can take a variety of actions to manage a patient’s orders. The actions that are allowed for a given order are based on its status (new or existing) as well as the actions that your administrator has enabled for each type of order. Allowed actions include:
* *[Changing the Visit for a New Order](../enter_patient_data/enter-orders#changing-the-visit-for-a-new-order)*
* *[Modifying the Details of a New Order](../enter_patient_data/enter-orders#modifying-the-details-of-a-new-order)*
* *[Discarding or Deleting New Orders](../enter_patient_data/enter-orders#discarding-or-deleting-new-orders)*
* *[Modifying the Details of an Existing Medication Order](../enter_patient_data/enter-orders#modifying-the-details-of-an-existing-medication-order)*
* *[Renewing an Expiring Medication Order](../enter_patient_data/enter-orders#renewing-an-expiring-medication-order)*
* *[Reordering an Existing Order](../enter_patient_data/enter-orders#reordering-an-existing-order)*
* *[Discontinuing an Existing Order](../enter_patient_data/enter-orders#discontinuing-an-existing-order)*
* *[Holding an Existing Active Medication Order](../enter_patient_data/enter-orders#holding-an-existing-active-medication-order)*
* *[Changing or Canceling a Future Hold on a Medication](../enter_patient_data/enter-orders#changing-or-canceling-a-future-hold-on-a-medication)*
* *[Resuming a Held Medication Order](../enter_patient_data/enter-orders#resuming-a-held-medication-order)*
* *[Undoing Changes to Orders](../enter_patient_data/enter-orders#undoing-changes-to-orders)*
The Order Again, Hold, Resume, Renew, and Discontinue functions may only be used with existing orders having the same set of order definitions from the same facility group. A facility group, which can consist of one or more facilities such as a hospital, has its own distinct set of order definitions that are only shared by its facilities. An order from one facility group (Facility Group A) will not match an order in a different facility group (Facility Group B). However, facilities within a Facility Group can share a set of order definitions.
For example, if your organization has multiple hospitals and designates each hospital as a facility group with its own distinct set of order definitions and you have privileges to more than one hospital, you cannot use the Order Again, Hold, Resume, Renew, or Discontinue functions for an order that your patient had during a visit at a Hospital A (part of Facility Group A with its own set of order definitions) for your patient’s visit in Hospital B (part of Facility Group B with a different set of order definitions).
### Changing the Visit for a New Order
When you first access the Orders module, the patient’s current visit is automatically selected to be associated with any new orders that you enter. In most cases, you never need to change the visit that is automatically selected. However, you can change the visit if necessary, such as might be the case when placing orders against a future visit, or when a patient is transitioning from the emergency room to an inpatient status. When changing the visit, take note of the following:
* You are not allowed to enter new orders against a past visit, one that is discharged, or one that is in a facility that is not enabled for CPOE.
* If you change the visit after you have already entered some new orders (but before signing and submitting them), a warning message alerts you to the fact that the new orders will be discarded and must be re-entered.
Please note that if two visits have the same account number (also known as the financial number), they are treated as a single visit in the Orders module. For example, if a patient were transitioning from the emergency room to an inpatient status, both an emergency room visit and an inpatient visit might exist for the patient. In this example, the inpatient visit would be considered as the "current visit," since it has the most recent admission date.
* If both visits have the *same* account number, then only the "current visit" (the inpatient visit in this example) will be available when the user taps the **Visits** button at the top of the Orders Summary. In addition, all orders from both the emergency room visit and the inpatient visit will be listed together in the **Existing Orders** section.
* If the two visits have *different* account numbers, then both of the visits will be available when the user taps the **Visits** button at the top of the Orders Summary. In addition, the orders for each visit will be listed separately. The orders for the currently selected visit will be listed first in the **Existing Orders** section, and the orders for the other visit will be listed next under an **Existing Orders for Other Visits** heading.
To change the visit for new orders, follow the steps below.
1. On the Orders Summary screen, at the top of the screen, select the **Visit** drop-down that shows the type of visit and the visit date.
If the patient has more than one active visit, a list of the patient’s active visits is displayed.
2. Select the visit with which you want to associate your new orders.
The Orders Summary is redisplayed, with the orders for the visit that you selected shown first, in the **Existing Orders** section. If the patient has orders associated with any other visits, they are shown next under an **Existing Orders for Other Visits** heading.
3. (Optional) You can expand or collapse the **Existing Orders** or the **Existing Orders for Other Visits** sections as desired using the **Expand** or **Collapse** icons to the left of the headings.
### Modifying the Details of a New Order
You can modify any of the details on a newly entered order, as long you have not yet signed and submitted it.
When modifying a new order, you might see clinical decision support (CDS) alerts (see *[Reviewing Clinical Decision Support (CDS) Alerts](#reviewing-clinical-decision-support-cds-alerts)*). After tapping **Sign/Submit**, you might see alerts about drug, disease, or allergy interactions or duplicate orders (see *[Reviewing Interaction and Duplicate Order Alerts](../enter_patient_data/enter-orders#reviewing-interaction-and-duplicate-order-alerts)*). Alerts can provide clinical data or inform you of issues related to an order.
1. On the Orders Summary screen, under the New Orders section, select the order that you want to modify.
The Order Details screen is displayed.
2. Change the value for any of the details fields for the selected order.
* For a free text order, you might want to enter a more descriptive name in the **Description** field.
* For medication orders, if you change the **Priority**, **Frequency**, or **Start First Dose** fields such that the number of hours to the patient’s first scheduled dose is more than half the total number of hours between doses (based on the **Frequency** that you selected), you may see the following message displayed in the **Priority** field: "*Next scheduled dose in nn hours nn mins (mm/dd hh:mm AM/PM).*" If you want the first dose to be given now, tap the **Priority** field and select "Now."
* For lab or test orders, if you wish to be notified when the results are ready, select the Notify when order resulted checkbox at the bottom of the Order Details screen. See *[Viewing and Responding to Unread Messages or New Result Notifications](../communicate/commure-pro-messaging#viewing-and-responding-to-unread-messages-or-new-result-notifications)*.
* If any CDS alerts are applicable, they are listed at the top of the screen in yellow.
* Required fields are highlighted in pink with the text "This field is required."
3. Select **Back** to save your changes and go back to the Orders Summary (or select the **More** button and choose **Discard Changes** to close the Order Details without saving your changes).
The order is saved and is redisplayed on the Orders Summary.
4. Select **SIGN/SUBMIT**.
The new order with its changes is submitted to the server.
### Discarding or Deleting New Orders
If you enter one or more new orders in error, you can delete them, as long as you have not yet signed and submitted them. You can open the Order Details to review an order before deleting it, or just delete it directly from the Orders Summary. You can delete new orders individually, or you can delete all of your new orders at once. Instructions for all workflows are listed below.
Once you have signed and submitted an order, it can no longer be deleted. Instead, you must discontinue it. See *[Discontinuing an Existing Order](../enter_patient_data/enter-orders#discontinuing-an-existing-order)*.
When deleting orders, you might see clinical decision support (CDS) alerts (see *[Reviewing Clinical Decision Support (CDS) Alerts](#reviewing-clinical-decision-support-cds-alerts)*). Alerts can provide clinical data or inform you of issues related to an order.
To delete an individual new order:
* On the Orders Summary screen, under the New Orders section, identify the order that you want to delete, and then take either of the actions below:
* Select the new order that you want to delete. When the Order Details screen opens, review the details and any CDS alerts. If you still want to delete the order, select the **Delete** button , located at the top of the screen.
* Tap *and hold* on that order’s row. When the action buttons appear at the top of the Orders Summary screen, select the **Delete** button .
The order is deleted and no longer displays in the New Orders section.
To delete (discard) all new orders:
* On the Orders Summary screen, select the More button\*\*\*\* and choose the **Discard All** option.
All of the new orders are discarded and no longer display in the New Orders section.
### Modifying the Details of an Existing Medication Order
Once an order has been signed and submitted, and has moved to the Existing Orders section, you cannot make modifications to it. The only possible exception to this rule is medication orders. You can modify an existing medication order if:
* Your system administrator has enabled the Modify workflow for medication orders. The Modify function is not available for any other type of order (such as Labs or Radiology). If modifications are allowed for medication orders, then it also includes orders with additives/diluents.
* The medication order is still active (you cannot modify a medication order that is complete, or no longer active).
To modify an existing medication order from the Orders module:
When modifying an existing medication order, you might see clinical decision support (CDS) alerts (see *[Reviewing Clinical Decision Support (CDS) Alerts](#reviewing-clinical-decision-support-cds-alerts)*). After tapping **Sign/Submit**, you might see alerts about drug, disease, or allergy interactions or duplicate orders (see *[Reviewing Interaction and Duplicate Order Alerts](../enter_patient_data/enter-orders#reviewing-interaction-and-duplicate-order-alerts)*). Alerts can provide clinical data or inform you of issues related to an order.
1. On the Orders Summary screen, identify the order you want modify under the Existing Orders section, and then take either of the actions below:
* Select the medication order to open the Order Details screen, and then select the **Modify** button at the top of the screen to get into edit mode (if the **Modify** button is not visible, select the **More** button and then choose **Modify**).
* Tap *and hold* on the medication order’s row. When the action buttons appear at the top of the Orders Summary screen, select the **Modify** button (if the **Modify** button is not visible, select the **More** button and then choose **Modify**).
The Modify Order screen is displayed.
2. Change the value for any of the detail fields for the selected order.
* If any CDS alerts are applicable, they are listed at the top of the screen in yellow.
* Required fields are highlighted in pink with the text "This field is required."
* If you change the **Priority**, **Frequency**, or **Start First Dose** fields such that the number of hours to the patient’s first or next scheduled dose is more than half the total number of hours between doses (based on the **Frequency** that you selected), you may see the following message displayed in the **Priority** field: "*Next scheduled dose in nn hours nn mins (mm/dd hh:mm AM/PM).*" If you want the first or next dose to be given now, tap the **Priority** field and select "Now."
If a patient receives a dose of the medication between the time you choose "Now" and actually submit the order, you are warned of this fact and given an opportunity to modify the order so that you can change the Priority.
3. Select **Back** to save your changes and go back to the Orders Summary. (Or select the **More** button and choose **Discard Changes** to close the Order Details without saving your changes.)
Your changes are saved and the Orders Summary screen is displayed with two items listed under the New Orders section: a discontinue for the original order (shown with a line struck through the order description), and a new order containing your modifications.
4. Select **SIGN/SUBMIT** .
Both items are submitted to the server.
### Renewing an Expiring Medication Order
If a patient has expiring medication orders that need to be renewed, they are displayed at the top of the Existing Orders section on the Orders Summary. Each expiring medication order has a comment in red text that states the date that the order is expiring (for example: "Expires Tomorrow at 11:00 AM"). The amount of time in advance that you are notified of the expiring orders is based on your system’s configuration.
You can **Renew** an expiring medication order if your system has been configured to allow this. Check with your system administrator to see if this functionality is enabled. The Renew function is not available for any other type of order (such as Labs or Radiology).
When renewing an expiring medication order, you might see clinical decision support (CDS) alerts (see *[Reviewing Clinical Decision Support (CDS) Alerts](#reviewing-clinical-decision-support-cds-alerts)*). After tapping **Sign/Submit**, you might see alerts about drug, disease, or allergy interactions or duplicate orders (see *[Reviewing Interaction and Duplicate Order Alerts](../enter_patient_data/enter-orders#reviewing-interaction-and-duplicate-order-alerts)*). Alerts can provide clinical data or inform you of issues related to an order.
To renew an expiring medication order from the Orders module:
1. Under the Existing Orders section, identify the expiring medication that you want to renew and then take either of the actions below:
* Select the medication order to open the Order Details screen, and then select the **Renew** button at the top of the screen (if the **Renew** button is not visible, select the **More** button and then choose **Renew**).
* Tap *and hold* on the medication order’s row. When the action buttons appear at the top of the Orders Summary screen, select the **Renew** button (if the **Renew** button is not visible, select the **More** button and then choose **Renew**).
The Order Details screen is displayed. If any CDS alerts are applicable, they are listed at the top of the screen in yellow.
2. Enter the number of days to renew the medication in the **Renew for** field, and then select **Back** to save your changes and go back to the Orders Summary.
The Orders Summary is re-displayed and the renewal order is listed in the New Orders section. The words "**RENEW for n days:**" precedes the order description, where "n" is the number of days for which the order is to be renewed.
3. Select **SIGN/SUBMIT** .
The renewal is submitted to the server. The order is moved from the New Orders section to the Existing Orders section.
### Reordering an Existing Order
While reviewing a patient’s list of Existing Orders on the Orders Summary, you may decide that you want to repeat (reorder) an item from that list. For instructions, see *[Repeating an Existing Order](../enter_patient_data/enter-orders#repeating-an-existing-order)*.
### Discontinuing an Existing Order
After reviewing a patient’s list of Existing Orders on the Orders Summary, you may decide that you want to discontinue one or more of them. You can discontinue an order if:
* Your system administrator has allowed the Discontinue workflow for the type of order that you want to discontinue. In most cases, your administrator will allow discontinues for all types of existing orders. However, they can disable discontinues for certain types of existing orders, if your organization’s workflow requires it. If discontinues are allowed for medication orders, then it also includes orders with additives/diluents.
* The existing order that you want to discontinue is for the same visit that is currently selected for the order session.
Additionally, all active orders can be *automatically* discontinued for patients upon their discharge, if enabled by your organization. If the discharge is canceled, all orders that were automatically discontinued upon discharge will be automatically re-activated.
When discontinuing IV medication orders, both the base medication and any additives or diluents are discontinued.
There is no discontinue function for new unsubmitted orders. Instead, you can cancel a new order that has not yet been signed and submitted, by simply deleting it. See *[Discarding or Deleting New Orders](../enter_patient_data/enter-orders#discarding-or-deleting-new-orders)*.
When discontinuing orders, you might see clinical decision support (CDS) alerts (see *[Reviewing Clinical Decision Support (CDS) Alerts](#reviewing-clinical-decision-support-cds-alerts)*). Alerts can provide clinical data or inform you of issues related to an order.
To discontinue an existing order from the Orders module:
1. Under the Existing Orders section, identify the order that you want to discontinue, and then take either of the actions below:
* Select the existing order to open the Order Details screen, and then select the **DC** button at the top of the screen (if the **DC** button is not visible, select the **More** button and then choose **DC**).
* Tap *and hold* on the existing order’s row. When the action buttons appear at the top of the Orders Summary screen, select the **DC** button (if the **DC** button is not visible, select the **More** button and then choose **DC**).
The Orders Summary is redisplayed and the discontinued order is listed under the New Orders section. It is shown with a line struck through the order description.
2. (Optional) Enter a reason for discontinuing the order, if necessary:
1. On the Orders Summary, select the discontinued medication order listed in the New Orders section.
The Order Details screen opens.- b. Enter a reason in the **Reason for Discontinue** field, and then select **Back** to go back to the Orders Summary.
The Orders Summary is redisplayed, showing the discontinued medication order in the New Orders section, with the **DC Reason** listed at the end of the description.
3. Select **SIGN/SUBMIT** .
The discontinue is submitted to the server. The order is moved from the New Orders section to the Existing Orders section, and is now displayed with a line struck through the order description.
### Holding an Existing Active Medication Order
You may be able to **Hold** (and **Resume**) existing active Medication orders, if your system administrator has enabled this feature. The Hold and Resume functions are not available for any other type of order (such as Labs or Radiology).
When holding orders, you might see clinical decision support (CDS) alerts (see *[Reviewing Clinical Decision Support (CDS) Alerts](#reviewing-clinical-decision-support-cds-alerts)*). Alerts can provide clinical data or inform you of issues related to an order.
To hold an existing active medication order from the Orders module:
1. In the Orders module, under the Existing Orders section of the Orders Summary, identify the medication order that you want to hold and then take either of the actions below:
* Select the existing medication order to open the Order Details screen, and then select the **Hold** button at the top of the screen (if the **Hold** button is not visible, select the **More** button and then choose **Hold**).
* Tap *and hold* on the existing medication order’s row. When the action buttons appear at the top of the Orders Summary screen, select the **Hold** button (if the **Hold** button is not visible, select the **More** button and then choose **Hold**).
The **Hold Order** screen is displayed.
2. Complete the fields below.
Some fields may be required. If so, they are highlighted in pink with the text "This field is required."
* **Hold Reason**: Enter the reason for holding the medication.
* **Hold Date/Time**: If the hold should start immediately, enter the current date and time in the **Hold Date/Time** field. If the hold should start in the future, enter the future date and time that the hold should begin.
* **Resume Date/Time**: Enter the date that the medication administration should resume.
3. Select **Back** to go back to the Orders Summary.
The Orders Summary is re-displayed and the held order is listed in the New Orders section. The words "**HOLD:**" or "**FUTURE HOLD:**" precede the order description, depending on whether the hold is to begin immediately or in the future. This is followed by the **Hold Reason** and **Resume Date/Time** (if any).
4. Select **SIGN/SUBMIT** .
The hold is submitted to the server. The order is moved from the New Orders section to the Existing Orders section.
### Changing or Canceling a Future Hold on a Medication
If a future hold for an order has not begun, you can change the future hold date and time or cancel the future hold entirely.
When changing or canceling a future hold, you might see clinical decision support (CDS) alerts (see *[Reviewing Clinical Decision Support (CDS) Alerts](#reviewing-clinical-decision-support-cds-alerts)*). Alerts can provide clinical data or inform you of issues related to an order.
To change or cancel a future hold on a medication order from the Orders module:
1. In the Orders module, under the Existing Orders section of the Orders Summary, identify the medication order that is on future hold and then take either of the actions below:
* Select the existing medication order to open the Order Details screen, and then select the **Hold** button at the top of the screen (if the **Hold** button is not visible, select the **More** button and then choose **Hold**).
* Tap *and hold* on the existing medication order’s row. When the action buttons appear at the top of the Orders Summary screen, select the **Hold** button (if the **Hold** button is not visible, select the **More** button and then choose **Hold**).
The **Hold Order** screen is displayed.
2. Take one of the following steps:
* To change the date/time that the future hold should begin, modify the **Hold Date/Time** fields as needed.
* To cancel the future hold entirely, enter the same date and time in the **Hold Date/Time** fields and the **Resume Date/Time** fields.
3. Select **Back** to go back to the Orders Summary.
The Orders Summary screen is re-displayed and shows your changes to the held order.
4. Select **SIGN/SUBMIT** .
Your changes are submitted to the server.
### Resuming a Held Medication Order
You may be able to Resume a Medication order that is currently on **Hold**, if your system administrator has enabled this feature. The Resume function is not available for any other type of order (such as Labs or Radiology).
When resuming held orders, you might see clinical decision support (CDS) alerts (see *[Reviewing Clinical Decision Support (CDS) Alerts](#reviewing-clinical-decision-support-cds-alerts)*). After tapping **Sign/Submit**, you might see alerts about drug, disease, or allergy interactions or duplicate orders (see *[Reviewing Interaction and Duplicate Order Alerts](../enter_patient_data/enter-orders#reviewing-interaction-and-duplicate-order-alerts)*). Alerts can provide clinical data or inform you of issues related to an order.
To resume a held medication order from the Orders module:
1. In the Orders module, under the Existing Orders section of the Orders Summary, identify the held medication order that you want to resume and then take either of the actions below. (Medication orders that are on hold are preceded by this icon:.)
* **System Notification**: A notification stating "*Commure Pro: You have n unsubmitted order(s)*" is displayed in the system notifications list if any of the following occur while you have unsubmitted orders on the device: if the Commure Pro application times out, if you press the device’s **Home** button to switch to a different application, if you log out and keep the orders (as described in the previous bullet), or if you shut down the Commure Pro application entirely. In all cases, you can tap the notification to launch the Commure Pro application, and as described above, the patients with unsubmitted orders will be flagged with the yellow icon so that you can quickly identify them and address their orders. Or you can ignore the notification; the notification and the unsubmitted orders will remain on the device (flagged with the yellow icon until you log back in again and either submit or discard them.
* **Badge on Commure Pro App Icon**: If you log out of Commure Pro while you still have unsubmitted orders, a badge displays on the **Commure Pro** application icon, as in this example: . Depending on your device, the badge may appear as a solid dot, or as a dot with a number in the middle.
Badge display is supported with Android OS version 8 and higher.
## Managing New and Existing Orders
From the Orders Summary screen, you can take a variety of actions to manage a patient’s orders. The actions that are allowed for a given order are based on its status (new or existing) as well as the actions that your administrator has enabled for each type of order. Allowed actions include:
* *[Changing the Visit for a New Order](../enter_patient_data/enter-orders#changing-the-visit-for-a-new-order)*
* *[Modifying the Details of a New Order](../enter_patient_data/enter-orders#modifying-the-details-of-a-new-order)*
* *[Discarding or Deleting New Orders](../enter_patient_data/enter-orders#discarding-or-deleting-new-orders)*
* *[Modifying the Details of an Existing Medication Order](../enter_patient_data/enter-orders#modifying-the-details-of-an-existing-medication-order)*
* *[Renewing an Expiring Medication Order](../enter_patient_data/enter-orders#renewing-an-expiring-medication-order)*
* *[Reordering an Existing Order](../enter_patient_data/enter-orders#reordering-an-existing-order)*
* *[Discontinuing an Existing Order](../enter_patient_data/enter-orders#discontinuing-an-existing-order)*
* *[Holding an Existing Active Medication Order](../enter_patient_data/enter-orders#holding-an-existing-active-medication-order)*
* *[Changing or Canceling a Future Hold on a Medication](../enter_patient_data/enter-orders#changing-or-canceling-a-future-hold-on-a-medication)*
* *[Resuming a Held Medication Order](../enter_patient_data/enter-orders#resuming-a-held-medication-order)*
* *[Undoing Changes to Orders](../enter_patient_data/enter-orders#undoing-changes-to-orders)*
The Order Again, Hold, Resume, Renew, and Discontinue functions may only be used with existing orders having the same set of order definitions from the same facility group. A facility group, which can consist of one or more facilities such as a hospital, has its own distinct set of order definitions that are only shared by its facilities. An order from one facility group (Facility Group A) will not match an order in a different facility group (Facility Group B). However, facilities within a Facility Group can share a set of order definitions.
For example, if your organization has multiple hospitals and designates each hospital as a facility group with its own distinct set of order definitions and you have privileges to more than one hospital, you cannot use the Order Again, Hold, Resume, Renew, or Discontinue functions for an order that your patient had during a visit at a Hospital A (part of Facility Group A with its own set of order definitions) for your patient’s visit in Hospital B (part of Facility Group B with a different set of order definitions).
### Changing the Visit for a New Order
When you first access the Orders module, the patient’s current visit is automatically selected to be associated with any new orders that you enter. In most cases, you never need to change the visit that is automatically selected. However, you can change the visit if necessary, such as might be the case when placing orders against a future visit, or when a patient is transitioning from the emergency room to an inpatient status. When changing the visit, take note of the following:
* You are not allowed to enter new orders against a past visit, one that is discharged, or one that is in a facility that is not enabled for CPOE.
* If you change the visit after you have already entered some new orders (but before signing and submitting them), a warning message alerts you to the fact that the new orders will be discarded and must be re-entered.
Please note that if two visits have the same account number (also known as the financial number), they are treated as a single visit in the Orders module. For example, if a patient were transitioning from the emergency room to an inpatient status, both an emergency room visit and an inpatient visit might exist for the patient. In this example, the inpatient visit would be considered as the "current visit," since it has the most recent admission date.
* If both visits have the *same* account number, then only the "current visit" (the inpatient visit in this example) will be available when the user taps the **Visits** button at the top of the Orders Summary. In addition, all orders from both the emergency room visit and the inpatient visit will be listed together in the **Existing Orders** section.
* If the two visits have *different* account numbers, then both of the visits will be available when the user taps the **Visits** button at the top of the Orders Summary. In addition, the orders for each visit will be listed separately. The orders for the currently selected visit will be listed first in the **Existing Orders** section, and the orders for the other visit will be listed next under an **Existing Orders for Other Visits** heading.
To change the visit for new orders, follow the steps below.
1. On the Orders Summary screen, at the top of the screen, select the **Visit** drop-down that shows the type of visit and the visit date.
If the patient has more than one active visit, a list of the patient’s active visits is displayed.
2. Select the visit with which you want to associate your new orders.
The Orders Summary is redisplayed, with the orders for the visit that you selected shown first, in the **Existing Orders** section. If the patient has orders associated with any other visits, they are shown next under an **Existing Orders for Other Visits** heading.
3. (Optional) You can expand or collapse the **Existing Orders** or the **Existing Orders for Other Visits** sections as desired using the **Expand** or **Collapse** icons to the left of the headings.
### Modifying the Details of a New Order
You can modify any of the details on a newly entered order, as long you have not yet signed and submitted it.
When modifying a new order, you might see clinical decision support (CDS) alerts (see *[Reviewing Clinical Decision Support (CDS) Alerts](#reviewing-clinical-decision-support-cds-alerts)*). After tapping **Sign/Submit**, you might see alerts about drug, disease, or allergy interactions or duplicate orders (see *[Reviewing Interaction and Duplicate Order Alerts](../enter_patient_data/enter-orders#reviewing-interaction-and-duplicate-order-alerts)*). Alerts can provide clinical data or inform you of issues related to an order.
1. On the Orders Summary screen, under the New Orders section, select the order that you want to modify.
The Order Details screen is displayed.
2. Change the value for any of the details fields for the selected order.
* For a free text order, you might want to enter a more descriptive name in the **Description** field.
* For medication orders, if you change the **Priority**, **Frequency**, or **Start First Dose** fields such that the number of hours to the patient’s first scheduled dose is more than half the total number of hours between doses (based on the **Frequency** that you selected), you may see the following message displayed in the **Priority** field: "*Next scheduled dose in nn hours nn mins (mm/dd hh:mm AM/PM).*" If you want the first dose to be given now, tap the **Priority** field and select "Now."
* For lab or test orders, if you wish to be notified when the results are ready, select the Notify when order resulted checkbox at the bottom of the Order Details screen. See *[Viewing and Responding to Unread Messages or New Result Notifications](../communicate/commure-pro-messaging#viewing-and-responding-to-unread-messages-or-new-result-notifications)*.
* If any CDS alerts are applicable, they are listed at the top of the screen in yellow.
* Required fields are highlighted in pink with the text "This field is required."
3. Select **Back** to save your changes and go back to the Orders Summary (or select the **More** button and choose **Discard Changes** to close the Order Details without saving your changes).
The order is saved and is redisplayed on the Orders Summary.
4. Select **SIGN/SUBMIT**.
The new order with its changes is submitted to the server.
### Discarding or Deleting New Orders
If you enter one or more new orders in error, you can delete them, as long as you have not yet signed and submitted them. You can open the Order Details to review an order before deleting it, or just delete it directly from the Orders Summary. You can delete new orders individually, or you can delete all of your new orders at once. Instructions for all workflows are listed below.
Once you have signed and submitted an order, it can no longer be deleted. Instead, you must discontinue it. See *[Discontinuing an Existing Order](../enter_patient_data/enter-orders#discontinuing-an-existing-order)*.
When deleting orders, you might see clinical decision support (CDS) alerts (see *[Reviewing Clinical Decision Support (CDS) Alerts](#reviewing-clinical-decision-support-cds-alerts)*). Alerts can provide clinical data or inform you of issues related to an order.
To delete an individual new order:
* On the Orders Summary screen, under the New Orders section, identify the order that you want to delete, and then take either of the actions below:
* Select the new order that you want to delete. When the Order Details screen opens, review the details and any CDS alerts. If you still want to delete the order, select the **Delete** button , located at the top of the screen.
* Tap *and hold* on that order’s row. When the action buttons appear at the top of the Orders Summary screen, select the **Delete** button .
The order is deleted and no longer displays in the New Orders section.
To delete (discard) all new orders:
* On the Orders Summary screen, select the More button\*\*\*\* and choose the **Discard All** option.
All of the new orders are discarded and no longer display in the New Orders section.
### Modifying the Details of an Existing Medication Order
Once an order has been signed and submitted, and has moved to the Existing Orders section, you cannot make modifications to it. The only possible exception to this rule is medication orders. You can modify an existing medication order if:
* Your system administrator has enabled the Modify workflow for medication orders. The Modify function is not available for any other type of order (such as Labs or Radiology). If modifications are allowed for medication orders, then it also includes orders with additives/diluents.
* The medication order is still active (you cannot modify a medication order that is complete, or no longer active).
To modify an existing medication order from the Orders module:
When modifying an existing medication order, you might see clinical decision support (CDS) alerts (see *[Reviewing Clinical Decision Support (CDS) Alerts](#reviewing-clinical-decision-support-cds-alerts)*). After tapping **Sign/Submit**, you might see alerts about drug, disease, or allergy interactions or duplicate orders (see *[Reviewing Interaction and Duplicate Order Alerts](../enter_patient_data/enter-orders#reviewing-interaction-and-duplicate-order-alerts)*). Alerts can provide clinical data or inform you of issues related to an order.
1. On the Orders Summary screen, identify the order you want modify under the Existing Orders section, and then take either of the actions below:
* Select the medication order to open the Order Details screen, and then select the **Modify** button at the top of the screen to get into edit mode (if the **Modify** button is not visible, select the **More** button and then choose **Modify**).
* Tap *and hold* on the medication order’s row. When the action buttons appear at the top of the Orders Summary screen, select the **Modify** button (if the **Modify** button is not visible, select the **More** button and then choose **Modify**).
The Modify Order screen is displayed.
2. Change the value for any of the detail fields for the selected order.
* If any CDS alerts are applicable, they are listed at the top of the screen in yellow.
* Required fields are highlighted in pink with the text "This field is required."
* If you change the **Priority**, **Frequency**, or **Start First Dose** fields such that the number of hours to the patient’s first or next scheduled dose is more than half the total number of hours between doses (based on the **Frequency** that you selected), you may see the following message displayed in the **Priority** field: "*Next scheduled dose in nn hours nn mins (mm/dd hh:mm AM/PM).*" If you want the first or next dose to be given now, tap the **Priority** field and select "Now."
If a patient receives a dose of the medication between the time you choose "Now" and actually submit the order, you are warned of this fact and given an opportunity to modify the order so that you can change the Priority.
3. Select **Back** to save your changes and go back to the Orders Summary. (Or select the **More** button and choose **Discard Changes** to close the Order Details without saving your changes.)
Your changes are saved and the Orders Summary screen is displayed with two items listed under the New Orders section: a discontinue for the original order (shown with a line struck through the order description), and a new order containing your modifications.
4. Select **SIGN/SUBMIT** .
Both items are submitted to the server.
### Renewing an Expiring Medication Order
If a patient has expiring medication orders that need to be renewed, they are displayed at the top of the Existing Orders section on the Orders Summary. Each expiring medication order has a comment in red text that states the date that the order is expiring (for example: "Expires Tomorrow at 11:00 AM"). The amount of time in advance that you are notified of the expiring orders is based on your system’s configuration.
You can **Renew** an expiring medication order if your system has been configured to allow this. Check with your system administrator to see if this functionality is enabled. The Renew function is not available for any other type of order (such as Labs or Radiology).
When renewing an expiring medication order, you might see clinical decision support (CDS) alerts (see *[Reviewing Clinical Decision Support (CDS) Alerts](#reviewing-clinical-decision-support-cds-alerts)*). After tapping **Sign/Submit**, you might see alerts about drug, disease, or allergy interactions or duplicate orders (see *[Reviewing Interaction and Duplicate Order Alerts](../enter_patient_data/enter-orders#reviewing-interaction-and-duplicate-order-alerts)*). Alerts can provide clinical data or inform you of issues related to an order.
To renew an expiring medication order from the Orders module:
1. Under the Existing Orders section, identify the expiring medication that you want to renew and then take either of the actions below:
* Select the medication order to open the Order Details screen, and then select the **Renew** button at the top of the screen (if the **Renew** button is not visible, select the **More** button and then choose **Renew**).
* Tap *and hold* on the medication order’s row. When the action buttons appear at the top of the Orders Summary screen, select the **Renew** button (if the **Renew** button is not visible, select the **More** button and then choose **Renew**).
The Order Details screen is displayed. If any CDS alerts are applicable, they are listed at the top of the screen in yellow.
2. Enter the number of days to renew the medication in the **Renew for** field, and then select **Back** to save your changes and go back to the Orders Summary.
The Orders Summary is re-displayed and the renewal order is listed in the New Orders section. The words "**RENEW for n days:**" precedes the order description, where "n" is the number of days for which the order is to be renewed.
3. Select **SIGN/SUBMIT** .
The renewal is submitted to the server. The order is moved from the New Orders section to the Existing Orders section.
### Reordering an Existing Order
While reviewing a patient’s list of Existing Orders on the Orders Summary, you may decide that you want to repeat (reorder) an item from that list. For instructions, see *[Repeating an Existing Order](../enter_patient_data/enter-orders#repeating-an-existing-order)*.
### Discontinuing an Existing Order
After reviewing a patient’s list of Existing Orders on the Orders Summary, you may decide that you want to discontinue one or more of them. You can discontinue an order if:
* Your system administrator has allowed the Discontinue workflow for the type of order that you want to discontinue. In most cases, your administrator will allow discontinues for all types of existing orders. However, they can disable discontinues for certain types of existing orders, if your organization’s workflow requires it. If discontinues are allowed for medication orders, then it also includes orders with additives/diluents.
* The existing order that you want to discontinue is for the same visit that is currently selected for the order session.
Additionally, all active orders can be *automatically* discontinued for patients upon their discharge, if enabled by your organization. If the discharge is canceled, all orders that were automatically discontinued upon discharge will be automatically re-activated.
When discontinuing IV medication orders, both the base medication and any additives or diluents are discontinued.
There is no discontinue function for new unsubmitted orders. Instead, you can cancel a new order that has not yet been signed and submitted, by simply deleting it. See *[Discarding or Deleting New Orders](../enter_patient_data/enter-orders#discarding-or-deleting-new-orders)*.
When discontinuing orders, you might see clinical decision support (CDS) alerts (see *[Reviewing Clinical Decision Support (CDS) Alerts](#reviewing-clinical-decision-support-cds-alerts)*). Alerts can provide clinical data or inform you of issues related to an order.
To discontinue an existing order from the Orders module:
1. Under the Existing Orders section, identify the order that you want to discontinue, and then take either of the actions below:
* Select the existing order to open the Order Details screen, and then select the **DC** button at the top of the screen (if the **DC** button is not visible, select the **More** button and then choose **DC**).
* Tap *and hold* on the existing order’s row. When the action buttons appear at the top of the Orders Summary screen, select the **DC** button (if the **DC** button is not visible, select the **More** button and then choose **DC**).
The Orders Summary is redisplayed and the discontinued order is listed under the New Orders section. It is shown with a line struck through the order description.
2. (Optional) Enter a reason for discontinuing the order, if necessary:
1. On the Orders Summary, select the discontinued medication order listed in the New Orders section.
The Order Details screen opens.- b. Enter a reason in the **Reason for Discontinue** field, and then select **Back** to go back to the Orders Summary.
The Orders Summary is redisplayed, showing the discontinued medication order in the New Orders section, with the **DC Reason** listed at the end of the description.
3. Select **SIGN/SUBMIT** .
The discontinue is submitted to the server. The order is moved from the New Orders section to the Existing Orders section, and is now displayed with a line struck through the order description.
### Holding an Existing Active Medication Order
You may be able to **Hold** (and **Resume**) existing active Medication orders, if your system administrator has enabled this feature. The Hold and Resume functions are not available for any other type of order (such as Labs or Radiology).
When holding orders, you might see clinical decision support (CDS) alerts (see *[Reviewing Clinical Decision Support (CDS) Alerts](#reviewing-clinical-decision-support-cds-alerts)*). Alerts can provide clinical data or inform you of issues related to an order.
To hold an existing active medication order from the Orders module:
1. In the Orders module, under the Existing Orders section of the Orders Summary, identify the medication order that you want to hold and then take either of the actions below:
* Select the existing medication order to open the Order Details screen, and then select the **Hold** button at the top of the screen (if the **Hold** button is not visible, select the **More** button and then choose **Hold**).
* Tap *and hold* on the existing medication order’s row. When the action buttons appear at the top of the Orders Summary screen, select the **Hold** button (if the **Hold** button is not visible, select the **More** button and then choose **Hold**).
The **Hold Order** screen is displayed.
2. Complete the fields below.
Some fields may be required. If so, they are highlighted in pink with the text "This field is required."
* **Hold Reason**: Enter the reason for holding the medication.
* **Hold Date/Time**: If the hold should start immediately, enter the current date and time in the **Hold Date/Time** field. If the hold should start in the future, enter the future date and time that the hold should begin.
* **Resume Date/Time**: Enter the date that the medication administration should resume.
3. Select **Back** to go back to the Orders Summary.
The Orders Summary is re-displayed and the held order is listed in the New Orders section. The words "**HOLD:**" or "**FUTURE HOLD:**" precede the order description, depending on whether the hold is to begin immediately or in the future. This is followed by the **Hold Reason** and **Resume Date/Time** (if any).
4. Select **SIGN/SUBMIT** .
The hold is submitted to the server. The order is moved from the New Orders section to the Existing Orders section.
### Changing or Canceling a Future Hold on a Medication
If a future hold for an order has not begun, you can change the future hold date and time or cancel the future hold entirely.
When changing or canceling a future hold, you might see clinical decision support (CDS) alerts (see *[Reviewing Clinical Decision Support (CDS) Alerts](#reviewing-clinical-decision-support-cds-alerts)*). Alerts can provide clinical data or inform you of issues related to an order.
To change or cancel a future hold on a medication order from the Orders module:
1. In the Orders module, under the Existing Orders section of the Orders Summary, identify the medication order that is on future hold and then take either of the actions below:
* Select the existing medication order to open the Order Details screen, and then select the **Hold** button at the top of the screen (if the **Hold** button is not visible, select the **More** button and then choose **Hold**).
* Tap *and hold* on the existing medication order’s row. When the action buttons appear at the top of the Orders Summary screen, select the **Hold** button (if the **Hold** button is not visible, select the **More** button and then choose **Hold**).
The **Hold Order** screen is displayed.
2. Take one of the following steps:
* To change the date/time that the future hold should begin, modify the **Hold Date/Time** fields as needed.
* To cancel the future hold entirely, enter the same date and time in the **Hold Date/Time** fields and the **Resume Date/Time** fields.
3. Select **Back** to go back to the Orders Summary.
The Orders Summary screen is re-displayed and shows your changes to the held order.
4. Select **SIGN/SUBMIT** .
Your changes are submitted to the server.
### Resuming a Held Medication Order
You may be able to Resume a Medication order that is currently on **Hold**, if your system administrator has enabled this feature. The Resume function is not available for any other type of order (such as Labs or Radiology).
When resuming held orders, you might see clinical decision support (CDS) alerts (see *[Reviewing Clinical Decision Support (CDS) Alerts](#reviewing-clinical-decision-support-cds-alerts)*). After tapping **Sign/Submit**, you might see alerts about drug, disease, or allergy interactions or duplicate orders (see *[Reviewing Interaction and Duplicate Order Alerts](../enter_patient_data/enter-orders#reviewing-interaction-and-duplicate-order-alerts)*). Alerts can provide clinical data or inform you of issues related to an order.
To resume a held medication order from the Orders module:
1. In the Orders module, under the Existing Orders section of the Orders Summary, identify the held medication order that you want to resume and then take either of the actions below. (Medication orders that are on hold are preceded by this icon:.)
 * Select the held medication order to open the Order Details screen, and then select the **Resume** button at the top of the screen (if the **Resume** button is not visible, select the **More** button and then choose **Resume**).
* Tap *and hold* on the held medication order’s row. When the action buttons appear at the top of the Orders Summary screen, select the **Resume** button (if the **Resume** button is not visible, select the **More** button and then choose **Resume**).
The **Resume Order screen** displays.
2. Enter the reason for resuming the medication in the **Resume Reason** field, as well as the **Resume Date/Time**,and then select **Back** to go back to the Orders Summary.
The Orders Summary is re-displayed and the resumed order is listed in the New Orders section. The word "**RESUME:**" precedes the order description and the **Resume Reason** and **Resume Date/Time** are added to the end.
3. Select SIGN/SUBMIT .
The resume is submitted to the server. The order is moved from the New Orders section to the Existing Orders section.
### Undoing Changes to Orders
You can undo any modify, discontinue, hold, resume, or renew action that you applied to an active order, as long as you have not yet signed and submitted it.
When undoing changes to orders, you might see clinical decision support (CDS) alerts (see *[Reviewing Clinical Decision Support (CDS) Alerts](#reviewing-clinical-decision-support-cds-alerts)*). Alerts can provide clinical data or inform you of issues related to an order.
* On the Orders Summary screen, under the New Orders section, locate the order that you accidentally discontinued, held, resumed, renewed, or modified. Discontinues are listed with a line struck through the order description. Holds and Resumes are listed with the words "**HOLD:**", "**FUTURE HOLD**:", or "**RESUME:**" preceding the order description. Renewals are listed with the words "**RENEW for n days:**" preceding the order description. Modifications show two items: a discontinue for the original order (with a line struck through it), and a new order for the modification.
* If you want to undo *all* of the items listed in the New Orders section: Select the **More** button and choose the **Discard All** option.
* If you want to undo only *some* of items listed in the New Orders section, you must undo each item individually. You can use either of these methods:
* On the New Orders list, tap *and hold* on the specific order that you want to undo. Once the **Delete** button is exposed at the top of the Orders Summary, select it.
* On the New Orders list, select the specific order that you want to undo. When the Order Details screen is displayed, select the **Delete** button at the top of the screen.
In the case of modifications, you can use the methods above on *either* the discontinue *or* the new order (it does not matter which one you choose). When you delete one item, *both items* are then automatically deleted (the discontinue *and* the new order).
The discontinue, hold, resume, renewal or modification is "undone" and the original order remains unchanged. When the Orders Summary is re-displayed, the discontinued, held, resumed, renewed, or modified order is no longer listed in the New Orders section.
## Managing Your Favorites List
The **Favorites** list is a list of those items that you or members of your department order frequently. Favorites allow you to quickly find commonly used orders or order sets for your patients. The favorite orders are typically grouped into categories, although there may be a few orders at the top or bottom of the Favorites list that are not included in any category.
*How do orders get added to your Favorites list?* First, administrators can create a list of orders or order sets that are commonly used within each department. Next, at initial implementation your administrator can automatically add all of the orders that you have used frequently in the past to your **Favorites** list (using the **Auto-Create Favorites** option). And finally, when working in the CPOE web application or the Mobile CPOE application, you can personally add items to your **Favorites** list at any time.
The following restrictions affect the **Favorites** list:
* In the Mobile CPOE application, any handheld user can add or manipulate individual orders or order sets within their **Favorites** list.
* You cannot add, edit, delete, or move any departmental category, order, or order set in your Favorites list. All departmental categories, orders, and order sets are locked and may only be edited by the department administrator. When editing your **Favorites** list, departmental favorites show the word "(dept.") next to them so that they are clearly distinguished from personal favorites.
* If you have access to multiple facilities, you cannot save any site specific fields to a Favorite order.
This chapter describes the following procedures that allow you to manage your personal favorites so they are current and useful:
* *[Adding Orders to Your Favorites List](../enter_patient_data/enter-orders#adding-orders-to-your-favorites-list)*
* *[Managing Orders in Your Favorites List](../enter_patient_data/enter-orders#managing-orders-in-your-favorites-list)*
### Adding Orders to Your Favorites List
There are several points at which you can add an order or order set to your **Favorites** list. Below is a list of the scenarios in which they can be added, along with links to the instructions for each.
* You can add new orders or order sets to your Favorites while in the middle of entering them for a patient.
See *[Adding a New Order to the Favorites List While Entering It](../enter_patient_data/enter-orders#adding-a-new-order-to-the-favorites-list-while-entering-it)* or *[Adding a New Order Set to the Favorites List While Entering It](../enter_patient_data/enter-orders#adding-a-new-order-set-to-the-favorites-list-while-entering-it)*.
* You can select new or existing orders from a patient’s Orders Summary screen and add them to your Favorites list.
*[Adding a New Order from the Orders Summary to the Favorites List](../enter_patient_data/enter-orders#adding-a-new-order-from-the-orders-summary-to-the-favorites-list)* or *[Adding an Existing Order from the Orders Summary to the Favorites List](../enter_patient_data/enter-orders#adding-an-existing-order-from-the-orders-summary-to-the-favorites-list)*.
* You can add new orders or order sets to your **Favorites** list while using the **Manage Favorites** option.
See *[Adding an Order to the Favorites List via the Manage Favorites Option](../enter_patient_data/enter-orders#adding-an-order-to-the-favorites-list-via-the-manage-favorites-option)* or *[Adding an Order Set to the Favorites List via the Manage Favorites Option](../enter_patient_data/enter-orders#adding-an-order-set-to-the-favorites-list-via-the-manage-favorites-option)*.
## Adding a New Order to the Favorites List While Entering It
To add an individual order to the **Favorites** list while in the process of entering a new order for a patient, follow the steps below. You can even modify the details of the order prior to adding it to your **Favorites** list.
During the order entry process, you might see clinical decision support (CDS) alerts (see *[Reviewing Clinical Decision Support (CDS) Alerts](#reviewing-clinical-decision-support-cds-alerts)*). After tapping **Sign/Submit**, you might see alerts about drug, disease, or allergy interactions or duplicate orders (see *[Reviewing Interaction and Duplicate Order Alerts](../enter_patient_data/enter-orders#reviewing-interaction-and-duplicate-order-alerts)*). Alerts can provide clinical data or inform you of issues related to an order.
1. From the Orders Summary screen select the **Add** button .
The Add Orders screen is displayed.
2. Search for an order to add or select an order from an order set (see *[Searching for an Order to Add](../enter_patient_data/enter-orders#searching-for-an-order-to-add)*, or *[Adding Orders from an Order Set](../enter_patient_data/enter-orders#adding-orders-from-an-order-set)* for instructions).
The Order Details screen is automatically displayed if the new order contains CDS alerts or specific fields that need to be completed.
* If the Order Details screen is displayed, continue to [Step 3](../enter_patient_data/enter-orders#adding-a-new-order-to-the-favorites-list-while-entering-it) .
* If the Order Details screen is not displayed, continue entering the order for the patient as you normally would, and save it. Then follow the steps in *[Adding a New Order from the Orders Summary to the Favorites List](../enter_patient_data/enter-orders#adding-a-new-order-from-the-orders-summary-to-the-favorites-list)*.
3. Review any CDS alerts and then determine what characteristics the order should have for your **Favorites** list:
* To add the order to your **Favorites** list "as is," select the **Favorites** button now.
* To personalize the order for your **Favorites** list, first complete the detail fields so that it has the characteristics that you want, and *then* select the **Favorites** button
If you entered a **Stop Date/Time** on the order that you are favoriting, the following message is displayed: "*Warning: Stop date will not be saved when creating this favorite. Select and edit the Favorite within Manage Favorites to add a relative stop date such as "Stop In 2 Days.*" Tap **OK** to acknowledge the message. After you finish adding the order to your **Favorites** list (by completing the steps below), see *[Editing a Favorite Order](../enter_patient_data/enter-orders#editing-a-favorite-order)* if you want to add a relative stop date to the new favorite order.
The **Add Favorite to Category window** displays.
4. Select the personal **favorites** category or subcategory where you want to the order to be listed (tap the **Expand** icon next to any category name to view its subcategories). If you do not want to add it to a specific category or subcategory, you can select **Favorites** at the top of the list of categories. This will add the order to your Favorites list below all of your categories.
* Select the held medication order to open the Order Details screen, and then select the **Resume** button at the top of the screen (if the **Resume** button is not visible, select the **More** button and then choose **Resume**).
* Tap *and hold* on the held medication order’s row. When the action buttons appear at the top of the Orders Summary screen, select the **Resume** button (if the **Resume** button is not visible, select the **More** button and then choose **Resume**).
The **Resume Order screen** displays.
2. Enter the reason for resuming the medication in the **Resume Reason** field, as well as the **Resume Date/Time**,and then select **Back** to go back to the Orders Summary.
The Orders Summary is re-displayed and the resumed order is listed in the New Orders section. The word "**RESUME:**" precedes the order description and the **Resume Reason** and **Resume Date/Time** are added to the end.
3. Select SIGN/SUBMIT .
The resume is submitted to the server. The order is moved from the New Orders section to the Existing Orders section.
### Undoing Changes to Orders
You can undo any modify, discontinue, hold, resume, or renew action that you applied to an active order, as long as you have not yet signed and submitted it.
When undoing changes to orders, you might see clinical decision support (CDS) alerts (see *[Reviewing Clinical Decision Support (CDS) Alerts](#reviewing-clinical-decision-support-cds-alerts)*). Alerts can provide clinical data or inform you of issues related to an order.
* On the Orders Summary screen, under the New Orders section, locate the order that you accidentally discontinued, held, resumed, renewed, or modified. Discontinues are listed with a line struck through the order description. Holds and Resumes are listed with the words "**HOLD:**", "**FUTURE HOLD**:", or "**RESUME:**" preceding the order description. Renewals are listed with the words "**RENEW for n days:**" preceding the order description. Modifications show two items: a discontinue for the original order (with a line struck through it), and a new order for the modification.
* If you want to undo *all* of the items listed in the New Orders section: Select the **More** button and choose the **Discard All** option.
* If you want to undo only *some* of items listed in the New Orders section, you must undo each item individually. You can use either of these methods:
* On the New Orders list, tap *and hold* on the specific order that you want to undo. Once the **Delete** button is exposed at the top of the Orders Summary, select it.
* On the New Orders list, select the specific order that you want to undo. When the Order Details screen is displayed, select the **Delete** button at the top of the screen.
In the case of modifications, you can use the methods above on *either* the discontinue *or* the new order (it does not matter which one you choose). When you delete one item, *both items* are then automatically deleted (the discontinue *and* the new order).
The discontinue, hold, resume, renewal or modification is "undone" and the original order remains unchanged. When the Orders Summary is re-displayed, the discontinued, held, resumed, renewed, or modified order is no longer listed in the New Orders section.
## Managing Your Favorites List
The **Favorites** list is a list of those items that you or members of your department order frequently. Favorites allow you to quickly find commonly used orders or order sets for your patients. The favorite orders are typically grouped into categories, although there may be a few orders at the top or bottom of the Favorites list that are not included in any category.
*How do orders get added to your Favorites list?* First, administrators can create a list of orders or order sets that are commonly used within each department. Next, at initial implementation your administrator can automatically add all of the orders that you have used frequently in the past to your **Favorites** list (using the **Auto-Create Favorites** option). And finally, when working in the CPOE web application or the Mobile CPOE application, you can personally add items to your **Favorites** list at any time.
The following restrictions affect the **Favorites** list:
* In the Mobile CPOE application, any handheld user can add or manipulate individual orders or order sets within their **Favorites** list.
* You cannot add, edit, delete, or move any departmental category, order, or order set in your Favorites list. All departmental categories, orders, and order sets are locked and may only be edited by the department administrator. When editing your **Favorites** list, departmental favorites show the word "(dept.") next to them so that they are clearly distinguished from personal favorites.
* If you have access to multiple facilities, you cannot save any site specific fields to a Favorite order.
This chapter describes the following procedures that allow you to manage your personal favorites so they are current and useful:
* *[Adding Orders to Your Favorites List](../enter_patient_data/enter-orders#adding-orders-to-your-favorites-list)*
* *[Managing Orders in Your Favorites List](../enter_patient_data/enter-orders#managing-orders-in-your-favorites-list)*
### Adding Orders to Your Favorites List
There are several points at which you can add an order or order set to your **Favorites** list. Below is a list of the scenarios in which they can be added, along with links to the instructions for each.
* You can add new orders or order sets to your Favorites while in the middle of entering them for a patient.
See *[Adding a New Order to the Favorites List While Entering It](../enter_patient_data/enter-orders#adding-a-new-order-to-the-favorites-list-while-entering-it)* or *[Adding a New Order Set to the Favorites List While Entering It](../enter_patient_data/enter-orders#adding-a-new-order-set-to-the-favorites-list-while-entering-it)*.
* You can select new or existing orders from a patient’s Orders Summary screen and add them to your Favorites list.
*[Adding a New Order from the Orders Summary to the Favorites List](../enter_patient_data/enter-orders#adding-a-new-order-from-the-orders-summary-to-the-favorites-list)* or *[Adding an Existing Order from the Orders Summary to the Favorites List](../enter_patient_data/enter-orders#adding-an-existing-order-from-the-orders-summary-to-the-favorites-list)*.
* You can add new orders or order sets to your **Favorites** list while using the **Manage Favorites** option.
See *[Adding an Order to the Favorites List via the Manage Favorites Option](../enter_patient_data/enter-orders#adding-an-order-to-the-favorites-list-via-the-manage-favorites-option)* or *[Adding an Order Set to the Favorites List via the Manage Favorites Option](../enter_patient_data/enter-orders#adding-an-order-set-to-the-favorites-list-via-the-manage-favorites-option)*.
## Adding a New Order to the Favorites List While Entering It
To add an individual order to the **Favorites** list while in the process of entering a new order for a patient, follow the steps below. You can even modify the details of the order prior to adding it to your **Favorites** list.
During the order entry process, you might see clinical decision support (CDS) alerts (see *[Reviewing Clinical Decision Support (CDS) Alerts](#reviewing-clinical-decision-support-cds-alerts)*). After tapping **Sign/Submit**, you might see alerts about drug, disease, or allergy interactions or duplicate orders (see *[Reviewing Interaction and Duplicate Order Alerts](../enter_patient_data/enter-orders#reviewing-interaction-and-duplicate-order-alerts)*). Alerts can provide clinical data or inform you of issues related to an order.
1. From the Orders Summary screen select the **Add** button .
The Add Orders screen is displayed.
2. Search for an order to add or select an order from an order set (see *[Searching for an Order to Add](../enter_patient_data/enter-orders#searching-for-an-order-to-add)*, or *[Adding Orders from an Order Set](../enter_patient_data/enter-orders#adding-orders-from-an-order-set)* for instructions).
The Order Details screen is automatically displayed if the new order contains CDS alerts or specific fields that need to be completed.
* If the Order Details screen is displayed, continue to [Step 3](../enter_patient_data/enter-orders#adding-a-new-order-to-the-favorites-list-while-entering-it) .
* If the Order Details screen is not displayed, continue entering the order for the patient as you normally would, and save it. Then follow the steps in *[Adding a New Order from the Orders Summary to the Favorites List](../enter_patient_data/enter-orders#adding-a-new-order-from-the-orders-summary-to-the-favorites-list)*.
3. Review any CDS alerts and then determine what characteristics the order should have for your **Favorites** list:
* To add the order to your **Favorites** list "as is," select the **Favorites** button now.
* To personalize the order for your **Favorites** list, first complete the detail fields so that it has the characteristics that you want, and *then* select the **Favorites** button
If you entered a **Stop Date/Time** on the order that you are favoriting, the following message is displayed: "*Warning: Stop date will not be saved when creating this favorite. Select and edit the Favorite within Manage Favorites to add a relative stop date such as "Stop In 2 Days.*" Tap **OK** to acknowledge the message. After you finish adding the order to your **Favorites** list (by completing the steps below), see *[Editing a Favorite Order](../enter_patient_data/enter-orders#editing-a-favorite-order)* if you want to add a relative stop date to the new favorite order.
The **Add Favorite to Category window** displays.
4. Select the personal **favorites** category or subcategory where you want to the order to be listed (tap the **Expand** icon next to any category name to view its subcategories). If you do not want to add it to a specific category or subcategory, you can select **Favorites** at the top of the list of categories. This will add the order to your Favorites list below all of your categories.
 5\. Select the **OK** button at the bottom of the category list.
The order is added to your **Favorites** list and the Order Details screen is redisplayed.
6. (Optional) Enter or modify any of the detail fields as necessary so that the order is appropriate for the currently selected patient.
7. Select **Back** to save the order for the selected patient.
The Add New Orders screen is redisplayed.
8. You can now select more orders for the patient, or select the **Back** button if you are done.
The Orders Summary screen is displayed. The order you just entered for the patient is listed under the New Orders section.
## Adding a New Order Set to the Favorites List While Entering It
To add an order set to the **Favorites** list while in the process of using that order set for a patient, follow the steps below. You cannot modify the order set when adding it to your **Favorites** list. You can only add the order set as it is currently defined.
During the order entry process, you might see clinical decision support (CDS) alerts (see *[Reviewing Clinical Decision Support (CDS) Alerts](#reviewing-clinical-decision-support-cds-alerts)*). After tapping **Sign/Submit**, you might see alerts about drug, disease, or allergy interactions or duplicate orders (see *[Reviewing Interaction and Duplicate Order Alerts](../enter_patient_data/enter-orders#reviewing-interaction-and-duplicate-order-alerts)*). Alerts can provide clinical data or inform you of issues related to an order.
1. From the Orders Summary screen select the **Add** button .
The Add Orders screen is displayed.
2. Search for and select an order set (see *[Searching for an Order to Add](../enter_patient_data/enter-orders#searching-for-an-order-to-add)* for instructions.)
The Order Set screen is displayed.
3. Select the **Favorites** button at the top of the Order Set screen.
The **Add Favorite to Category window** is displayed.
4. Select the personal **favorites** category or subcategory where you want to the order set to be listed (tap the **Expand** icon next to any category name to view its subcategories). If you do not want to add it to a specific category or subcategory, you can select **Favorites** at the top of the list of categories. This will add the order to your Favorites list below all of your categories.
5. Select the **OK** button at the bottom of the category list.
The order set is added to your **Favorites** list and the order set screen is redisplayed.
6. Select one or more orders from the order set as appropriate for the currently selected patient, review any CDS alerts, and then select the **Back** button to close the order set screen.
The Orders Summary is displayed. All of the orders you selected from the order set are listed in the New Orders section.
## Adding a New Order from the Orders Summary to the Favorites List
You can add any order that is listed in the New Orders section of a patient’s Orders Summary to the **Favorites** list. You can add the order "as is," or you can make changes to it so that it has the characteristics you want, before adding it to the **Favorites** list. Instructions for both workflows are included below.
During the order entry process, you might see clinical decision support (CDS) alerts (see *[Reviewing Clinical Decision Support (CDS) Alerts](#reviewing-clinical-decision-support-cds-alerts)*). After tapping **Sign/Submit**, you might see alerts about drug, disease, or allergy interactions or duplicate orders (see *[Reviewing Interaction and Duplicate Order Alerts](../enter_patient_data/enter-orders#reviewing-interaction-and-duplicate-order-alerts)*). Alerts can provide clinical data or inform you of issues related to an order.
**To add the new order "as is" to the Favorites list:**
1. On the Order Summary screen, under the New Orders section, tap *and hold* on the order that you want to add to your **Favorites** list.
2. When the action buttons appear at the top of the Order Summary screen, select the **Favorites** button (if the **Favorites** button is not visible, select the **More** button and then choose **Add to Favorites**).
If you entered a **Stop Date/Time** on the order that you are favoriting, the following message is displayed: "*Warning: Stop date will not be saved when creating this favorite. Select and edit the Favorite within Manage Favorites to add a relative stop date such as "Stop In 2 Days.*" Tap **OK** to acknowledge the message. After you finish adding the order to your **Favorites** list (by completing the steps below), see *[Editing a Favorite Order](../enter_patient_data/enter-orders#editing-a-favorite-order)* if you want to add a relative stop date to the new favorite order.
3. Select the personal **favorites** category or subcategory where you want to the order to be listed (tap the **Expand** icon next to any category name to view its subcategories). If you do not want to add it to a specific category or subcategory, you can select **Favorites** at the top of the list of categories. This will add the order to your Favorites list below all of your categories.
4. Select the **OK** button at the bottom of the category list.
The order is added to your **Favorites** list and the Order Details screen is redisplayed.
### To make changes to the new order’s details before adding it to the Favorites list
1. On the Order Summary screen, under the New Orders section, select the order that you want to add to your **Favorites** list.
The Order Details screen is displayed.
2. Review any CDS alerts. and then make any changes to the detail fields as desired, so that it has the characteristics that you want for the **Favorites** list.
3. Select the **Favorites** button, located at the top of the Order Details screen.
If you entered a **Stop Date/Time** on the order that you are favoriting, the following message is displayed: "*Warning: Stop date will not be saved when creating this favorite. Select and edit the Favorite within Manage Favorites to add a relative stop date such as "Stop In 2 Days.*" Tap **OK** to acknowledge the message. After you finish adding the order to your **Favorites** list (by completing the steps below), see *[Editing a Favorite Order](../enter_patient_data/enter-orders#editing-a-favorite-order)* if you want to add a relative stop date to the new favorite order.
The **Add Favorite to Category window** displays.
4. Select the personal **favorites** category or subcategory where you want to the order to be listed (tap the **Expand** icon next to any category name to view its subcategories). If you do not want to add it to a specific category or subcategory, you can select **Favorites** at the top of the list of categories. This will add the order to your Favorites list below all of your categories.
5. Select the **OK** button at the bottom of the category list.
The order is added to your **Favorites** list and the Order Details screen is redisplayed.
6. Select **Back** if you want the changes you made in [Step 2](../enter_patient_data/enter-orders#adding-a-new-order-from-the-orders-summary-to-the-favorites-list) to be saved for this particular order for this patient. (Or, select **More** button and then choose **Discard Changes** if you do not want to save the changes to the order for this patient.)
The modified order is added to the **Favorites** list (even if the modifications are not saved for the patient), and the Order Summary screen is displayed.
## Adding an Existing Order from the Orders Summary to the Favorites List
You can add an order that is listed in the Existing Orders section of a patient’s Orders Summary to the **Favorites** list. You can add the order "as is," or you can make changes to it so that it has the characteristics you want, before adding it to the **Favorites** list. Instructions for both workflows are included below.
During the order entry process, you might see clinical decision support (CDS) alerts (see *[Reviewing Clinical Decision Support (CDS) Alerts](#reviewing-clinical-decision-support-cds-alerts)*). After tapping **Sign/Submit**, you might see alerts about drug, disease, or allergy interactions or duplicate orders (see *[Reviewing Interaction and Duplicate Order Alerts](../enter_patient_data/enter-orders#reviewing-interaction-and-duplicate-order-alerts)*). Alerts can provide clinical data or inform you of issues related to an order.
**To add the existing order "as is" to the Favorites list:**
1. On the Order Summary screen, under the Existing Orders section, tap *and hold* on the order that you want to add to your **Favorites** list.
2. When the action buttons appear at the top of the Order Summary screen, select the **Favorites** button (if the **Favorites** button is not visible, select the **More** button and then choose **Add to Favorites**).
If the order you are favoriting has a value in the **Stop Date/Time** field, the following message is displayed: "*Warning: Stop date will not be saved when creating this favorite. Select and edit the Favorite within Manage Favorites to add a relative stop date such as "Stop In 2 Days.*" Tap **OK** to acknowledge the message. After you finish adding the order to your **Favorites** list (by completing the steps below), see *[Editing a Favorite Order](../enter_patient_data/enter-orders#editing-a-favorite-order)* if you want to add a relative stop date to the new favorite order.
The Add Favorite to **Category** window displays.
3. Select the personal **favorites** category or subcategory where you want to the order to be listed (tap the **Expand** icon next to any category name to view its subcategories). If you do not want to add it to a specific category or subcategory, you can select **Favorites** at the top of the list of categories. This will add the order to your Favorites list below all of your categories.
4. Select the **OK** button at the bottom of the category list.
The order is added to your **Favorites** list and the Order Details screen is redisplayed.
### To make changes to the existing order’s details before adding it to the Favorites list (for active medication orders only)
1. On the Order Summary screen, under the Existing Orders section, select the order that you want to add to your **Favorites** list.
The Order Details screen is displayed.
2. Select the **Modify** button at the top of the Order Details screen (if the **Modify** button is not visible, select the **More** button and then choose **Modify**).
3. Review any CDS alerts. and then make any changes to the detail fields as desired, so that the order has the characteristics that you want for your **Favorites** list.
4. Select the **Favorites** button, located at the top of the Order Details screen.
If the order you are favoriting has a value in the **Stop Date/Time** field, the following message is displayed: "*Warning: Stop date will not be saved when creating this favorite. Select and edit the Favorite within Manage Favorites to add a relative stop date such as "Stop In 2 Days.*" Tap **OK** to acknowledge the message. After you finish adding the order to your **Favorites** list (by completing the steps below), see *[Editing a Favorite Order](../enter_patient_data/enter-orders#editing-a-favorite-order)* if you want to add a relative stop date to the new favorite order.
The Add Favorite to **Category** window displays.
5. Select the personal **favorites** category or subcategory where you want to the order to be listed (tap the **Expand** icon next to any category name to view its subcategories). If you do not want to add it to a specific category or subcategory, you can select **Favorites** at the top of the list of categories. This will add the order to your Favorites list below all of your categories.
6. Select the **OK** button at the bottom of the category list.
The order is added to your **Favorites** list and the Order Details screen is redisplayed.
7. Select **Back** if you want the changes you made in [Step 3](../enter_patient_data/enter-orders#adding-an-existing-order-from-the-orders-summary-to-the-favorites-list) to be saved for this particular order for this patient. (Or, select **Delete** at the top right of the screen to discard the changes you made in [Step 3](../enter_patient_data/enter-orders#adding-an-existing-order-from-the-orders-summary-to-the-favorites-list) , so that the existing order remains unchanged for the current patient.)
The modified order is added to the **Favorites** list (even if the changes ares not saved for the current patient), and the Order Summary screen is displayed.
### Managing Orders in Your Favorites List
Use the **Manage Favorites** option to make changes to your Favorites list, such as adding new items to the **Favorites** list, removing items from the **Favorites** list, modifying the details of favorite items, renaming favorite categories, or moving items within the **Favorites** list. The **Manage Favorites** option is available during the process of adding a new order.
1. From the Orders Summary for any patient, select the **Add** button .
The Add New Orders screen is displayed.
2. Select the **More** button and then choose the **Manage Favorites** option.
The Manage Favorites screen is displayed.
From this screen, you can do the following to manage the contents of your **Favorites** list:
* *[Adding an Order to the Favorites List via the Manage Favorites Option](../enter_patient_data/enter-orders#adding-an-order-to-the-favorites-list-via-the-manage-favorites-option)*
* *[Adding an Order Set to the Favorites List via the Manage Favorites Option](../enter_patient_data/enter-orders#adding-an-order-set-to-the-favorites-list-via-the-manage-favorites-option)*
* *[Editing a Favorite Order](../enter_patient_data/enter-orders#editing-a-favorite-order)*
* *[Deleting a Favorite Order, Order Set, or Category](../enter_patient_data/enter-orders#deleting-a-favorite-order-order-set-or-category)*
* *[Creating a Category or Subcategory in the Favorites List](../enter_patient_data/enter-orders#creating-a-category-or-subcategory-in-the-favorites-list)*
* *[Renaming a Category or Subcategory in the Favorites List](../enter_patient_data/enter-orders#renaming-a-category-or-subcategory-in-the-favorites-list)*
* *[Moving Orders, Order Sets, and Categories in the Favorites List](../enter_patient_data/enter-orders#moving-orders-order-sets-and-categories-in-the-favorites-list)*
## Adding an Order to the Favorites List via the Manage Favorites Option
In the **Manage Favorites** option, you can add an individual order to your **Favorites** list. In the process of adding it, you can personalize the order to suit your needs, by modifying the Order Details.
1. From the Patient List, select any patient, and then select the Orders module.
When the Orders Summary is displayed, you might see clinical decision support (CDS) alerts (see *[Reviewing Clinical Decision Support (CDS) Alerts](#reviewing-clinical-decision-support-cds-alerts)*) for the selected patient. Alerts should be reviewed as they can provide useful information about the patient, but they will not impact your ability to make changes to your order favorites.
2. On the Orders Summary, select the **Add** button .
The Add New Orders screen is displayed.
3. Select the **More** button and then choose the **Manage Favorites** option.
The Manage Favorites screen is displayed.
4. Review your current list of favorite categories, and select a personal category or subcategory under which you want to place the new favorite that you are about to create. For example, if it is a medication, you might select your "Medications" category. If you do not want to add it to a specific category or subcategory, you can select **Favorites** at the top of the list of categories. This will add the order to your Favorites list below all of your categories.
5. Once you have selected the desired destination category or subcategory, select the **Add Favorite** button, located at the top right of the screen.
5\. Select the **OK** button at the bottom of the category list.
The order is added to your **Favorites** list and the Order Details screen is redisplayed.
6. (Optional) Enter or modify any of the detail fields as necessary so that the order is appropriate for the currently selected patient.
7. Select **Back** to save the order for the selected patient.
The Add New Orders screen is redisplayed.
8. You can now select more orders for the patient, or select the **Back** button if you are done.
The Orders Summary screen is displayed. The order you just entered for the patient is listed under the New Orders section.
## Adding a New Order Set to the Favorites List While Entering It
To add an order set to the **Favorites** list while in the process of using that order set for a patient, follow the steps below. You cannot modify the order set when adding it to your **Favorites** list. You can only add the order set as it is currently defined.
During the order entry process, you might see clinical decision support (CDS) alerts (see *[Reviewing Clinical Decision Support (CDS) Alerts](#reviewing-clinical-decision-support-cds-alerts)*). After tapping **Sign/Submit**, you might see alerts about drug, disease, or allergy interactions or duplicate orders (see *[Reviewing Interaction and Duplicate Order Alerts](../enter_patient_data/enter-orders#reviewing-interaction-and-duplicate-order-alerts)*). Alerts can provide clinical data or inform you of issues related to an order.
1. From the Orders Summary screen select the **Add** button .
The Add Orders screen is displayed.
2. Search for and select an order set (see *[Searching for an Order to Add](../enter_patient_data/enter-orders#searching-for-an-order-to-add)* for instructions.)
The Order Set screen is displayed.
3. Select the **Favorites** button at the top of the Order Set screen.
The **Add Favorite to Category window** is displayed.
4. Select the personal **favorites** category or subcategory where you want to the order set to be listed (tap the **Expand** icon next to any category name to view its subcategories). If you do not want to add it to a specific category or subcategory, you can select **Favorites** at the top of the list of categories. This will add the order to your Favorites list below all of your categories.
5. Select the **OK** button at the bottom of the category list.
The order set is added to your **Favorites** list and the order set screen is redisplayed.
6. Select one or more orders from the order set as appropriate for the currently selected patient, review any CDS alerts, and then select the **Back** button to close the order set screen.
The Orders Summary is displayed. All of the orders you selected from the order set are listed in the New Orders section.
## Adding a New Order from the Orders Summary to the Favorites List
You can add any order that is listed in the New Orders section of a patient’s Orders Summary to the **Favorites** list. You can add the order "as is," or you can make changes to it so that it has the characteristics you want, before adding it to the **Favorites** list. Instructions for both workflows are included below.
During the order entry process, you might see clinical decision support (CDS) alerts (see *[Reviewing Clinical Decision Support (CDS) Alerts](#reviewing-clinical-decision-support-cds-alerts)*). After tapping **Sign/Submit**, you might see alerts about drug, disease, or allergy interactions or duplicate orders (see *[Reviewing Interaction and Duplicate Order Alerts](../enter_patient_data/enter-orders#reviewing-interaction-and-duplicate-order-alerts)*). Alerts can provide clinical data or inform you of issues related to an order.
**To add the new order "as is" to the Favorites list:**
1. On the Order Summary screen, under the New Orders section, tap *and hold* on the order that you want to add to your **Favorites** list.
2. When the action buttons appear at the top of the Order Summary screen, select the **Favorites** button (if the **Favorites** button is not visible, select the **More** button and then choose **Add to Favorites**).
If you entered a **Stop Date/Time** on the order that you are favoriting, the following message is displayed: "*Warning: Stop date will not be saved when creating this favorite. Select and edit the Favorite within Manage Favorites to add a relative stop date such as "Stop In 2 Days.*" Tap **OK** to acknowledge the message. After you finish adding the order to your **Favorites** list (by completing the steps below), see *[Editing a Favorite Order](../enter_patient_data/enter-orders#editing-a-favorite-order)* if you want to add a relative stop date to the new favorite order.
3. Select the personal **favorites** category or subcategory where you want to the order to be listed (tap the **Expand** icon next to any category name to view its subcategories). If you do not want to add it to a specific category or subcategory, you can select **Favorites** at the top of the list of categories. This will add the order to your Favorites list below all of your categories.
4. Select the **OK** button at the bottom of the category list.
The order is added to your **Favorites** list and the Order Details screen is redisplayed.
### To make changes to the new order’s details before adding it to the Favorites list
1. On the Order Summary screen, under the New Orders section, select the order that you want to add to your **Favorites** list.
The Order Details screen is displayed.
2. Review any CDS alerts. and then make any changes to the detail fields as desired, so that it has the characteristics that you want for the **Favorites** list.
3. Select the **Favorites** button, located at the top of the Order Details screen.
If you entered a **Stop Date/Time** on the order that you are favoriting, the following message is displayed: "*Warning: Stop date will not be saved when creating this favorite. Select and edit the Favorite within Manage Favorites to add a relative stop date such as "Stop In 2 Days.*" Tap **OK** to acknowledge the message. After you finish adding the order to your **Favorites** list (by completing the steps below), see *[Editing a Favorite Order](../enter_patient_data/enter-orders#editing-a-favorite-order)* if you want to add a relative stop date to the new favorite order.
The **Add Favorite to Category window** displays.
4. Select the personal **favorites** category or subcategory where you want to the order to be listed (tap the **Expand** icon next to any category name to view its subcategories). If you do not want to add it to a specific category or subcategory, you can select **Favorites** at the top of the list of categories. This will add the order to your Favorites list below all of your categories.
5. Select the **OK** button at the bottom of the category list.
The order is added to your **Favorites** list and the Order Details screen is redisplayed.
6. Select **Back** if you want the changes you made in [Step 2](../enter_patient_data/enter-orders#adding-a-new-order-from-the-orders-summary-to-the-favorites-list) to be saved for this particular order for this patient. (Or, select **More** button and then choose **Discard Changes** if you do not want to save the changes to the order for this patient.)
The modified order is added to the **Favorites** list (even if the modifications are not saved for the patient), and the Order Summary screen is displayed.
## Adding an Existing Order from the Orders Summary to the Favorites List
You can add an order that is listed in the Existing Orders section of a patient’s Orders Summary to the **Favorites** list. You can add the order "as is," or you can make changes to it so that it has the characteristics you want, before adding it to the **Favorites** list. Instructions for both workflows are included below.
During the order entry process, you might see clinical decision support (CDS) alerts (see *[Reviewing Clinical Decision Support (CDS) Alerts](#reviewing-clinical-decision-support-cds-alerts)*). After tapping **Sign/Submit**, you might see alerts about drug, disease, or allergy interactions or duplicate orders (see *[Reviewing Interaction and Duplicate Order Alerts](../enter_patient_data/enter-orders#reviewing-interaction-and-duplicate-order-alerts)*). Alerts can provide clinical data or inform you of issues related to an order.
**To add the existing order "as is" to the Favorites list:**
1. On the Order Summary screen, under the Existing Orders section, tap *and hold* on the order that you want to add to your **Favorites** list.
2. When the action buttons appear at the top of the Order Summary screen, select the **Favorites** button (if the **Favorites** button is not visible, select the **More** button and then choose **Add to Favorites**).
If the order you are favoriting has a value in the **Stop Date/Time** field, the following message is displayed: "*Warning: Stop date will not be saved when creating this favorite. Select and edit the Favorite within Manage Favorites to add a relative stop date such as "Stop In 2 Days.*" Tap **OK** to acknowledge the message. After you finish adding the order to your **Favorites** list (by completing the steps below), see *[Editing a Favorite Order](../enter_patient_data/enter-orders#editing-a-favorite-order)* if you want to add a relative stop date to the new favorite order.
The Add Favorite to **Category** window displays.
3. Select the personal **favorites** category or subcategory where you want to the order to be listed (tap the **Expand** icon next to any category name to view its subcategories). If you do not want to add it to a specific category or subcategory, you can select **Favorites** at the top of the list of categories. This will add the order to your Favorites list below all of your categories.
4. Select the **OK** button at the bottom of the category list.
The order is added to your **Favorites** list and the Order Details screen is redisplayed.
### To make changes to the existing order’s details before adding it to the Favorites list (for active medication orders only)
1. On the Order Summary screen, under the Existing Orders section, select the order that you want to add to your **Favorites** list.
The Order Details screen is displayed.
2. Select the **Modify** button at the top of the Order Details screen (if the **Modify** button is not visible, select the **More** button and then choose **Modify**).
3. Review any CDS alerts. and then make any changes to the detail fields as desired, so that the order has the characteristics that you want for your **Favorites** list.
4. Select the **Favorites** button, located at the top of the Order Details screen.
If the order you are favoriting has a value in the **Stop Date/Time** field, the following message is displayed: "*Warning: Stop date will not be saved when creating this favorite. Select and edit the Favorite within Manage Favorites to add a relative stop date such as "Stop In 2 Days.*" Tap **OK** to acknowledge the message. After you finish adding the order to your **Favorites** list (by completing the steps below), see *[Editing a Favorite Order](../enter_patient_data/enter-orders#editing-a-favorite-order)* if you want to add a relative stop date to the new favorite order.
The Add Favorite to **Category** window displays.
5. Select the personal **favorites** category or subcategory where you want to the order to be listed (tap the **Expand** icon next to any category name to view its subcategories). If you do not want to add it to a specific category or subcategory, you can select **Favorites** at the top of the list of categories. This will add the order to your Favorites list below all of your categories.
6. Select the **OK** button at the bottom of the category list.
The order is added to your **Favorites** list and the Order Details screen is redisplayed.
7. Select **Back** if you want the changes you made in [Step 3](../enter_patient_data/enter-orders#adding-an-existing-order-from-the-orders-summary-to-the-favorites-list) to be saved for this particular order for this patient. (Or, select **Delete** at the top right of the screen to discard the changes you made in [Step 3](../enter_patient_data/enter-orders#adding-an-existing-order-from-the-orders-summary-to-the-favorites-list) , so that the existing order remains unchanged for the current patient.)
The modified order is added to the **Favorites** list (even if the changes ares not saved for the current patient), and the Order Summary screen is displayed.
### Managing Orders in Your Favorites List
Use the **Manage Favorites** option to make changes to your Favorites list, such as adding new items to the **Favorites** list, removing items from the **Favorites** list, modifying the details of favorite items, renaming favorite categories, or moving items within the **Favorites** list. The **Manage Favorites** option is available during the process of adding a new order.
1. From the Orders Summary for any patient, select the **Add** button .
The Add New Orders screen is displayed.
2. Select the **More** button and then choose the **Manage Favorites** option.
The Manage Favorites screen is displayed.
From this screen, you can do the following to manage the contents of your **Favorites** list:
* *[Adding an Order to the Favorites List via the Manage Favorites Option](../enter_patient_data/enter-orders#adding-an-order-to-the-favorites-list-via-the-manage-favorites-option)*
* *[Adding an Order Set to the Favorites List via the Manage Favorites Option](../enter_patient_data/enter-orders#adding-an-order-set-to-the-favorites-list-via-the-manage-favorites-option)*
* *[Editing a Favorite Order](../enter_patient_data/enter-orders#editing-a-favorite-order)*
* *[Deleting a Favorite Order, Order Set, or Category](../enter_patient_data/enter-orders#deleting-a-favorite-order-order-set-or-category)*
* *[Creating a Category or Subcategory in the Favorites List](../enter_patient_data/enter-orders#creating-a-category-or-subcategory-in-the-favorites-list)*
* *[Renaming a Category or Subcategory in the Favorites List](../enter_patient_data/enter-orders#renaming-a-category-or-subcategory-in-the-favorites-list)*
* *[Moving Orders, Order Sets, and Categories in the Favorites List](../enter_patient_data/enter-orders#moving-orders-order-sets-and-categories-in-the-favorites-list)*
## Adding an Order to the Favorites List via the Manage Favorites Option
In the **Manage Favorites** option, you can add an individual order to your **Favorites** list. In the process of adding it, you can personalize the order to suit your needs, by modifying the Order Details.
1. From the Patient List, select any patient, and then select the Orders module.
When the Orders Summary is displayed, you might see clinical decision support (CDS) alerts (see *[Reviewing Clinical Decision Support (CDS) Alerts](#reviewing-clinical-decision-support-cds-alerts)*) for the selected patient. Alerts should be reviewed as they can provide useful information about the patient, but they will not impact your ability to make changes to your order favorites.
2. On the Orders Summary, select the **Add** button .
The Add New Orders screen is displayed.
3. Select the **More** button and then choose the **Manage Favorites** option.
The Manage Favorites screen is displayed.
4. Review your current list of favorite categories, and select a personal category or subcategory under which you want to place the new favorite that you are about to create. For example, if it is a medication, you might select your "Medications" category. If you do not want to add it to a specific category or subcategory, you can select **Favorites** at the top of the list of categories. This will add the order to your Favorites list below all of your categories.
5. Once you have selected the desired destination category or subcategory, select the **Add Favorite** button, located at the top right of the screen.
 The Add New Orders screen is displayed.
6. Tap into the **Search** field at the top of the screen, type a word or phrase in the **Search** field, and then select **Search** from the virtual keyboard.
All orders and order sets that are a potential match, excluding non-formulary medications, are displayed.
If there are too many matches to look through, or if you want to see non-formulary medications, tap the filter heading ("**Show: All**"). A list of categories is displayed, each indicating the number of matching orders in that category. You can select a category to view only the matches in that category, and then select an order from the shorter list.
7. Select an order from the list of matches.
The **Order Details screen for that item is displayed.**
8. **Make any changes to the details of the order as desired, so that it has the characteristics that you want for your Favorites list.** For example, you might change the **Route** or **Frequency**, or add a relative **Stop Date**.
Instructions for adding a relative **Stop Date**:
You can specify a relative stop date and time in a favorited order. When you create an order using that favorited order, the relative date will be converted to an actual date based on the current date.
For example, if an order in your Favorites list has a relative Stop Date/Time of 2 days from today at 5:30 PM, and on August 10, 2022 you add an order using that favorited order, the Stop Date/Time is updated to August 12, 2022 at 5:30 PM.
1. In the **Stop Date** field, select "In."
2. Two additional fields appear, complete them as follows:
* **Number of Days from Today**: Enter the number of days after which the order should stop, relative to the date on which the order is placed. For example, if you enter 5, the order will stop 5 days after the date it is placed.
* **When Time of Day**: Enter the time of day at which the order should stop, in addition to the number of days (for example, in 5 days at 3:00 PM).
9. **Select Back to return to the Manage Favorites screen.**
* If you selected a category in [Step 4](../enter_patient_data/enter-orders#adding-an-order-to-the-favorites-list-via-the-manage-favorites-option) , the new favorite order is located at the bottom of that category.
* If you selected the "main" Favorites category in [Step 4](../enter_patient_data/enter-orders#adding-an-order-to-the-favorites-list-via-the-manage-favorites-option) , the new favorite order is located at the bottom of the screen.
You can move the new order to a different place within the Favorites list. See *[Moving Orders, Order Sets, and Categories in the Favorites List](../enter_patient_data/enter-orders#moving-orders-order-sets-and-categories-in-the-favorites-list)* for more information.
10. Select **Back** to save your changes and exit the Manage Favorites option. (Or select the **More** button and then choose **Discard Changes** to cancel your changes.)
The new order is saved to your Favorites list.
## Adding an Order Set to the Favorites List via the Manage Favorites Option
In the **Manage Favorites** option, you can add an order set to your **Favorites** list. However, unlike individual orders, you cannot modify the order set while in the process of adding it to your **Favorites** list. You can only add the order set as it is currently defined. Contact your system administrator if you feel an order set should be modified.
1. From the Patient List, select any patient, and then select the Orders module.
When the Orders Summary is displayed, you might see clinical decision support (CDS) alerts (see *[Reviewing Clinical Decision Support (CDS) Alerts](#reviewing-clinical-decision-support-cds-alerts)*) for the selected patient. Alerts should be reviewed as they can provide useful information about the patient, but they will not impact your ability to make changes to your order favorites.
2. On the Orders Summary, select the **Add** button .
The Add New Orders screen is displayed.
3. Select the **More** button and then choose the **Manage Favorites** option.
The Manage Favorites screen is displayed.
4. Review your current list of favorite categories, and select a personal category or subcategory under which you want to place the new favorite that you are about to create. If you do not want to add it to a specific category or subcategory, you can select **Favorites** at the top of the list of categories. This will add the order to your Favorites list below all of your categories.
5. Once you have selected the desired destination category or subcategory, select the **Add Favorite** button, located at the top right of the screen.
The Add Favorite screen is displayed.
6. Tap into the **Search** field at the top of the screen, type a word or phrase in the **Search** field, and then select **Search** from the virtual keyboard.
All orders and order sets that are a potential match, excluding non-formulary medications, are displayed.
If there are too many matches to look through, tap the filter heading **Show: All**, and select the Order Set category to view only the matches in that category.
7. Select an order set from the list of matches.
The **Manage Favorites screen is displayed.**
* If you selected a category in [Step 4](../enter_patient_data/enter-orders#adding-an-order-set-to-the-favorites-list-via-the-manage-favorites-option) , the new favorite order set is located at the bottom of that category.
* If you selected the "main" Favorites category in [Step 4](../enter_patient_data/enter-orders#adding-an-order-set-to-the-favorites-list-via-the-manage-favorites-option) , the new favorite order set is located at the bottom of the screen.
You can move the order set to a different place within the Favorites list. See *[Moving Orders, Order Sets, and Categories in the Favorites List](../enter_patient_data/enter-orders#moving-orders-order-sets-and-categories-in-the-favorites-list)* for more information.
8. Select **Back** to save your changes and exit the Manage Favorites option. (Or select the **More** button and then choose **Discard Changes** to cancel your changes.)
The order set is saved to your Favorites list.
## Editing a Favorite Order
In the **Manage Favorites** option, you can change the attributes of an existing favorite order. For example, you might want to change details such as the time, frequency, or dose, to match those that you use most often.
You cannot change the attributes of an existing favorite order set. See your system administrator for any changes to order sets.
1. From the Patient List, select any patient, and then select the Orders module.
When the Orders Summary is displayed, you might see clinical decision support (CDS) alerts (see *[Reviewing Clinical Decision Support (CDS) Alerts](#reviewing-clinical-decision-support-cds-alerts)*) for the selected patient. Alerts should be reviewed as they can provide useful information about the patient, but they will not impact your ability to make changes to your order favorites.
2. On the Orders Summary, select the **Add** button .
The Add New Orders screen is displayed.
3. Select the **More** button and then choose the **Manage Favorites** option.
The Manage Favorites screen is displayed.
4. Locate and select the favorite order that you want to modify (tap the **Expand** icon next to any category or subcategory name to view its contents).
5. Select the **Modify** button located at the top of the screen.
The Order Details screen for that favorite order is displayed.
6. Make your changes to the favorite order. For example, you might change the **Route** or **Frequency**, or add a relative **Stop Date**.
Instructions for adding a relative **Stop Date**:
You can specify a relative stop date and time in a favorited order. When you create an order using that favorited order, the relative date will be converted to an actual date based on the current date.
For example, if an order in your Favorites list has a relative Stop Date/Time of 2 days from today at 5:30 PM, and on August 10, 2022 you add an order using that favorited order, the Stop Date/Time is updated to August 12, 2022 at 5:30 PM.
1. In the **Stop Date** field, select "In."
2. Two additional fields appear, complete them as follows:
* **Number of Days from Today**: Enter the number of days after which the order should stop, relative to the date on which the order is placed. For example, if you enter 5, the order will stop 5 days after the date it is placed.
* **When Time of Day**: Enter the time of day at which the order should stop, in addition to the number of days (for example, in 5 days at 3:00 PM).
7. Select **Back** to save your changes to the favorite order.
The **Manage Favorites** screen is re-displayed. The modified favorite order displays the new information.
8. Select **Back** to exit the Manage Favorites option. (Or select the **More** button and then choose **Discard Changes** to cancel your changes.)
The order is modified in your Favorites list.
## Deleting a Favorite Order, Order Set, or Category
In the **Manage Favorites** option, you can easily remove a personal favorite order or order set from your **Favorites** list if you find that you are no longer regularly using it. You can also remove an entire personal category or subcategory (and all the contents within it) from your **Favorites** list.
1. From the Patient List, select any patient, and then select the Orders module.
When the Orders Summary is displayed, you might see clinical decision support (CDS) alerts (see *[Reviewing Clinical Decision Support (CDS) Alerts](#reviewing-clinical-decision-support-cds-alerts)*) for the selected patient. Alerts should be reviewed as they can provide useful information about the patient, but they will not impact your ability to make changes to your order favorites.
2. On the Orders Summary, select the **Add** button .
The Add New Orders screen is displayed.
3. Select the **More** button and then choose the **Manage Favorites** option.
The Manage Favorites screen is displayed.
4. Locate and select the order, order set, category, or subcategory that you want to remove from your **Favorites** list (tap the **Expand** icon next to any category or subcategory name to view its contents).
5. Select the **Delete** button located at the top right of the screen.
The order, order set, category, or subcategory is removed from the **Manage Favorites screen**.
6. Select **Back** to save your changes and exit the Manage Favorites option. (Or select the **More** button and then choose **Discard Changes** to cancel your changes.)
The order, order set, category, or subcategory is removed from your Favorites list.
## Creating a Category or Subcategory in the Favorites List
In the **Manage Favorites** option, you can create personal categories or subcategories to help you organize your favorite orders. This will make it easier and faster for you to find and use them.
1. From the Patient List, select any patient, and then select the Orders module.
When the Orders Summary is displayed, you might see clinical decision support (CDS) alerts (see *[Reviewing Clinical Decision Support (CDS) Alerts](#reviewing-clinical-decision-support-cds-alerts)*) for the selected patient. Alerts should be reviewed as they can provide useful information about the patient, but they will not impact your ability to make changes to your order favorites.
2. On the Orders Summary, select the **Add** button .
The Add New Orders screen is displayed.
3. Select the **More** button and then choose the **Manage Favorites** option.
The Manage Favorites screen is displayed.
4. Review your current list of favorite categories, and select a category under which you want to place the new category or subcategory that you are about to create. For example, you might want to create a subcategory under your personal "Medications" category, or you might want to create a new top-level category under the main **Favorites** category.
5. Once you have selected the desired category under which you want to place th new category/subcategory, select the **Add Category** button located at the top of the screen.
The Add New Orders screen is displayed.
6. Tap into the **Search** field at the top of the screen, type a word or phrase in the **Search** field, and then select **Search** from the virtual keyboard.
All orders and order sets that are a potential match, excluding non-formulary medications, are displayed.
If there are too many matches to look through, or if you want to see non-formulary medications, tap the filter heading ("**Show: All**"). A list of categories is displayed, each indicating the number of matching orders in that category. You can select a category to view only the matches in that category, and then select an order from the shorter list.
7. Select an order from the list of matches.
The **Order Details screen for that item is displayed.**
8. **Make any changes to the details of the order as desired, so that it has the characteristics that you want for your Favorites list.** For example, you might change the **Route** or **Frequency**, or add a relative **Stop Date**.
Instructions for adding a relative **Stop Date**:
You can specify a relative stop date and time in a favorited order. When you create an order using that favorited order, the relative date will be converted to an actual date based on the current date.
For example, if an order in your Favorites list has a relative Stop Date/Time of 2 days from today at 5:30 PM, and on August 10, 2022 you add an order using that favorited order, the Stop Date/Time is updated to August 12, 2022 at 5:30 PM.
1. In the **Stop Date** field, select "In."
2. Two additional fields appear, complete them as follows:
* **Number of Days from Today**: Enter the number of days after which the order should stop, relative to the date on which the order is placed. For example, if you enter 5, the order will stop 5 days after the date it is placed.
* **When Time of Day**: Enter the time of day at which the order should stop, in addition to the number of days (for example, in 5 days at 3:00 PM).
9. **Select Back to return to the Manage Favorites screen.**
* If you selected a category in [Step 4](../enter_patient_data/enter-orders#adding-an-order-to-the-favorites-list-via-the-manage-favorites-option) , the new favorite order is located at the bottom of that category.
* If you selected the "main" Favorites category in [Step 4](../enter_patient_data/enter-orders#adding-an-order-to-the-favorites-list-via-the-manage-favorites-option) , the new favorite order is located at the bottom of the screen.
You can move the new order to a different place within the Favorites list. See *[Moving Orders, Order Sets, and Categories in the Favorites List](../enter_patient_data/enter-orders#moving-orders-order-sets-and-categories-in-the-favorites-list)* for more information.
10. Select **Back** to save your changes and exit the Manage Favorites option. (Or select the **More** button and then choose **Discard Changes** to cancel your changes.)
The new order is saved to your Favorites list.
## Adding an Order Set to the Favorites List via the Manage Favorites Option
In the **Manage Favorites** option, you can add an order set to your **Favorites** list. However, unlike individual orders, you cannot modify the order set while in the process of adding it to your **Favorites** list. You can only add the order set as it is currently defined. Contact your system administrator if you feel an order set should be modified.
1. From the Patient List, select any patient, and then select the Orders module.
When the Orders Summary is displayed, you might see clinical decision support (CDS) alerts (see *[Reviewing Clinical Decision Support (CDS) Alerts](#reviewing-clinical-decision-support-cds-alerts)*) for the selected patient. Alerts should be reviewed as they can provide useful information about the patient, but they will not impact your ability to make changes to your order favorites.
2. On the Orders Summary, select the **Add** button .
The Add New Orders screen is displayed.
3. Select the **More** button and then choose the **Manage Favorites** option.
The Manage Favorites screen is displayed.
4. Review your current list of favorite categories, and select a personal category or subcategory under which you want to place the new favorite that you are about to create. If you do not want to add it to a specific category or subcategory, you can select **Favorites** at the top of the list of categories. This will add the order to your Favorites list below all of your categories.
5. Once you have selected the desired destination category or subcategory, select the **Add Favorite** button, located at the top right of the screen.
The Add Favorite screen is displayed.
6. Tap into the **Search** field at the top of the screen, type a word or phrase in the **Search** field, and then select **Search** from the virtual keyboard.
All orders and order sets that are a potential match, excluding non-formulary medications, are displayed.
If there are too many matches to look through, tap the filter heading **Show: All**, and select the Order Set category to view only the matches in that category.
7. Select an order set from the list of matches.
The **Manage Favorites screen is displayed.**
* If you selected a category in [Step 4](../enter_patient_data/enter-orders#adding-an-order-set-to-the-favorites-list-via-the-manage-favorites-option) , the new favorite order set is located at the bottom of that category.
* If you selected the "main" Favorites category in [Step 4](../enter_patient_data/enter-orders#adding-an-order-set-to-the-favorites-list-via-the-manage-favorites-option) , the new favorite order set is located at the bottom of the screen.
You can move the order set to a different place within the Favorites list. See *[Moving Orders, Order Sets, and Categories in the Favorites List](../enter_patient_data/enter-orders#moving-orders-order-sets-and-categories-in-the-favorites-list)* for more information.
8. Select **Back** to save your changes and exit the Manage Favorites option. (Or select the **More** button and then choose **Discard Changes** to cancel your changes.)
The order set is saved to your Favorites list.
## Editing a Favorite Order
In the **Manage Favorites** option, you can change the attributes of an existing favorite order. For example, you might want to change details such as the time, frequency, or dose, to match those that you use most often.
You cannot change the attributes of an existing favorite order set. See your system administrator for any changes to order sets.
1. From the Patient List, select any patient, and then select the Orders module.
When the Orders Summary is displayed, you might see clinical decision support (CDS) alerts (see *[Reviewing Clinical Decision Support (CDS) Alerts](#reviewing-clinical-decision-support-cds-alerts)*) for the selected patient. Alerts should be reviewed as they can provide useful information about the patient, but they will not impact your ability to make changes to your order favorites.
2. On the Orders Summary, select the **Add** button .
The Add New Orders screen is displayed.
3. Select the **More** button and then choose the **Manage Favorites** option.
The Manage Favorites screen is displayed.
4. Locate and select the favorite order that you want to modify (tap the **Expand** icon next to any category or subcategory name to view its contents).
5. Select the **Modify** button located at the top of the screen.
The Order Details screen for that favorite order is displayed.
6. Make your changes to the favorite order. For example, you might change the **Route** or **Frequency**, or add a relative **Stop Date**.
Instructions for adding a relative **Stop Date**:
You can specify a relative stop date and time in a favorited order. When you create an order using that favorited order, the relative date will be converted to an actual date based on the current date.
For example, if an order in your Favorites list has a relative Stop Date/Time of 2 days from today at 5:30 PM, and on August 10, 2022 you add an order using that favorited order, the Stop Date/Time is updated to August 12, 2022 at 5:30 PM.
1. In the **Stop Date** field, select "In."
2. Two additional fields appear, complete them as follows:
* **Number of Days from Today**: Enter the number of days after which the order should stop, relative to the date on which the order is placed. For example, if you enter 5, the order will stop 5 days after the date it is placed.
* **When Time of Day**: Enter the time of day at which the order should stop, in addition to the number of days (for example, in 5 days at 3:00 PM).
7. Select **Back** to save your changes to the favorite order.
The **Manage Favorites** screen is re-displayed. The modified favorite order displays the new information.
8. Select **Back** to exit the Manage Favorites option. (Or select the **More** button and then choose **Discard Changes** to cancel your changes.)
The order is modified in your Favorites list.
## Deleting a Favorite Order, Order Set, or Category
In the **Manage Favorites** option, you can easily remove a personal favorite order or order set from your **Favorites** list if you find that you are no longer regularly using it. You can also remove an entire personal category or subcategory (and all the contents within it) from your **Favorites** list.
1. From the Patient List, select any patient, and then select the Orders module.
When the Orders Summary is displayed, you might see clinical decision support (CDS) alerts (see *[Reviewing Clinical Decision Support (CDS) Alerts](#reviewing-clinical-decision-support-cds-alerts)*) for the selected patient. Alerts should be reviewed as they can provide useful information about the patient, but they will not impact your ability to make changes to your order favorites.
2. On the Orders Summary, select the **Add** button .
The Add New Orders screen is displayed.
3. Select the **More** button and then choose the **Manage Favorites** option.
The Manage Favorites screen is displayed.
4. Locate and select the order, order set, category, or subcategory that you want to remove from your **Favorites** list (tap the **Expand** icon next to any category or subcategory name to view its contents).
5. Select the **Delete** button located at the top right of the screen.
The order, order set, category, or subcategory is removed from the **Manage Favorites screen**.
6. Select **Back** to save your changes and exit the Manage Favorites option. (Or select the **More** button and then choose **Discard Changes** to cancel your changes.)
The order, order set, category, or subcategory is removed from your Favorites list.
## Creating a Category or Subcategory in the Favorites List
In the **Manage Favorites** option, you can create personal categories or subcategories to help you organize your favorite orders. This will make it easier and faster for you to find and use them.
1. From the Patient List, select any patient, and then select the Orders module.
When the Orders Summary is displayed, you might see clinical decision support (CDS) alerts (see *[Reviewing Clinical Decision Support (CDS) Alerts](#reviewing-clinical-decision-support-cds-alerts)*) for the selected patient. Alerts should be reviewed as they can provide useful information about the patient, but they will not impact your ability to make changes to your order favorites.
2. On the Orders Summary, select the **Add** button .
The Add New Orders screen is displayed.
3. Select the **More** button and then choose the **Manage Favorites** option.
The Manage Favorites screen is displayed.
4. Review your current list of favorite categories, and select a category under which you want to place the new category or subcategory that you are about to create. For example, you might want to create a subcategory under your personal "Medications" category, or you might want to create a new top-level category under the main **Favorites** category.
5. Once you have selected the desired category under which you want to place th new category/subcategory, select the **Add Category** button located at the top of the screen.
 The **Add Category dialog displays.**
6. Enter the name of the new category in the text field, and then select OK.
The Add Category dialog closes and the Manage Favorites screen is displayed.
* If you selected a category in [Step 4](../enter_patient_data/enter-orders#creating-a-category-or-subcategory-in-the-favorites-list) , your new category is created as a subcategory under that category.
* If you selected the "main" Favorites category in [Step 4](../enter_patient_data/enter-orders#creating-a-category-or-subcategory-in-the-favorites-list) , your new category is created as a top-level category, located at the bottom of all the other top-level categories.
If you find that you placed the new category in the wrong location, you can always move to a different location within the Favorites list, or you can move it *into* another category, thereby making it a subcategory. See *[Moving Orders, Order Sets, and Categories in the Favorites List](../enter_patient_data/enter-orders#moving-orders-order-sets-and-categories-in-the-favorites-list)* for more information.
7. Select **Back** to save your changes and exit the Manage Favorites option. (Or select the **More** button and then choose **Discard Changes** to cancel your changes.)
The new category is saved to your Favorites list.
## Renaming a Category or Subcategory in the Favorites List
In the **Manage Favorites** option, you can rename a personal category or subcategory if you decide that it is incorrectly named.
1. From the Patient List, select any patient, and then select the Orders module.
When the Orders Summary is displayed, you might see clinical decision support (CDS) alerts (see *[Reviewing Clinical Decision Support (CDS) Alerts](#reviewing-clinical-decision-support-cds-alerts)*) for the selected patient. Alerts should be reviewed as they can provide useful information about the patient, but they will not impact your ability to make changes to your order favorites.
2. On the Orders Summary, select the **Add** button .
The Add New Orders screen is displayed.
3. Select the **More** button and then choose the **Manage Favorites** option.
The Manage Favorites screen is displayed.
4. Locate and select the personal category or subcategory that you want to rename (tap the **Expand** icon next to any category or subcategory name to view its contents).
5. Once you have selected the category or subcategory that you want to rename, select the **Modify** button located at the top of the screen.
The Rename Category dialog displays.
6. Enter the new name, and then select OK.
The new name replaces the old name in the list of Favorites.
7. Select **Back** to save your changes and exit the Manage Favorites option. (Or select the **More** button and then choose **Discard Changes** to cancel your changes.)
The modified category or subcategory name is saved to your Favorites list.
## Moving Orders, Order Sets, and Categories in the Favorites List
In the **Manage Favorites** option, you can change the location of any personal order, order set, category, or subcategory within the Favorites list using "drag and drop." When you move a category into another category, it becomes a subcategory.
1. From the Patient List, select any patient, and then select the Orders module.
When the Orders Summary is displayed, you might see clinical decision support (CDS) alerts (see *[Reviewing Clinical Decision Support (CDS) Alerts](#reviewing-clinical-decision-support-cds-alerts)*) for the selected patient. Alerts should be reviewed as they can provide useful information about the patient, but they will not impact your ability to make changes to your order favorites.
2. On the Orders Summary, select the **Add** button .
The Add New Orders screen is displayed.
3. Select the **More** button and then choose the **Manage Favorites** option.
The Manage Favorites screen is displayed.
4. Move the order, order set, or category:
* To move an order, order set, or category up or down in the list (without putting it into a category): Grab the **Sort** icon for the order, order set, or category, drag it to where you want it, and drop it.
* To move an order, order set, or category *into* a personal category or subcategory folder:
1. Open the destination category or subcategory by tapping the **Expand** icon next to its name.
2. Grab the **Sort** icon for the order, order set, or category that you want to move, drag it to where you want within the destination category, and then drop it.
When you drag a category into another category, it becomes a subcategory.
5\. Select **Back** to save your changes and exit the Manage Favorites option. (Or select the **More** button and then choose **Discard Changes** to cancel your changes.)
The order, order set, or category is saved to its new location in your Favorites list.
The **Add Category dialog displays.**
6. Enter the name of the new category in the text field, and then select OK.
The Add Category dialog closes and the Manage Favorites screen is displayed.
* If you selected a category in [Step 4](../enter_patient_data/enter-orders#creating-a-category-or-subcategory-in-the-favorites-list) , your new category is created as a subcategory under that category.
* If you selected the "main" Favorites category in [Step 4](../enter_patient_data/enter-orders#creating-a-category-or-subcategory-in-the-favorites-list) , your new category is created as a top-level category, located at the bottom of all the other top-level categories.
If you find that you placed the new category in the wrong location, you can always move to a different location within the Favorites list, or you can move it *into* another category, thereby making it a subcategory. See *[Moving Orders, Order Sets, and Categories in the Favorites List](../enter_patient_data/enter-orders#moving-orders-order-sets-and-categories-in-the-favorites-list)* for more information.
7. Select **Back** to save your changes and exit the Manage Favorites option. (Or select the **More** button and then choose **Discard Changes** to cancel your changes.)
The new category is saved to your Favorites list.
## Renaming a Category or Subcategory in the Favorites List
In the **Manage Favorites** option, you can rename a personal category or subcategory if you decide that it is incorrectly named.
1. From the Patient List, select any patient, and then select the Orders module.
When the Orders Summary is displayed, you might see clinical decision support (CDS) alerts (see *[Reviewing Clinical Decision Support (CDS) Alerts](#reviewing-clinical-decision-support-cds-alerts)*) for the selected patient. Alerts should be reviewed as they can provide useful information about the patient, but they will not impact your ability to make changes to your order favorites.
2. On the Orders Summary, select the **Add** button .
The Add New Orders screen is displayed.
3. Select the **More** button and then choose the **Manage Favorites** option.
The Manage Favorites screen is displayed.
4. Locate and select the personal category or subcategory that you want to rename (tap the **Expand** icon next to any category or subcategory name to view its contents).
5. Once you have selected the category or subcategory that you want to rename, select the **Modify** button located at the top of the screen.
The Rename Category dialog displays.
6. Enter the new name, and then select OK.
The new name replaces the old name in the list of Favorites.
7. Select **Back** to save your changes and exit the Manage Favorites option. (Or select the **More** button and then choose **Discard Changes** to cancel your changes.)
The modified category or subcategory name is saved to your Favorites list.
## Moving Orders, Order Sets, and Categories in the Favorites List
In the **Manage Favorites** option, you can change the location of any personal order, order set, category, or subcategory within the Favorites list using "drag and drop." When you move a category into another category, it becomes a subcategory.
1. From the Patient List, select any patient, and then select the Orders module.
When the Orders Summary is displayed, you might see clinical decision support (CDS) alerts (see *[Reviewing Clinical Decision Support (CDS) Alerts](#reviewing-clinical-decision-support-cds-alerts)*) for the selected patient. Alerts should be reviewed as they can provide useful information about the patient, but they will not impact your ability to make changes to your order favorites.
2. On the Orders Summary, select the **Add** button .
The Add New Orders screen is displayed.
3. Select the **More** button and then choose the **Manage Favorites** option.
The Manage Favorites screen is displayed.
4. Move the order, order set, or category:
* To move an order, order set, or category up or down in the list (without putting it into a category): Grab the **Sort** icon for the order, order set, or category, drag it to where you want it, and drop it.
* To move an order, order set, or category *into* a personal category or subcategory folder:
1. Open the destination category or subcategory by tapping the **Expand** icon next to its name.
2. Grab the **Sort** icon for the order, order set, or category that you want to move, drag it to where you want within the destination category, and then drop it.
When you drag a category into another category, it becomes a subcategory.
5\. Select **Back** to save your changes and exit the Manage Favorites option. (Or select the **More** button and then choose **Discard Changes** to cancel your changes.)
The order, order set, or category is saved to its new location in your Favorites list.